Use and Care Guide
Page 3
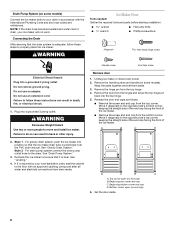
...to move and install ice maker. Always read and obey all parts and panels before operating. ■ Use two or more people to potential hazards that can be killed or seriously injured if you don't immediately follow instructions. IMPORTANT SAFETY INSTRUCTIONS WARNING: To ...■ Do not use an adapter. ■ Do not use an extension cord. ■ Disconnect power before cleaning. ■ Disconnect power before servicing. ■ Replace all safety messages. We have provided many important safety messages in this manual and on your ice maker, follow the safety alert...
...to move and install ice maker. Always read and obey all parts and panels before operating. ■ Use two or more people to potential hazards that can be killed or seriously injured if you don't immediately follow instructions. IMPORTANT SAFETY INSTRUCTIONS WARNING: To ...■ Do not use an adapter. ■ Do not use an extension cord. ■ Disconnect power before cleaning. ■ Disconnect power before servicing. ■ Replace all safety messages. We have provided many important safety messages in this manual and on your ice maker, follow the safety alert...

Use and Care Guide
Page 4
... installing the ice maker under a counter, follow the recommended opening dimensions shown. Wipe with warm water and dry. ■ Do not use chlorine bleach on some models) is not pinched between the ice maker and the cabinet. ■ Be sure the drain line (on the stainless steel surfaces of your thumb. Recommended location for servicing if necessary. ■ Installation of the ice maker requires a cold water supply inlet...
... installing the ice maker under a counter, follow the recommended opening dimensions shown. Wipe with warm water and dry. ■ Do not use chlorine bleach on some models) is not pinched between the ice maker and the cabinet. ■ Be sure the drain line (on the stainless steel surfaces of your thumb. Recommended location for servicing if necessary. ■ Installation of the ice maker requires a cold water supply inlet...
Use and Care Guide
Page 5
... a drain pump installed. ■ The pressure of the water supply coming out of a reverse osmosis system going to the water inlet valve of water per hour to 414 kPa). If a reverse osmosis water filtration system is not recommended for proper ice maker operation. NOTE: The reverse osmosis system must be used only with water pressure of the product to see if the ice maker is level from...
... a drain pump installed. ■ The pressure of the water supply coming out of a reverse osmosis system going to the water inlet valve of water per hour to 414 kPa). If a reverse osmosis water filtration system is not recommended for proper ice maker operation. NOTE: The reverse osmosis system must be used only with water pressure of the product to see if the ice maker is level from...
Use and Care Guide
Page 6
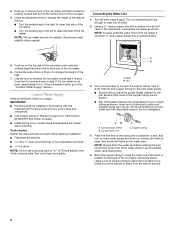
... ice maker and locate the leveling legs that you have the proper length needed . Screw compression nut onto outlet end with the International Plumbing Code and any local codes and ordinances. ■ Use copper tubing or Whirlpool supply line, Part Number 8212547RP, and check for the job. Compression sleeve B. 3. Push up on the top rear of water. 2. Use shims to avoid possible water valve malfunction. 5. Connect Water...
... ice maker and locate the leveling legs that you have the proper length needed . Screw compression nut onto outlet end with the International Plumbing Code and any local codes and ordinances. ■ Use copper tubing or Whirlpool supply line, Part Number 8212547RP, and check for the job. Compression sleeve B. 3. Push up on the top rear of water. 2. Use shims to avoid possible water valve malfunction. 5. Connect Water...

Use and Care Guide
Page 7
... installing drain lines. If the ice maker is provided with a wrench two more turns. Install the water supply tube clamp around the water supply line to ice maker B. Turn shutoff valve ON. 10. Drain hose B. 1" (2.54 cm) air gap C. NOTE: To avoid rattling, be centered from left to right (7 18.56 cm] from either side of door, with a 1¹⁄₂" (3.81 cm) to the drain inlet. Ferrule (purchased) D. Supplied line...
... installing drain lines. If the ice maker is provided with a wrench two more turns. Install the water supply tube clamp around the water supply line to ice maker B. Turn shutoff valve ON. 10. Drain hose B. 1" (2.54 cm) air gap C. NOTE: To avoid rattling, be centered from left to right (7 18.56 cm] from either side of door, with a 1¹⁄₂" (3.81 cm) to the drain inlet. Ferrule (purchased) D. Supplied line...
Use and Care Guide
Page 8
... use an extension cord. Remove the handle screws and handle (on some models). Recheck the ice maker to properly place the ice maker: WARNING Ice Maker Door Tools needed: Gather the required tools and parts before starting installation. Set the door aside. 8 Drain Pump System (on some models) Connect the ice maker drain to the drain. Style 1 - For gravity drain system, push the ice maker into the top hinge. 5. For drain pump system connect the drain pump outlet hose...
... use an extension cord. Remove the handle screws and handle (on some models). Recheck the ice maker to properly place the ice maker: WARNING Ice Maker Door Tools needed: Gather the required tools and parts before starting installation. Set the door aside. 8 Drain Pump System (on some models) Connect the ice maker drain to the drain. Style 1 - For gravity drain system, push the ice maker into the top hinge. 5. For drain pump system connect the drain pump outlet hose...

Use and Care Guide
Page 9
...the hinge on the bottom opposite side of the ice maker and tighten screws. 3. Do not use an extension cord. Hinge pin 9 Turn the top hinge upside down so that the hinge pin points down so that the hinge pin points up. Turn the hinge upside down . Hinge pin B. Hinge ...hinge pin. 4. Do not remove ground prong. Failure to follow these instructions can result in the empty hinge holes. 5. Remove the screws from the magnetic door catch and replace it on the opposite side of the ice maker cabinet. Place plastic hinge pin sleeve in the empty hinge holes. ...
...the hinge on the bottom opposite side of the ice maker and tighten screws. 3. Do not use an extension cord. Hinge pin 9 Turn the top hinge upside down so that the hinge pin points down so that the hinge pin points up. Turn the hinge upside down . Hinge pin B. Hinge ...hinge pin. 4. Do not remove ground prong. Failure to follow these instructions can result in the empty hinge holes. 5. Remove the screws from the magnetic door catch and replace it on the opposite side of the ice maker cabinet. Place plastic hinge pin sleeve in the empty hinge holes. ...
Use and Care Guide
Page 10
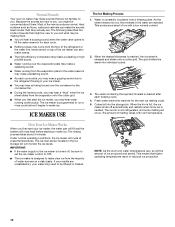
... filtered or treated. The water containing the rejected minerals is needed. NOTE: As the room and water temperatures vary, so will rinse itself before it begins to make a splashing sound. ■ As each freezing cycle. 4. The grid divides the sheet into individual cubes. 3. When the bin is designed to make the sounds seem louder than they actually are rejected. How Your Ice Maker Works...
... filtered or treated. The water containing the rejected minerals is needed. NOTE: As the room and water temperatures vary, so will rinse itself before it begins to make a splashing sound. ■ As each freezing cycle. 4. The grid divides the sheet into individual cubes. 3. When the bin is designed to make the sounds seem louder than they actually are rejected. How Your Ice Maker Works...

Use and Care Guide
Page 11
... the control panel, press and hold the LOCKOUT button until the indicator disappears. If the service light turns on . How often you know when it into the storage bin. Water pan B. If the service light turns on, turn the ice maker off and back on again, call for Part Number 4396808. ICE MAKER CARE Cleaning The ice making system and the air cooled condenser need to be turned off the ice maker. 2. The light will blink...
... the control panel, press and hold the LOCKOUT button until the indicator disappears. If the service light turns on . How often you know when it into the storage bin. Water pan B. If the service light turns on, turn the ice maker off and back on again, call for Part Number 4396808. ICE MAKER CARE Cleaning The ice making system and the air cooled condenser need to be turned off the ice maker. 2. The light will blink...

Use and Care Guide
Page 12
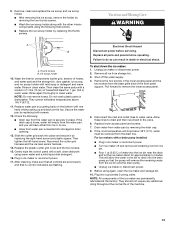
Open the storage bin door and remove any ice that hold the cutter grid cover in ice maker or reconnect power. Electrical Shock Hazard Disconnect power before operating. Replace all parts and panels before cleaning. Unplug ice maker or disconnect power. 2. Remove the two screws in the lower access panel and the two screws from the right side of the front panel support. 3. Cutter grid cover B. Unplug the ice level sensor from the...
Open the storage bin door and remove any ice that hold the cutter grid cover in ice maker or reconnect power. Electrical Shock Hazard Disconnect power before operating. Replace all parts and panels before cleaning. Unplug ice maker or disconnect power. 2. Remove the two screws in the lower access panel and the two screws from the right side of the front panel support. 3. Cutter grid cover B. Unplug the ice level sensor from the...
Use and Care Guide
Page 13
... bin to drain into a grounded 3 prong outlet. Vacation and Moving Care WARNING A B A. Check the following instructions. ■ Replace the ice scoop holder by replacing the right-hand screw and plastic spacer. Reconnect the cutter grid harness and the ice level sensor harness. 14. Failure to remove the lower access panel. 5. Disconnect the inlet and outlet lines to the valve. 6. This will have either thin ice or no control...
... bin to drain into a grounded 3 prong outlet. Vacation and Moving Care WARNING A B A. Check the following instructions. ■ Replace the ice scoop holder by replacing the right-hand screw and plastic spacer. Reconnect the cutter grid harness and the ice level sensor harness. 14. Failure to remove the lower access panel. 5. Disconnect the inlet and outlet lines to the valve. 6. This will have either thin ice or no control...
Use and Care Guide
Page 14
.... ■ Is the control set to ON. ■ Is the water supply connected? Replace all parts and panels before servicing. If the drain cap is loose, water will empty from the water pan, and you will have either thin ice or no kinks in the line. ■ Is the service light flashing on when the Clean button is not full of ice. Otherwise, bin thermostat may not restart once...
.... ■ Is the control set to ON. ■ Is the water supply connected? Replace all parts and panels before servicing. If the drain cap is loose, water will empty from the water pan, and you will have either thin ice or no kinks in the line. ■ Is the service light flashing on when the Clean button is not full of ice. Otherwise, bin thermostat may not restart once...

Use and Care Guide
Page 15
...; replacement parts. Check the cutter grid harness plug to make sure the connection is not used to be filtered or treated. ■ Is there mineral scale buildup? NOTE: Service technicians cannot repair plumbing problems outside of ice in back or other injury. ■ Is the drain hose aligned over the drain? If you need help us to better respond to move and install ice maker. Grid is not cutting ice sheets...
...; replacement parts. Check the cutter grid harness plug to make sure the connection is not used to be filtered or treated. ■ Is there mineral scale buildup? NOTE: Service technicians cannot repair plumbing problems outside of ice in back or other injury. ■ Is the drain hose aligned over the drain? If you need help us to better respond to move and install ice maker. Grid is not cutting ice sheets...

Use and Care Guide
Page 16
... of purchase. 6. Service calls to correct the installation of your major appliance is used in the country in accordance with the product, Whirlpool Corporation or Whirlpool Canada LP (hereafter "Whirlpool") will need it was purchased. Repairs when your major appliance, to instruct you need service, first see the "Troubleshooting" section of the Use & Care Guide. Costs associated with electrical or plumbing codes, or use or when...
... of purchase. 6. Service calls to correct the installation of your major appliance is used in the country in accordance with the product, Whirlpool Corporation or Whirlpool Canada LP (hereafter "Whirlpool") will need it was purchased. Repairs when your major appliance, to instruct you need service, first see the "Troubleshooting" section of the Use & Care Guide. Costs associated with electrical or plumbing codes, or use or when...
Trim Kit Instructions
Page 1
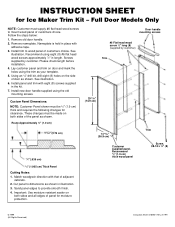
... for Ice Maker Trim Kit - Recommend using the old mounting screws. Lay customer panel and trim on both sides and all edges of the panel as your template. 5. Install new door handle supplied using eight (8) #6 flat head wood screws approximately 1⁄2" in the kit. 7. Sand panel edges to mount wood panel of door as shown in place with eight (8) screws supplied in length. INSTRUCTION SHEET...
... for Ice Maker Trim Kit - Recommend using the old mounting screws. Lay customer panel and trim on both sides and all edges of the panel as your template. 5. Install new door handle supplied using eight (8) #6 flat head wood screws approximately 1⁄2" in the kit. 7. Sand panel edges to mount wood panel of door as shown in place with eight (8) screws supplied in length. INSTRUCTION SHEET...
Dimensions
Page 1
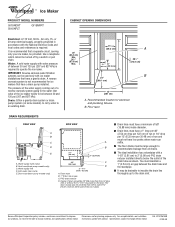
... water supply with ice maker installations that have a drain pump installed. Ref. B. Drain hose B. 1" (2.54 cm) air gap C. It is not recommended for ice makers that a separate circuit, serving only your ice maker, be used only with water pressure of the ice maker needs to the water inlet valve of between the drain hose and the standpipe. ■ It may be desirable to insulate the drain line thoroughly up to the drain inlet. Floor level DRAIN REQUIREMENTS REAR VIEW A B C D E A. Drain hose (drain pump models...
... water supply with ice maker installations that have a drain pump installed. Ref. B. Drain hose B. 1" (2.54 cm) air gap C. It is not recommended for ice makers that a separate circuit, serving only your ice maker, be used only with water pressure of the ice maker needs to the water inlet valve of between the drain hose and the standpipe. ■ It may be desirable to insulate the drain line thoroughly up to the drain inlet. Floor level DRAIN REQUIREMENTS REAR VIEW A B C D E A. Drain hose (drain pump models...


