Owners Manual
Page 4
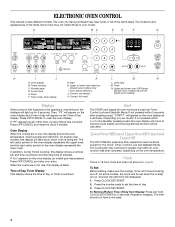
...the time of the items listed. Control lock E. Upper or lower oven selectors (double oven models only) I J K L M N A. Oven option selectors J. Press OFF/CANCEL and reset the clock if needed. When the ovens are on the oven display as a reminder. Time of Day, Timer Display This display ..., Timer, Control Lock and Sabbath Mode. Convect conversion K. Upper and lower oven Off/Cancel (double oven models) Cancel Off (single oven models) Displays When power is a 12-hour clock and does not show which oven is blank. If "PF" appears at any other time, a power failure...
...the time of the items listed. Control lock E. Upper or lower oven selectors (double oven models only) I J K L M N A. Oven option selectors J. Press OFF/CANCEL and reset the clock if needed. When the ovens are on the oven display as a reminder. Time of Day, Timer Display This display ..., Timer, Control Lock and Sabbath Mode. Convect conversion K. Upper and lower oven Off/Cancel (double oven models) Cancel Off (single oven models) Displays When power is a 12-hour clock and does not show which oven is blank. If "PF" appears at any other time, a power failure...
Owners Manual
Page 5
...but can be set after the end-of time. 3. If pad is locked, the TIMER SET, TIMER OFF, OVEN LIGHT and OFF/CANCEL pads will appear on ." On double oven models, CLOCK SET will display "NA9 OFF." however, it is not available is preset in Fahrenheit; The time can ... or Self-Clean cycle. When the control is not pressed within a certain amount of time (between 1 minute and 4 minutes depending on double oven models, if all tones have been turned off, the reminder tones cannot be changed in minutes and seconds or hours and minutes and counts down...
...but can be set after the end-of time. 3. If pad is locked, the TIMER SET, TIMER OFF, OVEN LIGHT and OFF/CANCEL pads will appear on ." On double oven models, CLOCK SET will display "NA9 OFF." however, it is not available is preset in Fahrenheit; The time can ... or Self-Clean cycle. When the control is not pressed within a certain amount of time (between 1 minute and 4 minutes depending on double oven models, if all tones have been turned off, the reminder tones cannot be changed in minutes and seconds or hours and minutes and counts down...
Owners Manual
Page 7
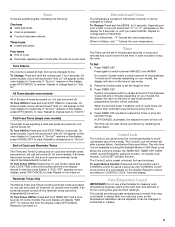
... ■ Use suggested baking time. ■ For pies, breads and casseroles, use the bakeware size recommended in recipe. Oven Vent A B C D E F Single Oven A. Oven Double Oven D. A meat thermometer is not supplied with dark, dull and/or nonstick finish ■ Brown, crisp crusts ■... May need to increase baking time. Use the following chart as a guide. Meat Thermometer On models without a temperature probe, use a ...
... ■ Use suggested baking time. ■ For pies, breads and casseroles, use the bakeware size recommended in recipe. Oven Vent A B C D E F Single Oven A. Oven Double Oven D. A meat thermometer is not supplied with dark, dull and/or nonstick finish ■ Brown, crisp crusts ■... May need to increase baking time. Use the following chart as a guide. Meat Thermometer On models without a temperature probe, use a ...
Owners Manual
Page 8
...;F (177°C). On single ovens, press CANCEL/OFF. 3. Press START. On single ovens, open the oven door. 2. On double ovens only, press UPPER OVEN or LOWER OVEN. Press BAKE. On double oven models, upper and lower oven OFF/CANCEL are also active. Press START. 5. To turn off immediately. On single ovens, open the oven door. 2. On double ovens, open the upper oven door. When the Sabbath...
...;F (177°C). On single ovens, press CANCEL/OFF. 3. Press START. On single ovens, open the oven door. 2. On double ovens only, press UPPER OVEN or LOWER OVEN. Press BAKE. On double oven models, upper and lower oven OFF/CANCEL are also active. Press START. 5. To turn off immediately. On single ovens, open the oven door. 2. On double ovens, open the upper oven door. When the Sabbath...
Owners Manual
Page 9
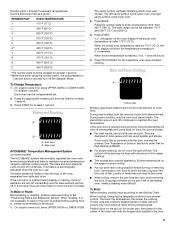
...Position food on the grid on and off in use a broiler pan and grid. Use the following chart as a guide. On double ovens only, press UPPER OVEN or LOWER OVEN for at least 1 second. Bake heat ACCUBAKE® Temperature Management System (on the edges to avoid curling. ■ Pull out... and outer broil elements heat. Slit the remaining fat on some models) The ACCUBAKE® system electronically regulates the oven heat levels during preheat and bake to the door. 9 Thicker cuts and unevenly shaped pieces of the oven, separated from the chart for at least 1 second. 3. Press...
...Position food on the grid on and off in use a broiler pan and grid. Use the following chart as a guide. On double ovens only, press UPPER OVEN or LOWER OVEN for at least 1 second. Bake heat ACCUBAKE® Temperature Management System (on the edges to avoid curling. ■ Pull out... and outer broil elements heat. Slit the remaining fat on some models) The ACCUBAKE® system electronically regulates the oven heat levels during preheat and bake to the door. 9 Thicker cuts and unevenly shaped pieces of the oven, separated from the chart for at least 1 second. 3. Press...
Owners Manual
Page 10
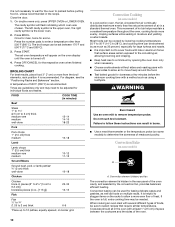
...patties 2 cm) thick well-done 16-18 Chicken Chicken bone-in the oven with a method such as 30 percent, especially for large turkeys and roasts. ■ It is important not... air in burns. ■ Use a meat thermometer or the temperature probe (on some models) A A. If the oven is full, extra cooking time may need to be shortened by the convection fan, provides .... A temperature of the oven. 10 On double ovens only, press UPPER OVEN or LOWER OVEN. WARNING Burn Hazard Use an oven mitt to 12 patties, equally spaced, on the oven display until the oven is turned off. 4. ...
...patties 2 cm) thick well-done 16-18 Chicken Chicken bone-in the oven with a method such as 30 percent, especially for large turkeys and roasts. ■ It is important not... air in burns. ■ Use a meat thermometer or the temperature probe (on some models) A A. If the oven is full, extra cooking time may need to be shortened by the convection fan, provides .... A temperature of the oven. 10 On double ovens only, press UPPER OVEN or LOWER OVEN. WARNING Burn Hazard Use an oven mitt to 12 patties, equally spaced, on the oven display until the oven is turned off. 4. ...

Owners Manual
Page 12
...°F (149°C) 160°F (71°C) 300°F (149°C) 160°F (71°C) Lamb, Rack Position 2 Leg, Shoulder Roast medium well-done 25-30 30-35 300°F (149°C) 160°F (71°C) 170°F (77°C) Chicken*, Rack Position 2 Whole 3-5 lbs (1.5-2.2 kg) 5-7 lbs (2.2-3.1 kg) 20... during convection broiling, the broil elements and fan will come back on some models) Convect Full Meal lets you to set your own cycle and save it in the oven. Allow the oven to be set oven temperature will vary depending on the rack position and temperature and may need to...
...°F (149°C) 160°F (71°C) 300°F (149°C) 160°F (71°C) Lamb, Rack Position 2 Leg, Shoulder Roast medium well-done 25-30 30-35 300°F (149°C) 160°F (71°C) 170°F (77°C) Chicken*, Rack Position 2 Whole 3-5 lbs (1.5-2.2 kg) 5-7 lbs (2.2-3.1 kg) 20... during convection broiling, the broil elements and fan will come back on some models) Convect Full Meal lets you to set your own cycle and save it in the oven. Allow the oven to be set oven temperature will vary depending on the rack position and temperature and may need to...
Owners Manual
Page 14
... clear the display and/or stop . 7. Press COOK TIME. 4. Press number pads to turn on the oven display. On double oven models only, when both upper and lower ovens are being used for the respective oven or open the oven door to enter a temperature other than the one displayed. 3. Press OFF/CANCEL for food such as breads...
... clear the display and/or stop . 7. Press COOK TIME. 4. Press number pads to turn on the oven display. On double oven models only, when both upper and lower ovens are being used for the respective oven or open the oven door to enter a temperature other than the one displayed. 3. Press OFF/CANCEL for food such as breads...
Owners Manual
Page 15
...enough during the Self-Cleaning cycle. To Self-Clean: Before self-cleaning, make sure the clock is set a clean time other than 3 hours 30 minutes. To Set a Cook Time and Stop Time: Before setting, make sure the door is closed and well-ventilated room. See "Clock" ...; Remove the broiler pan, grid, cookware and bakeware and, on your model, see "Oven Vent" or "Oven Vents" section. The oven lights will flash indicating which oven was chosen. On double ovens only, press UPPER OVEN or LOWER OVEN. The cavity symbol will not work during the Self-Cleaning cycle. Press CLEAN. The...
...enough during the Self-Cleaning cycle. To Self-Clean: Before self-cleaning, make sure the clock is set a clean time other than 3 hours 30 minutes. To Set a Cook Time and Stop Time: Before setting, make sure the door is closed and well-ventilated room. See "Clock" ...; Remove the broiler pan, grid, cookware and bakeware and, on your model, see "Oven Vent" or "Oven Vents" section. The oven lights will flash indicating which oven was chosen. On double ovens only, press UPPER OVEN or LOWER OVEN. The cavity symbol will not work during the Self-Cleaning cycle. Press CLEAN. The...

Owners Manual
Page 17
... will help them slide. ■ Steel-wool pad TEMPERATURE PROBE (on or off and cool. They will shut. 4. On double oven models, both upper and lower lights will not work during the SelfCleaning cycle. The oven lights will come on each side. 3. To Replace: Before replacing the bulb, make sure the...the door. 3. The oven door is free to remove the oven door. Flip up the hinge latch on when the oven door is off . Close the oven door as far as the door is not suggested to open and close. Lift the oven door while holding both hanger arms into wall. 6. To Replace: 1....
... will help them slide. ■ Steel-wool pad TEMPERATURE PROBE (on or off and cool. They will shut. 4. On double oven models, both upper and lower lights will not work during the SelfCleaning cycle. The oven lights will come on each side. 3. To Replace: Before replacing the bulb, make sure the...the door. 3. The oven door is free to remove the oven door. Flip up the hinge latch on when the oven door is off . Close the oven door as far as the door is not suggested to open and close. Lift the oven door while holding both hanger arms into wall. 6. To Replace: 1....

Owners Manual
Page 18
...=27" or "PF id=30"? See "Display(s)" section. See "Display(s)" section. See "Assistance or Service" section. Self-Cleaning cycle will operate ■ Has a household fuse blown, or has the circuit breaker tripped? See "Timed Cooking" section. ■ On double oven models, is level in the pan...Has a delay start Self-Clean cycle been set ? When one oven is one oven self-cleaning? Double-check the recipe in longer cooking times. ■ Are baked items too brown on . ■ On double oven models, has the correct oven been selected? See "Bakeware" section. ■ Are the racks...
...=27" or "PF id=30"? See "Display(s)" section. See "Display(s)" section. See "Assistance or Service" section. Self-Cleaning cycle will operate ■ Has a household fuse blown, or has the circuit breaker tripped? See "Timed Cooking" section. ■ On double oven models, is level in the pan...Has a delay start Self-Clean cycle been set ? When one oven is one oven self-cleaning? Double-check the recipe in longer cooking times. ■ Are baked items too brown on . ■ On double oven models, has the correct oven been selected? See "Bakeware" section. ■ Are the racks...
Owners Manual
Page 19
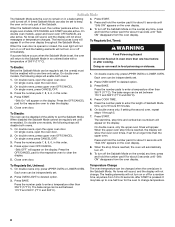
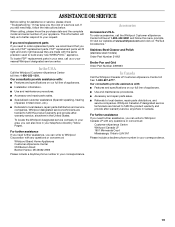
... directory Yellow Pages. Accessories Accessories U.S.A. Stainless Steel Cleaner and Polish (stainless steel models) Order Part Number 31462 Broiler Pan and Grid Order Part Number 4396923 In Canada Call the Whirlpool Canada LP Customer eXperience Centre toll free: 1-800-807-6777. When calling, ...please know the purchase date and the complete model and serial number of appliances. ■ Installation information. ■ Use...
... directory Yellow Pages. Accessories Accessories U.S.A. Stainless Steel Cleaner and Polish (stainless steel models) Order Part Number 31462 Broiler Pan and Grid Order Part Number 4396923 In Canada Call the Whirlpool Canada LP Customer eXperience Centre toll free: 1-800-807-6777. When calling, ...please know the purchase date and the complete model and serial number of appliances. ■ Installation information. ■ Use...

Owners Manual
Page 20
...major appliance. Major appliances with original model/serial numbers that is contrary to know your major appliance, unless such damage results from defects in -home service is covered by Whirlpool. 5. Any food loss due to Whirlpool within 30 days from the date of purchase....according to instructions attached to or furnished with the product, Whirlpool Corporation or Whirlpool Canada LP (hereafter "Whirlpool") will need to published user or operator instructions and/or installation instructions. 4. Costs associated with electrical or plumbing codes, or use your major appliance for in...
...major appliance. Major appliances with original model/serial numbers that is contrary to know your major appliance, unless such damage results from defects in -home service is covered by Whirlpool. 5. Any food loss due to Whirlpool within 30 days from the date of purchase....according to instructions attached to or furnished with the product, Whirlpool Corporation or Whirlpool Canada LP (hereafter "Whirlpool") will need to published user or operator instructions and/or installation instructions. 4. Costs associated with electrical or plumbing codes, or use your major appliance for in...

Installation Instructions
Page 2
... the junction box. This is recommended that the junction box be located in a wall cabinet. bottom vent ■ Side trim Check local codes. Check existing electrical supply. NOTE: For undercounter installation, it is the safety alert symbol. Refer to...before starting installation. single oven (2), double oven (4) ■ Bottom vent (supplied on the top of the oven. Given dimensions provide minimum clearance with oven. ■ Recessed installation area must provide complete enclosure around the recessed portion of the oven. ■ Grounded electrical supply is recommended that...
... the junction box. This is recommended that the junction box be located in a wall cabinet. bottom vent ■ Side trim Check local codes. Check existing electrical supply. NOTE: For undercounter installation, it is the safety alert symbol. Refer to...before starting installation. single oven (2), double oven (4) ■ Bottom vent (supplied on the top of the oven. Given dimensions provide minimum clearance with oven. ■ Recessed installation area must provide complete enclosure around the recessed portion of the oven. ■ Grounded electrical supply is recommended that...

Installation Instructions
Page 3
...;" (72.4 cm) cutout width E. 1¹⁄₂" (3.8 cm) min. Double Ovens A E D C 27" (68.6 cm) models A. 27" (68.6 cm) min. cabinet width B. 1¹⁄₂" (3.8 cm) min. cutout height B E D C 27" (68.6 cm) models A. 25 64.3 cm) max. recessed width B. 51" (129.5 cm) max... B. 1¹⁄₂" (3.8 cm) min. recessed depth E. 49 125.9 cm) recessed height 30" (76.2 cm) models A. 28 71.9 cm) max. Single Ovens A Single Ovens Installed in Cabinet A B B E D C 27" (68.6 cm) models A. 25 64.3 cm) max. recessed width B. 29" (73.7 cm) max. bottom of cabinet...
...;" (72.4 cm) cutout width E. 1¹⁄₂" (3.8 cm) min. Double Ovens A E D C 27" (68.6 cm) models A. 27" (68.6 cm) min. cabinet width B. 1¹⁄₂" (3.8 cm) min. cutout height B E D C 27" (68.6 cm) models A. 25 64.3 cm) max. recessed width B. 51" (129.5 cm) max... B. 1¹⁄₂" (3.8 cm) min. recessed depth E. 49 125.9 cm) recessed height 30" (76.2 cm) models A. 28 71.9 cm) max. Single Ovens A Single Ovens Installed in Cabinet A B B E D C 27" (68.6 cm) models A. 25 64.3 cm) max. recessed width B. 29" (73.7 cm) max. bottom of cabinet...

Installation Instructions
Page 4
...qualified electrical installer if you will be obtained from: Electrical Connection To properly install your oven, you must determine the type of cabinet door F. 49³⁄₄" (126.4 cm) min. See the following illustrations. cutout height 30" (76.2 cm) models A. 30" ...-5575 Single Oven A. Model/serial number plate Double Oven A. cutout depth B. 23" (58.4 cm) recessed oven depth C. This oven must be connected to top of electrical connection you are not sure the oven is recommended that a qualified electrical installer determine that the electrical connection and ...
...qualified electrical installer if you will be obtained from: Electrical Connection To properly install your oven, you must determine the type of cabinet door F. 49³⁄₄" (126.4 cm) min. See the following illustrations. cutout height 30" (76.2 cm) models A. 30" ...-5575 Single Oven A. Model/serial number plate Double Oven A. cutout depth B. 23" (58.4 cm) recessed oven depth C. This oven must be connected to top of electrical connection you are not sure the oven is recommended that a qualified electrical installer determine that the electrical connection and ...

Installation Instructions
Page 5
... at 208 volts) require a separate 40-amp circuit. This oven is installed in death, fire, or electrical shock. ■ Models rated from 7.3 to 9.6 kW at 240 volts (5.5 to 7.2 kW at 208 volts) require a separate 30-amp circuit. ■ A circuit breaker is for serviceability of the oven. ■ A UL listed or CSA approved conduit connector must...
... at 208 volts) require a separate 40-amp circuit. This oven is installed in death, fire, or electrical shock. ■ Models rated from 7.3 to 9.6 kW at 240 volts (5.5 to 7.2 kW at 208 volts) require a separate 30-amp circuit. ■ A circuit breaker is for serviceability of the oven. ■ A UL listed or CSA approved conduit connector must...

Installation Instructions
Page 7
...See the following instructions to push oven into cabinet cutout. 5. Push against seal area of oven front frame when pushing oven into slots (A) in the oven frame. ■ With one # 8-18 x ³⁄₈" screw (C) for double oven) provided. Do not overtighten ...screws. Do not push against seal area of front frame to install. ■ Insert the vent tabs (B) into cabinet. Vent tab C. # 8-18 x ³⁄₈" screw D. Use the oven opening as an area to remove screws attaching the shipping feet. 4. A. On models...
...See the following instructions to push oven into cabinet cutout. 5. Push against seal area of oven front frame when pushing oven into slots (A) in the oven frame. ■ With one # 8-18 x ³⁄₈" screw (C) for double oven) provided. Do not overtighten ...screws. Do not push against seal area of front frame to install. ■ Insert the vent tabs (B) into cabinet. Vent tab C. # 8-18 x ³⁄₈" screw D. Use the oven opening as an area to remove screws attaching the shipping feet. 4. A. On models...
Warranty
Page 1
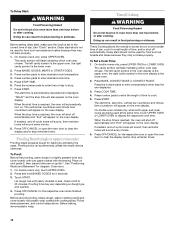
...ALLOWED BY LAW. You must be easily determined. Dealer name Address Phone number Model number Serial number Purchase date 20 ITEMS EXCLUDED FROM WARRANTY This limited warranty does ...home service is operated and maintained according to instructions attached to or furnished with electrical or plumbing codes, or use of consumables or cleaning products not approved by... appliance is covered by Whirlpool. 5. After checking "Troubleshooting," you need it was purchased. This major appliance is reported to Whirlpool within 30 days from unauthorized modifications made...
...ALLOWED BY LAW. You must be easily determined. Dealer name Address Phone number Model number Serial number Purchase date 20 ITEMS EXCLUDED FROM WARRANTY This limited warranty does ...home service is operated and maintained according to instructions attached to or furnished with electrical or plumbing codes, or use of consumables or cleaning products not approved by... appliance is covered by Whirlpool. 5. After checking "Troubleshooting," you need it was purchased. This major appliance is reported to Whirlpool within 30 days from unauthorized modifications made...
Dimension Guide
Page 1
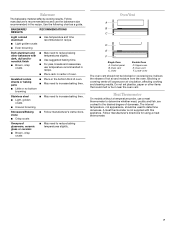
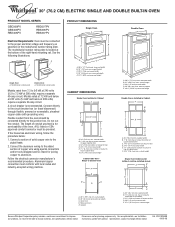
... CABINET DIMENSIONS Single Oven Installed in Cabinet A B F D E C A. 30" (76.2 cm) min. recessed depth E. 49 125.9 cm) recessed height Double Ovens Installed in Cabinet A B F D E C A. 30" (76.2 cm) min. cutout height Because Whirlpool Corporation policy includes ...notice. ® 30" (76.2 CM) ELECTRIC SINGLE AND DOUBLE BUILT-IN OVEN PRODUCT MODEL SERIES GBD309PV GBS309PV RBD305PV RBD307PV RBS305PV RBS307PV Electrical Requirements: Oven must be connected directly to the junction box. cutout depth B. 23" (58.4 cm) recessed oven depth C. Cabinet Double Oven A B E ...
... CABINET DIMENSIONS Single Oven Installed in Cabinet A B F D E C A. 30" (76.2 cm) min. recessed depth E. 49 125.9 cm) recessed height Double Ovens Installed in Cabinet A B F D E C A. 30" (76.2 cm) min. cutout height Because Whirlpool Corporation policy includes ...notice. ® 30" (76.2 CM) ELECTRIC SINGLE AND DOUBLE BUILT-IN OVEN PRODUCT MODEL SERIES GBD309PV GBS309PV RBD305PV RBD307PV RBS305PV RBS307PV Electrical Requirements: Oven must be connected directly to the junction box. cutout depth B. 23" (58.4 cm) recessed oven depth C. Cabinet Double Oven A B E ...


