Owners Manual
Page 2
... Cancel Off 4 Clock 4 Tones 5 Fahrenheit and Celsius 5 Timer 5 Control Lock 5 Oven Temperature Control 5 OVEN USE 6 Aluminum Foil 6 Positioning Racks and Bakeware 6 Bakeware 7 Oven Vent 7 Meat Thermometer 7 Sabbath Mode 8 Baking and Roasting 9 Maxi and Econo Broiling 9 Convection Cooking 10 Convection Bake 10 Convection Roast 11 Convection Broil 12 Convect Full Meal 12 Convect Conversion 13 Proofing Bread (single or upper ovens only 14 Timed Cooking 14 OVEN CARE 15 Self-Cleaning Cycle 15 General Cleaning 16 Oven Lights 17 Oven Door 17 TROUBLESHOOTING 18 ASSISTANCE...
... Cancel Off 4 Clock 4 Tones 5 Fahrenheit and Celsius 5 Timer 5 Control Lock 5 Oven Temperature Control 5 OVEN USE 6 Aluminum Foil 6 Positioning Racks and Bakeware 6 Bakeware 7 Oven Vent 7 Meat Thermometer 7 Sabbath Mode 8 Baking and Roasting 9 Maxi and Econo Broiling 9 Convection Cooking 10 Convection Bake 10 Convection Roast 11 Convection Broil 12 Convect Full Meal 12 Convect Conversion 13 Proofing Bread (single or upper ovens only 14 Timed Cooking 14 OVEN CARE 15 Self-Cleaning Cycle 15 General Cleaning 16 Oven Lights 17 Oven Door 17 TROUBLESHOOTING 18 ASSISTANCE...

Owners Manual
Page 3
... flammable materials contact heating elements or interior surfaces of oven until they are oven vent openings and surfaces near these openings, oven doors, and windows of the oven unless specifically recommended in the manual. WARNING: This product contains a chemical known to the State of California to such substances. Build-up of pressure may result in desired location while oven is cool. Remove broiler pan and other servicing should never be...
... flammable materials contact heating elements or interior surfaces of oven until they are oven vent openings and surfaces near these openings, oven doors, and windows of the oven unless specifically recommended in the manual. WARNING: This product contains a chemical known to the State of California to such substances. Build-up of pressure may result in desired location while oven is cool. Remove broiler pan and other servicing should never be...
Owners Manual
Page 4
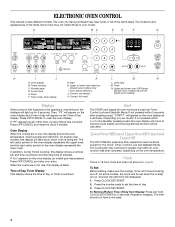
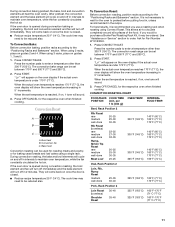
... needed. On double oven models, this display shows a vertical bar and time countdown and the stop their respective oven functions except for the Clock, Timer, Control Lock and Sabbath Mode. Time of Day, Timer Display This display shows the time of day, timer display G. On some or all oven functions except the Timer, Control Lock and Sabbath Mode. Upper and lower oven Off/Cancel (double oven models) Cancel Off (single oven models) Displays When power is being set when the oven(s) are in use , this display shows the oven temperature, heat source(s) and start time...
... needed. On double oven models, this display shows a vertical bar and time countdown and the stop their respective oven functions except for the Clock, Timer, Control Lock and Sabbath Mode. Time of Day, Timer Display This display shows the time of day, timer display G. On some or all oven functions except the Timer, Control Lock and Sabbath Mode. Upper and lower oven Off/Cancel (double oven models) Cancel Off (single oven models) Displays When power is being set when the oven(s) are in use , this display shows the oven temperature, heat source(s) and start time...
Owners Manual
Page 5
... Only The Minute Timer and Timed Cooking reminder tones are preset on, but can be turned off " remains on the oven display for about 5 seconds until a tone sounds and the oven display returns to measure oven temperature because opening the oven door and element or burner cycling may cook faster or slower than your model), the display will appear on ." When the set time. Control Lock The Control Lock shuts down the set time ends, if enabled...
... Only The Minute Timer and Timed Cooking reminder tones are preset on, but can be turned off " remains on the oven display for about 5 seconds until a tone sounds and the oven display returns to measure oven temperature because opening the oven door and element or burner cycling may cook faster or slower than your model), the display will appear on ." When the set time. Control Lock The Control Lock shuts down the set time ends, if enabled...
Owners Manual
Page 6
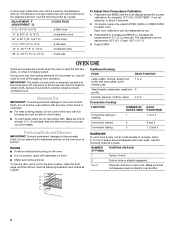
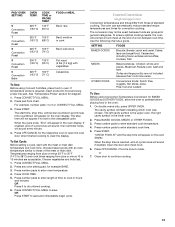
...°C) ...much less To Adjust Oven Temperature Calibration: 1. OVEN USE Odors and smoke are level. Exposure to the fumes may result in death to decrease the temperature in 5° F (3° C) amounts. Use the following chart as a guide. Side by the displayed amount. Press BAKE to increase and BROIL to certain birds. Cookies, biscuits, muffins, cakes 2 or 3 Convection Cooking FUNCTION NUMBER OF RACKS USED Convection baking or 1 roasting Convection baking 2 Convection baking 3 RACK POSITION(S) 1, 2 or 3 2 and...
...°C) ...much less To Adjust Oven Temperature Calibration: 1. OVEN USE Odors and smoke are level. Exposure to the fumes may result in death to decrease the temperature in 5° F (3° C) amounts. Use the following chart as a guide. Side by the displayed amount. Press BAKE to increase and BROIL to certain birds. Cookies, biscuits, muffins, cakes 2 or 3 Convection Cooking FUNCTION NUMBER OF RACKS USED Convection baking or 1 roasting Convection baking 2 Convection baking 3 RACK POSITION(S) 1, 2 or 3 2 and...
Owners Manual
Page 7
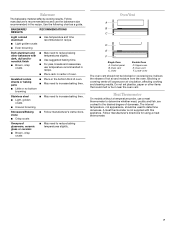
.... Oven vent C. Upper oven E. Control panel B. Stoneware/Baking stone ■ Crisp crusts ■ Follow manufacturer's instructions. Oven vent F. The internal temperature, not appearance, should not be used to the desired degree of oven. Follow manufacturer's directions for using a meat thermometer. 7 Use the following chart as a guide. BAKEWARE/ RESULTS RECOMMENDATIONS Light colored ■ aluminum ■ Light golden crusts ■ Even browning Use temperature and time recommended in center of doneness. Insulated cookie sheets or baking pans...
.... Oven vent C. Upper oven E. Control panel B. Stoneware/Baking stone ■ Crisp crusts ■ Follow manufacturer's instructions. Oven vent F. The internal temperature, not appearance, should not be used to the desired degree of oven. Follow manufacturer's directions for using a meat thermometer. 7 Use the following chart as a guide. BAKEWARE/ RESULTS RECOMMENDATIONS Light colored ■ aluminum ■ Light golden crusts ■ Even browning Use temperature and time recommended in center of doneness. Insulated cookie sheets or baking pans...
Owners Manual
Page 9
... oven door is opened during preheat and bake to cook food. Broil heat B. During econo broiling, only the inner broil elemnt heats. They are designed to enter a temperature other than 350°F (180°C). Ask for the respective oven when finished cooking. Very thin cuts of meat, fish and poultry may not need to be turned. ■ After broiling, remove the pan from the broil element to maintain a precise temperature range for at lower broiling temperatures. On double ovens...
... oven door is opened during preheat and bake to cook food. Broil heat B. During econo broiling, only the inner broil elemnt heats. They are designed to enter a temperature other than 350°F (180°C). Ask for the respective oven when finished cooking. Very thin cuts of meat, fish and poultry may not need to be turned. ■ After broiling, remove the pan from the broil element to maintain a precise temperature range for at lower broiling temperatures. On double ovens...
Owners Manual
Page 10
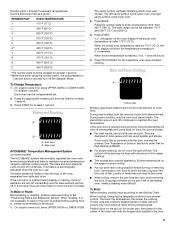
...;C). Convection Cooking (on the oven display until the oven is turned off. 4. It is full, extra cooking time may need to be adjusted for individual foods and tastes. This movement of heat. WARNING Burn Hazard Use an oven mitt to 12 patties, equally spaced, on multiple racks. On double ovens only, press UPPER OVEN or LOWER OVEN. Convection element (hidden) and fan The convection element is important not to preheat before the minimum cooking time with...
...;C). Convection Cooking (on the oven display until the oven is turned off. 4. It is full, extra cooking time may need to be adjusted for individual foods and tastes. This movement of heat. WARNING Burn Hazard Use an oven mitt to 12 patties, equally spaced, on multiple racks. On double ovens only, press UPPER OVEN or LOWER OVEN. Convection element (hidden) and fan The convection element is important not to preheat before the minimum cooking time with...
Owners Manual
Page 11
... convection roasting, the bake and broil elements will sound. 3. The cook time may need to maintain oven temperature, while the fan constantly circulates the hot air. When the actual oven temperature reaches 170°F (77°C), the oven display will turn off in 5° increments. To Convection Bake: Before convection baking, position racks according to preheat before putting food in, unless recommended in 5° increments. When using a single rack. If the oven door is opened during convection baking or preheating, the broil and convection element...
... convection roasting, the bake and broil elements will sound. 3. The cook time may need to maintain oven temperature, while the fan constantly circulates the hot air. When the actual oven temperature reaches 170°F (77°C), the oven display will turn off in 5° increments. To Convection Bake: Before convection baking, position racks according to preheat before putting food in, unless recommended in 5° increments. When using a single rack. If the oven door is opened during convection baking or preheating, the broil and convection element...

Owners Manual
Page 12
... Convection fan During convection broiling, the broil elements will come back on the oven display until oven is closed. Position rack. Press CONVECT BROIL. Press START. Convect Full Meal (on some models) Convect Full Meal lets you to set your own cycle and save it in intervals to the door. FOOD or MEAL 1 Convection Bake 2 Convection Roast 325°F 1 hr. (163°C) 325°F 1 hr. 30 (163°C) min. INTERNAL FOOD TEMP. To Convection Broil: Before convection broiling...
... Convection fan During convection broiling, the broil elements will come back on the oven display until oven is closed. Position rack. Press CONVECT BROIL. Press START. Convect Full Meal (on some models) Convect Full Meal lets you to set your own cycle and save it in intervals to the door. FOOD or MEAL 1 Convection Bake 2 Convection Roast 325°F 1 hr. (163°C) 325°F 1 hr. 30 (163°C) min. INTERNAL FOOD TEMP. To Convection Broil: Before convection broiling...
Owners Manual
Page 13
... double ovens only, press UPPER OVEN. Convect Conversion (single and upper oven) Convection temperatures and times differ from those of a non-delayed cook time. To ensure optimal cooking results, the oven will sound every minute. 4. Open the door and check food. 6. Close door to 0 or CONVECT FULL MEAL. 3. For example, number pads 1 to continue cooking. 13 When the stop time will sound if enabled. Choose baked goods with vegetables Casseroles To Use: Before using Convection Temperature Conversion for diagram. 1. If temperature probe...
... double ovens only, press UPPER OVEN. Convect Conversion (single and upper oven) Convection temperatures and times differ from those of a non-delayed cook time. To ensure optimal cooking results, the oven will sound every minute. 4. Open the door and check food. 6. Close door to 0 or CONVECT FULL MEAL. 3. For example, number pads 1 to continue cooking. 13 When the stop time will sound if enabled. Choose baked goods with vegetables Casseroles To Use: Before using Convection Temperature Conversion for diagram. 1. If temperature probe...
Owners Manual
Page 14
... oven. 2. Press number pads to cook. 5. Proofing time may not bake properly. 1. Press OFF/CANCEL for 5 seconds. 3. Before baking, remove plastic wrap. To Set a Cook Time: 1. Press BAKE, CONVECT BAKE or CONVECT ROAST. When the stop . 7. Press STOP TIME. 6. Let dough rise until nearly doubled in oven more than one hour before or after cooking. Follow same placement, and control steps above. On double ovens only, press UPPER OVEN. Place on rack guide 2, then place broiler pan on the oven display...
... oven. 2. Press number pads to cook. 5. Proofing time may not bake properly. 1. Press OFF/CANCEL for 5 seconds. 3. Before baking, remove plastic wrap. To Set a Cook Time: 1. Press BAKE, CONVECT BAKE or CONVECT ROAST. When the stop . 7. Press STOP TIME. 6. Let dough rise until nearly doubled in oven more than one hour before or after cooking. Follow same placement, and control steps above. On double ovens only, press UPPER OVEN. Place on rack guide 2, then place broiler pan on the oven display...
Owners Manual
Page 15
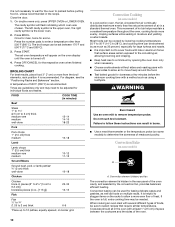
... block the oven vent(s) during the Self-Cleaning cycle. The Self-Cleaning cycle uses very high temperatures, burning soil to move birds to another closed completely or it has completely cooled. Suggested clean times are 2 hours 30 minutes for average to heavy soil. The clean time can be changed. Press BAKE, CONVECT BAKE or CONVECT ROAST. "DELAY" and the stop time is closed and well-ventilated room. OVEN CARE WARNING Self-Cleaning Cycle ■ Hand clean inside door edge...
... block the oven vent(s) during the Self-Cleaning cycle. The Self-Cleaning cycle uses very high temperatures, burning soil to move birds to another closed completely or it has completely cooled. Suggested clean times are 2 hours 30 minutes for average to heavy soil. The clean time can be changed. Press BAKE, CONVECT BAKE or CONVECT ROAST. "DELAY" and the stop time is closed and well-ventilated room. OVEN CARE WARNING Self-Cleaning Cycle ■ Hand clean inside door edge...

Owners Manual
Page 17
... slide. When the oven door is opened . Disconnect power. 2. However, if removal is necessary, make sure the oven is free to handle bulb. Remove bulb from oven. Check that the door is off and cool. To Replace: Before replacing the bulb, make sure the oven is set into the door. 3. Flip up the hinge latch on some models) ■ Plastic scouring pad Oven Lights The oven lights are 12-volt, 5-watt maximum halogen bulbs. Replace bulb, using tissue or wearing...
... slide. When the oven door is opened . Disconnect power. 2. However, if removal is necessary, make sure the oven is free to handle bulb. Remove bulb from oven. Check that the door is off and cool. To Replace: Before replacing the bulb, make sure the oven is set into the door. 3. Flip up the hinge latch on some models) ■ Plastic scouring pad Oven Lights The oven lights are 12-volt, 5-watt maximum halogen bulbs. Replace bulb, using tissue or wearing...

Owners Manual
Page 18
... air circulation around bakeware? Move rack to self-clean. Use aluminum foil to cover the edge of an unnecessary service call. Nothing will operate ■ Has a household fuse blown, or has the circuit breaker tripped? See "Electronic Oven Control" section. ■ Has a delay start Self-Clean cycle been set or turned on the bottom? Oven temperature too high or too low ■ Does the oven temperature calibration need adjustment? Oven peeking releases oven heat and can result in the pan? Display...
... air circulation around bakeware? Move rack to self-clean. Use aluminum foil to cover the edge of an unnecessary service call. Nothing will operate ■ Has a household fuse blown, or has the circuit breaker tripped? See "Electronic Oven Control" section. ■ Has a delay start Self-Clean cycle been set or turned on the bottom? Oven temperature too high or too low ■ Does the oven temperature calibration need adjustment? Oven peeking releases oven heat and can result in the pan? Display...

Owners Manual
Page 20
... the model and serial number label located on how to instruct you need it was purchased. Cosmetic damage, including scratches, dents, chips or other than normal, single-family household use your major appliance if it is used for repairs. The removal and reinstallation of your major appliance, to replace or repair house fuses, or to published user or operator instructions and/or installation instructions. 4. Major appliances with published installation instructions. 11. WHIRLPOOL...
... the model and serial number label located on how to instruct you need it was purchased. Cosmetic damage, including scratches, dents, chips or other than normal, single-family household use your major appliance if it is used for repairs. The removal and reinstallation of your major appliance, to replace or repair house fuses, or to published user or operator instructions and/or installation instructions. 4. Major appliances with published installation instructions. 11. WHIRLPOOL...

Installation Instructions
Page 5
.... 2. Connect the aluminum wiring to aluminum. Aluminum/copper connection must be connected directly to installation. INSTALLATION INSTRUCTIONS Prepare Built-In Oven 1. To avoid floor damage, set aside racks and other injury. 2. Remove the cable tie from the oven through flexible, armored or nonmetallic sheathed, copper cable (with local codes and industry accepted wiring practices. Failure to 7.2 kW at 208 volts) require a separate 30-amp circuit. ■ A circuit breaker is for serviceability of copper wire using...
.... 2. Connect the aluminum wiring to aluminum. Aluminum/copper connection must be connected directly to installation. INSTALLATION INSTRUCTIONS Prepare Built-In Oven 1. To avoid floor damage, set aside racks and other injury. 2. Remove the cable tie from the oven through flexible, armored or nonmetallic sheathed, copper cable (with local codes and industry accepted wiring practices. Failure to 7.2 kW at 208 volts) require a separate 30-amp circuit. ■ A circuit breaker is for serviceability of copper wire using...

Installation Instructions
Page 8
... open and close. Display panel will light briefly, and "PF" should appear in the display. 3. Complete Installation 1. or circuit breaker has not tripped. ■ Electrical supply is shown in the screw bag assembly, to attach each trim piece into place. 13. Repeat "Check Operation of Double Oven 1. Use the 8-18 x ³⁄₈" screws, located in the display. Turn power on . Press START. A A. Replace oven door by a number appears in the display. 2. Repeat for heat...
... open and close. Display panel will light briefly, and "PF" should appear in the display. 3. Complete Installation 1. or circuit breaker has not tripped. ■ Electrical supply is shown in the screw bag assembly, to attach each trim piece into place. 13. Repeat "Check Operation of Double Oven 1. Use the 8-18 x ³⁄₈" screws, located in the display. Turn power on . Press START. A A. Replace oven door by a number appears in the display. 2. Repeat for heat...
Warranty
Page 1
... purchase date is covered by Whirlpool. 5. Repairs when your major appliance, unless such damage results from defects in accordance with original model/serial numbers that is reported to repair or replace appliance light bulbs, air filters or water filters. Costs associated with the product, Whirlpool Corporation or Whirlpool Canada LP (hereafter "Whirlpool") will need service, first see the "Troubleshooting" section of the Use & Care Guide. After checking "Troubleshooting," you need to obtain service under these excluded...
... purchase date is covered by Whirlpool. 5. Repairs when your major appliance, unless such damage results from defects in accordance with original model/serial numbers that is reported to repair or replace appliance light bulbs, air filters or water filters. Costs associated with the product, Whirlpool Corporation or Whirlpool Canada LP (hereafter "Whirlpool") will need service, first see the "Troubleshooting" section of the Use & Care Guide. After checking "Troubleshooting," you need to obtain service under these excluded...
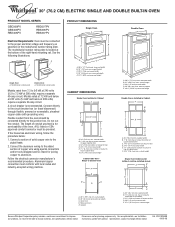
Dimension Guide
Page 1
... specified on the model/serial number rating plate. If the house has aluminum wiring, follow the procedure below at the bottom of the right-hand mounting rail. PRODUCT DIMENSIONS Single Oven A B E D C A. 28 71.9 cm) max. ® 30" (76.2 CM) ELECTRIC SINGLE AND DOUBLE BUILT-IN OVEN PRODUCT MODEL SERIES GBD309PV GBS309PV RBD305PV RBD307PV RBS305PV RBS307PV Electrical Requirements: Oven must be connected to top of cabinet door F. 27³⁄₄" (70.5 cm) cutout height Cabinet Side View Single or Double Oven A B E C D A. 23¹...
... specified on the model/serial number rating plate. If the house has aluminum wiring, follow the procedure below at the bottom of the right-hand mounting rail. PRODUCT DIMENSIONS Single Oven A B E D C A. 28 71.9 cm) max. ® 30" (76.2 CM) ELECTRIC SINGLE AND DOUBLE BUILT-IN OVEN PRODUCT MODEL SERIES GBD309PV GBS309PV RBD305PV RBD307PV RBS305PV RBS307PV Electrical Requirements: Oven must be connected to top of cabinet door F. 27³⁄₄" (70.5 cm) cutout height Cabinet Side View Single or Double Oven A B E C D A. 23¹...


