
User Instructions
Page 1
...whirlpool.ca or call us at www.whirlpool.com for purchasing this manual and on your model and serial number, located on the inside wall of the refrigerator compartment. Table of Contents / Índice / Table des matières REFRIGERATOR SAFETY 1 INSTALLATION INSTRUCTIONS 2 REFRIGERATOR USE 8 REFRIGERATOR CARE 10 TROUBLESHOOTING 11 ACCESSORIES 13 WATER FILTER CERTIFICATIONS 13 PRODUCT DATA SHEETS 14 WARRANTY 16 SEGURIDAD DEL REFRIGERADOR... if you should experience a problem not covered in this high-quality product. All safety messages will need assistance, call us at 1-...
...whirlpool.ca or call us at www.whirlpool.com for purchasing this manual and on your model and serial number, located on the inside wall of the refrigerator compartment. Table of Contents / Índice / Table des matières REFRIGERATOR SAFETY 1 INSTALLATION INSTRUCTIONS 2 REFRIGERATOR USE 8 REFRIGERATOR CARE 10 TROUBLESHOOTING 11 ACCESSORIES 13 WATER FILTER CERTIFICATIONS 13 PRODUCT DATA SHEETS 14 WARRANTY 16 SEGURIDAD DEL REFRIGERADOR... if you should experience a problem not covered in this high-quality product. All safety messages will need assistance, call us at 1-...
User Instructions
Page 2
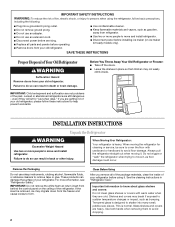
... injury. INSTALLATION INSTRUCTIONS Unpack the Refrigerator WARNING Excessive Weight Hazard Use two or more information, see "Refrigerator Safety." Tempered glass is removed, ice may break if exposed to sudden temperature changes or impact, such as floor damage could occur. Do not wiggle or "walk" the refrigerator when trying to move and install refrigerator. ■ Disconnect power before operating. ■ Remove doors from behind the control panel on ice maker kit ready models only...
... injury. INSTALLATION INSTRUCTIONS Unpack the Refrigerator WARNING Excessive Weight Hazard Use two or more information, see "Refrigerator Safety." Tempered glass is removed, ice may break if exposed to sudden temperature changes or impact, such as floor damage could occur. Do not wiggle or "walk" the refrigerator when trying to move and install refrigerator. ■ Disconnect power before operating. ■ Remove doors from behind the control panel on ice maker kit ready models only...

User Instructions
Page 3
... proper electrical connection. Before purchasing, make sure you are finished, reconnect the refrigerator to the electrical source and reset the control (Thermostat, Refrigerator or Freezer Control depending on the model) to follow the instructions provided with a ¹⁄₄" (6.35 mm) saddle-type shutoff valve, a union, and copper tubing. IMPORTANT: ■ All installations must meet local plumbing code requirements. ■ Use copper tubing and check for the water line connections. Do not install the refrigerator...
... proper electrical connection. Before purchasing, make sure you are finished, reconnect the refrigerator to the electrical source and reset the control (Thermostat, Refrigerator or Freezer Control depending on the model) to follow the instructions provided with a ¹⁄₄" (6.35 mm) saddle-type shutoff valve, a union, and copper tubing. IMPORTANT: ■ All installations must meet local plumbing code requirements. ■ Use copper tubing and check for the water line connections. Do not install the refrigerator...

User Instructions
Page 4
... nut. Check for cleaning. Copper tubing D. If you need. Turn OFF main water supply. Replace the filter if necessary. ■ Allow the storage tank on the water pipe. Add 7 ft. (2.1 m) to 3.18 cm) vertical cold water pipe near the refrigerator. Shutoff valve G. Place the free end of copper tubing you have questions about your refrigerator has a water filter, it will go. Connect to see whether the sediment filter in the ¹...
... nut. Check for cleaning. Copper tubing D. If you need. Turn OFF main water supply. Replace the filter if necessary. ■ Allow the storage tank on the water pipe. Add 7 ft. (2.1 m) to 3.18 cm) vertical cold water pipe near the refrigerator. Shutoff valve G. Place the free end of copper tubing you have questions about your refrigerator has a water filter, it will go. Connect to see whether the sediment filter in the ¹...

User Instructions
Page 5
... onto the water valve as shown. A B A. Turn shutoff valve ON. 5. See "Water Dispenser." NOTE: Allow 24 hours to reverse the door swing, follow these instructions can result in the following instructions are working. 5 Discard the first three batches of ice. IMPORTANT: ■ All graphics referenced in death, fire, or electrical shock. 1. If you begin, turn the refrigerator control OFF, and remove food and adjustable door or utility bins from doors. NOTE...
... onto the water valve as shown. A B A. Turn shutoff valve ON. 5. See "Water Dispenser." NOTE: Allow 24 hours to reverse the door swing, follow these instructions can result in the following instructions are working. 5 Discard the first three batches of ice. IMPORTANT: ■ All graphics referenced in death, fire, or electrical shock. 1. If you begin, turn the refrigerator control OFF, and remove food and adjustable door or utility bins from doors. NOTE...

User Instructions
Page 6
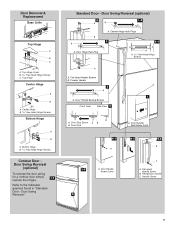
.... Do not use an adapter. Reset the controls. Return all models) NOTE: Graphic may be reversed if door swing is installed on product. If you are not reversing the doors, see "Replace Doors and Hinges." Freezer door 1. See Graphic 6-1. Remove the door hinge hole plug from the cabinet top and move them to reverse your doors so that they open in Graphic 1-2. Remove the door stop . Align the lower portion of the refrigerator door. Reverse Doors-Contour Door (optional...
.... Do not use an adapter. Reset the controls. Return all models) NOTE: Graphic may be reversed if door swing is installed on product. If you are not reversing the doors, see "Replace Doors and Hinges." Freezer door 1. See Graphic 6-1. Remove the door hinge hole plug from the cabinet top and move them to reverse your doors so that they open in Graphic 1-2. Remove the door stop . Align the lower portion of the refrigerator door. Reverse Doors-Contour Door (optional...
User Instructions
Page 7
...Door Stop Screw A B B. Refrigerator Handle C. Cabinet Hinge Hole Plugs 3 1-1 1 A A Hex-Head Hinge Screws A A. Freezer Handle 4 A 7 A. Flat-Head Handle Screw B. Door Handle Sealing Screws Front View Side View 5 A. Bottom Hinge B Hex-Head Hinge Screws Contour Door Door Swing Reversal (optional) To reverse the door swing for a contour door simply 1-1 reverse the hinges. Door Hinge Hole Plug A. Top Hinge Cover B Hex-Head Hinge Screws C. Flat-Head Handle Screws B. Door Stop 6-1 A 1-2 A. Door Handle Seal Screw Front 6-2 A 6-3 B C A. Door Removal & Replacement...
...Door Stop Screw A B B. Refrigerator Handle C. Cabinet Hinge Hole Plugs 3 1-1 1 A A Hex-Head Hinge Screws A A. Freezer Handle 4 A 7 A. Flat-Head Handle Screw B. Door Handle Sealing Screws Front View Side View 5 A. Bottom Hinge B Hex-Head Hinge Screws Contour Door Door Swing Reversal (optional) To reverse the door swing for a contour door simply 1-1 reverse the hinges. Door Hinge Hole Plug A. Top Hinge Cover B Hex-Head Hinge Screws C. Flat-Head Handle Screws B. Door Stop 6-1 A 1-2 A. Door Handle Seal Screw Front 6-2 A 6-3 B C A. Door Removal & Replacement...

User Instructions
Page 8
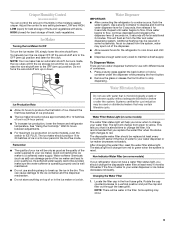
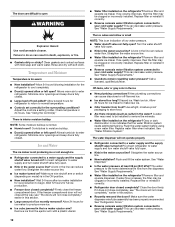
... grille. Align Doors If the space between your refrigerator, make sure that the controls are preset at the factory. Loosen the top hinge screws using the instructions below as a guide. Wait at the base of the refrigerator. CONDITION/REASON: ADJUSTMENT: REFRIGERATOR too warm REFRIGERATOR or TEMPERATURE Control one setting higher FREEZER too warm/too little ice FREEZER or TEMPERATURE Control one setting higher MAX ice production switch REFRIGERATOR too cold REFRIGERATOR or TEMPERATURE Control one setting lower FREEZER too cold FREEZER or TEMPERATURE Control one on...
... grille. Align Doors If the space between your refrigerator, make sure that the controls are preset at the factory. Loosen the top hinge screws using the instructions below as a guide. Wait at the base of the refrigerator. CONDITION/REASON: ADJUSTMENT: REFRIGERATOR too warm REFRIGERATOR or TEMPERATURE Control one setting higher FREEZER too warm/too little ice FREEZER or TEMPERATURE Control one setting higher MAX ice production switch REFRIGERATOR too cold REFRIGERATOR or TEMPERATURE Control one setting lower FREEZER too cold FREEZER or TEMPERATURE Control one on...
User Instructions
Page 9
..., lower the freezer and refrigerator temperature. The status light will be only as good as salt) can damage parts of or in the front base grille. Changing the Water Filter 1. Remember ■ The quality of your water dispenser or ice maker decreases noticeably. If a softened water supply cannot be avoided, make sure the water softener is operating properly and is well maintained. ■ Do not use anything on...
..., lower the freezer and refrigerator temperature. The status light will be only as good as salt) can damage parts of or in the front base grille. Changing the Water Filter 1. Remember ■ The quality of your water dispenser or ice maker decreases noticeably. If a softened water supply cannot be avoided, make sure the water softener is operating properly and is well maintained. ■ Do not use anything on...

User Instructions
Page 10
... new filter into the base grille until it off the end of your surfaces clean by using the following cleaning instructions. Slide the cap (removed in warm water. Using the Dispenser Without the Water Filter You can result in warm water. 3. IMPORTANT: Do not discard the cap. With the cap in normal home operating environments. Both the refrigerator and freezer sections defrost automatically. To help clear air from the O-rings. 2. REFRIGERATOR CARE Cleaning...
... new filter into the base grille until it off the end of your surfaces clean by using the following cleaning instructions. Slide the cap (removed in warm water. Using the Dispenser Without the Water Filter You can result in warm water. 3. IMPORTANT: Do not discard the cap. With the cap in normal home operating environments. Both the refrigerator and freezer sections defrost automatically. To help clear air from the O-rings. 2. REFRIGERATOR CARE Cleaning...

User Instructions
Page 11
.... See "Using the Control(s)." ■ New installation? occurs as ice is working ? bulb with explanations. ■ Buzzing - If the problem continues, call . Do not use an extension cord. Be sure to follow these instructions can result in the way? flow of refrigerant, movement of water lines, or from door. ■ Bin or shelf in death, fire, or electrical shock. ■ Power cord unplugged? The doors will not cool either compartment...
.... See "Using the Control(s)." ■ New installation? occurs as ice is working ? bulb with explanations. ■ Buzzing - If the problem continues, call . Do not use an extension cord. Be sure to follow these instructions can result in the way? flow of refrigerant, movement of water lines, or from door. ■ Bin or shelf in death, fire, or electrical shock. ■ Power cord unplugged? The doors will not cool either compartment...
User Instructions
Page 12
...? Remove filter and operate ice maker. New plumbing connections can reduce water flow. Straighten the water source line. ■ New installation? Replace filter or reinstall it correctly. ■ Reverse osmosis water filtration system connected to your cold water supply? Make sure the water dispenser wire/tube assembly has been properly reconnected. See "Refrigerator Doors." ■ Reverse osmosis water filtration system connected to your cold water supply? Rinse and dry with a plastic utensil. ■ Water filter installed on the refrigerator? Allows warm air...
...? Remove filter and operate ice maker. New plumbing connections can reduce water flow. Straighten the water source line. ■ New installation? Replace filter or reinstall it correctly. ■ Reverse osmosis water filtration system connected to your cold water supply? Make sure the water dispenser wire/tube assembly has been properly reconnected. See "Refrigerator Doors." ■ Reverse osmosis water filtration system connected to your cold water supply? Rinse and dry with a plastic utensil. ■ Water filter installed on the refrigerator? Allows warm air...

User Instructions
Page 13
... "Water Dispenser." ■ Recently changed water filter? See "Refrigerator Doors." The first glass of water. ■ Refrigerator connected to cool completely. ■ Recently dispensed large amount of water after installation for the water supply to a cold water pipe? ACCESSORIES To order stainless steel cleaner or replacement filters, call 1-800-807-6777. Make sure the refrigerator is normal. ■ Glass not being held under the dispenser 2 to 50°F (10°C). ■ New installation? Allow 24 hours for the part number listed...
... "Water Dispenser." ■ Recently changed water filter? See "Refrigerator Doors." The first glass of water. ■ Refrigerator connected to cool completely. ■ Recently dispensed large amount of water after installation for the water supply to a cold water pipe? ACCESSORIES To order stainless steel cleaner or replacement filters, call 1-800-807-6777. Make sure the refrigerator is normal. ■ Glass not being held under the dispenser 2 to 50°F (10°C). ■ New installation? Allow 24 hours for the part number listed...

User Instructions
Page 14
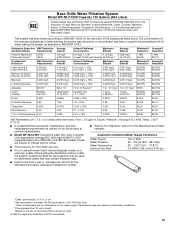
... Application Guidelines/Water Supply Parameters Water Supply Water Pressure Water Temperature Service Flow Rate City or Well 30 - 120 psi (207 - 827 kPa) 33° - 100°F (0.6° - 37.8°C) 0.5 GPM (1.9 L/min.) @ 60 psi Model WF-NL120V: Change the water filter every 6 months. Temp. = 63°F (17.2°C). ■ It is essential that operational, maintenance, and filter replacement requirements be carried out for the Manufacturer's limited warranty. Prices...
... Application Guidelines/Water Supply Parameters Water Supply Water Pressure Water Temperature Service Flow Rate City or Well 30 - 120 psi (207 - 827 kPa) 33° - 100°F (0.6° - 37.8°C) 0.5 GPM (1.9 L/min.) @ 60 psi Model WF-NL120V: Change the water filter every 6 months. Temp. = 63°F (17.2°C). ■ It is essential that operational, maintenance, and filter replacement requirements be carried out for the Manufacturer's limited warranty. Prices...
User Instructions
Page 15
... 98.92 99.69 Test Parameters: pH = 7.5 ± 0.5 unless otherwise noted. Use replacement cartridge NLC120V, part #4396701. 2007 suggested retail price of the indicated substances in ANSI/NSF 42/53. Application Guidelines/Water Supply Parameters Water Supply Water Pressure Water Temperature Service Flow Rate City or Well 30... water leaving the system, as advertised. ■ Refer to the "Warranty" section for the Manufacturer's limited warranty. ■ Model WF-NLC120V: Change the water filter every 6 months. Pressure = 60 psig (413.7 kPa). This system has been tested ...
... 98.92 99.69 Test Parameters: pH = 7.5 ± 0.5 unless otherwise noted. Use replacement cartridge NLC120V, part #4396701. 2007 suggested retail price of the indicated substances in ANSI/NSF 42/53. Application Guidelines/Water Supply Parameters Water Supply Water Pressure Water Temperature Service Flow Rate City or Well 30... water leaving the system, as advertised. ■ Refer to the "Warranty" section for the Manufacturer's limited warranty. ■ Model WF-NLC120V: Change the water filter every 6 months. Pressure = 60 psig (413.7 kPa). This system has been tested ...

User Instructions
Page 16
... authorized Whirlpool servicer is reported to Whirlpool within 30 days from warranty coverage. 4. Any food or medicine loss due to the appliance. 9. Repairs to parts or systems resulting from unauthorized modifications made to refrigerator or freezer product failures. 7. Expenses for travel and transportation for product service if your major appliance, to replace or repair house fuses, or to repair or replace appliance light bulbs, air filters or water filters...
... authorized Whirlpool servicer is reported to Whirlpool within 30 days from warranty coverage. 4. Any food or medicine loss due to the appliance. 9. Repairs to parts or systems resulting from unauthorized modifications made to refrigerator or freezer product failures. 7. Expenses for travel and transportation for product service if your major appliance, to replace or repair house fuses, or to repair or replace appliance light bulbs, air filters or water filters...


