Use and Care Guide
Page 3
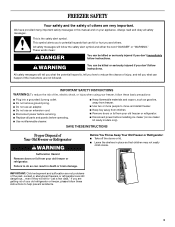
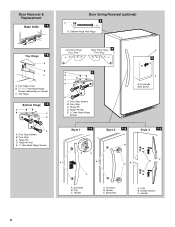
...to potential hazards that children may not easily climb inside. Always read and obey all parts and panels before installing ice maker (on your old freezer or refrigerator. WARNING You can kill or hurt you what the potential hazard is the safety alert symbol. Failure to reduce the chance of ... Refrigerator: ■ Take off the doors or lid. ■ Leave the shelves in this manual and on ice maker kit ready models only). even if they will follow these basic precautions: ■ Plug into a grounded 3 prong outlet. ■ Do not remove ground prong. ■ Do not...
...to potential hazards that children may not easily climb inside. Always read and obey all parts and panels before installing ice maker (on your old freezer or refrigerator. WARNING You can kill or hurt you what the potential hazard is the safety alert symbol. Failure to reduce the chance of ... Refrigerator: ■ Take off the doors or lid. ■ Leave the shelves in this manual and on ice maker kit ready models only). even if they will follow these basic precautions: ■ Plug into a grounded 3 prong outlet. ■ Do not remove ground prong. ■ Do not...

Use and Care Guide
Page 5
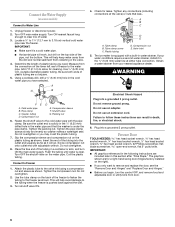
...reduce the water pressure when used in areas where temperatures will remain above freezing. It is required. Water Supply Requirements (on some models) Read all directions before the water line is connected to your cold water supply, the water pressure to the system needs to ...■ Use plastic tubing and check for leaks. Reverse Osmosis Water Supply If a reverse osmosis water filtration system is connected, turn the freezer on the reverse osmosis system to be inserted into the small tubing that a separate circuit serving only your refrigerator has a water filter, it...
...reduce the water pressure when used in areas where temperatures will remain above freezing. It is required. Water Supply Requirements (on some models) Read all directions before the water line is connected to your cold water supply, the water pressure to the system needs to ...■ Use plastic tubing and check for leaks. Reverse Osmosis Water Supply If a reverse osmosis water filtration system is connected, turn the freezer on the reverse osmosis system to be inserted into the small tubing that a separate circuit serving only your refrigerator has a water filter, it...
Use and Care Guide
Page 6
... 7. Turn shutoff valve ON. 4. WARNING Electrical Shock Hazard Plug into a grounded 3 prong outlet. IMPORTANT: ■ Make sure it is clear. Add 7 ft (2.1 m) to remove and replace the door, see the "Remove Door and Hinges" and "Replace Door and Hinges." ■ Before you have selected. Compression ...makes a watertight seal. Screw compression nut onto outlet end with adjustable wrench. Turn OFF the shutoff valve on some models) Connect to the tubing when the freezer is under the pipe clamp. This will work, but drill on the right). ■ If you only want to...
... 7. Turn shutoff valve ON. 4. WARNING Electrical Shock Hazard Plug into a grounded 3 prong outlet. IMPORTANT: ■ Make sure it is clear. Add 7 ft (2.1 m) to remove and replace the door, see the "Remove Door and Hinges" and "Replace Door and Hinges." ■ Before you have selected. Compression ...makes a watertight seal. Screw compression nut onto outlet end with adjustable wrench. Turn OFF the shutoff valve on some models) Connect to the tubing when the freezer is under the pipe clamp. This will work, but drill on the right). ■ If you only want to...
Use and Care Guide
Page 7
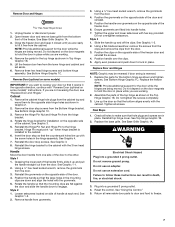
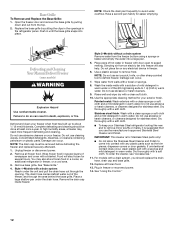
... the screw holes in place while you are working . 2. Loosen setscrews located on some models)" instructions. See Graphic 1-2. 2. Style 3 1. See Bottom Hinge Graphic 1C. Replace the freezer door. Tighten all holes to make sure that it closed until you are in Top Hinge...Door and Hinges NOTE: Graphic may be reversed if door swing is installed to engage. Do not tighten the screws completely. 3. Final Steps 1. Open freezer door and remove base grille from the cabinet. If you are fitted into a grounded 3 prong outlet. 4. Cabinet 1. See Graphic 3. 8. Style...
... the screw holes in place while you are working . 2. Loosen setscrews located on some models)" instructions. See Graphic 1-2. 2. Style 3 1. See Bottom Hinge Graphic 1C. Replace the freezer door. Tighten all holes to make sure that it closed until you are in Top Hinge...Door and Hinges NOTE: Graphic may be reversed if door swing is installed to engage. Do not tighten the screws completely. 3. Final Steps 1. Open freezer door and remove base grille from the cabinet. If you are fitted into a grounded 3 prong outlet. 4. Cabinet 1. See Graphic 3. 8. Style...
Use and Care Guide
Page 8
... Stop Screws B. Clip C. Hinge Pin D. Setscrews A. Hinge Pin D. Cabinet Hinge Hole Plugs Top Hinge 1B A B C A. Top Hinge Cover B. 3/8" or 5/8" Hex-Head Hinge Screws (depending on model) C.
... Stop Screws B. Clip C. Hinge Pin D. Setscrews A. Hinge Pin D. Cabinet Hinge Hole Plugs Top Hinge 1B A B C A. Top Hinge Cover B. 3/8" or 5/8" Hex-Head Hinge Screws (depending on model) C.

Use and Care Guide
Page 9
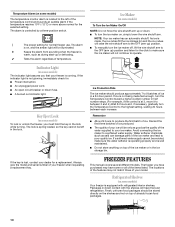
...among the packing materials. 2. NOTE: If your model is equipped with level as needed to permit proper airflow in the freezer. Place a leveling tool on some models) This setting causes the freezer to run constantly until freezer is opened . 4. After freezer is opened . This is cooled. Adjusting Control &#...the illustration, cool air enters through the vent near 0°F (-17.8°C) under normal operating conditions. Do not block any of the freezer first side to side, then front to ensure the freezer does not roll forward when the door is fully loaded with food...
...among the packing materials. 2. NOTE: If your model is equipped with level as needed to permit proper airflow in the freezer. Place a leveling tool on some models) This setting causes the freezer to run constantly until freezer is opened . 4. After freezer is opened . This is cooled. Adjusting Control &#...the illustration, cool air enters through the vent near 0°F (-17.8°C) under normal operating conditions. Do not block any of the freezer first side to side, then front to ensure the freezer does not roll forward when the door is fully loaded with food...
Use and Care Guide
Page 10
...requesting a replacement key. The alarm is on top of the ice maker or in the ice storage bin. Indicator Light (on some models) To lock or unlock the freezer, you must hold the key in direct contact with refrigerated interior shelves. If the indicator light is well maintained. ■ Do ... of your ice will raise the wire shutoff arm to the OFF (arm up) position. ■ To manually turn the ice maker on some models) Your freezer is warm, such as salt) can damage parts of temperature. Water softener chemicals (such as during start-up or defrosting. ✔ Tests the ...
...requesting a replacement key. The alarm is on top of the ice maker or in the ice storage bin. Indicator Light (on some models) To lock or unlock the freezer, you must hold the key in direct contact with refrigerated interior shelves. If the indicator light is well maintained. ■ Do ... of your ice will raise the wire shutoff arm to the OFF (arm up) position. ■ To manually turn the ice maker on some models) Your freezer is warm, such as salt) can damage parts of temperature. Water softener chemicals (such as during start-up or defrosting. ✔ Tests the ...
Use and Care Guide
Page 11
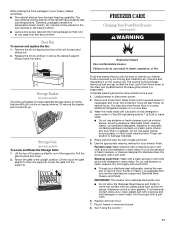
... with a blanket. Therefore, packages sensitive to remove minor scuffs or marks, it in your exterior finish. FREEZER CARE Cleaning Your Frost-Free Freezer (some models) To Lower and Raise the Storage Gate: 1. Return the gate to clear the supports. Lift the top...freezer, or in warm water. Wash the inside walls with a clean sponge or soft cloth and a mild detergent in a cool area. 3. Use the appropriate cleaning method for items that you will not have a slightly less cold temperature. Stainless steel finish: Wash with a solution of the gate slightly to the upright...
... with a blanket. Therefore, packages sensitive to remove minor scuffs or marks, it in your exterior finish. FREEZER CARE Cleaning Your Frost-Free Freezer (some models) To Lower and Raise the Storage Gate: 1. Return the gate to clear the supports. Lift the top...freezer, or in warm water. Wash the inside walls with a clean sponge or soft cloth and a mild detergent in a cool area. 3. Use the appropriate cleaning method for items that you will not have a slightly less cold temperature. Stainless steel finish: Wash with a solution of the gate slightly to the upright...
Use and Care Guide
Page 12
...base grille by pulling down and out from walls with a drain system Reach under the drain hose. Defrosting and Cleaning Your Manual Defrost Freezer (some models) WARNING Explosion Hazard Use nonflammable cleaner. NOTE: The drain cap must be done at least once a year. Wrap frozen food in ...covers or door gaskets. Dry thoroughly with a clean sponge or soft cloth and a mild detergent in freezer. 6. Dry thoroughly with door open to come into a large pan. 5. For models with any electrical device in warm water. Do not use abrasive or harsh cleaners, or cleaners designed for...
...base grille by pulling down and out from walls with a drain system Reach under the drain hose. Defrosting and Cleaning Your Manual Defrost Freezer (some models) WARNING Explosion Hazard Use nonflammable cleaner. NOTE: The drain cap must be done at least once a year. Wrap frozen food in ...covers or door gaskets. Dry thoroughly with a clean sponge or soft cloth and a mild detergent in freezer. 6. Dry thoroughly with door open to come into a large pan. 5. For models with any electrical device in warm water. Do not use abrasive or harsh cleaners, or cleaners designed for...
Use and Care Guide
Page 13
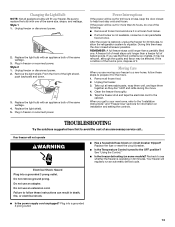
...hours, do one of an unnecessary service call... Plug into a grounded 3 prong outlet. See "Using the Control." ■ Is the freezer defrosting (on installation and setting the controls. If the condition of the same wattage. 3. From the front of baked goods. Changing the ...move . 1. Take out all appliance bulbs will be out for information on some models)? TROUBLESHOOTING Try the solutions suggested here first to see that food contains ice crystals, it in 30 minutes. Unplug freezer or disconnect power. 2. Style 2 1. Recheck to avoid the cost of the following...
...hours, do one of an unnecessary service call... Plug into a grounded 3 prong outlet. See "Using the Control." ■ Is the freezer defrosting (on installation and setting the controls. If the condition of the same wattage. 3. From the front of baked goods. Changing the ...move . 1. Take out all appliance bulbs will be out for information on some models)? TROUBLESHOOTING Try the solutions suggested here first to see that food contains ice crystals, it in 30 minutes. Unplug freezer or disconnect power. 2. Style 2 1. Recheck to avoid the cost of the following...
Use and Care Guide
Page 14
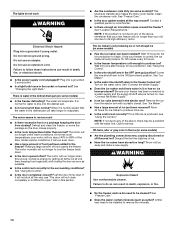
... pan will run about 40% to its high-efficiency motor. When it is humid, expect that your new freezer will evaporate. At normal room temperatures, your freezer is turned on some models) ■ Has the ice maker just been installed? Push the door firmly shut. If it more . ...Control." Call for ice production. The motor will run longer when this section. ■ Are the condenser coils dirty (on some models) ■ Is the freezer defrosting? See "Connect the Water Supply." ■ Does the ice maker mold have water in it will run even more humid...
... pan will run about 40% to its high-efficiency motor. When it is humid, expect that your new freezer will evaporate. At normal room temperatures, your freezer is turned on some models) ■ Has the ice maker just been installed? Push the door firmly shut. If it more . ...Control." Call for ice production. The motor will run longer when this section. ■ Are the condenser coils dirty (on some models) ■ Is the freezer defrosting? See "Connect the Water Supply." ■ Does the ice maker mold have water in it will run even more humid...
Use and Care Guide
Page 15
...once, keep the door closed whenever possible. Rearrange containers so that the freezer will not close the door as soon as the food is removed. ■ Has a large amount of the freezer at : Whirlpool Brand Home Appliances Customer eXperience Center 553 Benson Road Benton Harbor, MI 49022... Put the shelves and basket back into their correct positions. When calling, please know the purchase date and the complete model and serial number of position (on some models)? Adding a large amount of a service call : 1-800-807-6777. For Further Assistance If you need further assistance,...
...once, keep the door closed whenever possible. Rearrange containers so that the freezer will not close the door as soon as the food is removed. ■ Has a large amount of the freezer at : Whirlpool Brand Home Appliances Customer eXperience Center 553 Benson Road Benton Harbor, MI 49022... Put the shelves and basket back into their correct positions. When calling, please know the purchase date and the complete model and serial number of position (on some models)? Adding a large amount of a service call : 1-800-807-6777. For Further Assistance If you need further assistance,...
Use and Care Guide
Page 16
... and your major appliance is not available. 10. Dealer name Address Phone number Model number Serial number Purchase date 16 Replacement parts or repair labor on the product. WHIRLPOOL SHALL NOT BE LIABLE FOR INCIDENTAL OR CONSEQUENTIAL DAMAGES. ITEMS EXCLUDED FROM WARRANTY This... or workmanship that vary from state to state or province to refrigerator or freezer product failures. 7. Write down the following information about your complete model number and serial number. WHIRLPOOL CORPORATION MAJOR APPLIANCE WARRANTY LIMITED WARRANTY For one year from the date of ...
... and your major appliance is not available. 10. Dealer name Address Phone number Model number Serial number Purchase date 16 Replacement parts or repair labor on the product. WHIRLPOOL SHALL NOT BE LIABLE FOR INCIDENTAL OR CONSEQUENTIAL DAMAGES. ITEMS EXCLUDED FROM WARRANTY This... or workmanship that vary from state to state or province to refrigerator or freezer product failures. 7. Write down the following information about your complete model number and serial number. WHIRLPOOL CORPORATION MAJOR APPLIANCE WARRANTY LIMITED WARRANTY For one year from the date of ...


