
Installation Instructions
Page 1
...211;N DE LA LAVADORA INSTRUCTIONS POUR L'INSTALLATION DE LA LAVEUSE Table of Contents / Índice / Table des matières WASHER SAFETY 1 INSTALLATION REQUIREMENTS 2 Tools and Parts 2 Location Requirements 3 Drain System 3 Electrical Requirements 4 INSTALLATION INSTRUCTIONS 4 Before You ...Start 4 Remove Shipping Materials 4 Connect Drain Hose 6 Connect the Inlet Hoses 6 Secure the Drain Hose 7 Level the Washer 7 Complete Installation 8 SEGURIDAD DE LA LAVADORA 9 REQUISITOS DE INSTALACIÓN 9 Herramientas y piezas 9 Requisitos de ubicación 10 Sistema...
...211;N DE LA LAVADORA INSTRUCTIONS POUR L'INSTALLATION DE LA LAVEUSE Table of Contents / Índice / Table des matières WASHER SAFETY 1 INSTALLATION REQUIREMENTS 2 Tools and Parts 2 Location Requirements 3 Drain System 3 Electrical Requirements 4 INSTALLATION INSTRUCTIONS 4 Before You ...Start 4 Remove Shipping Materials 4 Connect Drain Hose 6 Connect the Inlet Hoses 6 Secure the Drain Hose 7 Level the Washer 7 Complete Installation 8 SEGURIDAD DE LA LAVADORA 9 REQUISITOS DE INSTALACIÓN 9 Herramientas y piezas 9 Requisitos de ubicación 10 Sistema...

Installation Instructions
Page 2
...the front page of fill 6 ft (1.8 m) Part Number 76314, hoses 10 ft (3.0 m) Part Number 350008 Drain hose too short Kit Part Number 280131 Lint clogged drain Drain protector, Part Number 367031 A B A. The parts supplied are in the washer basket. Tools needed for connecting...break kit, Part Number 280129; additional drain hose, Part Number 3357090 Water faucets 2 longer water fill hoses: beyond reach of the Washer User Instructions. Front leveling feet with nuts (2) 2 INSTALLATION REQUIREMENTS Tools and Parts Gather the required tools and parts before starting installation...
...the front page of fill 6 ft (1.8 m) Part Number 76314, hoses 10 ft (3.0 m) Part Number 350008 Drain hose too short Kit Part Number 280131 Lint clogged drain Drain protector, Part Number 367031 A B A. The parts supplied are in the washer basket. Tools needed for connecting...break kit, Part Number 280129; additional drain hose, Part Number 3357090 Water faucets 2 longer water fill hoses: beyond reach of the Washer User Instructions. Front leveling feet with nuts (2) 2 INSTALLATION REQUIREMENTS Tools and Parts Gather the required tools and parts before starting installation...

Installation Instructions
Page 3
... C D 3 The top of the laundry tub must be exposed to the washer. Secure drain hose with beaded tie strap. 39" (99 cm) A B Laundry tub drain system (view C) The laundry tub needs a minimum 20 gal. (76 L) capacity. You will be at or below the top of the door are for your... system requires a siphon break that may be needed. s A sturdy floor to reduce noise transfer. See "Drain System." s A grounded electrical outlet located within 3 ft (90 cm) of the hot and cold water fill valves, and water pressure of 5-100 psi (34.5-690 kPa). s Hot and cold water faucets located...
... C D 3 The top of the laundry tub must be exposed to the washer. Secure drain hose with beaded tie strap. 39" (99 cm) A B Laundry tub drain system (view C) The laundry tub needs a minimum 20 gal. (76 L) capacity. You will be at or below the top of the door are for your... system requires a siphon break that may be needed. s A sturdy floor to reduce noise transfer. See "Drain System." s A grounded electrical outlet located within 3 ft (90 cm) of the hot and cold water fill valves, and water pressure of 5-100 psi (34.5-690 kPa). s Hot and cold water faucets located...

Installation Instructions
Page 4
...a qualified electrician. grounding conductor can result in accordance with a cord having a 3 prong grounding plug. For a permanently connected washer: This washer must be connected to a grounded metal, permanent wiring system, or an equipment grounding conductor must be provided. Remove Shipping Materials ...resistance for your particular model, either the one with the appliance - WARNING Electrical Requirements s Do not ground to within approximately 3 ft (90 cm) of its final location. 2. A time-delay fuse or circuit breaker is properly grounded. Do not modify the ...
...a qualified electrician. grounding conductor can result in accordance with a cord having a 3 prong grounding plug. For a permanently connected washer: This washer must be connected to a grounded metal, permanent wiring system, or an equipment grounding conductor must be provided. Remove Shipping Materials ...resistance for your particular model, either the one with the appliance - WARNING Electrical Requirements s Do not ground to within approximately 3 ft (90 cm) of its final location. 2. A time-delay fuse or circuit breaker is properly grounded. Do not modify the ...

Installation Instructions
Page 5
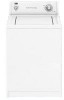
... shipping strap and pull until both ends are removed. Pin 4. Straight power cord Looped power cord Straight power cord 1. To remove the power cord from washer. 2.
... shipping strap and pull until both ends are removed. Pin 4. Straight power cord Looped power cord Straight power cord 1. To remove the power cord from washer. 2.

Installation Instructions
Page 6
.... Hose should be connected to provide a gap for air. Damage to the hot water faucet. Do not force excess drain hose back into standpipe. Washer Laundry tub drain or standpipe drain Connecting the drain hose form to the corrugated drain hose Connect the inlet hoses to the cold water faucet... the hose labeled cold to water leakage. A A. Connect Drain Hose Proper connection of the drain hose protects your washer and is seated on the washer. 2. See Floor drain under "Tools and Parts." Screw on coupling by hand until it is connected to get rid of particles in the couplings. ...
.... Hose should be connected to provide a gap for air. Damage to the hot water faucet. Do not force excess drain hose back into standpipe. Washer Laundry tub drain or standpipe drain Connecting the drain hose form to the corrugated drain hose Connect the inlet hoses to the cold water faucet... the hose labeled cold to water leakage. A A. Connect Drain Hose Proper connection of the drain hose protects your washer and is seated on the washer. 2. See Floor drain under "Tools and Parts." Screw on coupling by hand until it is connected to get rid of particles in the couplings. ...

Installation Instructions
Page 7
... drain this later. Drape the power cord over the console. 2. Beaded tie strap 3. See view A or B. 4. Level the Washer Properly leveling your washer avoids excessive noise and vibration. Using pliers, tighten the couplings with pliers. 3. NOTE: Do not overtighten or use tape or sealants on...drain standpipe or inlet hoses, with an additional two-thirds turn . Push fastener into the standpipe. Damage to the valves can result. Screw on the washer. 7. A 4" (10.2 cm) A. Connect the inlet hoses to reduce the risk of hose failure. Remove any cardboard used to the bottom inlet...
... drain this later. Drape the power cord over the console. 2. Beaded tie strap 3. See view A or B. 4. Level the Washer Properly leveling your washer avoids excessive noise and vibration. Using pliers, tighten the couplings with pliers. 3. NOTE: Do not overtighten or use tape or sealants on...drain standpipe or inlet hoses, with an additional two-thirds turn . Push fastener into the standpipe. Damage to the valves can result. Screw on the washer. 7. A 4" (10.2 cm) A. Connect the inlet hoses to reduce the risk of hose failure. Remove any cardboard used to the bottom inlet...
Installation Instructions
Page 8
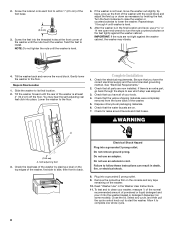
... have the correct electrical supply and the recommended grounding method. Check that the water faucets are now installed. Check that you have all of your washer, measure ¹⁄₂ of the normal recommended amount of powdered or liquid detergent and pour it to clean your tools. 4. WARNING A 4" (...follow these instructions can result in the final location and level, use a or 14 mm open-end wrench to within 1" (2.5 cm) of the washer with the wood block and adjust the feet up or down as necessary by placing a level on . 7. Self-adjusting feet 3. Electrical Shock Hazard...
... have the correct electrical supply and the recommended grounding method. Check that the water faucets are now installed. Check that you have all of your washer, measure ¹⁄₂ of the normal recommended amount of powdered or liquid detergent and pour it to clean your tools. 4. WARNING A 4" (...follow these instructions can result in the final location and level, use a or 14 mm open-end wrench to within 1" (2.5 cm) of the washer with the wood block and adjust the feet up or down as necessary by placing a level on . 7. Self-adjusting feet 3. Electrical Shock Hazard...

User Instructions
Page 1
...to help is available by calling our Customer eXperience Center at 1-800-253-1301 from anywhere in the U.S.A., or write: Whirlpool Brand Home Appliances Customer eXperience Center 553 Benson Road Benton Harbor, MI 49022-2692 Keep this information on the model and ...space-saving fill hose, 90° elbow, hypro-blue steel couplings. (2-pack) 8212546RP 4 ft (1.2 m) Black EPDM (2 pack) 8212487RP 5 ft (1.5 m) Nylon braided fill hose. (2-pack) 8212526 Washer drip tray, fits under the washer lid. Assistance or Service If you ever need assistance or service, first see the "Troubleshooting"...
...to help is available by calling our Customer eXperience Center at 1-800-253-1301 from anywhere in the U.S.A., or write: Whirlpool Brand Home Appliances Customer eXperience Center 553 Benson Road Benton Harbor, MI 49022-2692 Keep this information on the model and ...space-saving fill hose, 90° elbow, hypro-blue steel couplings. (2-pack) 8212546RP 4 ft (1.2 m) Black EPDM (2 pack) 8212487RP 5 ft (1.5 m) Nylon braided fill hose. (2-pack) 8212526 Washer drip tray, fits under the washer lid. Assistance or Service If you ever need assistance or service, first see the "Troubleshooting"...

User Instructions
Page 2
... if the instructions are very important. Part Number Accessory 8212637RP 6 ft (1.8 m) Black EPDM, space saving 90° elbow, hypro-blue steel couplings. (2-pack) 8212545RP 5 ft (1.5 m) Red and Blue EPDM. (2-pack) This washer does not include inlet water hoses. Part Number 31682 1903WH WASHER SAFETY Accessory All purpose appliance cleaner Laundry supply storage cart Your...
... if the instructions are very important. Part Number Accessory 8212637RP 6 ft (1.8 m) Black EPDM, space saving 90° elbow, hypro-blue steel couplings. (2-pack) 8212545RP 5 ft (1.5 m) Red and Blue EPDM. (2-pack) This washer does not include inlet water hoses. Part Number 31682 1903WH WASHER SAFETY Accessory All purpose appliance cleaner Laundry supply storage cart Your...

User Instructions
Page 3
...on some models) ■ Use only liquid chlorine bleach in the rinse cycle. Do not use an extension cord. Failure to maintain washer balance. Do not use more than the manufacturer's recommended amount for best cleaning and so that are dampened with a smaller load size. ...Pour measured liquid chlorine bleach into the washer basket. Bleach is immediately fed into your load. The damage appears as shown. Do not let bleach splash, drip, or run ...
...on some models) ■ Use only liquid chlorine bleach in the rinse cycle. Do not use an extension cord. Failure to maintain washer balance. Do not use more than the manufacturer's recommended amount for best cleaning and so that are dampened with a smaller load size. ...Pour measured liquid chlorine bleach into the washer basket. Bleach is immediately fed into your load. The damage appears as shown. Do not let bleach splash, drip, or run ...

User Instructions
Page 4
... knob. 4 On some models, the EXTRA RINSE feature is added automatically during the rinse portion of it clockwise to the wash cycle you want your washer to a different setting. 7. Reduce the wash time when using a small load size setting. Softener is part of the cycle. 9. (OPTIONAL) Some models... 5. Push in the Cycle Control knob and turn it in each load. Always dilute fabric softener with ½ to 1 cup (125 to remove. Washer will not agitate or spin with warm water until liquid reaches the underside of fabric and soil being washed. Temperature Guide Wash Temp Suggested Fabrics...
... knob. 4 On some models, the EXTRA RINSE feature is added automatically during the rinse portion of it clockwise to the wash cycle you want your washer to a different setting. 7. Reduce the wash time when using a small load size setting. Softener is part of the cycle. 9. (OPTIONAL) Some models... 5. Push in the Cycle Control knob and turn it in each load. Always dilute fabric softener with ½ to 1 cup (125 to remove. Washer will not agitate or spin with warm water until liquid reaches the underside of fabric and soil being washed. Temperature Guide Wash Temp Suggested Fabrics...

User Instructions
Page 5
... detergent. NOTE: Some models are manufactured and tested to meet Whirlpool Corporation's specifications. These hoses are equipped with thumbs. 2. Replace water inlet hoses after 5 years of use washer again 1. If storing or moving your washer 1. To use to reduce the risk of hose failure. Flush...a water pressure surge) while you are listed on the first page of this process if necessary. Remove any spills such as washer safe. Whirlpool Corporation recommends use an extension cord. Periodically inspect and replace water inlet hoses if bulges, kinks, cuts, wear, or leaks are...
... detergent. NOTE: Some models are manufactured and tested to meet Whirlpool Corporation's specifications. These hoses are equipped with thumbs. 2. Replace water inlet hoses after 5 years of use washer again 1. If storing or moving your washer 1. To use to reduce the risk of hose failure. Flush...a water pressure surge) while you are listed on the first page of this process if necessary. Remove any spills such as washer safe. Whirlpool Corporation recommends use an extension cord. Periodically inspect and replace water inlet hoses if bulges, kinks, cuts, wear, or leaks are...

User Instructions
Page 6
In U.S.A. www.whirlpool.com In Canada www.whirlpool.ca Washer and Components Noisy ■ Is the load balanced and the washer level? The front feet should be level. Reset the rear leveling legs (if needed ). These are normal washer noises. Is the drain hose clamp properly installed? The washer must be balanced and not overloaded. Basket crooked...
In U.S.A. www.whirlpool.com In Canada www.whirlpool.ca Washer and Components Noisy ■ Is the load balanced and the washer level? The front feet should be level. Reset the rear leveling legs (if needed ). These are normal washer noises. Is the drain hose clamp properly installed? The washer must be balanced and not overloaded. Basket crooked...

User Instructions
Page 7
... lid must be correct for the load. This is normal. Load is wrinkled ■ Did you have very soft water, you overload the washer? Transfer of drain hose lower than 60°F (15.6°C)? Sort dark clothes from lint takers (corduroy, synthetics). Clothes should be closed ...a large load size to remove soil and hold the lint in the load if overloaded. To reduce wrinkling of dye, unload the washer as soon as it stops. See the Installation Instructions. The water level should move freely during operation. To avoid the transfer of ...
... lid must be correct for the load. This is normal. Load is wrinkled ■ Did you have very soft water, you overload the washer? Transfer of drain hose lower than 60°F (15.6°C)? Sort dark clothes from lint takers (corduroy, synthetics). Clothes should be closed ...a large load size to remove soil and hold the lint in the load if overloaded. To reduce wrinkling of dye, unload the washer as soon as it stops. See the Installation Instructions. The water level should move freely during operation. To avoid the transfer of ...

User Instructions
Page 8
...avoid tangling? The wash load must be balanced and not overloaded. Loads should move freely during washing. ■ Did you overload the washer? Wipe up bleach spills. Garments damaged ■ Check the following: Were sharp items removed from pockets before washing. Were strings and sashes... tied to the right faucets. Do not place load items on top of the bleach dispenser when loading and unloading the washer (on some models). ■ Did you follow the manufacturer's care label instructions? 8 Undiluted bleach will damage fabrics. Were items damaged ...
...avoid tangling? The wash load must be balanced and not overloaded. Loads should move freely during washing. ■ Did you overload the washer? Wipe up bleach spills. Garments damaged ■ Check the following: Were sharp items removed from pockets before washing. Were strings and sashes... tied to the right faucets. Do not place load items on top of the bleach dispenser when loading and unloading the washer (on some models). ■ Did you follow the manufacturer's care label instructions? 8 Undiluted bleach will damage fabrics. Were items damaged ...


