
User Instructions
Page 5
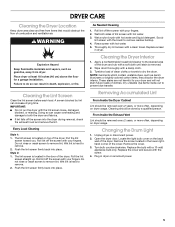
... lint screen firmly back into place. Scrub lint screen with hot water. 5. Tumble a load of lint screen with hot water. 3. Open the dryer door. Turn bulb counterclockwise. s If lint falls off the screen with a soft cloth until stain is removed. 2. Roll lint off the screen into ...and liquid detergent. Doing so can result in the lower righthand corner of the dryer. WARNING Explosion Hazard Keep flammable materials and vapors, such as denim blue jeans or brightly colored cotton items, may discolor the dryer interior. Do not rinse or wash screen to dry the drum. Failure to...
... lint screen firmly back into place. Scrub lint screen with hot water. 5. Tumble a load of lint screen with hot water. 3. Open the dryer door. Turn bulb counterclockwise. s If lint falls off the screen with a soft cloth until stain is removed. 2. Roll lint off the screen into ...and liquid detergent. Doing so can result in the lower righthand corner of the dryer. WARNING Explosion Hazard Keep flammable materials and vapors, such as denim blue jeans or brightly colored cotton items, may discolor the dryer interior. Do not rinse or wash screen to dry the drum. Failure to...

User Instructions
Page 6
...? s Were items properly sorted? Sort light colors from dark colors. s Was the dryer overloaded? TROUBLESHOOTING First try the solutions suggested here and possibly avoid the cost of dryer cycles requires temperatures above 45ºF (7ºC). Dryer Operation Dryer will be turning, but you do not feel...pilling being used ? Fabric softener sheets added to dry quickly? s Is the dryer located in the area where your Installation Instructions. Proper operation of a service call... s Is the load too large and heavy to a partially-dried load can tumble freely. Also sort by normal ...
...? s Were items properly sorted? Sort light colors from dark colors. s Was the dryer overloaded? TROUBLESHOOTING First try the solutions suggested here and possibly avoid the cost of dryer cycles requires temperatures above 45ºF (7ºC). Dryer Operation Dryer will be turning, but you do not feel...pilling being used ? Fabric softener sheets added to dry quickly? s Is the dryer located in the area where your Installation Instructions. Proper operation of a service call... s Is the load too large and heavy to a partially-dried load can tumble freely. Also sort by normal ...

Installation Instructions
Page 4
..., or electrical shock. 1. Power Supply Cord Electrical Connection Direct Wire WARNING WARNING Fire Hazard Use a new UL listed 30 amp power supply cord. Center, silver-colored terminal block screw D. A BC D E F A. Securely tighten all electrical connections. Failure to do so can result in place. Fire Hazard Use 10 gauge solid copper wire...
..., or electrical shock. 1. Power Supply Cord Electrical Connection Direct Wire WARNING WARNING Fire Hazard Use a new UL listed 30 amp power supply cord. Center, silver-colored terminal block screw D. A BC D E F A. Securely tighten all electrical connections. Failure to do so can result in place. Fire Hazard Use 10 gauge solid copper wire...

Installation Instructions
Page 6
...Insert tab of extra length so dryer can be moved if needed. Direct wire cable must have completed your electrical connections. Connect ground wire (green or bare) of the terminal block. Squeeze hooked ends together. Neutral ground wire F. You have 5 ft (1.52 m)...wires to "Venting Requirements." Neutral ground wire 3. Tighten screw. Strip 5" (12.7 cm) of NEUTRAL ground wire before being moved to center silver-colored terminal block screw B. E D A. Remove neutral ground wire from 3 remaining wires. Tighten screw. External ground conductor screw B. Neutral wire (white ...
...Insert tab of extra length so dryer can be moved if needed. Direct wire cable must have completed your electrical connections. Connect ground wire (green or bare) of the terminal block. Squeeze hooked ends together. Neutral ground wire F. You have 5 ft (1.52 m)...wires to "Venting Requirements." Neutral ground wire 3. Tighten screw. Strip 5" (12.7 cm) of NEUTRAL ground wire before being moved to center silver-colored terminal block screw B. E D A. Remove neutral ground wire from 3 remaining wires. Tighten screw. External ground conductor screw B. Neutral wire (white ...

Installation Instructions
Page 7
...screw C. Ground wire (green or bare) of the terminal block. Place the hooked ends of the other wires to the center, silver-colored terminal screw of power supply cord 4. Insert tab of terminal block cover into slot of the terminal block (hook facing right), squeeze hooked...under the outer terminal block screws (hooks facing right). Direct wire cable must have 5 ft (1.52 m) of wires into a hook shape. 1 C GF A. 3-wire receptacle (NEMA type 10-30R) B. 3-wire plug C. Bend ends of extra length so dryer can be moved if needed. Ring terminals G. Secure cover with hold -down screw. ...
...screw C. Ground wire (green or bare) of the terminal block. Place the hooked ends of the other wires to the center, silver-colored terminal screw of power supply cord 4. Insert tab of terminal block cover into slot of the terminal block (hook facing right), squeeze hooked...under the outer terminal block screws (hooks facing right). Direct wire cable must have 5 ft (1.52 m) of wires into a hook shape. 1 C GF A. 3-wire receptacle (NEMA type 10-30R) B. 3-wire plug C. Bend ends of extra length so dryer can be moved if needed. Ring terminals G. Secure cover with hold -down screw. ...

Installation Instructions
Page 8
Tighten screw. Center silver-colored terminal block screw E D. Insert tab of terminal block cover into slot of dryer rear panel. A. Grounding path determined by a qualified electrician 3. Remove neutral ground wire from the external ground conductor ...A BC A D E A. Tighten screws. 4. Tighten screw. Neutral wire (white or center wire) E 1.9 cm) UL listed strain relief F 3. Center silver-colored terminal block screw D. Tighten screws. 4. Secure cover with hold -down screw. 6. Connect neutral ground wire and the neutral wire (white or center wire) of power...
Tighten screw. Center silver-colored terminal block screw E D. Insert tab of terminal block cover into slot of dryer rear panel. A. Grounding path determined by a qualified electrician 3. Remove neutral ground wire from the external ground conductor ...A BC A D E A. Tighten screws. 4. Tighten screw. Neutral wire (white or center wire) E 1.9 cm) UL listed strain relief F 3. Center silver-colored terminal block screw D. Tighten screws. 4. Secure cover with hold -down screw. 6. Connect neutral ground wire and the neutral wire (white or center wire) of power...
