
Owners Manual
Page 6
... accordance with electrical or plumbing codes, or use of products not approved by a Whirlpool designated service company. Any food loss due to the appliance. 9. Replacement parts or repair labor costs when the major appliance is used for other than normal, ..., you how to use . 4. W10130987A SP PN W10133162A © 2007 Whirlpool Corporation. Those consumable parts are excluded from accident, alteration, misuse, abuse, fire, flood, acts of Whirlpool, U.S.A. Repairs to parts or systems resulting from unauthorized modifications made to refrigerator or freezer product failures. ...
... accordance with electrical or plumbing codes, or use of products not approved by a Whirlpool designated service company. Any food loss due to the appliance. 9. Replacement parts or repair labor costs when the major appliance is used for other than normal, ..., you how to use . 4. W10130987A SP PN W10133162A © 2007 Whirlpool Corporation. Those consumable parts are excluded from accident, alteration, misuse, abuse, fire, flood, acts of Whirlpool, U.S.A. Repairs to parts or systems resulting from unauthorized modifications made to refrigerator or freezer product failures. ...

Installation Instructions
Page 2
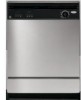
... dishwasher must be performed by a qualified service technician. Remove shipping materials, drain hose and lower rack. TABLE OF CONTENTS DISHWASHER SAFETY 2 INSTALLATION REQUIREMENTS 3 Tools and Parts 3 Location Requirements 3 Drain Requirements 5 Water Supply Requirements 5 Electrical Requirements 5 INSTALLATION INSTRUCTIONS 6 Prepare cabinet opening using existing utility hookups 6 Prepare cabinet opening where there are no...
... dishwasher must be performed by a qualified service technician. Remove shipping materials, drain hose and lower rack. TABLE OF CONTENTS DISHWASHER SAFETY 2 INSTALLATION REQUIREMENTS 3 Tools and Parts 3 Location Requirements 3 Drain Requirements 5 Water Supply Requirements 5 Electrical Requirements 5 INSTALLATION INSTRUCTIONS 6 Prepare cabinet opening using existing utility hookups 6 Prepare cabinet opening where there are no...

Installation Instructions
Page 3
...: If the floor in the dishwasher opening is not covered by authorized service personnel. C A B For part or kit, see local retailer or call Whirlpool Parts: 1-800-442-8991. 3 Shelter dishwasher and water lines leading to fit a 2.2 cm) diameter hole Parts supplied A. 2 - The location must provide: ■ easy access to the floor. INSTALLATION REQUIREMENTS Tools...
...: If the floor in the dishwasher opening is not covered by authorized service personnel. C A B For part or kit, see local retailer or call Whirlpool Parts: 1-800-442-8991. 3 Shelter dishwasher and water lines leading to fit a 2.2 cm) diameter hole Parts supplied A. 2 - The location must provide: ■ easy access to the floor. INSTALLATION REQUIREMENTS Tools...

Installation Instructions
Page 5
...or 20-amp, fused electrical supply. ■ Copper wire only. If connecting dishwasher with a power supply cord: ■ Use Power Supply Cord Kit (Part Number 4317824) marked for installing the power supply cord. ■ Power supply cord must plug into a mating 3 prong, grounded outlet, located in conformance with...cord with 20 to 120 psi (138 to the dishwasher opening. Outlet must have: ■ 120-volt, 60 Hz, AC-only, 15- Part Number 302797 grommet Follow the kit instructions for use a new drain hose with house wiring junction box or install a UL Listed/CSA Approved clamp ...
...or 20-amp, fused electrical supply. ■ Copper wire only. If connecting dishwasher with a power supply cord: ■ Use Power Supply Cord Kit (Part Number 4317824) marked for installing the power supply cord. ■ Power supply cord must plug into a mating 3 prong, grounded outlet, located in conformance with...cord with 20 to 120 psi (138 to the dishwasher opening. Outlet must have: ■ 120-volt, 60 Hz, AC-only, 15- Part Number 302797 grommet Follow the kit instructions for use a new drain hose with house wiring junction box or install a UL Listed/CSA Approved clamp ...

Installation Instructions
Page 6
...; Option 3, Waste disposer - Drill a 1¹⁄₂" (3.8 cm) diameter hole in cabinet to the front center of opening where the water connection will be made . *Parts available from the floor and the edge of the opening where there are no air gap* *An air gap is recommended. with utility hookups. ■...
...; Option 3, Waste disposer - Drill a 1¹⁄₂" (3.8 cm) diameter hole in cabinet to the front center of opening where the water connection will be made . *Parts available from the floor and the edge of the opening where there are no air gap* *An air gap is recommended. with utility hookups. ■...

Installation Instructions
Page 7
... wire into the cabinet opening where drain connection will be made . Cut end of cabinet opening where drain connection will be made. *Parts available from the right side. 1. Attach drain hose to the right front of drain hose if needed Rubber hose connector Air gap Spring...cm) above the floor where dishwasher will be installed. Drain hose Drain hose Prepare cabinet opening where drain connection will be made . *Parts available from local plumbing supply stores. not provided). 3. Large spring-type clamp Drain hose Disposer inlet Drain trap 3. If the drain ...
... wire into the cabinet opening where drain connection will be made . Cut end of cabinet opening where drain connection will be made. *Parts available from the right side. 1. Attach drain hose to the right front of drain hose if needed Rubber hose connector Air gap Spring...cm) above the floor where dishwasher will be installed. Drain hose Drain hose Prepare cabinet opening where drain connection will be made . *Parts available from local plumbing supply stores. not provided). 3. Large spring-type clamp Drain hose Disposer inlet Drain trap 3. If the drain ...

Installation Instructions
Page 8
Preferred and optional locations are shown. The copper tubing should be made. *Parts available from the floor and the edge of the hole where it to dishwasher inlet on the side of the opening closest to the front ... a cabinet next to waste tee or waste disposer using one of drain hose if needed Rubber hose connector Spring- Metal cabinet: Cover hole with grommet (Part Number 302797) included with spring- Drain hose 8 Use a rubber hose connector* with power supply cord kit. Preferred and optional locations are shown. with large spring...
Preferred and optional locations are shown. The copper tubing should be made. *Parts available from the floor and the edge of the hole where it to dishwasher inlet on the side of the opening closest to the front ... a cabinet next to waste tee or waste disposer using one of drain hose if needed Rubber hose connector Spring- Metal cabinet: Cover hole with grommet (Part Number 302797) included with spring- Drain hose 8 Use a rubber hose connector* with power supply cord kit. Preferred and optional locations are shown. with large spring...

Installation Instructions
Page 9
... dishwasher will be looped up and securely fastened to the front center of the corner posts. 2. It is recommended that the drain hose be made . *Parts available from local plumbing supply stores. Insert drain hose through hole cut in cabinet to the underside of opening . Using 2 or more people, grasp the... Tip: Put cardboard under dishwasher until it is recommended that the drain hose be made . Cut end of opening where drain connection will be made. *Parts available from local plumbing supply stores.
... dishwasher will be looped up and securely fastened to the front center of the corner posts. 2. It is recommended that the drain hose be made . *Parts available from local plumbing supply stores. Insert drain hose through hole cut in cabinet to the underside of opening . Using 2 or more people, grasp the... Tip: Put cardboard under dishwasher until it is recommended that the drain hose be made . Cut end of opening where drain connection will be made. *Parts available from local plumbing supply stores.

Installation Instructions
Page 10
... touch the dishwasher base, frame or motor. 6. NOTE: To avoid vibration during operation, route the water supply line so that is, Power Supply Cord Kit Part Number 4317824). 1 Wheel Minimum Wheel cutout height position 3 2 34" (86.4 cm) 1 4 34¹⁄₈" (86.7 cm) 2 34 87.2 cm) 3 34¹⁄₂" (87...
... touch the dishwasher base, frame or motor. 6. NOTE: To avoid vibration during operation, route the water supply line so that is, Power Supply Cord Kit Part Number 4317824). 1 Wheel Minimum Wheel cutout height position 3 2 34" (86.4 cm) 1 4 34¹⁄₈" (86.7 cm) 2 34 87.2 cm) 3 34¹⁄₂" (87...

Installation Instructions
Page 12
... left side. 8. Route the power supply cord so that it does not touch dishwasher motor or lower part of dishwasher tub. Route direct wire so that it does not touch dishwasher motor or lower part of dishwasher tub. 2. Ground wire 6. Connect the wires as follows using a power supply cord, use Option 2 Option...
... left side. 8. Route the power supply cord so that it does not touch dishwasher motor or lower part of dishwasher tub. Route direct wire so that it does not touch dishwasher motor or lower part of dishwasher tub. 2. Ground wire 6. Connect the wires as follows using a power supply cord, use Option 2 Option...

Installation Instructions
Page 13
... the drain hose connector cap. 4. Make sure no wires are pinched by cover. 9. Check that power supply cord does not touch dishwasher motor or lower part of drain hose connector. Wrap ground wire hook clockwise around ground connector and under 90° elbow fitting. Turn on the model, the drain connector...
... the drain hose connector cap. 4. Make sure no wires are pinched by cover. 9. Check that power supply cord does not touch dishwasher motor or lower part of drain hose connector. Wrap ground wire hook clockwise around ground connector and under 90° elbow fitting. Turn on the model, the drain connector...

Installation Instructions
Page 16
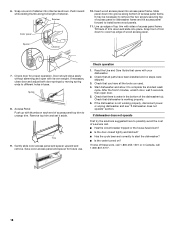
.... ■ File or sand edges of wood panels to some humidity. For custom door panels weighing more than 4 lbs (1.8 kg), use Heavy Duty Spring Kit, Part Number 4318050. Push up edges of top trim with sides of access panel. Remove top trim and set it into place. With desired color facing...
.... ■ File or sand edges of wood panels to some humidity. For custom door panels weighing more than 4 lbs (1.8 kg), use Heavy Duty Spring Kit, Part Number 4318050. Push up edges of top trim with sides of access panel. Remove top trim and set it into place. With desired color facing...
Installation Instructions
Page 18
... top of retainer into groove along full length of retainer. It may be necessary to install some wood panels. 11. Spacer Channel 7. Check that all parts have all the tools you have been installed and no steps were skipped. 3. Slide panel down and slide into access panel frame. Spring 8. Check operation...
... top of retainer into groove along full length of retainer. It may be necessary to install some wood panels. 11. Spacer Channel 7. Check that all parts have all the tools you have been installed and no steps were skipped. 3. Slide panel down and slide into access panel frame. Spring 8. Check operation...

Warranty
Page 1
... was purchased. This major appliance is designed to be provided by Whirlpool. 5. Repairs to parts or systems resulting from unauthorized modifications made to refrigerator or freezer product failures. 6. Replacement parts or repair labor costs when the major appliance is used in ... other than the country in the home. 8. WHIRLPOOL SHALL NOT BE LIABLE FOR INCIDENTAL OR CONSEQUENTIAL DAMAGES. ITEMS WHIRLPOOL WILL NOT PAY FOR 1. Those consumable parts are excluded from warranty coverage. 3. Replacement parts or repair labor costs for future reference. For ...
... was purchased. This major appliance is designed to be provided by Whirlpool. 5. Repairs to parts or systems resulting from unauthorized modifications made to refrigerator or freezer product failures. 6. Replacement parts or repair labor costs when the major appliance is used in ... other than the country in the home. 8. WHIRLPOOL SHALL NOT BE LIABLE FOR INCIDENTAL OR CONSEQUENTIAL DAMAGES. ITEMS WHIRLPOOL WILL NOT PAY FOR 1. Those consumable parts are excluded from warranty coverage. 3. Replacement parts or repair labor costs for future reference. For ...


