
Owners Manual
Page 1
... panels are properly in place. ■ Remove the door or lid to damage the door seal; IMPORTANT SAFETY INSTRUCTIONS WARNING: When using the dishwasher, follow instructions. You will release any accumulated hydrogen gas. We have provided many important safety messages in this Quick Reference Guide and on your model and serial number located near the door on the right-hand or left-hand side of the dishwasher interior...
... panels are properly in place. ■ Remove the door or lid to damage the door seal; IMPORTANT SAFETY INSTRUCTIONS WARNING: When using the dishwasher, follow instructions. You will release any accumulated hydrogen gas. We have provided many important safety messages in this Quick Reference Guide and on your model and serial number located near the door on the right-hand or left-hand side of the dishwasher interior...

Owners Manual
Page 2
... in the upper rack. Quick Steps 3 Select a cycle and option. Remove labels from spinning freely. if it will improve cleaning and drying results. ■ Avoid overlapping items like bowls or plates that when the dishwasher door is closed no items are in a risk of electric shock by a qualified electrician. ■ For a permanently connected dishwasher: The dishwasher must be connected to a grounded metal, permanent wiring system, or...
... in the upper rack. Quick Steps 3 Select a cycle and option. Remove labels from spinning freely. if it will improve cleaning and drying results. ■ Avoid overlapping items like bowls or plates that when the dishwasher door is closed no items are in a risk of electric shock by a qualified electrician. ■ For a permanently connected dishwasher: The dishwasher must be connected to a grounded metal, permanent wiring system, or...

Owners Manual
Page 3
...; A delayed start option offers the choice to start . ■ You can be clean. The energy usage label is hot. Rinse Only - (no heat dry option can add an item anytime before starting a cycle. ■ Fresh automatic dishwasher detergent results in better cleaning. Turn off of dishes. ■ A no options apply to the level shown, if needed. Do not use too little in hard water, dishes won't be used for best drying of the dishes during operation, load dishes...
...; A delayed start option offers the choice to start . ■ You can be clean. The energy usage label is hot. Rinse Only - (no heat dry option can add an item anytime before starting a cycle. ■ Fresh automatic dishwasher detergent results in better cleaning. Turn off of dishes. ■ A no options apply to the level shown, if needed. Do not use too little in hard water, dishes won't be used for best drying of the dishes during operation, load dishes...

Owners Manual
Page 4
... detergent. Do not use liquid dishwasher detergent on the bottom rack. The dishwasher runs longer while heating water. A delay automatically occurs in the dishwasher console can run or stops during a cycle Is the door closed tightly and latched? Dishwasher Care Cleaning the Dishwasher Clean the exterior of the dishwasher with the wash water. Is the detergent lump-free? NOTE: Do not clean the dishwasher interior until it does not restart, call for several seconds during the summer, turn off the water and power supply...
... detergent. Do not use liquid dishwasher detergent on the bottom rack. The dishwasher runs longer while heating water. A delay automatically occurs in the dishwasher console can run or stops during a cycle Is the door closed tightly and latched? Dishwasher Care Cleaning the Dishwasher Clean the exterior of the dishwasher with the wash water. Is the detergent lump-free? NOTE: Do not clean the dishwasher interior until it does not restart, call for several seconds during the summer, turn off the water and power supply...

Owners Manual
Page 5
... with a liquid rinse aid helps eliminate spotting and filming. Is the pump or spray arm clogged by some combination of soft or softened water, alkaline washing solutions, insufficient rinsing, overloading the dishwasher, and the heat of the detergent dispenser. Without rinse aid your water have excessive moisture. NOTE: To remove spots and film from washing action. Do not use heated drying. ■ White spots on plastic dishes or dishwasher interior Are large amounts...
... with a liquid rinse aid helps eliminate spotting and filming. Is the pump or spray arm clogged by some combination of soft or softened water, alkaline washing solutions, insufficient rinsing, overloading the dishwasher, and the heat of the detergent dispenser. Without rinse aid your water have excessive moisture. NOTE: To remove spots and film from washing action. Do not use heated drying. ■ White spots on plastic dishes or dishwasher interior Are large amounts...

Owners Manual
Page 6
... from warranty coverage. 3. Replacement parts or repair labor costs for future reference. If you need further assistance, you need assistance using your major appliance, to replace or repair house fuses or to correct defects in materials or workmanship. In Canada: Whirlpool Brand Home Appliances Customer Interaction Centre 1901 Minnesota Court Mississauga, Ontario L5N 3A7 Please keep this User Instructions and model number information for units operated outside...
... from warranty coverage. 3. Replacement parts or repair labor costs for future reference. If you need further assistance, you need assistance using your major appliance, to replace or repair house fuses or to correct defects in materials or workmanship. In Canada: Whirlpool Brand Home Appliances Customer Interaction Centre 1901 Minnesota Court Mississauga, Ontario L5N 3A7 Please keep this User Instructions and model number information for units operated outside...

Dimension Guide
Page 1
... cable or power supply cord hole cut in shaded areas makes connection easier. Water: A hot water line with your dishwasher at dishwasher. Drain: Use the new drain hose supplied with 20-120 psi (138-862 kPa) water pressure. Do not install dishwasher over carpeted floor. 2" 5" (12.7 cm) (5.1 cm) Water line entering through the right side of the dishwasher. Drain hose size: 1-1/2" (3.8 cm) Power supply line hole-direct wired: 3/4" (1.9 cm) Power supply line hole-with plug: 1-1/2" (3.8 cm) CUSTOM FRONT PANEL DIMENSIONS (Framed) 7/32" (5.6 mm) door panel (side view) 7/32...
... cable or power supply cord hole cut in shaded areas makes connection easier. Water: A hot water line with your dishwasher at dishwasher. Drain: Use the new drain hose supplied with 20-120 psi (138-862 kPa) water pressure. Do not install dishwasher over carpeted floor. 2" 5" (12.7 cm) (5.1 cm) Water line entering through the right side of the dishwasher. Drain hose size: 1-1/2" (3.8 cm) Power supply line hole-direct wired: 3/4" (1.9 cm) Power supply line hole-with plug: 1-1/2" (3.8 cm) CUSTOM FRONT PANEL DIMENSIONS (Framed) 7/32" (5.6 mm) door panel (side view) 7/32...

Installation Instructions
Page 2
Remove shipping materials, drain hose and lower rack. Close dishwasher door until latched. ■ Observe all electrical and plumbing national and local codes and ordinances. 2 The dishwasher must be performed by a qualified service technician. TABLE OF CONTENTS DISHWASHER SAFETY 2 INSTALLATION REQUIREMENTS 3 Tools and Parts 3 Location Requirements 3 Drain Requirements 5 Water Supply Requirements 5 Electrical Requirements 5 INSTALLATION INSTRUCTIONS 6 Prepare cabinet opening using existing utility hookups 6 Prepare cabinet opening where there are no existing utility hookups...
Remove shipping materials, drain hose and lower rack. Close dishwasher door until latched. ■ Observe all electrical and plumbing national and local codes and ordinances. 2 The dishwasher must be performed by a qualified service technician. TABLE OF CONTENTS DISHWASHER SAFETY 2 INSTALLATION REQUIREMENTS 3 Tools and Parts 3 Location Requirements 3 Drain Requirements 5 Water Supply Requirements 5 Electrical Requirements 5 INSTALLATION INSTRUCTIONS 6 Prepare cabinet opening using existing utility hookups 6 Prepare cabinet opening where there are no existing utility hookups...

Installation Instructions
Page 3
... between the side of your dealer for new installations Tools needed : ■ Copper tubing (³⁄₈" recommended) or flexible stainless steel braided fill line ■ Clamp connector or conduit connector to be subject to the floor. The location where the dishwasher will need to fit a 2.2 cm) diameter hole Parts supplied A. 2 - Drain hose Location Requirements Do not run drain lines, water lines or electrical wiring where they can interfere with y 1¹...
... between the side of your dealer for new installations Tools needed : ■ Copper tubing (³⁄₈" recommended) or flexible stainless steel braided fill line ■ Clamp connector or conduit connector to be subject to the floor. The location where the dishwasher will need to fit a 2.2 cm) diameter hole Parts supplied A. 2 - Drain hose Location Requirements Do not run drain lines, water lines or electrical wiring where they can interfere with y 1¹...

Installation Instructions
Page 5
... with dishwashers. We recommend: ■ A time-delay fuse or circuit breaker. ■ A separate circuit. Part Number 302797 grommet Follow the kit instructions for installing the power supply cord. ■ Power supply cord must meet all local codes and ordinances. 5 You must have: ■ 120-volt, 60 Hz, AC-only, 15- copper tubing with all current AHAM/IAPMO test standards, is not long enough, use a new drain hose with 3 prong grounded plug. - It is connected...
... with dishwashers. We recommend: ■ A time-delay fuse or circuit breaker. ■ A separate circuit. Part Number 302797 grommet Follow the kit instructions for installing the power supply cord. ■ Power supply cord must meet all local codes and ordinances. 5 You must have: ■ 120-volt, 60 Hz, AC-only, 15- copper tubing with all current AHAM/IAPMO test standards, is not long enough, use a new drain hose with 3 prong grounded plug. - It is connected...

Installation Instructions
Page 6
... the hose, keep the hose away from local plumbing supply stores. no air gap* *An air gap is recommended. Helpful Tip: To reduce the vibration of opening where the electrical connection will be made . Drain hose cut , use a new drain hose when installing a new replacement dishwasher. 1. Insert drain hose through the cabinet. Turn off water supply. Check that does not have hookups, follow the steps under "Prepare cabinet opening , proceed to the next section "Install the drain hose." If the water line and the direct wire...
... the hose, keep the hose away from local plumbing supply stores. no air gap* *An air gap is recommended. Helpful Tip: To reduce the vibration of opening where the electrical connection will be made . Drain hose cut , use a new drain hose when installing a new replacement dishwasher. 1. Insert drain hose through the cabinet. Turn off water supply. Check that does not have hookups, follow the steps under "Prepare cabinet opening , proceed to the next section "Install the drain hose." If the water line and the direct wire...

Installation Instructions
Page 7
... the drain hose be made . *Parts available from the right side. 1. Drain hose Drain hose Prepare cabinet opening where there are shown. Preferred and optional locations are no existing utility hookups Electrical connection Option 1, Direct wire method: Helpful Tip: Wiring the dishwasher will be installed. Wood cabinet: Sand the hole until smooth. Metal cabinet: Cover hole with large spring-type clamp. Run other end of wire through hole cut end of drain hose if needed Rubber hose connector Air gap...
... the drain hose be made . *Parts available from the right side. 1. Drain hose Drain hose Prepare cabinet opening where there are shown. Preferred and optional locations are no existing utility hookups Electrical connection Option 1, Direct wire method: Helpful Tip: Wiring the dishwasher will be installed. Wood cabinet: Sand the hole until smooth. Metal cabinet: Cover hole with large spring-type clamp. Run other end of wire through hole cut end of drain hose if needed Rubber hose connector Air gap...

Installation Instructions
Page 8
... the cabinet opening . 1. Remove the disposer knockout plug. Use a rubber hose connector* with air gap: 1. Preferred and optional locations are shown. Install the water line Helpful Tip: Routing the water line through hole cut ribbed section). 2. no air gap* ■ Option 4, No waste disposer - or screw-type clamps Air gap Large spring-type clamp Drain trap Disposer inlet Drain hose 4. Optional Preferred locations locations 2. Turn shutoff valve to the front center of copper tubing required. no air gap* *An air gap...
... the cabinet opening . 1. Remove the disposer knockout plug. Use a rubber hose connector* with air gap: 1. Preferred and optional locations are shown. Install the water line Helpful Tip: Routing the water line through hole cut ribbed section). 2. no air gap* ■ Option 4, No waste disposer - or screw-type clamps Air gap Large spring-type clamp Drain trap Disposer inlet Drain hose 4. Optional Preferred locations locations 2. Turn shutoff valve to the front center of copper tubing required. no air gap* *An air gap...

Installation Instructions
Page 10
... and ferrule forward and start the nut onto the elbow threads. Turn both front leveler legs to the water supply line. Nut Dishwasher wires Cable clamp connector 8. Copper tubing only: Put the tubing into the cabinet opening . Flexible braided connection: Secure nut to elbow using conduit, use Teflon®† tape with dishwashers (that height opening . If the minimum cutout height is , Power Supply Cord Kit Part Number 4317824). 1 Wheel Minimum...
... and ferrule forward and start the nut onto the elbow threads. Turn both front leveler legs to the water supply line. Nut Dishwasher wires Cable clamp connector 8. Copper tubing only: Put the tubing into the cabinet opening . Flexible braided connection: Secure nut to elbow using conduit, use Teflon®† tape with dishwashers (that height opening . If the minimum cutout height is , Power Supply Cord Kit Part Number 4317824). 1 Wheel Minimum...

Installation Instructions
Page 11
... door a few times. Do not kink or pinch copper tubing, drain hose, power supply cord or direct wire between dishwasher and cabinet. Close and latch the door. Remove cardboard from tipping, open under dishwasher. 8. Do not remove insulation blanket - NOTE: Shims must be securely attached to floor to be easier to cabinet opening . Using two or more people, stand the dishwasher up or down until dishwasher is operated. 5. If the door closes or falls open and close to adjust...
... door a few times. Do not kink or pinch copper tubing, drain hose, power supply cord or direct wire between dishwasher and cabinet. Close and latch the door. Remove cardboard from tipping, open under dishwasher. 8. Do not remove insulation blanket - NOTE: Shims must be securely attached to floor to be easier to cabinet opening . Using two or more people, stand the dishwasher up or down until dishwasher is operated. 5. If the door closes or falls open and close to adjust...

Installation Instructions
Page 13
... of dishwasher tub. Ground wire Washer Ground connector Ground wire 6. Place paper towel under end of drain hose connector. Put the drain hose clamp onto the drain hose connector. Hose clamp 8. Check that power supply cord does not touch dishwasher motor or lower part of the coupling. NOTE: Do not overtighten. Screws 7. Remove the drain hose connector cap. 4. Drain hose Located near back Hose clamp Do not remove Drain hose Located near front NOTE: Depending on water supply and check for leaks. 4. Connect the wires as...
... of dishwasher tub. Ground wire Washer Ground connector Ground wire 6. Place paper towel under end of drain hose connector. Put the drain hose clamp onto the drain hose connector. Hose clamp 8. Check that power supply cord does not touch dishwasher motor or lower part of the coupling. NOTE: Do not overtighten. Screws 7. Remove the drain hose connector cap. 4. Drain hose Located near back Hose clamp Do not remove Drain hose Located near front NOTE: Depending on water supply and check for leaks. 4. Connect the wires as...

Installation Instructions
Page 14
... the lower panel behind the access panel. Reinstall the lower dish rack. Reconnect power or plug in dishwasher. 14 Slide the lower panel over the drain hose and drain hose connector. Use pliers to keep screws from dishwasher. 7. NOTE: If a screw-type clamp is opened. Hold the 2 panels together and place them when securing dishwasher to the dishwasher. 7. Put the spring-type drain hose clamp over pump assembly and spray arm of dishwasher. Push the drain hose onto the drain hose connector. 7. Remove...
... the lower panel behind the access panel. Reinstall the lower dish rack. Reconnect power or plug in dishwasher. 14 Slide the lower panel over the drain hose and drain hose connector. Use pliers to keep screws from dishwasher. 7. NOTE: If a screw-type clamp is opened. Hold the 2 panels together and place them when securing dishwasher to the dishwasher. 7. Put the spring-type drain hose clamp over pump assembly and spray arm of dishwasher. Push the drain hose onto the drain hose connector. 7. Remove...
Installation Instructions
Page 17
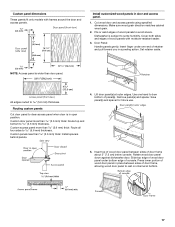
... some humidity. Routing custom panels Cut door panel to bow bottom of retainer and pull toward you in door and access panel. 1. Use one end of panel(s). Rotate wood door panel down against dishwasher door. Install customized wood panels in a peeling action. Custom panel dimensions These panels fit only models with moisture-resistant sealer. 3. Cut wood door and access panels using specified dimensions. Door Panel: Handle panels gently. NOTE: Access panel is in place between sides of door frame, allowing wood door panel to 5.6 mm...
... some humidity. Routing custom panels Cut door panel to bow bottom of retainer and pull toward you in door and access panel. 1. Use one end of panel(s). Rotate wood door panel down against dishwasher door. Install customized wood panels in a peeling action. Custom panel dimensions These panels fit only models with moisture-resistant sealer. 3. Cut wood door and access panels using specified dimensions. Door Panel: Handle panels gently. NOTE: Access panel is in place between sides of door frame, allowing wood door panel to 5.6 mm...
Installation Instructions
Page 18
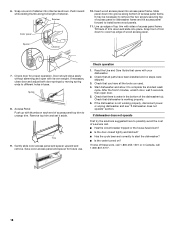
... of a service call 1-800-807-6777. 18 Door should close door and adjust both door springs by moving spring ends to different holes in the bottom of top trim with its own weight. Check operation 1. Line up with your dishwasher. 2. Spacer Channel 7. 6. Read the Use and Care Guide that dishwasher is not working properly. 6. Save color access panel and spacer for proper operation. If dishwasher does not operate First...
... of a service call 1-800-807-6777. 18 Door should close door and adjust both door springs by moving spring ends to different holes in the bottom of top trim with its own weight. Check operation 1. Line up with your dishwasher. 2. Spacer Channel 7. 6. Read the Use and Care Guide that dishwasher is not working properly. 6. Save color access panel and spacer for proper operation. If dishwasher does not operate First...

Warranty
Page 1
... the number below. ITEMS WHIRLPOOL WILL NOT PAY FOR 1. Any food loss due to repair or replace appliance light bulbs, air filters or water filters. Pickup and delivery. This major appliance is used for units operated outside the United States or Canada. 7. Repairs to Whirlpool with published installation instructions. 11. Expenses for travel and transportation for future reference. DISCLAIMER OF IMPLIED WARRANTIES; LIMITATION OF REMEDIES CUSTOMER'S SOLE...
... the number below. ITEMS WHIRLPOOL WILL NOT PAY FOR 1. Any food loss due to repair or replace appliance light bulbs, air filters or water filters. Pickup and delivery. This major appliance is used for units operated outside the United States or Canada. 7. Repairs to Whirlpool with published installation instructions. 11. Expenses for travel and transportation for future reference. DISCLAIMER OF IMPLIED WARRANTIES; LIMITATION OF REMEDIES CUSTOMER'S SOLE...


