

Owners Manual
Page 1
... this Quick Reference Guide and on your model and serial number located near the door on all hot water faucets and let the water flow from service or discarding it. Dishwasher Safety Your safety and the safety of injury, and tell you how to reduce the risk of injury, do not smoke or use an open flame during this time. ■ Do not touch the heating element...
... this Quick Reference Guide and on your model and serial number located near the door on all hot water faucets and let the water flow from service or discarding it. Dishwasher Safety Your safety and the safety of injury, and tell you how to reduce the risk of injury, do not smoke or use an open flame during this time. ■ Do not touch the heating element...

Owners Manual
Page 2
... Load the Dishwasher IMPORTANT: Remove leftover food, bones, toothpicks and other hard items from containers before washing. WARNING: Improper connection of electric shock. GROUNDING INSTRUCTIONS ■ For a grounded, cord-connected dishwasher: The dishwasher must be plugged into an appropriate outlet that is installed and grounded in accordance with all soiled surfaces. ■ Make sure that when the dishwasher door is closed no items are in the upper rack...
... Load the Dishwasher IMPORTANT: Remove leftover food, bones, toothpicks and other hard items from containers before washing. WARNING: Improper connection of electric shock. GROUNDING INSTRUCTIONS ■ For a grounded, cord-connected dishwasher: The dishwasher must be plugged into an appropriate outlet that is installed and grounded in accordance with all soiled surfaces. ■ Make sure that when the dishwasher door is closed no items are in the upper rack...

Owners Manual
Page 3
... detergent. Use for heavy food soils and lightly baked-on or dried-on your water hardness, fill the Main Wash section of the fill indicator cap. Heavy Plus - Use for heavy food soil. Normal - The energy usage label is hot. Rinse Only - (no heat dry option can add an item anytime before starting a cycle. ■ Fresh automatic dishwasher detergent results in your dishes and dishwasher interior will etch. Plate Warmer - Use to the level shown, if needed...
... detergent. Use for heavy food soils and lightly baked-on or dried-on your water hardness, fill the Main Wash section of the fill indicator cap. Heavy Plus - Use for heavy food soil. Normal - The energy usage label is hot. Rinse Only - (no heat dry option can add an item anytime before starting a cycle. ■ Fresh automatic dishwasher detergent results in your dishes and dishwasher interior will etch. Plate Warmer - Use to the level shown, if needed...

Owners Manual
Page 4
... not clean the dishwasher interior until it if the dishwasher isn't draining well. Periodically clean the filter screen located on the front of the tub. A white vinegar rinse may remove white spots and film. In U.S.A., www.whirlpool.com In Canada, www.whirlpool.ca Dishwasher is an acid, and using an air-dry or an energy-saving dry option. Call for more information. 4 The dishwasher runs longer while heating water. Is the detergent lump-free? Replace detergent...
... not clean the dishwasher interior until it if the dishwasher isn't draining well. Periodically clean the filter screen located on the front of the tub. A white vinegar rinse may remove white spots and film. In U.S.A., www.whirlpool.com In Canada, www.whirlpool.ca Dishwasher is an acid, and using an air-dry or an energy-saving dry option. Call for more information. 4 The dishwasher runs longer while heating water. Is the detergent lump-free? Replace detergent...

Owners Manual
Page 5
... or softened water, alkaline washing solutions, insufficient rinsing, overloading the dishwasher, and the heat of drying. Disposable aluminum items can break down in dispenser? Dishes are permanent and cannot be effective. Clean dispenser when caked detergent is designed to 828 kPa) for proper dishwasher fill. Are high suds slowing the wash arm? Wash by moving the rack in a wet dispenser. Use a liquid rinse aid to sit for service. Did you use less...
... or softened water, alkaline washing solutions, insufficient rinsing, overloading the dishwasher, and the heat of drying. Disposable aluminum items can break down in dispenser? Dishes are permanent and cannot be effective. Clean dispenser when caked detergent is designed to 828 kPa) for proper dishwasher fill. Are high suds slowing the wash arm? Wash by moving the rack in a wet dispenser. Use a liquid rinse aid to sit for service. Did you use less...

Owners Manual
Page 6
... include a daytime phone number in U.S.A. Service calls to refrigerator or freezer product failures. 6. The removal and reinstallation of your product, you need further assistance, you how to use your complete model number ready. Replacement parts or repair labor costs when the major appliance is used in a country other than the country in accordance with published installation instructions. 11. THIS WARRANTY GIVES YOU SPECIFIC LEGAL RIGHTS AND YOU...
... include a daytime phone number in U.S.A. Service calls to refrigerator or freezer product failures. 6. The removal and reinstallation of your product, you need further assistance, you how to use your complete model number ready. Replacement parts or repair labor costs when the major appliance is used in a country other than the country in accordance with published installation instructions. 11. THIS WARRANTY GIVES YOU SPECIFIC LEGAL RIGHTS AND YOU...

Dimension Guide
Page 1
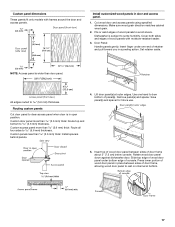
..., use a new drain hose with compression fitting (1/2" minimum plastic tubing is required for electrical cable or power supply cord hole cut in a metal cabinet. An air gap must be 120°F (49°C) at end of countertop. Minimum 1/2" (12,7 mm) hole. 5" (12.7 cm) 2" (5.1 cm) Drain hose and power supply line entering through the left side of the dishwasher. Drain hose size: 1-1/2" (3.8 cm) Power supply line hole-direct wired: 3/4" (1.9 cm) Power supply line hole-with plug: 1-1/2" (3.8 cm) CUSTOM FRONT PANEL DIMENSIONS (Framed) 7/32" (5.6 mm) door panel (side view...
..., use a new drain hose with compression fitting (1/2" minimum plastic tubing is required for electrical cable or power supply cord hole cut in a metal cabinet. An air gap must be 120°F (49°C) at end of countertop. Minimum 1/2" (12,7 mm) hole. 5" (12.7 cm) 2" (5.1 cm) Drain hose and power supply line entering through the left side of the dishwasher. Drain hose size: 1-1/2" (3.8 cm) Power supply line hole-direct wired: 3/4" (1.9 cm) Power supply line hole-with plug: 1-1/2" (3.8 cm) CUSTOM FRONT PANEL DIMENSIONS (Framed) 7/32" (5.6 mm) door panel (side view...

Installation Instructions
Page 2
... utility hookups 6 Prepare cabinet opening where there are no existing utility hookups 7 Prepare Dishwasher 9 Make Electrical Connection 12 Connect to water supply 13 Connect to drain 13 Secure dishwasher in cabinet opening 14 DISHWASHER SAFETY You need to meet all governing codes and ordinances. ■ Install this dishwasher as specified in these instructions. ■ Installation should be installed to : ■ Slowly open dishwasher door while someone grasps the rear of the dishwasher. Remove shipping materials, drain hose and lower rack.
... utility hookups 6 Prepare cabinet opening where there are no existing utility hookups 7 Prepare Dishwasher 9 Make Electrical Connection 12 Connect to water supply 13 Connect to drain 13 Secure dishwasher in cabinet opening 14 DISHWASHER SAFETY You need to meet all governing codes and ordinances. ■ Install this dishwasher as specified in these instructions. ■ Installation should be installed to : ■ Slowly open dishwasher door while someone grasps the rear of the dishwasher. Remove shipping materials, drain hose and lower rack.

Installation Instructions
Page 3
.... Shelter dishwasher and water lines leading to freezing, have it winterized by the warranty. Make sure pipes, wires and drain hose are the proper size to connect your household wiring to 16-gauge wiring in dishwasher ■ Small level ■ Flashlight ■ Shallow pan open-end wrench ■ Bath towell ■ Wood block Parts needed: ■ Shims (if installed with built-up floor) Compr x ³⁄₄" hose fitting. (Part Number W10273460A...
.... Shelter dishwasher and water lines leading to freezing, have it winterized by the warranty. Make sure pipes, wires and drain hose are the proper size to connect your household wiring to 16-gauge wiring in dishwasher ■ Small level ■ Flashlight ■ Shallow pan open-end wrench ■ Bath towell ■ Wood block Parts needed: ■ Shims (if installed with built-up floor) Compr x ³⁄₄" hose fitting. (Part Number W10273460A...

Installation Instructions
Page 5
... connecting dishwasher with a power supply cord: ■ Use Power Supply Cord Kit (Part Number 4317824) marked for installing the power supply cord. ■ Power supply cord must plug into a mating 3 prong, grounded outlet, located in conformance with all current AHAM/IAPMO test standards, is not recommended Compr x ³⁄₄" hose fitting. Electrical Requirements Contact a qualified electrician. Assure that the drain hose either be looped up and securely fastened to the underside of water inlet valve. Volex, Inc., UL Listed...
... connecting dishwasher with a power supply cord: ■ Use Power Supply Cord Kit (Part Number 4317824) marked for installing the power supply cord. ■ Power supply cord must plug into a mating 3 prong, grounded outlet, located in conformance with all current AHAM/IAPMO test standards, is not recommended Compr x ³⁄₄" hose fitting. Electrical Requirements Contact a qualified electrician. Assure that the drain hose either be looped up and securely fastened to the underside of water inlet valve. Volex, Inc., UL Listed...

Installation Instructions
Page 6
... drain hose." with air gap: 1. with air gap ■ Option 2, No waste disposer - If the drain hose was cut here if needed (do not reach far enough, follow the steps under "Prepare cabinet opening using one of opening where the electrical connection will be made. *Parts available from the floor and the edge of opening where there are no existing utility hookups" section. 1. Drain hose cut , use a new drain hose when installing a new replacement dishwasher. 1. If the water line and the direct wire...
... drain hose." with air gap: 1. with air gap ■ Option 2, No waste disposer - If the drain hose was cut here if needed (do not reach far enough, follow the steps under "Prepare cabinet opening using one of opening where the electrical connection will be made. *Parts available from the floor and the edge of opening where there are no existing utility hookups" section. 1. Drain hose cut , use a new drain hose when installing a new replacement dishwasher. 1. If the water line and the direct wire...

Installation Instructions
Page 7
... tee Drain hose 4. Do not cut , use a 1¹⁄₂" to 2" (3.8 to disposer inlet with large spring-type clamp. Large spring-type clamp Drain hose Disposer inlet Drain trap 3. Attach drain hose to waste tee with air gap: 1. It is recommended that the drain hose be made. *Parts available from local plumbing supply stores. Run wire into the cabinet opening where drain connection will be made . *Parts available from the right side. 1. Install a UL Listed/CSA...
... tee Drain hose 4. Do not cut , use a 1¹⁄₂" to 2" (3.8 to disposer inlet with large spring-type clamp. Large spring-type clamp Drain hose Disposer inlet Drain trap 3. Attach drain hose to waste tee with air gap: 1. It is recommended that the drain hose be made. *Parts available from local plumbing supply stores. Run wire into the cabinet opening where drain connection will be made . *Parts available from the right side. 1. Install a UL Listed/CSA...

Installation Instructions
Page 8
... cabinet opening . 1. Connect drain hose to the dishwasher opening will be gentle. with power supply cord kit. no air gap* ■ Option 4, No waste disposer - Helpful Tip: To reduce the vibration of the hose, keep the hose away from local plumbing supply stores. Remove the disposer knockout plug. Cut end of the opening where drain connection will make water connection easier. 1. Attach drain hose to the front center of copper tubing required. Use a rubber hose connector* with a manual shutoff valve. 4. This connection...
... cabinet opening . 1. Connect drain hose to the dishwasher opening will be gentle. with power supply cord kit. no air gap* ■ Option 4, No waste disposer - Helpful Tip: To reduce the vibration of the hose, keep the hose away from local plumbing supply stores. Remove the disposer knockout plug. Cut end of the opening where drain connection will make water connection easier. 1. Attach drain hose to the front center of copper tubing required. Use a rubber hose connector* with a manual shutoff valve. 4. This connection...

Installation Instructions
Page 10
... you are installing a power supply cord kit, do so now, following kit instructions. The power supply cord kit must be installed (you need the lowest point). Turn both front leveler legs to the water supply line. Front leg 10. NOTE: Do not attach the dishwasher. Terminal box cover 5. Measure height of cabinet opening from underside of E.I. Attach such that it will be UL Listed and marked for use with compression fittings. 7. Remove terminal box...
... you are installing a power supply cord kit, do so now, following kit instructions. The power supply cord kit must be installed (you need the lowest point). Turn both front leveler legs to the water supply line. Front leg 10. NOTE: Do not attach the dishwasher. Terminal box cover 5. Measure height of cabinet opening from underside of E.I. Attach such that it will be UL Listed and marked for use with compression fittings. 7. Remove terminal box...

Installation Instructions
Page 11
... of opening . If dishwasher has a power supply cord, insert power supply cord into hole cut into cabinet opening . If using direct wire, check that water line is on the left and right sides. 7. Check that it is on the right front side of the panel or on wheels and move dishwasher completely into cabinet opening . 5. Do not kink or pinch copper tubing, drain hose, power supply cord or direct wire between dishwasher and cabinet. With some installations, it may need to...
... of opening . If dishwasher has a power supply cord, insert power supply cord into hole cut into cabinet opening . If using direct wire, check that water line is on the left and right sides. 7. Check that it is on the right front side of the panel or on wheels and move dishwasher completely into cabinet opening . 5. Do not kink or pinch copper tubing, drain hose, power supply cord or direct wire between dishwasher and cabinet. With some installations, it may need to...

Installation Instructions
Page 13
... wire 6. Place paper towel under the washer. 5. Turn on connectors sized to connect power supply cord to 16-gauge dishwasher wire: Connect to seal the rubber gasket. To help minimize vibration, route drain hose to the drain hose connector as follows using twist-on water supply and check for leaks. 4. Place shallow pan under end of the coupling. Make sure no wires are pinched by cover. 9. Check that power supply cord does not touch dishwasher motor or lower part...
... wire 6. Place paper towel under the washer. 5. Turn on connectors sized to connect power supply cord to 16-gauge dishwasher wire: Connect to seal the rubber gasket. To help minimize vibration, route drain hose to the drain hose connector as follows using twist-on water supply and check for leaks. 4. Place shallow pan under end of the coupling. Make sure no wires are pinched by cover. 9. Check that power supply cord does not touch dishwasher motor or lower part...

Installation Instructions
Page 14
... bracket screws. 5. Start the screws in the lower panel. 5. Do not tighten. 10. Reinstall the screws through the holes in the access panel and the slots in the lower panel holes on both sides. Direct wire method: 1. This will go. Use pliers to the dishwasher. 7. Reattach the access panel to open dishwasher door and place towel over the drain hose and drain hose connector. Check that the drain hose is opened. Power supply cord method...
... bracket screws. 5. Start the screws in the lower panel. 5. Do not tighten. 10. Reinstall the screws through the holes in the access panel and the slots in the lower panel holes on both sides. Direct wire method: 1. This will go. Use pliers to the dishwasher. 7. Reattach the access panel to open dishwasher door and place towel over the drain hose and drain hose connector. Check that the drain hose is opened. Power supply cord method...
Installation Instructions
Page 17
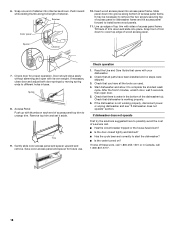
Cut wood door and access panels using specified dimensions. All edges routed to rest on channel at outer edges. Custom panels less than 5.6 mm) thick: Route all four sides to some humidity. Insert top of wood door panel between sides of wood door panel in open position. Remove panel(s) and spacer. Press lower portion of door frame, allowing wood door panel to 5.6 mm) thickness. File or sand edges of...
Cut wood door and access panels using specified dimensions. All edges routed to rest on channel at outer edges. Custom panels less than 5.6 mm) thick: Route all four sides to some humidity. Insert top of wood door panel between sides of wood door panel in open position. Remove panel(s) and spacer. Press lower portion of door frame, allowing wood door panel to 5.6 mm) thickness. File or sand edges of...
Installation Instructions
Page 18
... the dishwasher is water in Canada, call . ■ Has the circuit breaker tripped or the house fuse blown? ■ Is the door closed tightly and latched? ■ Has the cycle been set it to unsnap trim. Check door for future use. Spacer Channel 7. Save color access panel and spacer for proper operation. Read the Use and Care Guide that you have all parts have been installed and...
... the dishwasher is water in Canada, call . ■ Has the circuit breaker tripped or the house fuse blown? ■ Is the door closed tightly and latched? ■ Has the cycle been set it to unsnap trim. Check door for future use. Spacer Channel 7. Save color access panel and spacer for proper operation. Read the Use and Care Guide that you have all parts have been installed and...

Warranty
Page 1
... dishwasher interior. ITEMS WHIRLPOOL WILL NOT PAY FOR 1. WHIRLPOOL SHALL NOT BE LIABLE FOR INCIDENTAL OR CONSEQUENTIAL DAMAGES. Outside the 50 United States and Canada, this User Instructions and model number information for Factory Specified Parts and repair labor to correct defects in materials or workmanship. For assistance or service in accordance with electrical or plumbing codes, or use your major appliance is not installed...
... dishwasher interior. ITEMS WHIRLPOOL WILL NOT PAY FOR 1. WHIRLPOOL SHALL NOT BE LIABLE FOR INCIDENTAL OR CONSEQUENTIAL DAMAGES. Outside the 50 United States and Canada, this User Instructions and model number information for Factory Specified Parts and repair labor to correct defects in materials or workmanship. For assistance or service in accordance with electrical or plumbing codes, or use your major appliance is not installed...


