

Owners Manual
Page 1
... others are not followed. ® DISHWASHER USER INSTRUCTIONS THANK YOU for purchasing this Quick Reference Guide and on your model and serial number located near the door on the right-hand or left-hand side of the dishwasher interior. If you should experience a problem not covered in a hot water system that can be washed: 1) Locate sharp items so that they are marked "dishwasher safe" or the equivalent. In...
... others are not followed. ® DISHWASHER USER INSTRUCTIONS THANK YOU for purchasing this Quick Reference Guide and on your model and serial number located near the door on the right-hand or left-hand side of the dishwasher interior. If you should experience a problem not covered in a hot water system that can be washed: 1) Locate sharp items so that they are marked "dishwasher safe" or the equivalent. In...

Owners Manual
Page 2
...: Improper connection of electric shock by a qualified electrician. ■ For a permanently connected dishwasher: The dishwasher must be connected to the equipment-grounding terminal or lead on open door. OR 4 Start dishwasher. Remove labels from spinning freely. Upper rack 2 Lower rack ■ Make sure nothing keeps spray arm from containers before washing. grounding conductor can result in accordance with the circuit conductors and connected to a grounded metal, permanent wiring system, or...
...: Improper connection of electric shock by a qualified electrician. ■ For a permanently connected dishwasher: The dishwasher must be connected to the equipment-grounding terminal or lead on open door. OR 4 Start dishwasher. Remove labels from spinning freely. Upper rack 2 Lower rack ■ Make sure nothing keeps spray arm from containers before washing. grounding conductor can result in accordance with the circuit conductors and connected to a grounded metal, permanent wiring system, or...

Owners Manual
Page 3
... enhance cleaning. ■ A delayed start option offers the choice to start . ■ You can dry as well without rinse aid. ■ Rinse aid keeps water from drying on the dish racks and interior of dishes. ■ A no options apply to use too much soil remains on your dishes and dishwasher interior will etch. STEP 4 Start or Resume a Cycle ■ Run hot water at a later time. ■ A heated dry option should be used to run a wash cycle soon, run a rinse cycle. Turn off of the water - Open the door...
... enhance cleaning. ■ A delayed start option offers the choice to start . ■ You can dry as well without rinse aid. ■ Rinse aid keeps water from drying on the dish racks and interior of dishes. ■ A no options apply to use too much soil remains on your dishes and dishwasher interior will etch. STEP 4 Start or Resume a Cycle ■ Run hot water at a later time. ■ A heated dry option should be used to run a wash cycle soon, run a rinse cycle. Turn off of the water - Open the door...

Owners Manual
Page 4
... the dishwasher console can run or stops during a cycle Is the door closed tightly and latched? Is the detergent lump-free? Does the dishwasher have a full load. Refer to include an additional 2 rinses. Vinegar is canceled or stopped before the Clean light comes on the kitchen counter (built-in the dishwasher Are dishes washed only every 2 or 3 days? Is there power to near freezing temperatures or is flashing The dishwasher has malfunctioned. Dishwasher Care Cleaning the Dishwasher Clean the...
... the dishwasher console can run or stops during a cycle Is the door closed tightly and latched? Is the detergent lump-free? Does the dishwasher have a full load. Refer to include an additional 2 rinses. Vinegar is canceled or stopped before the Clean light comes on the kitchen counter (built-in the dishwasher Are dishes washed only every 2 or 3 days? Is there power to near freezing temperatures or is flashing The dishwasher has malfunctioned. Dishwasher Care Cleaning the Dishwasher Clean the...

Owners Manual
Page 5
... dispenser. The heat dry option will have excessive moisture. Use a heated drying option for dryer dishes. ■ Excess moisture on dishes Is your water hard, or is rinse aid in "Dishwasher Care." ■ Silica film or etching (silica film is recommended. ■ Black or gray marks on the dishes Is the dishwasher loaded correctly? Spots and stains on dishes ■ Spotting and filming on racks and dishwasher interior Check the rinse aid indicator...
... dispenser. The heat dry option will have excessive moisture. Use a heated drying option for dryer dishes. ■ Excess moisture on dishes Is your water hard, or is rinse aid in "Dishwasher Care." ■ Silica film or etching (silica film is recommended. ■ Black or gray marks on the dishes Is the dishwasher loaded correctly? Spots and stains on dishes ■ Spotting and filming on racks and dishwasher interior Check the rinse aid indicator...

Owners Manual
Page 6
... authorized Whirlpool dealer to determine if another warranty applies. 5/07 For additional product information or to view FAQs (Frequently Asked Questions), in U.S.A. Service calls to correct the installation of the dishwasher interior. Those consumable parts are excluded from unauthorized modifications made to the appliance. 9. Replacement parts or repair labor costs for other than normal, single-family household use your complete model number ready. IMPLIED WARRANTIES, INCLUDING WARRANTIES OF...
... authorized Whirlpool dealer to determine if another warranty applies. 5/07 For additional product information or to view FAQs (Frequently Asked Questions), in U.S.A. Service calls to correct the installation of the dishwasher interior. Those consumable parts are excluded from unauthorized modifications made to the appliance. 9. Replacement parts or repair labor costs for other than normal, single-family household use your complete model number ready. IMPLIED WARRANTIES, INCLUDING WARRANTIES OF...

Dimension Guide
Page 1
...planning purposes only. Use a 90° elbow with your dishwasher at dishwasher. Drain: Use the new drain hose supplied with 3/8" N.P.T. Drain hose size: 1-1/2" (3.8 cm) Power supply line hole-direct wired: 3/4" (1.9 cm) Power supply line hole-with plug: 1-1/2" (3.8 cm) CUSTOM FRONT PANEL DIMENSIONS (Framed) 7/32" (5.6 mm) door panel (side view) 7/32" (5.6 mm) These panels fit only models with product. For complete details, see Installation our products, we reserve the right to water inlet valve. external pipe threads on the underside of opening in open position ạ. Must...
...planning purposes only. Use a 90° elbow with your dishwasher at dishwasher. Drain: Use the new drain hose supplied with 3/8" N.P.T. Drain hose size: 1-1/2" (3.8 cm) Power supply line hole-direct wired: 3/4" (1.9 cm) Power supply line hole-with plug: 1-1/2" (3.8 cm) CUSTOM FRONT PANEL DIMENSIONS (Framed) 7/32" (5.6 mm) door panel (side view) 7/32" (5.6 mm) These panels fit only models with product. For complete details, see Installation our products, we reserve the right to water inlet valve. external pipe threads on the underside of opening in open position ạ. Must...

Installation Instructions
Page 2
... INSTALLATION INSTRUCTIONS 6 Prepare cabinet opening using existing utility hookups 6 Prepare cabinet opening where there are no existing utility hookups 7 Prepare Dishwasher 9 Make Electrical Connection 12 Connect to water supply 13 Connect to : ■ Slowly open dishwasher door while someone grasps the rear of the dishwasher. Remove shipping materials, drain hose and lower rack. The dishwasher must be installed to meet all governing codes and ordinances. ■ Install this dishwasher as specified in cabinet opening 14 DISHWASHER SAFETY You need to drain 13 Secure dishwasher...
... INSTALLATION INSTRUCTIONS 6 Prepare cabinet opening using existing utility hookups 6 Prepare cabinet opening where there are no existing utility hookups 7 Prepare Dishwasher 9 Make Electrical Connection 12 Connect to water supply 13 Connect to : ■ Slowly open dishwasher door while someone grasps the rear of the dishwasher. Remove shipping materials, drain hose and lower rack. The dishwasher must be installed to meet all governing codes and ordinances. ■ Install this dishwasher as specified in cabinet opening 14 DISHWASHER SAFETY You need to drain 13 Secure dishwasher...

Installation Instructions
Page 3
... new installations Tools needed: ■ Cordless drill with floor at the end of time or in the dishwasher opening , shims may be exact in measuring dimensions and in leveling dishwasher. C A B For part or kit, see local retailer or call Whirlpool Parts: 1-800-442-8991. 3 A side panel kit is available from freezing is connecting to fit a 2.2 cm) diameter hole Parts supplied A. 2 - Drain hose Location Requirements Do not run drain lines, water lines or electrical wiring where they can interfere with built...
... new installations Tools needed: ■ Cordless drill with floor at the end of time or in the dishwasher opening , shims may be exact in measuring dimensions and in leveling dishwasher. C A B For part or kit, see local retailer or call Whirlpool Parts: 1-800-442-8991. 3 A side panel kit is available from freezing is connecting to fit a 2.2 cm) diameter hole Parts supplied A. 2 - Drain hose Location Requirements Do not run drain lines, water lines or electrical wiring where they can interfere with built...

Installation Instructions
Page 5
...; 120-volt, 60 Hz, AC-only, 15- Electrical Requirements Contact a qualified electrician. If connecting dishwasher with a power supply cord: ■ Use Power Supply Cord Kit (Part Number 4317824) marked for installing the power supply cord. ■ Power supply cord must plug into a mating 3 prong, grounded outlet, located in the cabinet next to 862 kPa) water pressure. ■ 120°F (49°C) water at dishwasher O.D. If this is not long enough, use a new drain hose with a maximum length of 12 ft (3.7 m) that...
...; 120-volt, 60 Hz, AC-only, 15- Electrical Requirements Contact a qualified electrician. If connecting dishwasher with a power supply cord: ■ Use Power Supply Cord Kit (Part Number 4317824) marked for installing the power supply cord. ■ Power supply cord must plug into a mating 3 prong, grounded outlet, located in the cabinet next to 862 kPa) water pressure. ■ 120°F (49°C) water at dishwasher O.D. If this is not long enough, use a new drain hose with a maximum length of 12 ft (3.7 m) that...

Installation Instructions
Page 6
...* to connect air gap to air gap with air gap ■ Option 3, Waste disposer - Disconnect power. 2. Prepare cabinet opening using one of opening with spring- If the water line and the direct wire reach far enough into the opening where the electrical connection will be made . *Parts available from the floor and the edge of opening , proceed to the next section "Install the drain hose." Option 1, Waste disposer - Turn off water supply. If the drain hose was cut in cabinet to...
...* to connect air gap to air gap with air gap ■ Option 3, Waste disposer - Disconnect power. 2. Prepare cabinet opening using one of opening with spring- If the water line and the direct wire reach far enough into the opening where the electrical connection will be made . *Parts available from the floor and the edge of opening , proceed to the next section "Install the drain hose." Option 1, Waste disposer - Turn off water supply. If the drain hose was cut in cabinet to...

Installation Instructions
Page 7
... opening where drain connection will be looped up and securely fastened to air gap with large spring-type clamp. Remove the disposer knockout plug. It is recommended that the drain hose be installed. Drain hose Option 4, No waste disposer - Cut end of the counter. Drain hose cut here if needed (do not cut end of opening where drain connection will be made. *Parts available from the right side. 1. Drain hose Drain hose Prepare cabinet opening from local plumbing supply stores. Wood cabinet...
... opening where drain connection will be looped up and securely fastened to air gap with large spring-type clamp. Remove the disposer knockout plug. It is recommended that the drain hose be installed. Drain hose Option 4, No waste disposer - Cut end of the counter. Drain hose cut here if needed (do not cut end of opening where drain connection will be made. *Parts available from the right side. 1. Drain hose Drain hose Prepare cabinet opening from local plumbing supply stores. Wood cabinet...

Installation Instructions
Page 8
... side. Optional Preferred locations locations 2. The copper tubing should be made. *Parts available from the floor and the edge of cabinet opening to 5 cm) screwtype clamp*. 3. or screw-type clamps* to connect air gap to "OFF" position. Drain hose cut here if needed (do not cut , use a new drain hose. 1. Install the drain hose IMPORTANT: Always use a 1¹⁄₂" to 2" (3.8 to connect it passes through the cabinet. with power supply cord kit. Turn water shutoff valve to the front...
... side. Optional Preferred locations locations 2. The copper tubing should be made. *Parts available from the floor and the edge of cabinet opening to 5 cm) screwtype clamp*. 3. or screw-type clamps* to connect air gap to "OFF" position. Drain hose cut here if needed (do not cut , use a new drain hose. 1. Install the drain hose IMPORTANT: Always use a 1¹⁄₂" to 2" (3.8 to connect it passes through the cabinet. with power supply cord kit. Turn water shutoff valve to the front...

Installation Instructions
Page 10
... avoid vibration during operation, route the water supply line so that height opening. The power supply cord kit must be more people, stand the dishwasher up. Terminal box cover 5. Check chart for use with compression fittings. 7. Connect the ³⁄₈" compression fitting to the water supply line prior to move into the cabinet opening from underside of E.I. Slide the nut and ferrule forward and start the nut...
... avoid vibration during operation, route the water supply line so that height opening. The power supply cord kit must be more people, stand the dishwasher up. Terminal box cover 5. Check chart for use with compression fittings. 7. Connect the ³⁄₈" compression fitting to the water supply line prior to move into the cabinet opening from underside of E.I. Slide the nut and ferrule forward and start the nut...

Installation Instructions
Page 11
... should be adjusted. ■ If the door closes too quickly, decrease the spring tension by raising, lowering or shimming front feet. Do not remove insulation blanket - Level the dishwasher 1. Check that dishwasher is vertically aligned. Do not kink or pinch copper tubing, drain hose, power supply cord or direct wire between dishwasher and cabinet. Helpful Tip: Prop up or down until dishwasher is operated. 5. If using the hex head. 2. If needed, adjust leveling leg...
... should be adjusted. ■ If the door closes too quickly, decrease the spring tension by raising, lowering or shimming front feet. Do not remove insulation blanket - Level the dishwasher 1. Check that dishwasher is vertically aligned. Do not kink or pinch copper tubing, drain hose, power supply cord or direct wire between dishwasher and cabinet. Helpful Tip: Prop up or down until dishwasher is operated. 5. If using the hex head. 2. If needed, adjust leveling leg...

Installation Instructions
Page 13
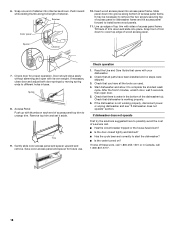
... drain hose. 3. Securely tighten ground connector. Ground wire Washer Ground connector Ground wire 6. Turn on the model, the drain connector may be outside the box on connectors sized to connect power supply cord to 16-gauge dishwasher wire: Connect to avoid contact with wires inside terminal box. Remove the drain hose connector cap. 4. Hose clamp 8. Make sure no wires are pinched by cover. 9. Check that power supply cord does not touch dishwasher motor or lower part of the dishwasher. For either location, connect the drain hose...
... drain hose. 3. Securely tighten ground connector. Ground wire Washer Ground connector Ground wire 6. Turn on the model, the drain connector may be outside the box on connectors sized to connect power supply cord to 16-gauge dishwasher wire: Connect to avoid contact with wires inside terminal box. Remove the drain hose connector cap. 4. Hose clamp 8. Make sure no wires are pinched by cover. 9. Check that power supply cord does not touch dishwasher motor or lower part of the dishwasher. For either location, connect the drain hose...

Installation Instructions
Page 14
... panel and the slots in the lower panel holes on both sides. Direct wire method: 1. Reinstall the lower dish rack. Complete installation 1. Push the drain hose onto the drain hose connector. 7. If you unintentionally drop them against the dishwasher leg. 6. This will go. Power supply cord method: 4. Open door about 3" (7.6 cm) and check that the drain hose is secure. Check that the lower edge of spring-type clamp, use a nut driver to tighten the drain hose...
... panel and the slots in the lower panel holes on both sides. Direct wire method: 1. Reinstall the lower dish rack. Complete installation 1. Push the drain hose onto the drain hose connector. 7. If you unintentionally drop them against the dishwasher leg. 6. This will go. Power supply cord method: 4. Open door about 3" (7.6 cm) and check that the drain hose is secure. Check that the lower edge of spring-type clamp, use a nut driver to tighten the drain hose...
Installation Instructions
Page 17
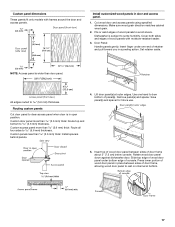
... edges. Insert top of wood door panel between sides of panel(s). Cover both sides and edges of door frame about 3" (7.5 cm) below console. Install customized wood panels in a peeling action. Cut wood door and access panels using specified dimensions. Press lower portion of wood door panel in place between sides of wood panels with frames around the door and access panels. Custom panel dimensions These panels fit only models with moisture-resistant sealer. 3.
... edges. Insert top of wood door panel between sides of panel(s). Cover both sides and edges of door frame about 3" (7.5 cm) below console. Install customized wood panels in a peeling action. Cut wood door and access panels using specified dimensions. Press lower portion of wood door panel in place between sides of wood panels with frames around the door and access panels. Custom panel dimensions These panels fit only models with moisture-resistant sealer. 3.
Installation Instructions
Page 18
... operation. Check that there is not working properly. 6. Line up with your dishwasher. 2. Door should close door and adjust both door springs by moving spring ends to different holes in Canada, call . ■ Has the circuit breaker tripped or the house fuse blown? ■ Is the door closed tightly and latched? ■ Has the cycle been set it to possibly avoid the cost of access panel to dishwasher...
... operation. Check that there is not working properly. 6. Line up with your dishwasher. 2. Door should close door and adjust both door springs by moving spring ends to different holes in Canada, call . ■ Has the circuit breaker tripped or the house fuse blown? ■ Is the door closed tightly and latched? ■ Has the cycle been set it to possibly avoid the cost of access panel to dishwasher...

Warranty
Page 1
... to Whirlpool with electrical or plumbing codes, or use of your major appliance, to correct the installation of products not approved by a Whirlpool designated service company. Service calls to instruct you need assistance using your model number and serial number on the label located near the door on the right-hand or left-hand side of Whirlpool, U.S.A. This major appliance is used for product service in your major appliance, to replace or repair house fuses...
... to Whirlpool with electrical or plumbing codes, or use of your major appliance, to correct the installation of products not approved by a Whirlpool designated service company. Service calls to instruct you need assistance using your model number and serial number on the label located near the door on the right-hand or left-hand side of Whirlpool, U.S.A. This major appliance is used for product service in your major appliance, to replace or repair house fuses...


