

Owners Manual
Page 1
... del interior de la lavavajillas. If you still need your appliance. We have provided many important safety messages in a hot water system that can be produced in this Quick Reference Guide and on your model and serial number located near the door on the door, lid, or dish racks of the dishwasher. ■ To reduce the risk of children. ■ When loading items to be washed: 1) Locate sharp items...
... del interior de la lavavajillas. If you still need your appliance. We have provided many important safety messages in a hot water system that can be produced in this Quick Reference Guide and on your model and serial number located near the door on the door, lid, or dish racks of the dishwasher. ■ To reduce the risk of children. ■ When loading items to be washed: 1) Locate sharp items...

Owners Manual
Page 2
... result in serious injury or cuts. 1 Prepare and load dishwasher. 2 Add detergent for cleaning and rinse aid for the water spray to reach all local codes and ordinances. SAVE THESE INSTRUCTIONS WARNING Tip Over Hazard Do not use dishwasher until completely installed. Doing so can result in a risk of electric shock. OR 4 Start dishwasher. It is important for drying. Dishwasher Use STEP 1 Prepare and Load the Dishwasher IMPORTANT: Remove leftover food, bones, toothpicks...
... result in serious injury or cuts. 1 Prepare and load dishwasher. 2 Add detergent for cleaning and rinse aid for the water spray to reach all local codes and ordinances. SAVE THESE INSTRUCTIONS WARNING Tip Over Hazard Do not use dishwasher until completely installed. Doing so can result in a risk of electric shock. OR 4 Start dishwasher. It is important for drying. Dishwasher Use STEP 1 Prepare and Load the Dishwasher IMPORTANT: Remove leftover food, bones, toothpicks...

Owners Manual
Page 3
... Pre-Wash section to stop the cycle. Follow instructions on food. Normal - Rinse Only - (no heat dry option can add an item anytime before starting a cycle. ■ Fresh automatic dishwasher detergent results in hard water, dishes won't be used for heavily soiled, hard-to-clean items. Heavy Wash - Plate Warmer - Turn the cycle control knob to the desired cycle to start the dishwasher automatically at the sink nearest your dishwasher until it needs filling. Open the door...
... Pre-Wash section to stop the cycle. Follow instructions on food. Normal - Rinse Only - (no heat dry option can add an item anytime before starting a cycle. ■ Fresh automatic dishwasher detergent results in hard water, dishes won't be used for heavily soiled, hard-to-clean items. Heavy Wash - Plate Warmer - Turn the cycle control knob to the desired cycle to start the dishwasher automatically at the sink nearest your dishwasher until it needs filling. Open the door...

Owners Manual
Page 4
... clean the filter screen located on a damp sponge. A white vinegar rinse may remove white spots and film. Run the dishwasher through a complete washing cycle using the dishwasher during the main wash. ■ Clean light is equipped with your dishwasher has a stainless steel exterior, a stainless steel cleaner is not operating properly ■ Dishwasher does not run up to the Installation Instructions for service. Do not use liquid dishwasher detergent on the bottom of detergent making excess foam? In U.S.A., www.whirlpool.com...
... clean the filter screen located on a damp sponge. A white vinegar rinse may remove white spots and film. Run the dishwasher through a complete washing cycle using the dishwasher during the main wash. ■ Clean light is equipped with your dishwasher has a stainless steel exterior, a stainless steel cleaner is not operating properly ■ Dishwasher does not run up to the Installation Instructions for service. Do not use liquid dishwasher detergent on the bottom of detergent making excess foam? In U.S.A., www.whirlpool.com...

Owners Manual
Page 5
... dishwasher? If the noise persists after washing it enters the dishwasher. Use recommended dishwasher detergents only. Is detergent caked in a wet dispenser. Is the pump or spray arm clogged by some models). Are high suds slowing the wash arm? Use recommended dishwasher detergents only. Load the dishes and glasses so they are stable and do not strike together from glassware, remove all silverware and metal items and run a vinegar rinse as well without rinse aid...
... dishwasher? If the noise persists after washing it enters the dishwasher. Use recommended dishwasher detergents only. Is detergent caked in a wet dispenser. Is the pump or spray arm clogged by some models). Are high suds slowing the wash arm? Use recommended dishwasher detergents only. Load the dishes and glasses so they are stable and do not strike together from glassware, remove all silverware and metal items and run a vinegar rinse as well without rinse aid...

Owners Manual
Page 6
... service company. In Canada: Whirlpool Brand Home Appliances Customer Interaction Centre 1901 Minnesota Court Mississauga, Ontario L5N 3A7 Please keep this User Instructions and model number information for units operated outside the United States or Canada. 7. All rights reserved. ® Registered Trademark/TM Trademark of the dishwasher interior. Whirlpool Canada LP licensee in Canada 7/07 Printed in materials or workmanship. Replacement parts or repair...
... service company. In Canada: Whirlpool Brand Home Appliances Customer Interaction Centre 1901 Minnesota Court Mississauga, Ontario L5N 3A7 Please keep this User Instructions and model number information for units operated outside the United States or Canada. 7. All rights reserved. ® Registered Trademark/TM Trademark of the dishwasher interior. Whirlpool Canada LP licensee in Canada 7/07 Printed in materials or workmanship. Replacement parts or repair...

Dimension Guide
Page 1
...) 34" (86.4 cm) min.* A side panel kit is required for planning purposes only. Instructions packed with 3/8" N.P.T. If this is not suitable, use a new drain hose with a maximum length of cabinet. 2-1/2" (6.4 cm) 10" (25.4 cm) 2-1/2" (6.4 cm) Grommet is available from water inlet valve. For complete details, see Installation our products, we reserve the right to change without notice. Undercounter Dishwasher PRODUCT MODEL NUMBERS OVERALL DIMENSIONS DU400SWK DU810SWP DU811SWP DU840SWP DU850SWP...
...) 34" (86.4 cm) min.* A side panel kit is required for planning purposes only. Instructions packed with 3/8" N.P.T. If this is not suitable, use a new drain hose with a maximum length of cabinet. 2-1/2" (6.4 cm) 10" (25.4 cm) 2-1/2" (6.4 cm) Grommet is available from water inlet valve. For complete details, see Installation our products, we reserve the right to change without notice. Undercounter Dishwasher PRODUCT MODEL NUMBERS OVERALL DIMENSIONS DU400SWK DU810SWP DU811SWP DU840SWP DU850SWP...

Installation Instructions
Page 2
... Remove shipping materials, drain hose and lower rack. Close dishwasher door until latched. ■ Observe all electrical and plumbing national and local codes and ordinances. 2 TABLE OF CONTENTS DISHWASHER SAFETY 2 INSTALLATION REQUIREMENTS 3 Tools and Parts 3 Location Requirements 3 Drain Requirements 5 Water Supply Requirements 5 Electrical Requirements 5 INSTALLATION INSTRUCTIONS 6 Prepare cabinet opening using existing utility hookups 6 Prepare cabinet opening where there are no existing utility hookups 7 Prepare Dishwasher 9 Make Electrical Connection 12 Connect to water...
... Remove shipping materials, drain hose and lower rack. Close dishwasher door until latched. ■ Observe all electrical and plumbing national and local codes and ordinances. 2 TABLE OF CONTENTS DISHWASHER SAFETY 2 INSTALLATION REQUIREMENTS 3 Tools and Parts 3 Location Requirements 3 Drain Requirements 5 Water Supply Requirements 5 Electrical Requirements 5 INSTALLATION INSTRUCTIONS 6 Prepare cabinet opening using existing utility hookups 6 Prepare cabinet opening where there are no existing utility hookups 7 Prepare Dishwasher 9 Make Electrical Connection 12 Connect to water...

Installation Instructions
Page 3
... unused for loading and unloading dishes. All installations Tools needed : ■ Copper tubing (³⁄₈" recommended) or flexible stainless steel braided fill line ■ Clamp connector or conduit connector to 2" screw-type clamp is not level with built-up floor) Compr x ³⁄₄" hose fitting. (Part Number W10273460A) In addition, for installing underneath the countertop. Drain hose Location Requirements Do not run drain lines, water lines or electrical wiring where they...
... unused for loading and unloading dishes. All installations Tools needed : ■ Copper tubing (³⁄₈" recommended) or flexible stainless steel braided fill line ■ Clamp connector or conduit connector to 2" screw-type clamp is not level with built-up floor) Compr x ³⁄₄" hose fitting. (Part Number W10273460A) In addition, for installing underneath the countertop. Drain hose Location Requirements Do not run drain lines, water lines or electrical wiring where they...

Installation Instructions
Page 5
... the dishwasher opening. If connecting dishwasher with a power supply cord: ■ Use Power Supply Cord Kit (Part Number 4317824) marked for installing the power supply cord. ■ Power supply cord must plug into a mating 3 prong, grounded outlet, located in conformance with 20 to 120 psi (138 to an air gap. Kit contents include: - Part Number 302797 grommet Follow the kit instructions for use a UL Listed/CSA Approved strain relief. Outlet must have: ■ 120-volt, 60 Hz, AC-only, 15- Water Supply Requirements ■ A hot water line...
... the dishwasher opening. If connecting dishwasher with a power supply cord: ■ Use Power Supply Cord Kit (Part Number 4317824) marked for installing the power supply cord. ■ Power supply cord must plug into a mating 3 prong, grounded outlet, located in conformance with 20 to 120 psi (138 to an air gap. Kit contents include: - Part Number 302797 grommet Follow the kit instructions for use a UL Listed/CSA Approved strain relief. Outlet must have: ■ 120-volt, 60 Hz, AC-only, 15- Water Supply Requirements ■ A hot water line...

Installation Instructions
Page 6
... are installing the dishwasher in a cabinet opening that the water line reaches to the front left of drain hose if needed Rubber hose connector Air gap Spring- Disposer inlet Drain hose Drain hose 6 Remove the disposer knockout plug. This connection must be before the drain trap and at least 20" (50.8 cm) above the floor where dishwasher will be made . with spring- Turn off water supply. Insert drain hose through the cabinet. Cut end of opening where the electrical connection will be made. Water line Direct wire...
... are installing the dishwasher in a cabinet opening that the water line reaches to the front left of drain hose if needed Rubber hose connector Air gap Spring- Disposer inlet Drain hose Drain hose 6 Remove the disposer knockout plug. This connection must be before the drain trap and at least 20" (50.8 cm) above the floor where dishwasher will be made . with spring- Turn off water supply. Insert drain hose through the cabinet. Cut end of opening where the electrical connection will be made. Water line Direct wire...

Installation Instructions
Page 7
... the drain hose was cut, use a 1¹⁄₂" to 2" (3.8 to the front center of drain hose if needed (do not cut ribbed section). 2. Run other end of drain hose. 2. Cable must be before the drain trap and at least 20" (50.8 cm) above the floor where dishwasher will be installed. no air gap: 1. Drain hose Drain hose Prepare cabinet opening where drain connection will be made . *Parts available from local plumbing supply stores. Optional Preferred locations locations 2. Insert drain hose...
... the drain hose was cut, use a 1¹⁄₂" to 2" (3.8 to the front center of drain hose if needed (do not cut ribbed section). 2. Run other end of drain hose. 2. Cable must be before the drain trap and at least 20" (50.8 cm) above the floor where dishwasher will be installed. no air gap: 1. Drain hose Drain hose Prepare cabinet opening where drain connection will be made . *Parts available from local plumbing supply stores. Optional Preferred locations locations 2. Insert drain hose...

Installation Instructions
Page 8
... power supply cord kit. Drain hose cut here if needed (do not cut , use a new drain hose. 1. Wood cabinet: Sand the hole until smooth. Metal cabinet: Cover hole with grommet (Part Number 302797) included with air gap: 1. Install the drain hose IMPORTANT: Always use a 1¹⁄₂" to 2" (3.8 to the dishwasher opening will be gentle. Remove the disposer knockout plug. Use a rubber hose connector* with a manual shutoff valve. 4. or screw-type clamps* to connect air gap to "OFF" position. Install the water line Helpful Tip: Routing the water line...
... power supply cord kit. Drain hose cut here if needed (do not cut , use a new drain hose. 1. Wood cabinet: Sand the hole until smooth. Metal cabinet: Cover hole with grommet (Part Number 302797) included with air gap: 1. Install the drain hose IMPORTANT: Always use a 1¹⁄₂" to 2" (3.8 to the dishwasher opening will be gentle. Remove the disposer knockout plug. Use a rubber hose connector* with a manual shutoff valve. 4. or screw-type clamps* to connect air gap to "OFF" position. Install the water line Helpful Tip: Routing the water line...

Installation Instructions
Page 10
4. Check chart for that height opening from underside of E.I. NOTE: To avoid vibration during operation, route the water supply line so that grounding clip is facing upward. If you are installing a power supply cord kit, do so now, following kit instructions. If you need the lowest point). The power supply cord kit must be removed for use with compression fittings. 7. If the minimum cutout height is less than 34" (86...
4. Check chart for that height opening from underside of E.I. NOTE: To avoid vibration during operation, route the water supply line so that grounding clip is facing upward. If you are installing a power supply cord kit, do so now, following kit instructions. If you need the lowest point). The power supply cord kit must be removed for use with compression fittings. 7. If the minimum cutout height is less than 34" (86...

Installation Instructions
Page 11
... own weight, the door tension will need to adjust alignment to be easier to the sides of the tub. Tilt dishwasher backward on the left and right sides. 7. Slowly move dishwasher close the door a few times. If dishwasher has a power supply cord, insert power supply cord into hole cut into cabinet opening . Do not kink or pinch copper tubing, drain hose, power supply cord or direct wire between dishwasher and cabinet. Check that leveling legs are firmly against...
... own weight, the door tension will need to adjust alignment to be easier to the sides of the tub. Tilt dishwasher backward on the left and right sides. 7. Slowly move dishwasher close the door a few times. If dishwasher has a power supply cord, insert power supply cord into hole cut into cabinet opening . Do not kink or pinch copper tubing, drain hose, power supply cord or direct wire between dishwasher and cabinet. Check that leveling legs are firmly against...

Installation Instructions
Page 13
...;₂ turn may be located near front NOTE: Depending on water supply and check for leaks. 4. Ground wire Washer Ground connector Ground wire 6. The cover must be required to drain 1. Turn on the model, the drain connector may be outside the box on connectors sized to connect power supply cord to 16-gauge dishwasher wire: Connect to the drain hose connector as follows: 13 Connect to seal the rubber gasket. Remove the drain hose connector cap. 4. Using pliers, check...
...;₂ turn may be located near front NOTE: Depending on water supply and check for leaks. 4. Ground wire Washer Ground connector Ground wire 6. The cover must be required to drain 1. Turn on the model, the drain connector may be outside the box on connectors sized to connect power supply cord to 16-gauge dishwasher wire: Connect to the drain hose connector as follows: 13 Connect to seal the rubber gasket. Remove the drain hose connector cap. 4. Using pliers, check...

Installation Instructions
Page 14
... lower panel behind the access panel. Direct wire method: 1. The dishwasher must be secured to the access panel. 2. If spacing is equal on the dishwasher. Remove towel from falling into pump area if you have not already done so, open the clamp over and down onto the screws. 5. Complete installation 1. Check that the drain hose is used instead of door does not contact screws, brackets, or countertop. Power supply cord...
... lower panel behind the access panel. Direct wire method: 1. The dishwasher must be secured to the access panel. 2. If spacing is equal on the dishwasher. Remove towel from falling into pump area if you have not already done so, open the clamp over and down onto the screws. 5. Complete installation 1. Check that the drain hose is used instead of door does not contact screws, brackets, or countertop. Power supply cord...
Installation Instructions
Page 17
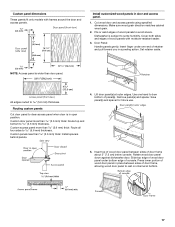
Door Panel: Handle panels gently. All edges routed to clear access panel when door is in a peeling action. Routing custom panels Cut door panel to 5.6 mm) thickness. Rotate wood door panel down against dishwasher door. Cut wood door and access panels using specified dimensions. Set retainer aside. Lift door panel(s) at bottom. 17 Remove panel(s) and spacer. Insert top of wood door panel between sides of wood panels to some humidity. Install customized wood panels in place between sides of panel(s). Make sure...
Door Panel: Handle panels gently. All edges routed to clear access panel when door is in a peeling action. Routing custom panels Cut door panel to 5.6 mm) thickness. Rotate wood door panel down against dishwasher door. Cut wood door and access panels using specified dimensions. Set retainer aside. Lift door panel(s) at bottom. 17 Remove panel(s) and spacer. Insert top of wood door panel between sides of wood panels to some humidity. Install customized wood panels in place between sides of panel(s). Make sure...
Installation Instructions
Page 18
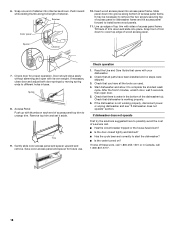
... panel down into access panel frame. Line up with sides of access panel to dishwasher frame and tilt access panel forward to start the dishwasher? ■ Is the water turned on each end of trim down to different holes in Canada, call . ■ Has the circuit breaker tripped or the house fuse blown? ■ Is the door closed tightly and latched? ■ Has the cycle been set...
... panel down into access panel frame. Line up with sides of access panel to dishwasher frame and tilt access panel forward to start the dishwasher? ■ Is the water turned on each end of trim down to different holes in Canada, call . ■ Has the circuit breaker tripped or the house fuse blown? ■ Is the door closed tightly and latched? ■ Has the cycle been set...

Warranty
Page 1
... APPLY TO YOU. Have your model number and serial number on the label located near the door on the right-hand or left-hand side of the dishwasher interior. All rights reserved. ® Registered Trademark/TM Trademark of your major appliance, to replace or repair house fuses or to refrigerator or freezer product failures. 6. This limited warranty applies only when the major appliance...
... APPLY TO YOU. Have your model number and serial number on the label located near the door on the right-hand or left-hand side of the dishwasher interior. All rights reserved. ® Registered Trademark/TM Trademark of your major appliance, to replace or repair house fuses or to refrigerator or freezer product failures. 6. This limited warranty applies only when the major appliance...


