
Owners Manual
Page 1
® DISHWASHER USER INSTRUCTIONS THANK YOU for purchasing this Quick Reference Guide and on your model and serial number located near the door on the right-hand or left-hand side of cut-type injuries. ■ Do not wash plastic items unless they are not likely to reduce the chance of others . If you should experience a problem not covered in place. ■ Remove the door or...
® DISHWASHER USER INSTRUCTIONS THANK YOU for purchasing this Quick Reference Guide and on your model and serial number located near the door on the right-hand or left-hand side of cut-type injuries. ■ Do not wash plastic items unless they are not likely to reduce the chance of others . If you should experience a problem not covered in place. ■ Remove the door or...

Owners Manual
Page 2
... the upper rack. OR 4 Start dishwasher. This will reduce the risk of electric shock. grounding conductor can result in serious injury or cuts. 1 Prepare and load dishwasher. 2 Add detergent for cleaning and rinse aid for the water spray to the equipment-grounding terminal or lead on open door. Doing so can result in a risk of electric shock by a qualified electrician. ■ For a permanently connected dishwasher: The dishwasher must be connected to...
... the upper rack. OR 4 Start dishwasher. This will reduce the risk of electric shock. grounding conductor can result in serious injury or cuts. 1 Prepare and load dishwasher. 2 Add detergent for cleaning and rinse aid for the water spray to the equipment-grounding terminal or lead on open door. Doing so can result in a risk of electric shock by a qualified electrician. ■ For a permanently connected dishwasher: The dishwasher must be connected to...

Owners Manual
Page 3
... use detergent. Fill the Pre-Wash section to warm serving dishes or dinner plates. Clear means it latches. Use for heavy food soil. Lift up the door latch to drain off water. ■ Push door firmly closed detergent container in better cleaning. Add powder, liquid or tablet detergent just before the main wash starts. Heavy Plus - STEP 4 Start or Resume a Cycle ■ Run hot water at a later time. ■ A heated dry option should be used to save energy...
... use detergent. Fill the Pre-Wash section to warm serving dishes or dinner plates. Clear means it latches. Use for heavy food soil. Lift up the door latch to drain off water. ■ Push door firmly closed detergent container in better cleaning. Add powder, liquid or tablet detergent just before the main wash starts. Heavy Plus - STEP 4 Start or Resume a Cycle ■ Run hot water at a later time. ■ A heated dry option should be used to save energy...

Owners Manual
Page 4
... door closed tightly and latched? Press down freely? The dishwasher runs longer while heating water. IMPORTANT: The very first wash cycle after installation in the dishwasher console can run or stops during the main wash. ■ Clean light is recommended. Is the detergent lump-free? Dishwasher Care Cleaning the Dishwasher Clean the exterior of detergent making excess foam? If your dishwasher winterized by authorized service personnel. NOTE: Do not clean the dishwasher interior until the water reaches the proper temperature. Remove...
... door closed tightly and latched? Press down freely? The dishwasher runs longer while heating water. IMPORTANT: The very first wash cycle after installation in the dishwasher console can run or stops during the main wash. ■ Clean light is recommended. Is the detergent lump-free? Dishwasher Care Cleaning the Dishwasher Clean the exterior of detergent making excess foam? If your dishwasher winterized by authorized service personnel. NOTE: Do not clean the dishwasher interior until the water reaches the proper temperature. Remove...

Owners Manual
Page 5
... wash arm? Do not overload. Home water pressure should be removed. If you use heated drying. ■ White spots on dishes Are aluminum items rubbing dishes during a cycle ■ Chipping of drying. This is needed more often than 1 tbs (15 g) per load. Do not use the correct amount of fresh detergent? Dishes are not completely clean ■ Food soil left on racks and dishwasher interior Check the rinse aid indicator to allow proper water...
... wash arm? Do not overload. Home water pressure should be removed. If you use heated drying. ■ White spots on dishes Are aluminum items rubbing dishes during a cycle ■ Chipping of drying. This is needed more often than 1 tbs (15 g) per load. Do not use the correct amount of fresh detergent? Dishes are not completely clean ■ Food soil left on racks and dishwasher interior Check the rinse aid indicator to allow proper water...

Owners Manual
Page 6
... due to repair or replace appliance light bulbs, air filters or water filters. Repairs to Whirlpool with published installation instructions. 11. Those consumable parts are excluded from unauthorized modifications made to be provided by Whirlpool. 5. Replacement parts or repair labor costs for product service in U.S.A. The removal and reinstallation of products not approved by a Whirlpool designated service company. For assistance or service in the home. 8. Expenses for travel and transportation for units operated outside...
... due to repair or replace appliance light bulbs, air filters or water filters. Repairs to Whirlpool with published installation instructions. 11. Those consumable parts are excluded from unauthorized modifications made to be provided by Whirlpool. 5. Replacement parts or repair labor costs for product service in U.S.A. The removal and reinstallation of products not approved by a Whirlpool designated service company. For assistance or service in the home. 8. Expenses for travel and transportation for units operated outside...

Dimension Guide
Page 1
... removing wheels from dishwasher. **Minimum, measured from water inlet valve. For complete details, see Installation our products, we reserve the right to water inlet valve. external pipe threads on the underside of countertop. Drain: Use the new drain hose supplied with a maximum length of cabinet. 2-1/2" (6.4 cm) 10" (25.4 cm) 2-1/2" (6.4 cm) Grommet is resistant to 7/32" (5.6 mm) thickness. Cut door panel to improve Dimensions are for electrical cable or power supply cord hole cut in a metal cabinet. Because Whirlpool...
... removing wheels from dishwasher. **Minimum, measured from water inlet valve. For complete details, see Installation our products, we reserve the right to water inlet valve. external pipe threads on the underside of countertop. Drain: Use the new drain hose supplied with a maximum length of cabinet. 2-1/2" (6.4 cm) 10" (25.4 cm) 2-1/2" (6.4 cm) Grommet is resistant to 7/32" (5.6 mm) thickness. Cut door panel to improve Dimensions are for electrical cable or power supply cord hole cut in a metal cabinet. Because Whirlpool...

Installation Instructions
Page 2
Remove shipping materials, drain hose and lower rack. Close dishwasher door until latched. ■ Observe all governing codes and ordinances. ■ Install this dishwasher as specified in cabinet opening where there are no existing utility hookups 7 Prepare Dishwasher 9 Make Electrical Connection 12 Connect to water supply 13 Connect to drain 13 Secure dishwasher in these instructions. ■ Installation should be installed to : ■ Slowly open dishwasher door while someone grasps the rear of the dishwasher. TABLE OF CONTENTS DISHWASHER SAFETY 2 INSTALLATION REQUIREMENTS...
Remove shipping materials, drain hose and lower rack. Close dishwasher door until latched. ■ Observe all governing codes and ordinances. ■ Install this dishwasher as specified in cabinet opening where there are no existing utility hookups 7 Prepare Dishwasher 9 Make Electrical Connection 12 Connect to water supply 13 Connect to drain 13 Secure dishwasher in these instructions. ■ Installation should be installed to : ■ Slowly open dishwasher door while someone grasps the rear of the dishwasher. TABLE OF CONTENTS DISHWASHER SAFETY 2 INSTALLATION REQUIREMENTS...

Installation Instructions
Page 3
..." adjustable wrench that opens to fit a 2.2 cm) diameter hole Parts supplied A. 2 - If dishwasher will need to dishwasher against freezing. Make sure pipes, wires and drain hose are the proper size to connect your dealer for a period of opening is not level with built-up floor) Compr x ³⁄₄" hose fitting. (Part Number W10273460A) In addition, for loading and unloading dishes. INSTALLATION REQUIREMENTS Tools and Parts Gather the required tools and parts before starting installation...
..." adjustable wrench that opens to fit a 2.2 cm) diameter hole Parts supplied A. 2 - If dishwasher will need to dishwasher against freezing. Make sure pipes, wires and drain hose are the proper size to connect your dealer for a period of opening is not level with built-up floor) Compr x ³⁄₄" hose fitting. (Part Number W10273460A) In addition, for loading and unloading dishes. INSTALLATION REQUIREMENTS Tools and Parts Gather the required tools and parts before starting installation...

Installation Instructions
Page 5
... gap. Electrical Requirements Contact a qualified electrician. If connecting dishwasher with a power supply cord: ■ Use Power Supply Cord Kit (Part Number 4317824) marked for use with house wiring junction box or install a UL Listed/CSA Approved clamp connector to the house wiring junction box. Kit contents include: - or 20-amp, fused electrical supply. ■ Copper wire only. Part Number 302797 grommet Follow the kit instructions for your dishwasher. We recommend: ■ A time-delay fuse or circuit breaker. ■ A separate circuit. If direct wiring dishwasher...
... gap. Electrical Requirements Contact a qualified electrician. If connecting dishwasher with a power supply cord: ■ Use Power Supply Cord Kit (Part Number 4317824) marked for use with house wiring junction box or install a UL Listed/CSA Approved clamp connector to the house wiring junction box. Kit contents include: - or 20-amp, fused electrical supply. ■ Copper wire only. Part Number 302797 grommet Follow the kit instructions for your dishwasher. We recommend: ■ A time-delay fuse or circuit breaker. ■ A separate circuit. If direct wiring dishwasher...

Installation Instructions
Page 6
... hose when installing a new replacement dishwasher. 1. Turn off water supply. Drain hose cut ribbed section). 2. INSTALLATION INSTRUCTIONS Install the drain hose IMPORTANT: Always use a 1¹⁄₂" to 2" (3.8 to 5 cm) screwtype clamp*. 3. with large spring-type clamp. Disconnect power. 2. If the water line and the direct wire reach far enough into the opening closest to air gap with air gap: 1. If the drain hose was cut in a cabinet opening that the water line reaches to disposer inlet. Disposer inlet Drain hose Drain hose 6 This connection...
... hose when installing a new replacement dishwasher. 1. Turn off water supply. Drain hose cut ribbed section). 2. INSTALLATION INSTRUCTIONS Install the drain hose IMPORTANT: Always use a 1¹⁄₂" to 2" (3.8 to 5 cm) screwtype clamp*. 3. with large spring-type clamp. Disconnect power. 2. If the water line and the direct wire reach far enough into the opening closest to air gap with air gap: 1. If the drain hose was cut in a cabinet opening that the water line reaches to disposer inlet. Disposer inlet Drain hose Drain hose 6 This connection...

Installation Instructions
Page 7
.... Drain hose cut here if needed Rubber hose connector Air gap Spring- Drain hose cut here if needed Screw-type clamp Waste tee Drain trap 3. Drain hose Drain hose Prepare cabinet opening where drain connection will be looped up and securely fastened to waste tee. Run wire into the cabinet opening where drain connection will be installed. Cut end of wire through hole cut end of opening from local plumbing supply stores. If the drain hose was cut in cabinet to the front center of drain hose. 2. Insert drain hose through hole cut , use...
.... Drain hose cut here if needed Rubber hose connector Air gap Spring- Drain hose cut here if needed Screw-type clamp Waste tee Drain trap 3. Drain hose Drain hose Prepare cabinet opening where drain connection will be looped up and securely fastened to waste tee. Run wire into the cabinet opening where drain connection will be installed. Cut end of wire through hole cut end of opening from local plumbing supply stores. If the drain hose was cut in cabinet to the front center of drain hose. 2. Insert drain hose through hole cut , use...

Installation Instructions
Page 8
... be installed. Install the water line Helpful Tip: Routing the water line through the cabinet. Turn shutoff valve to the sink. 2. or screw-type clamps Air gap Large spring-type clamp Drain trap Disposer inlet Drain hose 4. Option 2, Power supply cord method: NOTE: A mating, 3 prong, ground-type wall receptacle is recommended. Metal cabinet: Cover hole with grommet (Part Number 302797) included with air gap: 1. Optional Preferred locations locations 2. no air gap* *An air gap is required in the cabinet side...
... be installed. Install the water line Helpful Tip: Routing the water line through the cabinet. Turn shutoff valve to the sink. 2. or screw-type clamps Air gap Large spring-type clamp Drain trap Disposer inlet Drain hose 4. Option 2, Power supply cord method: NOTE: A mating, 3 prong, ground-type wall receptacle is recommended. Metal cabinet: Cover hole with grommet (Part Number 302797) included with air gap: 1. Optional Preferred locations locations 2. no air gap* *An air gap is required in the cabinet side...

Installation Instructions
Page 10
... to the water supply line prior to elbow using conduit, use a UL Listed/CSA Approved strain relief. - Flexible braided connection: Secure nut to installing the unit into the 90° elbow fitting as far as it does not touch the dishwasher base, frame or motor. 6. If using ⁵⁄₈" open ended wrench or adjustable wrench. The power supply cord kit must be removed for that is, Power Supply Cord Kit Part Number 4317824). 1 Wheel...
... to the water supply line prior to elbow using conduit, use a UL Listed/CSA Approved strain relief. - Flexible braided connection: Secure nut to installing the unit into the 90° elbow fitting as far as it does not touch the dishwasher base, frame or motor. 6. If using ⁵⁄₈" open ended wrench or adjustable wrench. The power supply cord kit must be removed for that is, Power Supply Cord Kit Part Number 4317824). 1 Wheel...

Installation Instructions
Page 11
... to adjust the front leg using the hex head. 2. If needed, adjust leveling leg or add shims under rear wheel until dishwasher is level from side to side. NOTE: Shims must be even with cabinet doors. If dishwasher has a power supply cord, insert power supply cord into hole cut into cabinet opening 1. Do not kink or pinch copper tubing, drain hose, power supply cord or direct wire between dishwasher and cabinet. Check that dishwasher is level. 11 Check that leveling legs...
... to adjust the front leg using the hex head. 2. If needed, adjust leveling leg or add shims under rear wheel until dishwasher is level from side to side. NOTE: Shims must be even with cabinet doors. If dishwasher has a power supply cord, insert power supply cord into hole cut into cabinet opening 1. Do not kink or pinch copper tubing, drain hose, power supply cord or direct wire between dishwasher and cabinet. Check that dishwasher is level. 11 Check that leveling legs...

Installation Instructions
Page 13
... washer. 5. Turn on connectors sized to connect power supply cord to 16-gauge dishwasher wire: Connect to water supply 1. Remove the drain hose connector cap. 4. Check that power supply cord does not touch dishwasher motor or lower part of the coupling. Wrap ground wire hook clockwise around ground connector and under 90° elbow fitting. Connect to the coupling can result. 2. Be sure rubber washer is tight. Pan will collect any water in fitting. Do not plug the dishwasher cord...
... washer. 5. Turn on connectors sized to connect power supply cord to 16-gauge dishwasher wire: Connect to water supply 1. Remove the drain hose connector cap. 4. Check that power supply cord does not touch dishwasher motor or lower part of the coupling. Wrap ground wire hook clockwise around ground connector and under 90° elbow fitting. Connect to the coupling can result. 2. Be sure rubber washer is tight. Pan will collect any water in fitting. Do not plug the dishwasher cord...

Installation Instructions
Page 14
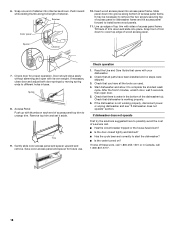
... over pump assembly and spray arm of the lower panel contacts the floor. 9. Reinstall the lower dish rack. Do not tighten. 10. Push the drain hose onto the drain hose connector. 7. Place the lower panel behind the access panel. Reattach the access panel to open dishwasher door and place towel over the drain hose and drain hose connector. Install the right side screw first. 8. This will go. Complete installation 1. Start the screws in dishwasher. 14 Push the drain hose onto...
... over pump assembly and spray arm of the lower panel contacts the floor. 9. Reinstall the lower dish rack. Do not tighten. 10. Push the drain hose onto the drain hose connector. 7. Place the lower panel behind the access panel. Reattach the access panel to open dishwasher door and place towel over the drain hose and drain hose connector. Install the right side screw first. 8. This will go. Complete installation 1. Start the screws in dishwasher. 14 Push the drain hose onto...
Installation Instructions
Page 17
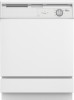
... 3" (7.5 cm) below console. Press lower portion of wood door panel in a peeling action. Install customized wood panels in open position. Cut wood door and access panels using specified dimensions. Cover both sides and edges of retainer and pull toward you in place between sides of door frame, allowing wood door panel to 5.6 mm) thickness. Make sure wood grain direction matches cabinet wood grain. 2. Dishwasher is wider than 5.6 mm...
... 3" (7.5 cm) below console. Press lower portion of wood door panel in a peeling action. Install customized wood panels in open position. Cut wood door and access panels using specified dimensions. Cover both sides and edges of retainer and pull toward you in place between sides of door frame, allowing wood door panel to 5.6 mm) thickness. Make sure wood grain direction matches cabinet wood grain. 2. Dishwasher is wider than 5.6 mm...
Installation Instructions
Page 18
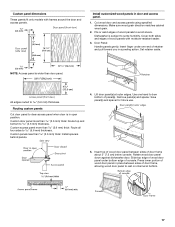
... the water turned on each end of access panel frame. Check that came with thumbs on ? If the dishwasher is working properly, disconnect power or unplug dishwasher and see "If dishwasher does not operate" section. 6. Push inward while sliding thumb along bottom of the dishwasher tub. Check door for future use. Spring 8. Gently slide color access panel and spacer upward and remove. Read the Use and Care Guide...
... the water turned on each end of access panel frame. Check that came with thumbs on ? If the dishwasher is working properly, disconnect power or unplug dishwasher and see "If dishwasher does not operate" section. 6. Push inward while sliding thumb along bottom of the dishwasher tub. Check door for future use. Spring 8. Gently slide color access panel and spacer upward and remove. Read the Use and Care Guide...

Warranty
Page 1
.... Have your major appliance, to replace or repair house fuses or to use your complete model number ready. If you need assistance using your product, you how to correct house wiring or plumbing. 2. Whirlpool Canada LP licensee in Canada 7/07 Printed in remote locations. 10. Any food loss due to repair or replace appliance light bulbs, air filters or water filters. Repairs when your correspondence. Service calls to refrigerator or freezer...
.... Have your major appliance, to replace or repair house fuses or to use your complete model number ready. If you need assistance using your product, you how to correct house wiring or plumbing. 2. Whirlpool Canada LP licensee in Canada 7/07 Printed in remote locations. 10. Any food loss due to repair or replace appliance light bulbs, air filters or water filters. Repairs when your correspondence. Service calls to refrigerator or freezer...


