

Dimension Guide
Page 1
... for installing the power supply cord. Drain Requirements: A new drain hose is not recommended). Instructions packed with compression fitting or flexible braided water supply line (¹⁄₂" minimum plastic tubing is supplied with the air gap installation instructions. Copper wire only. Specifications subject to change without notice. Use a U.L.-listed or CSA-approved conduit connector. copper tubing with product. If direct wiring dishwasher: Use flexible, armored or nonmetallic, sheathed copper wire with grounding wire that would prevent dishwasher installation...
... for installing the power supply cord. Drain Requirements: A new drain hose is not recommended). Instructions packed with compression fitting or flexible braided water supply line (¹⁄₂" minimum plastic tubing is supplied with the air gap installation instructions. Copper wire only. Specifications subject to change without notice. Use a U.L.-listed or CSA-approved conduit connector. copper tubing with product. If direct wiring dishwasher: Use flexible, armored or nonmetallic, sheathed copper wire with grounding wire that would prevent dishwasher installation...

Installation Instructions
Page 2
...Parts 3 Location Requirements 3 Product and Cabinet Opening Dimensions 4 Drain Requirements 5 Water Supply Requirements 5 Electrical Requirements 5 Installation Instructions 6 Prepare Cabinet Opening-Existing Utilities 6 Prepare Cabinet Opening-New Utilities 6 Prepare and Route Water Line 7 Install Drain Hose 8 Installation Instructions (cont.) Prepare Dishwasher 10 Make Power Cord Electrical Connection 11 Determine Cabinet Opening 12 Choose Attachment Option 13 Move Dishwasher into Cabinet Opening 13 Connect to Water Supply 15 Connect to Drain 16 Make Direct Wire Electrical...
...Parts 3 Location Requirements 3 Product and Cabinet Opening Dimensions 4 Drain Requirements 5 Water Supply Requirements 5 Electrical Requirements 5 Installation Instructions 6 Prepare Cabinet Opening-Existing Utilities 6 Prepare Cabinet Opening-New Utilities 6 Prepare and Route Water Line 7 Install Drain Hose 8 Installation Instructions (cont.) Prepare Dishwasher 10 Make Power Cord Electrical Connection 11 Determine Cabinet Opening 12 Choose Attachment Option 13 Move Dishwasher into Cabinet Opening 13 Connect to Water Supply 15 Connect to Drain 16 Make Direct Wire Electrical...

Installation Instructions
Page 3
... wire connectors* Parts needed to level dishwasher.) Helpful Tip: Be sure to accurately measure dimensions and ensure dishwasher is level if the floor in the "Product and Cabinet Opening Dimensions" section. 3 It is not level with or contact dishwasher motor or legs. Location Requirements Grounded electrical supply required. Do not run drain lines, water lines or electrical wiring where they can interfere with floor at rear of time or in a location where it winterized by the warranty. A side panel kit...
... wire connectors* Parts needed to level dishwasher.) Helpful Tip: Be sure to accurately measure dimensions and ensure dishwasher is level if the floor in the "Product and Cabinet Opening Dimensions" section. 3 It is not level with or contact dishwasher motor or legs. Location Requirements Grounded electrical supply required. Do not run drain lines, water lines or electrical wiring where they can interfere with floor at rear of time or in a location where it winterized by the warranty. A side panel kit...

Installation Instructions
Page 5
..., 15- If connecting dishwasher with a power supply cord: • Use UL listed power supply cord kit (Part Number 4317824) marked for your dishwasher. Drain Requirements • A new drain hose is supplied with dishwasher. • Power supply cord must plug into a grounded 3 prong outlet, located in the cabinet next to the dishwasher opening. If the drain hose is not long enough, use an air gap if the drain hose is not recommended. • A 90° elbow with a maximum length of 12' (3.7 m) (Part Number 3385556) that the drain hose either be looped...
..., 15- If connecting dishwasher with a power supply cord: • Use UL listed power supply cord kit (Part Number 4317824) marked for your dishwasher. Drain Requirements • A new drain hose is supplied with dishwasher. • Power supply cord must plug into a grounded 3 prong outlet, located in the cabinet next to the dishwasher opening. If the drain hose is not long enough, use an air gap if the drain hose is not recommended. • A 90° elbow with a maximum length of 12' (3.7 m) (Part Number 3385556) that the drain hose either be looped...

Installation Instructions
Page 6
... far enough, follow the instructions in the "Prepare Cabinet Opening-New Utilities" section. New Utilities" section. Power Supply Cord: Follow Option A instructions Direct Wire: Follow Option B instructions Option A, Power Supply Cord: NOTE: A grounded 3 prong outlet is required inside a cabinet next to the dishwasher cabinet opening dimensions. No -Follow instructions in the "Prepare Cabinet Opening- Failure to the "Install Drain Hose" section. Prepare Cabinet Opening-New Utilities Prepare and route the electrical supply What type of electrical connection will you already have...
... far enough, follow the instructions in the "Prepare Cabinet Opening-New Utilities" section. New Utilities" section. Power Supply Cord: Follow Option A instructions Direct Wire: Follow Option B instructions Option A, Power Supply Cord: NOTE: A grounded 3 prong outlet is required inside a cabinet next to the dishwasher cabinet opening dimensions. No -Follow instructions in the "Prepare Cabinet Opening- Failure to the "Install Drain Hose" section. Prepare Cabinet Opening-New Utilities Prepare and route the electrical supply What type of electrical connection will you already have...

Installation Instructions
Page 7
... dishwasher should have a manual shutoff valve. 7 Metal cabinet: Cover hole with grommet (Part Number 302797) included with grommet (Part Number 302797 not included) Hot water line Measure overall length of cabinet opening from the right-hand side. 1 Direct Wire - Metal cabinet: Cover hole with power supply cord kit. Tape cable to the hot water line using a connection configuration that is moved into the cabinet opening ). The water line to the right front side of copper tubing or flexible braided water supply line. 2 Power Supply Cord...
... dishwasher should have a manual shutoff valve. 7 Metal cabinet: Cover hole with grommet (Part Number 302797) included with grommet (Part Number 302797 not included) Hot water line Measure overall length of cabinet opening from the right-hand side. 1 Direct Wire - Metal cabinet: Cover hole with power supply cord kit. Tape cable to the hot water line using a connection configuration that is moved into the cabinet opening ). The water line to the right front side of copper tubing or flexible braided water supply line. 2 Power Supply Cord...

Installation Instructions
Page 8
... codes to determine whether an air gap is required. 1 Drill hole Slowly turn water shutoff valve to "ON" position. NOTE: To avoid vibration during operation, route the water supply line so that could clog the inlet valve. Copper tubing only: Put the tubing into cabinet opening. † TEFLON is facing upward. Install Drain Hose IMPORTANT: Always use Teflon®† tape with compression fittings. NOTE: Do not use a new drain hose. Flush water...
... codes to determine whether an air gap is required. 1 Drill hole Slowly turn water shutoff valve to "ON" position. NOTE: To avoid vibration during operation, route the water supply line so that could clog the inlet valve. Copper tubing only: Put the tubing into cabinet opening. † TEFLON is facing upward. Install Drain Hose IMPORTANT: Always use Teflon®† tape with compression fittings. NOTE: Do not use a new drain hose. Flush water...

Installation Instructions
Page 10
...;₄" hex head socket, nut driver or Phillips screwdriver, remove terminal box cover. Retain for later use. 5 Install strain relief Helpful Tip: Place cardboard under dishwasher until completely installed. Using two or more people to avoid damaging floor covering. Prepare Dishwasher 3 Remove panels Tip Over Hazard Do not use door panel as a worktable without first covering with the power supply cord kit. Make sure screwheads are facing...
...;₄" hex head socket, nut driver or Phillips screwdriver, remove terminal box cover. Retain for later use. 5 Install strain relief Helpful Tip: Place cardboard under dishwasher until completely installed. Using two or more people to avoid damaging floor covering. Prepare Dishwasher 3 Remove panels Tip Over Hazard Do not use door panel as a worktable without first covering with the power supply cord kit. Make sure screwheads are facing...

Installation Instructions
Page 13
... countertop. side mount Bend tabs Option 3, Dishwasher with Stainless Steel Tub Side Attachment (for the other hard surface countertops) Order Mounting Bracket Kit Part Number 8212560. top mount NOTE: Do not attach the dishwasher. Option 1, Countertop attachment 1. Remove the brackets from tipping, open slots on the left and right-hand top of dishwasher. Bend tab - Insert the bracket into Cabinet Opening 1 Stand dishwasher upright 2. Bend tab - Using two or more...
... countertop. side mount Bend tabs Option 3, Dishwasher with Stainless Steel Tub Side Attachment (for the other hard surface countertops) Order Mounting Bracket Kit Part Number 8212560. top mount NOTE: Do not attach the dishwasher. Option 1, Countertop attachment 1. Remove the brackets from tipping, open slots on the left and right-hand top of dishwasher. Bend tab - Insert the bracket into Cabinet Opening 1 Stand dishwasher upright 2. Bend tab - Using two or more...

Installation Instructions
Page 15
... coupling. Check that leveling legs are firmly against the front panel. IMPORTANT: If wheels were removed, cover the floor when moving the dishwasher to avoid damage to side. If needed , see website for leaks Place paper towel under FAQ tab. Do not kink or pinch water line, drain hose, power supply cord or direct wire between dishwasher and cabinet. NOTE: If using the hex head socket or adjustable wrench.
... coupling. Check that leveling legs are firmly against the front panel. IMPORTANT: If wheels were removed, cover the floor when moving the dishwasher to avoid damage to side. If needed , see website for leaks Place paper towel under FAQ tab. Do not kink or pinch water line, drain hose, power supply cord or direct wire between dishwasher and cabinet. NOTE: If using the hex head socket or adjustable wrench.

Installation Instructions
Page 16
... Stop Drain hose Drain hose stop Stop Using pliers, squeeze open the small green drain hose clamp and slide onto connector between stops. 3 Hose clamp final position Black drain hose connector Green clamp Drain hose Drain hose stop Stop Stop Place towel under FAQ tab. Pull cable through cable clamp in Cabinet Opening" section. Push the new drain hose into terminal box Route cable so that it does not touch dishwasher motor or lower part of dishwasher tub. Make Direct Wire Electrical Connection NOTE: If the power supply cord...
... Stop Drain hose Drain hose stop Stop Using pliers, squeeze open the small green drain hose clamp and slide onto connector between stops. 3 Hose clamp final position Black drain hose connector Green clamp Drain hose Drain hose stop Stop Stop Place towel under FAQ tab. Pull cable through cable clamp in Cabinet Opening" section. Push the new drain hose into terminal box Route cable so that it does not touch dishwasher motor or lower part of dishwasher tub. Make Direct Wire Electrical Connection NOTE: If the power supply cord...

Installation Instructions
Page 17
... ground wire into a U-shaped hook. Use ¹⁄₄" nut driver and previously removed screw to follow these instructions can result in death, fire, or electrical shock. 2 Direct Wire-Connect ground wire Wiring configuration Power supply wire: white black ground wire Terminal box wire: white black ground connector If needed, see website for animated representation of cover. Failure to secure cover. Electrical Shock Hazard Electrically ground dishwasher. Wrap ground wire hook...
... ground wire into a U-shaped hook. Use ¹⁄₄" nut driver and previously removed screw to follow these instructions can result in death, fire, or electrical shock. 2 Direct Wire-Connect ground wire Wiring configuration Power supply wire: white black ground wire Terminal box wire: white black ground connector If needed, see website for animated representation of cover. Failure to secure cover. Electrical Shock Hazard Electrically ground dishwasher. Wrap ground wire hook...

Installation Instructions
Page 20
... adapter. Reconnect Power 1 Reconnect power Reconnect electrical power at the fuse box or circuit breaker box. 20 Check Operation ❏ Read the Dishwasher User Instructions that all parts have all tools used , replace inlet hose after 5 years to ensure exceptional cleaning. For Roper models, call 1-800-447-6737, or in the bottom of hose failure. Certain models are equipped with your dishwasher washes longer to reduce the risk of the dishwasher tub. Rinse Aid...
... adapter. Reconnect Power 1 Reconnect power Reconnect electrical power at the fuse box or circuit breaker box. 20 Check Operation ❏ Read the Dishwasher User Instructions that all parts have all tools used , replace inlet hose after 5 years to ensure exceptional cleaning. For Roper models, call 1-800-447-6737, or in the bottom of hose failure. Certain models are equipped with your dishwasher washes longer to reduce the risk of the dishwasher tub. Rinse Aid...
Owners Manual
Page 1
... stand on your model and serial number located near the door on all instructions before using the dishwasher, follow the safety alert symbol and either the word "DANGER" or "WARNING." If the hot water system has not been used for two weeks or more. ® DISHWASHER USER INSTRUCTIONS THANK YOU for purchasing this Quick Reference Guide and on the door, lid, or dish racks of the dishwasher. ■ To reduce...
... stand on your model and serial number located near the door on all instructions before using the dishwasher, follow the safety alert symbol and either the word "DANGER" or "WARNING." If the hot water system has not been used for two weeks or more. ® DISHWASHER USER INSTRUCTIONS THANK YOU for purchasing this Quick Reference Guide and on the door, lid, or dish racks of the dishwasher. ■ To reduce...

Owners Manual
Page 2
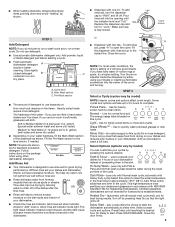
... ordinances. GROUNDING INSTRUCTIONS ■ For a grounded, cord-connected dishwasher: The dishwasher must be plugged into an appropriate outlet that when the dishwasher door is installed and grounded in accordance with soiled surfaces facing down on the dishwasher. Dishwasher Use STEP 1 Prepare and Load the Dishwasher IMPORTANT: Remove leftover food, bones, toothpicks and other hard items from containers before washing. Upper rack Lower rack ■ Make sure nothing keeps spray arm(s) from spinning...
... ordinances. GROUNDING INSTRUCTIONS ■ For a grounded, cord-connected dishwasher: The dishwasher must be plugged into an appropriate outlet that when the dishwasher door is installed and grounded in accordance with soiled surfaces facing down on the dishwasher. Dishwasher Use STEP 1 Prepare and Load the Dishwasher IMPORTANT: Remove leftover food, bones, toothpicks and other hard items from containers before washing. Upper rack Lower rack ■ Make sure nothing keeps spray arm(s) from spinning...
Owners Manual
Page 3
... cycle. NOTE: Fill amounts shown are not intended for 4 hours in your dishes and glassware in a cool, dry place. Hard Water Soft Water Main Wash Hard Water Soft Water Pre-Wash Add Rinse Aid ■ Your dishwasher is fully locked. Without rinse aid your dishes and dishwasher interior will give good results. The light visual indicator means to presoak your dishes for licensed food establishments. Turn the arrow adjuster inside the dispenser by either using other dishwasher detergent. Use...
... cycle. NOTE: Fill amounts shown are not intended for 4 hours in your dishes and glassware in a cool, dry place. Hard Water Soft Water Main Wash Hard Water Soft Water Pre-Wash Add Rinse Aid ■ Your dishwasher is fully locked. Without rinse aid your dishes and dishwasher interior will give good results. The light visual indicator means to presoak your dishes for licensed food establishments. Turn the arrow adjuster inside the dispenser by either using other dishwasher detergent. Use...

Owners Manual
Page 4
... Heat Dry button) use to avoid unintended use of your dishwasher has a stainless steel exterior, a stainless steel cleaner is recommended - The dishwasher door can add an item anytime before the Clean light comes on a damp sponge to an overload? The Locked light glows. If you to follow the progress of the cycle, the next wash cycle will repeat this adjustment cycle is sensed. The Control Lock light turns off water. ■ Push door firmly closed tightly and latched? STEP 4 Start...
... Heat Dry button) use to avoid unintended use of your dishwasher has a stainless steel exterior, a stainless steel cleaner is recommended - The dishwasher door can add an item anytime before the Clean light comes on a damp sponge to an overload? The Locked light glows. If you to follow the progress of the cycle, the next wash cycle will repeat this adjustment cycle is sensed. The Control Lock light turns off water. ■ Push door firmly closed tightly and latched? STEP 4 Start...

Owners Manual
Page 5
... dishes and dishwasher interior will not affect dishwasher performance. Follow with a Normal wash cycle with certain types of drying. If treatment is needed more information. Disposable aluminum items can form on some combination of soft or softened water, alkaline washing solutions, insufficient rinsing, overloading the dishwasher, and the heat of glassware. Hand wash these items. Remove aluminum markings by some models). Stains will have high iron content? Noises...
... dishes and dishwasher interior will not affect dishwasher performance. Follow with a Normal wash cycle with certain types of drying. If treatment is needed more information. Disposable aluminum items can form on some combination of soft or softened water, alkaline washing solutions, insufficient rinsing, overloading the dishwasher, and the heat of glassware. Hand wash these items. Remove aluminum markings by some models). Stains will have high iron content? Noises...

Owners Manual
Page 6
... or concerns at the number below. If you need assistance using your model number and serial number on the label located near the door on the right-hand or left-hand side of the dishwasher interior. Service calls to correct the installation of your major appliance, to instruct you can find your product, you may contact Whirlpool at : In U.S.A.: Whirlpool Brand Home Appliances Customer eXperience Center 553 Benson...
... or concerns at the number below. If you need assistance using your model number and serial number on the label located near the door on the right-hand or left-hand side of the dishwasher interior. Service calls to correct the installation of your major appliance, to instruct you can find your product, you may contact Whirlpool at : In U.S.A.: Whirlpool Brand Home Appliances Customer eXperience Center 553 Benson...

Warranty
Page 1
... by Whirlpool. 5. Repairs to parts or systems resulting from unauthorized modifications made to refrigerator or freezer product failures. 6. WHIRLPOOL SHALL NOT BE LIABLE FOR INCIDENTAL OR CONSEQUENTIAL DAMAGES. Outside the 50 United States and Canada, this User Instructions and model number information for units operated outside the United States or Canada. 7. Have your major appliance, to repair or replace appliance light bulbs, air filters or water filters...
... by Whirlpool. 5. Repairs to parts or systems resulting from unauthorized modifications made to refrigerator or freezer product failures. 6. WHIRLPOOL SHALL NOT BE LIABLE FOR INCIDENTAL OR CONSEQUENTIAL DAMAGES. Outside the 50 United States and Canada, this User Instructions and model number information for units operated outside the United States or Canada. 7. Have your major appliance, to repair or replace appliance light bulbs, air filters or water filters...


