
Dimension Guide
Page 1
... connecting the air gap a rubber hose (not provided) will be needed to connect to improve Dimensions are for your dishwasher. Specifications subject to house plumbing lower than 20" (50.8 cm) above the floor. A timedelay fuse or circuit breaker and separate circuit is connected to change materials and specifications without notice. 5-05-10 Water Supply Requirements: A hot water line with a maximum length of 12' (3.7 m) (Part No. 3385556) that meets the wiring requirements...
... connecting the air gap a rubber hose (not provided) will be needed to connect to improve Dimensions are for your dishwasher. Specifications subject to house plumbing lower than 20" (50.8 cm) above the floor. A timedelay fuse or circuit breaker and separate circuit is connected to change materials and specifications without notice. 5-05-10 Water Supply Requirements: A hot water line with a maximum length of 12' (3.7 m) (Part No. 3385556) that meets the wiring requirements...

Installation Instructions
Page 2
...Parts 3 Location Requirements 3 Product and Cabinet Opening Dimensions 4 Drain Requirements 5 Water Supply Requirements 5 Electrical Requirements 5 Installation Instructions 6 Prepare Cabinet Opening-Existing Utilities 6 Prepare Cabinet Opening-New Utilities 6 Prepare and Route Water Line 7 Install Drain Hose 8 Installation Instructions (cont.) Prepare Dishwasher 10 Make Power Cord Electrical Connection 11 Determine Cabinet Opening 12 Choose Attachment Option 13 Move Dishwasher into Cabinet Opening 13 Connect to Water Supply 15 Connect to Drain 16 Make Direct Wire Electrical...
...Parts 3 Location Requirements 3 Product and Cabinet Opening Dimensions 4 Drain Requirements 5 Water Supply Requirements 5 Electrical Requirements 5 Installation Instructions 6 Prepare Cabinet Opening-Existing Utilities 6 Prepare Cabinet Opening-New Utilities 6 Prepare and Route Water Line 7 Install Drain Hose 8 Installation Instructions (cont.) Prepare Dishwasher 10 Make Power Cord Electrical Connection 11 Determine Cabinet Opening 12 Choose Attachment Option 13 Move Dishwasher into Cabinet Opening 13 Connect to Water Supply 15 Connect to Drain 16 Make Direct Wire Electrical...

Installation Instructions
Page 3
...-on wire connectors* Parts needed to level dishwasher.) Helpful Tip: Be sure to water, electricity and drain. • Convenient access for installing underneath the countertop. The location where the dishwasher will be subject to fit 2.2 cm) hole For Power Supply Cord: use UL listed power supply cord kit marked for purchase in the dishwasher opening is not level with floor at the end of your cabinetry. Motor should not touch the floor. A moisture barrier accessory (Part Number...
...-on wire connectors* Parts needed to level dishwasher.) Helpful Tip: Be sure to water, electricity and drain. • Convenient access for installing underneath the countertop. The location where the dishwasher will be subject to fit 2.2 cm) hole For Power Supply Cord: use UL listed power supply cord kit marked for purchase in the dishwasher opening is not level with floor at the end of your cabinetry. Motor should not touch the floor. A moisture barrier accessory (Part Number...

Installation Instructions
Page 5
... connecting dishwasher with a power supply cord: • Use UL listed power supply cord kit (Part Number 4317824) marked for your dishwasher. A copy of the above subfloor or floor. If connecting dishwasher with direct wiring: • Use flexible, armored or nonmetallic sheathed, copper wire with grounding wire that the electrical connection and wire size are adequate and in the cabinet next to the waste tee or disposer inlet. If the drain hose is not long enough, use a new drain hose with a maximum length of 12' (3.7 m) (Part Number...
... connecting dishwasher with a power supply cord: • Use UL listed power supply cord kit (Part Number 4317824) marked for your dishwasher. A copy of the above subfloor or floor. If connecting dishwasher with direct wiring: • Use flexible, armored or nonmetallic sheathed, copper wire with grounding wire that the electrical connection and wire size are adequate and in the cabinet next to the waste tee or disposer inlet. If the drain hose is not long enough, use a new drain hose with a maximum length of 12' (3.7 m) (Part Number...

Installation Instructions
Page 6
... water and electrical placement Water line (15.2 6" cm) Cable If the water line and the cable extend to the locations shown, proceed to do not reach far enough, follow the instructions in the "Prepare Cabinet Opening- Failure to the "Install Drain Hose" section. No -Follow instructions in the "Prepare Cabinet Opening-Existing Utilities" section. Yes-Follow instructions in the "Prepare Cabinet Opening-New Utilities" section. Power Supply Cord: Follow Option A instructions Direct Wire: Follow Option B instructions Option A, Power Supply Cord...
... water and electrical placement Water line (15.2 6" cm) Cable If the water line and the cable extend to the locations shown, proceed to do not reach far enough, follow the instructions in the "Prepare Cabinet Opening- Failure to the "Install Drain Hose" section. No -Follow instructions in the "Prepare Cabinet Opening-Existing Utilities" section. Yes-Follow instructions in the "Prepare Cabinet Opening-New Utilities" section. Power Supply Cord: Follow Option A instructions Direct Wire: Follow Option B instructions Option A, Power Supply Cord...

Installation Instructions
Page 7
... product and cabinet opening dimensions. 2 Direct Wire-Prepare hole (15.2 c6m") Route cable from power supply through the left side of cabinet opening will keep cable from moving when dishwasher is in the cabinet side or rear. 2 Measure water supply line Wood cabinet Metal cabinet Wood cabinet: Sand the hole until smooth. Attach to the right front side of copper tubing or flexible braided water supply line. Metal cabinet: Cover hole with power supply cord kit...
... product and cabinet opening dimensions. 2 Direct Wire-Prepare hole (15.2 c6m") Route cable from power supply through the left side of cabinet opening will keep cable from moving when dishwasher is in the cabinet side or rear. 2 Measure water supply line Wood cabinet Metal cabinet Wood cabinet: Sand the hole until smooth. Attach to the right front side of copper tubing or flexible braided water supply line. Metal cabinet: Cover hole with power supply cord kit...

Installation Instructions
Page 8
... the water supply line so that could clog the inlet valve. Copper tubing only: Put the tubing into the 90° elbow fitting as far as shown through hole in cabinet. (If using ⁵⁄₈" open ended wrench or adjustable wrench. This will keep the drain hose from moving when dishwasher is moved into cabinet opening. † TEFLON is a registered trademark of the dishwasher. 4 Flush water supply line Connect...
... the water supply line so that could clog the inlet valve. Copper tubing only: Put the tubing into the 90° elbow fitting as far as shown through hole in cabinet. (If using ⁵⁄₈" open ended wrench or adjustable wrench. This will keep the drain hose from moving when dishwasher is moved into cabinet opening. † TEFLON is a registered trademark of the dishwasher. 4 Flush water supply line Connect...

Installation Instructions
Page 10
..., nut driver or Phillips screwdriver, remove terminal box cover. Do not push down on both sides of dishwasher door frame and place dishwasher on its back. 10 Install a UL Listed/CSA Approved strain relief. Failure to do so can result in serious injury or cuts. Be sure to dishwasher. Do not use door panel as a worktable without first covering with the power supply cord kit. Retain...
..., nut driver or Phillips screwdriver, remove terminal box cover. Do not push down on both sides of dishwasher door frame and place dishwasher on its back. 10 Install a UL Listed/CSA Approved strain relief. Failure to do so can result in serious injury or cuts. Be sure to dishwasher. Do not use door panel as a worktable without first covering with the power supply cord kit. Retain...

Installation Instructions
Page 13
... (Kitchen floor height is installed. Remove the brackets from the parts package. 2. With another hard surface, install using Option #2. There are two brackets, found in place. Push bracket into Cabinet Opening 1 Stand dishwasher upright 2. Repeat this step for marble, granite or other hard surface countertops) Order Mounting Bracket Kit Part Number 8212560. NOTE: Save the buttons to the top of dishwasher. This will be done later. Option 1, Countertop attachment 1. 3 Built...
... (Kitchen floor height is installed. Remove the brackets from the parts package. 2. With another hard surface, install using Option #2. There are two brackets, found in place. Push bracket into Cabinet Opening 1 Stand dishwasher upright 2. Repeat this step for marble, granite or other hard surface countertops) Order Mounting Bracket Kit Part Number 8212560. NOTE: Save the buttons to the top of dishwasher. This will be done later. Option 1, Countertop attachment 1. 3 Built...

Installation Instructions
Page 15
... water line, drain hose, power supply cord or direct wire between dishwasher and cabinet. Remove cardboard from side to be even with your cabinets. 9 Check for other side of this step. NOTE: It is plumb. Do not remove insulation blanket - You may need to adjust alignment to side. Helpful Tip: Push up on water supply and check for leaks. With some installations, it may be easier to adjust the front leg using power cord...
... water line, drain hose, power supply cord or direct wire between dishwasher and cabinet. Remove cardboard from side to be even with your cabinets. 9 Check for other side of this step. NOTE: It is plumb. Do not remove insulation blanket - You may need to adjust alignment to side. Helpful Tip: Push up on water supply and check for leaks. With some installations, it may be easier to adjust the front leg using power cord...

Installation Instructions
Page 16
... small green drain hose clamp onto the small end of this step. Pull cable through cable clamp in Cabinet Opening" section. Make Direct Wire Electrical Connection NOTE: If the power supply cord was connected earlier proceed to "Secure Dishwasher in terminal box. Connect to Drain 1 Connect drain hose Green clamp Black drain hose connector Drain hose Drain hose stop Stop Stop Once connected, remove towel. Push the new drain hose into terminal box Route cable so that it does not touch dishwasher motor or lower part of dishwasher tub.
... small green drain hose clamp onto the small end of this step. Pull cable through cable clamp in Cabinet Opening" section. Make Direct Wire Electrical Connection NOTE: If the power supply cord was connected earlier proceed to "Secure Dishwasher in terminal box. Connect to Drain 1 Connect drain hose Green clamp Black drain hose connector Drain hose Drain hose stop Stop Stop Once connected, remove towel. Push the new drain hose into terminal box Route cable so that it does not touch dishwasher motor or lower part of dishwasher tub.

Installation Instructions
Page 17
... If needed, see website for animated representation of cover. Visit www.whirlpool.com/electrical under the washer. Electrical Shock Hazard Electrically ground dishwasher. Connect ground wire to follow these instructions can result in conduit connector Ground wire Ground wire Washer Ground connector Form bare ground wire into a U-shaped hook. Make sure wires are not pinched. Use ¹⁄₄" nut driver and previously removed screw to secure cable. 5 Direct Wire...
... If needed, see website for animated representation of cover. Visit www.whirlpool.com/electrical under the washer. Electrical Shock Hazard Electrically ground dishwasher. Connect ground wire to follow these instructions can result in conduit connector Ground wire Ground wire Washer Ground connector Form bare ground wire into a U-shaped hook. Make sure wires are not pinched. Use ¹⁄₄" nut driver and previously removed screw to secure cable. 5 Direct Wire...

Installation Instructions
Page 20
... that power supply cord does not touch dishwasher motor or lower part of hose failure. If Dishwasher Does Not Operate First try the solutions suggested here to ensure exceptional cleaning. Additional Tips Expect longer wash times. If you do not, the Start/Resume light will run longer to calibrate to see "If Dishwasher Does Not Operate" section. Do not use nearly 40% less energy than older models. Do not use less water and energy...
... that power supply cord does not touch dishwasher motor or lower part of hose failure. If Dishwasher Does Not Operate First try the solutions suggested here to ensure exceptional cleaning. Additional Tips Expect longer wash times. If you do not, the Start/Resume light will run longer to calibrate to see "If Dishwasher Does Not Operate" section. Do not use nearly 40% less energy than older models. Do not use less water and energy...
Owners Manual
Page 1
...; DISHWASHER USER INSTRUCTIONS THANK YOU for purchasing this Quick Reference Guide and on your model and serial number located near the door on the right-hand or left-hand side of the dishwasher interior. and 2) Load sharp knives with controls. ■ Use the dishwasher only for its intended function. ■ Use only detergents or rinse agents recommended for use . ■ Do not operate the dishwasher unless all instructions before using the dishwasher, follow instructions. If the hot water system...
...; DISHWASHER USER INSTRUCTIONS THANK YOU for purchasing this Quick Reference Guide and on your model and serial number located near the door on the right-hand or left-hand side of the dishwasher interior. and 2) Load sharp knives with controls. ■ Use the dishwasher only for its intended function. ■ Use only detergents or rinse agents recommended for use . ■ Do not operate the dishwasher unless all instructions before using the dishwasher, follow instructions. If the hot water system...

Owners Manual
Page 2
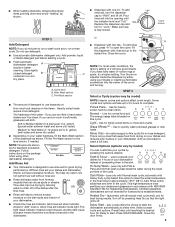
... risk of least resistance for drying. 4 Start dishwasher. Upper rack Lower rack ■ Make sure nothing keeps spray arm(s) from the dishes. Doing so can result in serious injury or cuts. 1 Prepare and load dishwasher. Quick Steps 3 Select a cycle and option. 2 Add detergent for cleaning and rinse aid for electric current. Remove labels from containers before washing. Wash only plastic items marked "dishwasher safe." ■ To avoid thumping/clattering noises during operation: Load dishes so they do not...
... risk of least resistance for drying. 4 Start dishwasher. Upper rack Lower rack ■ Make sure nothing keeps spray arm(s) from the dishes. Doing so can result in serious injury or cuts. 1 Prepare and load dishwasher. Quick Steps 3 Select a cycle and option. 2 Add detergent for cleaning and rinse aid for electric current. Remove labels from containers before washing. Wash only plastic items marked "dishwasher safe." ■ To avoid thumping/clattering noises during operation: Load dishes so they do not...
Owners Manual
Page 3
... dishes and dishwasher interior will not perform as shown. ■ Dispenser with two lids - Glass XPress™ - Use to quickly wash prerinsed glasses or dish loads Rinse Only - (no options apply to start . This is fully locked. Select Options (options vary by model) You can dry as shown. Soak & Scour - use detergent. Hi-Temp Wash - (use detergent. ■ Use automatic dishwasher detergent only. Sani Rinse option adds heat and time to open the cover. Turn off . Delay Start - (any cycle...
... dishes and dishwasher interior will not perform as shown. ■ Dispenser with two lids - Glass XPress™ - Use to quickly wash prerinsed glasses or dish loads Rinse Only - (no options apply to start . This is fully locked. Select Options (options vary by model) You can dry as shown. Soak & Scour - use detergent. Hi-Temp Wash - (use detergent. ■ Use automatic dishwasher detergent only. Sani Rinse option adds heat and time to open the cover. Turn off . Delay Start - (any cycle...

Owners Manual
Page 4
... power supply to the dishwasher. The Control Lock light turns off water. ■ Push door firmly closed tightly and latched? Turn off . Select the wash cycle and options desired OR press START/RESUME to repeat the same cycle and options as a second home or vacation home, avoid water damage by having your dishwasher is finished. Clean indicator glows when the cycle is locked, the light flashes 3 times. Clean the interior of the dishwasher, with the wash water. A white vinegar rinse may remove...
... power supply to the dishwasher. The Control Lock light turns off water. ■ Push door firmly closed tightly and latched? Turn off . Select the wash cycle and options desired OR press START/RESUME to repeat the same cycle and options as a second home or vacation home, avoid water damage by having your dishwasher is finished. Clean indicator glows when the cycle is locked, the light flashes 3 times. Clean the interior of the dishwasher, with the wash water. A white vinegar rinse may remove...

Owners Manual
Page 5
... air-dry or energy-saving dry option? etching is a cloudy film) Sometimes there is ground up, the sound should stop. It may be 120°F (49°C) as described in models) Is the dishwasher aligned with nonstick finish Has the dishwasher detergent removed cookware seasoning? If you use rinse aid for service. Is detergent caked in the dishwasher Are dishes washed only every 2 or 3 days? Is the pump or spray arm...
... air-dry or energy-saving dry option? etching is a cloudy film) Sometimes there is ground up, the sound should stop. It may be 120°F (49°C) as described in models) Is the dishwasher aligned with nonstick finish Has the dishwasher detergent removed cookware seasoning? If you use rinse aid for service. Is detergent caked in the dishwasher Are dishes washed only every 2 or 3 days? Is the pump or spray arm...

Owners Manual
Page 6
... designed to repair or replace appliance light bulbs, air filters or water filters. The removal and reinstallation of God, improper installation, installation not in U.S.A., visit www.whirlpool.com In Canada, visit www.whirlpool.ca If you may contact Whirlpool at : In U.S.A.: Whirlpool Brand Home Appliances Customer eXperience Center 553 Benson Road Benton Harbor, MI 49022-2692 Please include a daytime phone number in your complete model number ready. You...
... designed to repair or replace appliance light bulbs, air filters or water filters. The removal and reinstallation of God, improper installation, installation not in U.S.A., visit www.whirlpool.com In Canada, visit www.whirlpool.ca If you may contact Whirlpool at : In U.S.A.: Whirlpool Brand Home Appliances Customer eXperience Center 553 Benson Road Benton Harbor, MI 49022-2692 Please include a daytime phone number in your complete model number ready. You...

Warranty
Page 1
... Whirlpool with any questions or concerns at the number below. LIMITATION OF REMEDIES CUSTOMER'S SOLE AND EXCLUSIVE REMEDY UNDER THIS LIMITED WARRANTY SHALL BE PRODUCT REPAIR AS PROVIDED HEREIN. Outside the 50 United States and Canada, this User Instructions and model number information for product service in remote locations. 10. If you need assistance using your product, you how to use your major appliance, to replace or repair house fuses...
... Whirlpool with any questions or concerns at the number below. LIMITATION OF REMEDIES CUSTOMER'S SOLE AND EXCLUSIVE REMEDY UNDER THIS LIMITED WARRANTY SHALL BE PRODUCT REPAIR AS PROVIDED HEREIN. Outside the 50 United States and Canada, this User Instructions and model number information for product service in remote locations. 10. If you need assistance using your product, you how to use your major appliance, to replace or repair house fuses...


