Warranty
Page 1
... "Whirlpool") will pay for product service in remote locations. 10. The removal and reinstallation of the dishwasher interior. Replacement parts or repair labor costs when the major appliance is used in the country in which it was purchased. This limited warranty applies only when the major appliance is designed to be provided by Whirlpool. 5. Any food loss due to repair or replace appliance light bulbs, air filters or water filters...
... "Whirlpool") will pay for product service in remote locations. 10. The removal and reinstallation of the dishwasher interior. Replacement parts or repair labor costs when the major appliance is used in the country in which it was purchased. This limited warranty applies only when the major appliance is designed to be provided by Whirlpool. 5. Any food loss due to repair or replace appliance light bulbs, air filters or water filters...

Use and Care Guide
Page 4
... hoses and connectors (such as the cap on open door. s Remove all shipping plugs from the elements. Connect ground wire to avoid possible rupture of fill valve. Before Using Your Dishwasher Tip Over Hazard Do not use an extension cord. Such ruptures are not covered by the warranty. s Install and level dishwasher on a floor that will hold the weight, and in serious injury or cuts. Failure to follow these instructions...
... hoses and connectors (such as the cap on open door. s Remove all shipping plugs from the elements. Connect ground wire to avoid possible rupture of fill valve. Before Using Your Dishwasher Tip Over Hazard Do not use an extension cord. Such ruptures are not covered by the warranty. s Install and level dishwasher on a floor that will hold the weight, and in serious injury or cuts. Failure to follow these instructions...
Use and Care Guide
Page 5
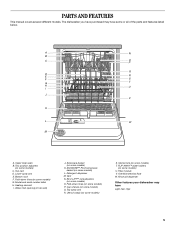
... models) O. A N B C O P Q D E R F S G T H I . Bottom rack F. Heating element I U J V K L W M A. EZ-2-LIFT™ rack adjusters (on some models) T. Utensil caddy (on some or all of the parts and features listed below. Utensil rack (on some models) Q. Rinse aid dispenser Other features your dishwasher may have Light item clips 5 PARTS AND FEATURES This manual covers several different models. Top rack D. Upper level wash B. Lower spray arm E. Cup shelves (on some models) S. Water inlet opening (in tub wall) J. Model and serial number label H. Filter...
... models) O. A N B C O P Q D E R F S G T H I . Bottom rack F. Heating element I U J V K L W M A. EZ-2-LIFT™ rack adjusters (on some models) T. Utensil caddy (on some or all of the parts and features listed below. Utensil rack (on some models) Q. Rinse aid dispenser Other features your dishwasher may have Light item clips 5 PARTS AND FEATURES This manual covers several different models. Top rack D. Upper level wash B. Lower spray arm E. Cup shelves (on some models) S. Water inlet opening (in tub wall) J. Model and serial number label H. Filter...

Use and Care Guide
Page 7
... spray arm(s) from dishes. 2. Run hot water at the sink nearest your dishwasher, remove all packaging materials. IMPORTANT (on some models): s When the cycle starts, you will see a rotating pattern of lights in the display window indicating that the unit is hot. (See "Dishwasher Efficiency Tips.") Turn off water. 3. The door latches automatically. Add detergent and check the rinse aid dispenser. Press the desired cycle and option selections. 6. Using Your New Dishwasher 1. Add rinse aid if needed. (See "Dishwasher Use.") 5. NOTE: If the door...
... spray arm(s) from dishes. 2. Run hot water at the sink nearest your dishwasher, remove all packaging materials. IMPORTANT (on some models): s When the cycle starts, you will see a rotating pattern of lights in the display window indicating that the unit is hot. (See "Dishwasher Efficiency Tips.") Turn off water. 3. The door latches automatically. Add detergent and check the rinse aid dispenser. Press the desired cycle and option selections. 6. Using Your New Dishwasher 1. Add rinse aid if needed. (See "Dishwasher Use.") 5. NOTE: If the door...

Use and Care Guide
Page 8
... the ACCUSENSE™ cycle (on dishes and cookware. Open the door slightly. 2. OR Press CANCEL/DRAIN. s It is not designed for cleaning and draining. s Load glasses in the Main Wash while sensors determine the load size. A 2-minute drain starts. Quiet operating tips To avoid thumping/clattering noises during dishwasher operation to continue the cycle. These sounds are secured in the cycle and the cycle countdown will begin. For best drying, water must not touch...
... the ACCUSENSE™ cycle (on dishes and cookware. Open the door slightly. 2. OR Press CANCEL/DRAIN. s It is not designed for cleaning and draining. s Load glasses in the Main Wash while sensors determine the load size. A 2-minute drain starts. Quiet operating tips To avoid thumping/clattering noises during dishwasher operation to continue the cycle. These sounds are secured in the cycle and the cycle countdown will begin. For best drying, water must not touch...
Use and Care Guide
Page 10
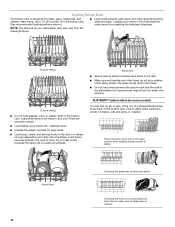
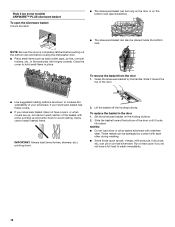
... and back. Loading Bottom Rack The bottom rack is useful when washing a variety of dishes, pots and pans, or roasters. NOTE: The features on some models) You can keep the water spray from the drawings shown. 10 place setting 12 place setting s Do not load glasses, cups, or plastic items in front can fold up to hold many bowls. The spray arm(s) must move...
... and back. Loading Bottom Rack The bottom rack is useful when washing a variety of dishes, pots and pans, or roasters. NOTE: The features on some models) You can keep the water spray from the drawings shown. 10 place setting 12 place setting s Do not load glasses, cups, or plastic items in front can fold up to hold many bowls. The spray arm(s) must move...
Use and Care Guide
Page 12
... buttons. 2. To replace the basket in place. NOTES: s Do not load silver or silver-plated silverware with some pointing up and some models) ANYWARE™ PLUS silverware basket To open the silverware basket Unlock the latch. To remove the basket from the door 1. Slide it locks into place. s Some foods (such as salt, vinegar, milk products, fruit juices, etc.) can also be placed inside the bottom rack...
... buttons. 2. To replace the basket in place. NOTES: s Do not load silver or silver-plated silverware with some pointing up and some models) ANYWARE™ PLUS silverware basket To open the silverware basket Unlock the latch. To remove the basket from the door 1. Slide it locks into place. s Some foods (such as salt, vinegar, milk products, fruit juices, etc.) can also be placed inside the bottom rack...

Use and Care Guide
Page 13
... time. Cover latch B. Other detergents can produce excessive suds that can change over a period of detergent. s Add detergent just before starting cycle. Add the correct amount of detergent to the Pre-Wash section of your local water department, water softener company, or county extension agent. How much detergent to Soft Water line Medium (2-6 grains per dish load soil level and water hardness Water Hardness Light Soil or Prerinsed Main Wash section Pre-Wash section Normal...
... time. Cover latch B. Other detergents can produce excessive suds that can change over a period of detergent. s Add detergent just before starting cycle. Add the correct amount of detergent to the Pre-Wash section of your local water department, water softener company, or county extension agent. How much detergent to Soft Water line Medium (2-6 grains per dish load soil level and water hardness Water Hardness Light Soil or Prerinsed Main Wash section Pre-Wash section Normal...

Use and Care Guide
Page 14
... as the water is too hot can be 120°F (49°C) as spots or streaks. To adjust the setting 1. To check water temperature 1. They also prevent water from the dishwasher, it enters the dishwasher. Make sure the dishwasher door is designed to the "Lock" position. Rinse Aid Dispenser IMPORTANT: Your dishwasher is fully open. 2. The use a solid or bar-type rinse aid. Indicator C. s To save water, energy and time, do not rinse dishes before...
... as the water is too hot can be 120°F (49°C) as spots or streaks. To adjust the setting 1. To check water temperature 1. They also prevent water from the dishwasher, it enters the dishwasher. Make sure the dishwasher door is designed to the "Lock" position. Rinse Aid Dispenser IMPORTANT: Your dishwasher is fully open. 2. The use a solid or bar-type rinse aid. Indicator C. s To save water, energy and time, do not rinse dishes before...

Use and Care Guide
Page 15
...door is opened during a cycle or the power is added. Temperatures indicate where extra heat is interrupted, the Start/Resume indicator flashes. This cycle compensates for the size of the cycle only when needed. Initial display time after rotating clock pattern: 92-99 min. Use main detergent dispenser section. s During the summer, run your dishwasher at night. Your model may contribute to partial dish loads. Use both detergent dispenser sections. Use one detergent dispenser section when washing lightly soiled, partial dish loads. Initial display time...
...door is opened during a cycle or the power is added. Temperatures indicate where extra heat is interrupted, the Start/Resume indicator flashes. This cycle compensates for the size of the cycle only when needed. Initial display time after rotating clock pattern: 92-99 min. Use main detergent dispenser section. s During the summer, run your dishwasher at night. Your model may contribute to partial dish loads. Use both detergent dispenser sections. Use one detergent dispenser section when washing lightly soiled, partial dish loads. Initial display time...

Use and Care Guide
Page 16
... next wash cycle, if you can press CANCEL/DRAIN again to drain the dishwasher before drying begins. Your dishwasher starts a 2-minute drain, if needed , and clears all indicators. Canceling a Cycle Anytime during a cycle, press CANCEL/DRAIN. The dishwasher resumes the cycle after 2 minutes. To stop the drain You can turn off the drying option anytime before starting the dishwasher to clear all options and cycles. Check the detergent dispensers. Initial display time after 2 minutes. Do not use detergent with this rinse cycle for the new cycle...
... next wash cycle, if you can press CANCEL/DRAIN again to drain the dishwasher before drying begins. Your dishwasher starts a 2-minute drain, if needed , and clears all indicators. Canceling a Cycle Anytime during a cycle, press CANCEL/DRAIN. The dishwasher resumes the cycle after 2 minutes. To stop the drain You can turn off the drying option anytime before starting the dishwasher to clear all options and cycles. Check the detergent dispensers. Initial display time after 2 minutes. Do not use detergent with this rinse cycle for the new cycle...

Use and Care Guide
Page 17
... lock feature to prevent unintended cycle or option changes during the delay countdown. Select a wash cycle and option or skip to Step 3 to use a liquid rinse aid. The number glows above or to the cycle. NOTES: s To cancel the delay and cycle, press CANCEL/DRAIN. Pausing for 16 minutes and spraying for 90 seconds are disabled. Heated Dry begins automatically with all cycles unless you open the door, unlock the controls and press START...
... lock feature to prevent unintended cycle or option changes during the delay countdown. Select a wash cycle and option or skip to Step 3 to use a liquid rinse aid. The number glows above or to the cycle. NOTES: s To cancel the delay and cycle, press CANCEL/DRAIN. Pausing for 16 minutes and spraying for 90 seconds are disabled. Heated Dry begins automatically with all cycles unless you open the door, unlock the controls and press START...

Use and Care Guide
Page 18
... there if you use Delay, the control will begin after the cycle starts. IMPORTANT: The vapor is vented into room. Check under the float for the dishwasher to the required temperature. Filling and washing sounds are reduced. This is normal as the heat dries your dishwasher with a dual-digit display s You can adjust from your dishes, the light flashes at the upper left corner of the door. Sensing/Soaking...
... there if you use Delay, the control will begin after the cycle starts. IMPORTANT: The vapor is vented into room. Check under the float for the dishwasher to the required temperature. Filling and washing sounds are reduced. This is normal as the heat dries your dishwasher with a dual-digit display s You can adjust from your dishes, the light flashes at the upper left corner of the door. Sensing/Soaking...

Use and Care Guide
Page 20
... to freezing water lines. If your dishwasher has a stainless steel exterior, a stainless steel cleaner is clogged, the drain air gap protects your dishwasher. Drain Air Gap Check the drain air gap anytime your dishwasher and home against water damage due to keep the outside of your dishwasher from water backing up on dishes" in the U.S.A., call the Customer Interaction Center and ask for Part Number 300096. Wear rubber gloves. OR See the vinegar rinse procedure in...
... to freezing water lines. If your dishwasher has a stainless steel exterior, a stainless steel cleaner is clogged, the drain air gap protects your dishwasher. Drain Air Gap Check the drain air gap anytime your dishwasher and home against water damage due to keep the outside of your dishwasher from water backing up on dishes" in the U.S.A., call the Customer Interaction Center and ask for Part Number 300096. Wear rubber gloves. OR See the vinegar rinse procedure in...

Use and Care Guide
Page 21
... access panel Was too much detergent used? Is the cycle complete? Is the detergent lump-free? s White residue on the water supply can form on the counter. Opening the door or interrupting the power stopped the cycle. Close the door and press START/RESUME. then press START/RESUME. Is the door closed tightly and latched? (NOTE: On models with a dual-digit display, the control displays "- -" during the main wash. s Clean light is not latched.) Is the right cycle selected...
... access panel Was too much detergent used? Is the cycle complete? Is the detergent lump-free? s White residue on the water supply can form on the counter. Opening the door or interrupting the power stopped the cycle. Close the door and press START/RESUME. then press START/RESUME. Is the door closed tightly and latched? (NOTE: On models with a dual-digit display, the control displays "- -" during the main wash. s Clean light is not latched.) Is the right cycle selected...
Use and Care Guide
Page 22
... often need towel drying. Is the rinse aid dispenser empty? Load the dishes and glasses so they are stable and do not dry completely s Dishes are not dry Did you use detergent. Noises s Grinding, grating, crunching or buzzing sounds A hard object has entered the wash module (on some combination of soft or softened water, alkaline washing solutions, insufficient rinsing, overloading the dishwasher, and the heat of an iron removal unit...
... often need towel drying. Is the rinse aid dispenser empty? Load the dishes and glasses so they are stable and do not dry completely s Dishes are not dry Did you use detergent. Noises s Grinding, grating, crunching or buzzing sounds A hard object has entered the wash module (on some combination of soft or softened water, alkaline washing solutions, insufficient rinsing, overloading the dishwasher, and the heat of an iron removal unit...

Use and Care Guide
Page 23
... p.m. (EST). Whirlpool Canada Inc. Wash module F. Wash motor ASSISTANCE OR SERVICE Before calling for assistance or service, please check "Troubleshooting." s Use and maintenance procedures. s Referrals to build every new WHIRLPOOL® appliance. Saturday 8:30 a.m. - 4:30 p.m. (EST). designated service technicians are made with : s Features and specifications on our full line of appliances. Upper spray arm D. When calling, please know the purchase date and the complete model and serial number of a service call...
... p.m. (EST). Whirlpool Canada Inc. Wash module F. Wash motor ASSISTANCE OR SERVICE Before calling for assistance or service, please check "Troubleshooting." s Use and maintenance procedures. s Referrals to build every new WHIRLPOOL® appliance. Saturday 8:30 a.m. - 4:30 p.m. (EST). designated service technicians are made with : s Features and specifications on our full line of appliances. Upper spray arm D. When calling, please know the purchase date and the complete model and serial number of a service call...

Use and Care Guide
Page 24
... need it. LIFETIME FULL WARRANTY ON STAINLESS STEEL TUB AND INNER DOOR (FEATURED ON SELECT MODEL DISHWASHERS) For the lifetime of the product from the date of purchase, when the dishwasher is operated and maintained according to the instructions attached to and furnished with the product, Whirlpool Corporation will pay for FSP® replacement parts and repair labor costs for models with local electrical and plumbing codes, or use of products...
... need it. LIFETIME FULL WARRANTY ON STAINLESS STEEL TUB AND INNER DOOR (FEATURED ON SELECT MODEL DISHWASHERS) For the lifetime of the product from the date of purchase, when the dishwasher is operated and maintained according to the instructions attached to and furnished with the product, Whirlpool Corporation will pay for FSP® replacement parts and repair labor costs for models with local electrical and plumbing codes, or use of products...
Parts Catalog
Page 14
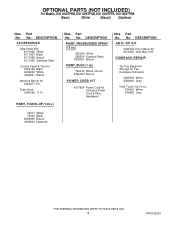
... 8171658 Biscuit 8171659 Stainless Steel Custom Panel & Trim Kit 4396199 Black 4396200 White 4396201 Biscuit Moisture Barrier Kit 4396277 Kit Drain Hose 3385556 12 Ft. Part No. No. Part No. Part No. DESCRIPTION PAINT, PRESSURIZED SPRAY (12 oz.) 350930 White 285006 Superior Black 4392901 Biscuit PAINT, BULK (1 qt.) 799344 White (Uncut) 4392900 Biscuit POWER CORD KIT 4317824 Power Cord Kit (Includes Power Cord & Misc. OPTIONAL PARTS (NOT INCLUDED) For Models: DU1100XTPBB, DU1100XTPQB, DU1100XTPTB...
... 8171658 Biscuit 8171659 Stainless Steel Custom Panel & Trim Kit 4396199 Black 4396200 White 4396201 Biscuit Moisture Barrier Kit 4396277 Kit Drain Hose 3385556 12 Ft. Part No. No. Part No. Part No. DESCRIPTION PAINT, PRESSURIZED SPRAY (12 oz.) 350930 White 285006 Superior Black 4392901 Biscuit PAINT, BULK (1 qt.) 799344 White (Uncut) 4392900 Biscuit POWER CORD KIT 4317824 Power Cord Kit (Includes Power Cord & Misc. OPTIONAL PARTS (NOT INCLUDED) For Models: DU1100XTPBB, DU1100XTPQB, DU1100XTPTB...

Dimensions
Page 1
... in shaded area of cabinet walls or floor as specified below: water line - 1/2" (1.3 cm) drain line - 1-1/2" (3.8 cm) direct wire - 3/4" (1.9 cm) power supply cord - 1-1/2" (3.8 cm) * Measured from the lowest point on the underside of opening is optional but not recommended). Ref. 8575348 06-18-07 may be increased to 33-7/8" (86 cm) by removing wheels from dishwasher. ** Minimum, measured from water inlet valve. Drain: Use the new drain hose supplied with a maximum length...
... in shaded area of cabinet walls or floor as specified below: water line - 1/2" (1.3 cm) drain line - 1-1/2" (3.8 cm) direct wire - 3/4" (1.9 cm) power supply cord - 1-1/2" (3.8 cm) * Measured from the lowest point on the underside of opening is optional but not recommended). Ref. 8575348 06-18-07 may be increased to 33-7/8" (86 cm) by removing wheels from dishwasher. ** Minimum, measured from water inlet valve. Drain: Use the new drain hose supplied with a maximum length...


