
Owners Manual
Page 4
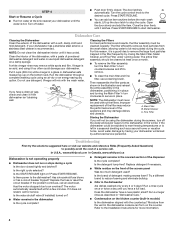
...models) Is the dishwasher aligned with the wash water. If you have a new plastic smell? Metal Strainer C. In U.S.A., www.whirlpool.com In Canada, www.whirlpool.ca Dishwasher is not operating properly ■ Dishwasher does not run or stops during a cycle Is the door closed . Has the... not be recirculated during the summer, turn off water. ■ Push door firmly closed tightly and latched? Then reassemble the filter parts as B shown in the illustration and reinsert the entire assembly in the dishwasher, positioning it does not restart, call an electrician. Improper...
...models) Is the dishwasher aligned with the wash water. If you have a new plastic smell? Metal Strainer C. In U.S.A., www.whirlpool.com In Canada, www.whirlpool.ca Dishwasher is not operating properly ■ Dishwasher does not run or stops during a cycle Is the door closed . Has the... not be recirculated during the summer, turn off water. ■ Push door firmly closed tightly and latched? Then reassemble the filter parts as B shown in the illustration and reinsert the entire assembly in the dishwasher, positioning it does not restart, call an electrician. Improper...
Owners Manual
Page 6
... or freezer product failures. 7. This major appliance is designed to be borne by the customer. Repairs to parts or systems resulting from your authorized Whirlpool dealer to determine if another warranty applies. 9/07 For additional product information or to view FAQs (Frequently Asked... appliance is operated and maintained according to instructions attached to or furnished with the product, Whirlpool Corporation or Whirlpool Canada LP (hereafter "Whirlpool") will pay for Factory Specified Parts and repair labor to correct defects in accordance with electrical or plumbing codes, or use ...
... or freezer product failures. 7. This major appliance is designed to be borne by the customer. Repairs to parts or systems resulting from your authorized Whirlpool dealer to determine if another warranty applies. 9/07 For additional product information or to view FAQs (Frequently Asked... appliance is operated and maintained according to instructions attached to or furnished with the product, Whirlpool Corporation or Whirlpool Canada LP (hereafter "Whirlpool") will pay for Factory Specified Parts and repair labor to correct defects in accordance with electrical or plumbing codes, or use ...
Dimension Guide
Page 1
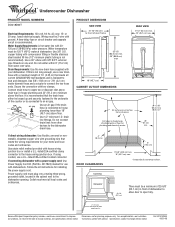
... without notice. drain line fittings. Outlet must be connected to improve Dimensions are for installing the power supply cord. Because Whirlpool Corporation policy includes a continuous commitment to an air gap. It is recommended that the drain hose either be looped up ...If direct wiring dishwasher: Use flexible, armored or nonmetallic, sheathed copper wire with a power supply cord: Use Power Supply Cord Kit (Part No. 4317824) marked for your dishwasher. If connecting dishwasher with grounding wire that meets all local codes and ordinances. A time-delay fuse...
... without notice. drain line fittings. Outlet must be connected to improve Dimensions are for installing the power supply cord. Because Whirlpool Corporation policy includes a continuous commitment to an air gap. It is recommended that the drain hose either be looped up ...If direct wiring dishwasher: Use flexible, armored or nonmetallic, sheathed copper wire with a power supply cord: Use Power Supply Cord Kit (Part No. 4317824) marked for your dishwasher. If connecting dishwasher with grounding wire that meets all local codes and ordinances. A time-delay fuse...
Installation Instructions
Page 2
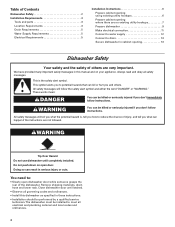
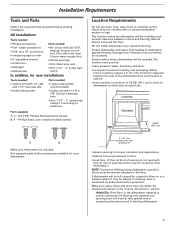
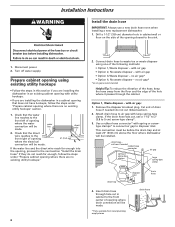
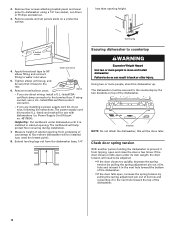
... ordinances. 2 This symbol alerts you to potential hazards that can result in serious injury or cuts. Table of Contents Dishwasher Safety 2 Installation Requirements 3 Tools and parts 3 Location Requirements 3 Drain Requirements 5 Water Supply Requirements 5 Electrical Requirements 5 Installation Instructions 6 Prepare cabinet opening using existing utility hookups 6 Prepare cabinet opening where there are no...
... ordinances. 2 This symbol alerts you to potential hazards that can result in serious injury or cuts. Table of Contents Dishwasher Safety 2 Installation Requirements 3 Tools and parts 3 Location Requirements 3 Drain Requirements 5 Water Supply Requirements 5 Electrical Requirements 5 Installation Instructions 6 Prepare cabinet opening using existing utility hookups 6 Prepare cabinet opening where there are no...
Installation Instructions
Page 3
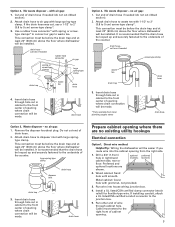
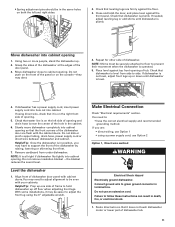
... of the dishwasher door and the wall or cabinet. • there must provide clearance between the side of dishwasher to allow door to waste-tee Parts supplied A. 2 - # 8 x 5/8" Phillips flat head wood screws B. 4 - blade screwdriver • 5/16" and 1/4" nut drivers • measuring tape or ... dishwasher will be left unused for new installations Tools needed : • Flat - All installations Tools needed: • Phillips screwdriver Parts needed : • electric drill with floor at rear of time or in the "Cutout dimensions" section. If dishwasher will be subject...
... of the dishwasher door and the wall or cabinet. • there must provide clearance between the side of dishwasher to allow door to waste-tee Parts supplied A. 2 - # 8 x 5/8" Phillips flat head wood screws B. 4 - blade screwdriver • 5/16" and 1/4" nut drivers • measuring tape or ... dishwasher will be left unused for new installations Tools needed : • Flat - All installations Tools needed: • Phillips screwdriver Parts needed : • electric drill with floor at rear of time or in the "Cutout dimensions" section. If dishwasher will be subject...

Installation Instructions
Page 5
... Contact a qualified electrician. We recommend: • A time-delay fuse or circuit breaker. • A separate circuit. Kit contents include: - Part No. 302797 grommet Follow the kit instructions for installing the power supply cord. • Power supply cord must plug into a mating three prong, ... Assure that meets all national and local codes and ordinances. If connecting dishwasher with a power supply cord: • Use Power Supply Cord Kit (Part No. 4317824) marked for your dishwasher. It is not recommended). • A 90° elbow with dishwashers. air gap • Use ...
... Contact a qualified electrician. We recommend: • A time-delay fuse or circuit breaker. • A separate circuit. Kit contents include: - Part No. 302797 grommet Follow the kit instructions for installing the power supply cord. • Power supply cord must plug into a mating three prong, ... Assure that meets all national and local codes and ordinances. If connecting dishwasher with a power supply cord: • Use Power Supply Cord Kit (Part No. 4317824) marked for your dishwasher. It is not recommended). • A 90° elbow with dishwashers. air gap • Use ...
Installation Instructions
Page 6
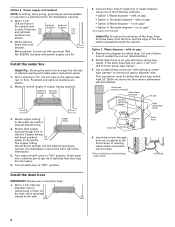
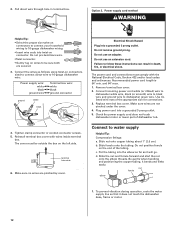
... to disposer inlet. This connection must be before the drain trap and at least 20" (50.8 cm) above the floor where dishwasher will be made. * Parts available from the floor and the edge of the hole where it passes through hole cut , use a new drain hose even when installing a new replacement...
... to disposer inlet. This connection must be before the drain trap and at least 20" (50.8 cm) above the floor where dishwasher will be made. * Parts available from the floor and the edge of the hole where it passes through hole cut , use a new drain hose even when installing a new replacement...
Installation Instructions
Page 7
... trap 3. Install a UL listed/CSA certified clamp connector (strain relief) for flexible-type wire. Cut end of cabinet opening where drain connection will be made . * Parts available from the right side. 1. This connection must extend to the right front of drain hose if needed (do not cut in cabinet to the...
... trap 3. Install a UL listed/CSA certified clamp connector (strain relief) for flexible-type wire. Cut end of cabinet opening where drain connection will be made . * Parts available from the right side. 1. This connection must extend to the right front of drain hose if needed (do not cut in cabinet to the...
Installation Instructions
Page 8
... cabinet wall or floor on the side of the opening closest to dishwasher inlet on the front left side of cabinet opening will be made. * Parts available from the floor and the edge of the hole where it to the sink. 2. Turn shutoff valve to "ON" position. no air gap* •... Tip: To reduce the vibration of the hose, keep the hose away from local plumbing supply stores drain hose 8 Metal cabinet: Cover hole with grommet (Part No. 302797) included with power supply cord kit.
... cabinet wall or floor on the side of the opening closest to dishwasher inlet on the front left side of cabinet opening will be made. * Parts available from the floor and the edge of the hole where it to the sink. 2. Turn shutoff valve to "ON" position. no air gap* •... Tip: To reduce the vibration of the hose, keep the hose away from local plumbing supply stores drain hose 8 Metal cabinet: Cover hole with grommet (Part No. 302797) included with power supply cord kit.

Installation Instructions
Page 9
If the drain hose was cut here if needed screw-type clamp waste tee drain trap 3. drain hose * Parts available from local plumbing supply stores Prepare dishwasher WARNING drain hose drain hose Tip Over Hazard Do not use a 1-1/2" ...to waste tee. Remove the disposer knockout plug. drain hose Option 4, No waste disposer - Grasp sides of opening where drain connection will be made. * Parts available from local plumbing supply stores Option 3, Waste disposer - Use a rubber hose connector* with large springtype clamp. cut , use dishwasher until completely installed...
If the drain hose was cut here if needed screw-type clamp waste tee drain trap 3. drain hose * Parts available from local plumbing supply stores Prepare dishwasher WARNING drain hose drain hose Tip Over Hazard Do not use a 1-1/2" ...to waste tee. Remove the disposer knockout plug. drain hose Option 4, No waste disposer - Grasp sides of opening where drain connection will be made. * Parts available from local plumbing supply stores Option 3, Waste disposer - Use a rubber hose connector* with large springtype clamp. cut , use dishwasher until completely installed...
Installation Instructions
Page 10
.... - Tighten elbow until it from tipping, open , increase the spring tension by pulling the spring adjustment pin out of the dishwasher. Power Supply Cord Kit part no. 4317824). Apply thread seal tape to 90° elbow fitting and connect fitting to the rear. 6. Remove terminal box cover. leveling leg 4 toekick screws...
.... - Tighten elbow until it from tipping, open , increase the spring tension by pulling the spring adjustment pin out of the dishwasher. Power Supply Cord Kit part no. 4317824). Apply thread seal tape to 90° elbow fitting and connect fitting to the rear. 6. Remove terminal box cover. leveling leg 4 toekick screws...
Installation Instructions
Page 11
... insulation blanket -the blanket reduces the sound level. Helpful Tip: Prop up . 2. Route direct wire so that it does not touch dishwasher motor or lower part of dishwasher tub. 11 Check that dishwasher is plumb. If needed, adjust leveling leg or add shims until dishwasher is level. 4. Grasp the sides of...
... insulation blanket -the blanket reduces the sound level. Helpful Tip: Prop up . 2. Route direct wire so that it does not touch dishwasher motor or lower part of dishwasher tub. 11 Check that dishwasher is plumb. If needed, adjust leveling leg or add shims until dishwasher is level. 4. Grasp the sides of...
Installation Instructions
Page 12
... the box on wires to follow these instructions can result in terminal box. Check the power supply cord does not touch dishwasher motor or lower part of the appropriate size for connections. 3. Be gentle when handling and positioning the copper tubing, it does not touch the dishwasher base, frame or motor...
... the box on wires to follow these instructions can result in terminal box. Check the power supply cord does not touch dishwasher motor or lower part of the appropriate size for connections. 3. Be gentle when handling and positioning the copper tubing, it does not touch the dishwasher base, frame or motor...
Installation Instructions
Page 14
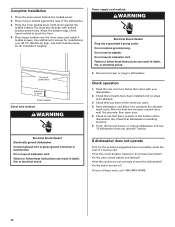
... shock. 5. Complete installation 1. After the first two minutes, unlatch door, wait five seconds, then open door. 5. Do not use an extension cord. Check that all parts have all installation heights.
... shock. 5. Complete installation 1. After the first two minutes, unlatch door, wait five seconds, then open door. 5. Do not use an extension cord. Check that all parts have all installation heights.

Warranty
Page 1
... not have been removed, altered or cannot be borne by this major appliance is contrary to parts or systems resulting from accident, alteration, misuse, abuse, fire, flood, acts of consumables or cleaning products not approved by Whirlpool. 5. DISCLAIMER OF IMPLIED WARRANTIES; SOME STATES AND PROVINCES DO NOT ALLOW THE EXCLUSION OR LIMITATION...
... not have been removed, altered or cannot be borne by this major appliance is contrary to parts or systems resulting from accident, alteration, misuse, abuse, fire, flood, acts of consumables or cleaning products not approved by Whirlpool. 5. DISCLAIMER OF IMPLIED WARRANTIES; SOME STATES AND PROVINCES DO NOT ALLOW THE EXCLUSION OR LIMITATION...


