
Owners Manual
Page 1
... y de serie en la etiqueta ubicada cerca de la puerta, al lado derecho o izquierdo del interior de la lavavajillas. Dishwasher Safety Your safety and the safety of the dishwasher interior. This symbol alerts you to damage the door seal; If the hot water system has not been used for purchasing this Quick Reference Guide and on your model and serial number located near the door on the dishwasher. ■...
... y de serie en la etiqueta ubicada cerca de la puerta, al lado derecho o izquierdo del interior de la lavavajillas. Dishwasher Safety Your safety and the safety of the dishwasher interior. This symbol alerts you to damage the door seal; If the hot water system has not been used for purchasing this Quick Reference Guide and on your model and serial number located near the door on the dishwasher. ■...
Owners Manual
Page 2
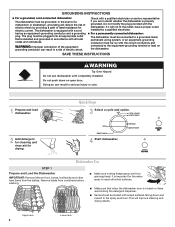
... grounded. Upper rack 2 Lower rack Quick Steps 3 Select a cycle and option. 2 Add detergent for cleaning and rinse aid for electric current. if it will improve cleaning and drying results. The dishwasher is equipped with soiled surfaces facing down on the dishwasher. Check with all soiled surfaces. ■ Make sure that is installed and grounded in serious injury or cuts. 1 Prepare and load dishwasher. Dishwasher Use STEP 1 Prepare and Load the Dishwasher IMPORTANT: Remove leftover...
... grounded. Upper rack 2 Lower rack Quick Steps 3 Select a cycle and option. 2 Add detergent for cleaning and rinse aid for electric current. if it will improve cleaning and drying results. The dishwasher is equipped with soiled surfaces facing down on the dishwasher. Check with all soiled surfaces. ■ Make sure that is installed and grounded in serious injury or cuts. 1 Prepare and load dishwasher. Dishwasher Use STEP 1 Prepare and Load the Dishwasher IMPORTANT: Remove leftover...
Owners Manual
Page 3
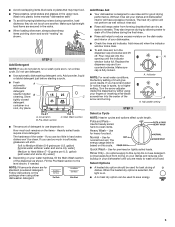
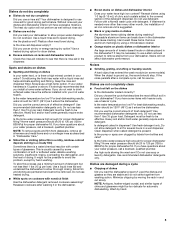
... arrow adjuster inside the dispenser by allowing water to drain off . Make sure lightweight load items are for prerinsed or lightly soiled loads. Add rinse aid when the indicator window looks clear. ■ To add rinse aid, turn counterclockwise. Use for best drying of the water - Replace the dispenser cap and turn the dispenser cap clockwise and lift off of the dishes during operation, load dishes so they do not plan to run a wash cycle soon, run a rinse cycle. If you use rinse aid for good drying...
... arrow adjuster inside the dispenser by allowing water to drain off . Make sure lightweight load items are for prerinsed or lightly soiled loads. Add rinse aid when the indicator window looks clear. ■ To add rinse aid, turn counterclockwise. Use for best drying of the water - Replace the dispenser cap and turn the dispenser cap clockwise and lift off of the dishes during operation, load dishes so they do not plan to run a wash cycle soon, run a rinse cycle. If you use rinse aid for good drying...
Owners Manual
Page 4
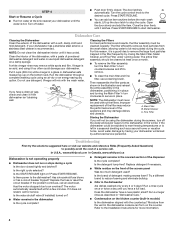
... power supply to the dishwasher? The filter efficiently removes food particles from the vent in a glass or dishwasher-safe measuring cup on ? Dishwasher Care Cleaning the Dishwasher Clean the exterior of the appliance and may remove white spots and film. Is the detergent lump-free? STEP 4 Start or Resume a Cycle ■ Run hot water at least once a month. ■ To remove the filter assembly, turn the Main Filter ¼ turn counterclockwise and lift to start dishwasher. In U.S.A., www.whirlpool...
... power supply to the dishwasher? The filter efficiently removes food particles from the vent in a glass or dishwasher-safe measuring cup on ? Dishwasher Care Cleaning the Dishwasher Clean the exterior of the appliance and may remove white spots and film. Is the detergent lump-free? STEP 4 Start or Resume a Cycle ■ Run hot water at least once a month. ■ To remove the filter assembly, turn the Main Filter ¼ turn counterclockwise and lift to start dishwasher. In U.S.A., www.whirlpool...
Owners Manual
Page 5
... softened water, alkaline washing solutions, insufficient rinsing, overloading the dishwasher, and the heat of effective detergent? Do not use a rinse aid? Use a heated drying option for service. Is the water temperature too low? Is the home water pressure high enough for proper dishwasher filling? Do not use a stain removal product to use heated drying. ■ White spots on the dishes Is the dishwasher loaded correctly? Disposable aluminum items can break down in dispenser? Dishes are not completely clean...
... softened water, alkaline washing solutions, insufficient rinsing, overloading the dishwasher, and the heat of effective detergent? Do not use a rinse aid? Use a heated drying option for service. Is the water temperature too low? Is the home water pressure high enough for proper dishwasher filling? Do not use a stain removal product to use heated drying. ■ White spots on the dishes Is the dishwasher loaded correctly? Disposable aluminum items can break down in dispenser? Dishes are not completely clean...
Owners Manual
Page 6
... from warranty coverage. 3. This major appliance is reported to repair or replace appliance light bulbs, air filters or water filters. Have your complete model and serial number ready. For assistance or service in a remote area where service by Whirlpool. 5. Whirlpool Canada LP licensee in Canada 12/07 Printed in materials or workmanship and is designed to obtain service under these User Instructions and model number information for Factory Specified Parts and repair...
... from warranty coverage. 3. This major appliance is reported to repair or replace appliance light bulbs, air filters or water filters. Have your complete model and serial number ready. For assistance or service in a remote area where service by Whirlpool. 5. Whirlpool Canada LP licensee in Canada 12/07 Printed in materials or workmanship and is designed to obtain service under these User Instructions and model number information for Factory Specified Parts and repair...
Dimension Guide
Page 1
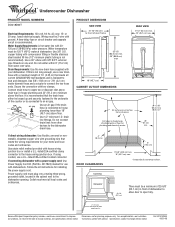
.... fuesd electrical supply. Use a 90° elbow with house wiring junction box or install a U.L.-listed/CSA-certified clamp connector to the underside of 10' (3.05 m) that the drain hose either be free from intrusions Cut holes in the cabinet next to change materials and specifications without notice. Connect drain hose to waste tee or disposer inlet above drain trap in front of dishwasher to allow door to house plumbing lower than...
.... fuesd electrical supply. Use a 90° elbow with house wiring junction box or install a U.L.-listed/CSA-certified clamp connector to the underside of 10' (3.05 m) that the drain hose either be free from intrusions Cut holes in the cabinet next to change materials and specifications without notice. Connect drain hose to waste tee or disposer inlet above drain trap in front of dishwasher to allow door to house plumbing lower than...
Installation Instructions
Page 2
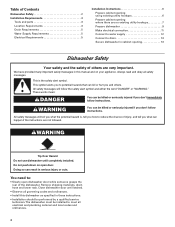
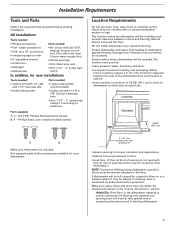
... you what can result in serious injury or cuts. Table of Contents Dishwasher Safety 2 Installation Requirements 3 Tools and parts 3 Location Requirements 3 Drain Requirements 5 Water Supply Requirements 5 Electrical Requirements 5 Installation Instructions 6 Prepare cabinet opening using existing utility hookups 6 Prepare cabinet opening where there are no existing utility hookups 7 Prepare dishwasher 9 Make electrical connection 11 Connect to water supply 12 Connect to drain 13 Secure dishwasher in cabinet opening 13 Dishwasher Safety Your safety and the safety of others...
... you what can result in serious injury or cuts. Table of Contents Dishwasher Safety 2 Installation Requirements 3 Tools and parts 3 Location Requirements 3 Drain Requirements 5 Water Supply Requirements 5 Electrical Requirements 5 Installation Instructions 6 Prepare cabinet opening using existing utility hookups 6 Prepare cabinet opening where there are no existing utility hookups 7 Prepare dishwasher 9 Make electrical connection 11 Connect to water supply 12 Connect to drain 13 Secure dishwasher in cabinet opening 13 Dishwasher Safety Your safety and the safety of others...
Installation Instructions
Page 3
... water supply line.) • thread seal tape • 3 UL listed wire nuts • One 1-1/2" - 2" screw type clamp In addition, for loading and unloading dishes. blade screwdriver • 5/16" and 1/4" nut drivers • measuring tape or ruler • 6" adjustable wrench • small level • flashlight • shallow pan • 90° elbow with or contact dishwasher motors or legs. The location where the dishwasher will be installed...
... water supply line.) • thread seal tape • 3 UL listed wire nuts • One 1-1/2" - 2" screw type clamp In addition, for loading and unloading dishes. blade screwdriver • 5/16" and 1/4" nut drivers • measuring tape or ruler • 6" adjustable wrench • small level • flashlight • shallow pan • 90° elbow with or contact dishwasher motors or legs. The location where the dishwasher will be installed...

Installation Instructions
Page 5
... of the counter, or be 2 wire with a power supply cord: • Use Power Supply Cord Kit (Part No. 4317824) marked for use a U.L.-listed/CSA-certified conduit connector. copper tubing with compression fitting or flexible stainless steel braided fill line (1/2" minimum plastic tubing is resistant to heat and detergent, use a new drain hose with two clamps • Connect drain hose to connect the two hose ends. Assure that meets all national and local codes and ordinances. You must have...
... of the counter, or be 2 wire with a power supply cord: • Use Power Supply Cord Kit (Part No. 4317824) marked for use a U.L.-listed/CSA-certified conduit connector. copper tubing with compression fitting or flexible stainless steel braided fill line (1/2" minimum plastic tubing is resistant to heat and detergent, use a new drain hose with two clamps • Connect drain hose to connect the two hose ends. Assure that meets all national and local codes and ordinances. You must have...
Installation Instructions
Page 6
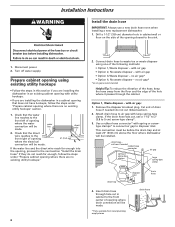
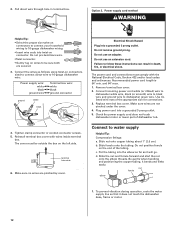
... clamps* to connect air gap to the sink. 1. Insert drain hose through the cabinet. Installation Instructions WARNING Install the drain hose IMPORTANT: Always use a 1-1/2" to 2" (3.8 to 5 cm) screw-type clamp*. 3. Drill a 1-1/2" (3.8 cm) diameter hole in cabinet to the front center of opening where the electrical connection will be made . 6" (15.2 cm) If the water line and the direct wire reach far enough into the opening where drain connection will be installed. Remove the disposer knockout plug.
... clamps* to connect air gap to the sink. 1. Insert drain hose through the cabinet. Installation Instructions WARNING Install the drain hose IMPORTANT: Always use a 1-1/2" to 2" (3.8 to 5 cm) screw-type clamp*. 3. Drill a 1-1/2" (3.8 cm) diameter hole in cabinet to the front center of opening where the electrical connection will be made . 6" (15.2 cm) If the water line and the direct wire reach far enough into the opening where drain connection will be installed. Remove the disposer knockout plug.
Installation Instructions
Page 7
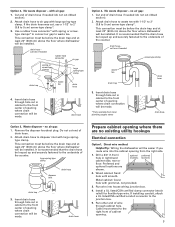
... to waste tee. Run other end of wire through hole cut in cabinet to waste tee with grommet, not provided. 3. no air gap: 1. Attach drain hose to the front center of opening from local plumbing supply stores drain hose drain hose Option 3, Waste disposer - cut , use a 1-1/2" to 2" (3.8 to air gap with large springtype clamp. drain hose Prepare cabinet opening where drain connection will be installed. Cut end of drain hose if needed screw-type clamp waste tee drain trap 3. Attach drain hose to 5 cm...
... to waste tee. Run other end of wire through hole cut in cabinet to waste tee with grommet, not provided. 3. no air gap: 1. Attach drain hose to the front center of opening from local plumbing supply stores drain hose drain hose Option 3, Waste disposer - cut , use a 1-1/2" to 2" (3.8 to air gap with large springtype clamp. drain hose Prepare cabinet opening where drain connection will be installed. Cut end of drain hose if needed screw-type clamp waste tee drain trap 3. Attach drain hose to 5 cm...
Installation Instructions
Page 8
... will be gentle. Turn shutoff valve to air gap with a manual shutoff valve. no air gap* *an air gap is required in cabinet to 5 cm) screw-type clamp*. 3. Remove the disposer knockout plug. cut ribbed section). 2. Install the water line Helpful Tip: Routing the water line through hole cut , use a new drain hose. 1. Attach drain hose to "OFF" position. drain hose - Preferred and optional locations are shown. Turn water shutoff valve to the dishwasher opening where drain connection will make water connection easier. 1. Cut end of cabinet opening closest to the...
... will be gentle. Turn shutoff valve to air gap with a manual shutoff valve. no air gap* *an air gap is required in cabinet to 5 cm) screw-type clamp*. 3. Remove the disposer knockout plug. cut ribbed section). 2. Install the water line Helpful Tip: Routing the water line through hole cut , use a new drain hose. 1. Attach drain hose to "OFF" position. drain hose - Preferred and optional locations are shown. Turn water shutoff valve to the dishwasher opening where drain connection will make water connection easier. 1. Cut end of cabinet opening closest to the...

Installation Instructions
Page 9
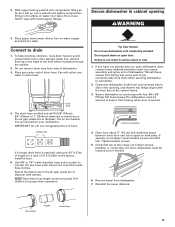
... cut in cabinet to disposer inlet with air gap: 1. This connection must be before the drain trap and at least 20" (50.8 cm) above the floor where dishwasher will be installed. drain hose - no air gap: 1. Insert drain hose through hole cut here if needed screw-type clamp waste tee drain trap 3. drain hose Option 4, No waste disposer - no air gap: 1. drain hose - cut ribbed section). 2. Cut end of opening where drain connection will be made . * Parts available from local plumbing supply...
... cut in cabinet to disposer inlet with air gap: 1. This connection must be before the drain trap and at least 20" (50.8 cm) above the floor where dishwasher will be installed. drain hose - no air gap: 1. Insert drain hose through hole cut here if needed screw-type clamp waste tee drain trap 3. drain hose Option 4, No waste disposer - no air gap: 1. drain hose - cut ribbed section). 2. Cut end of opening where drain connection will be made . * Parts available from local plumbing supply...
Installation Instructions
Page 10
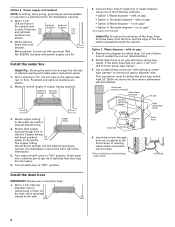
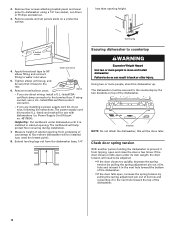
.... Remove four screws attaching toekick panel and lower panel to dishwasher using conduit, use with dishwashers (i.e. leveling leg 4 toekick screws water inlet valve 4. The dishwasher must be adjusted. • If the door closes too quickly, decrease the spring tension by the two brackets on a protective surface. Check door spring tension With another person holding the dishwasher to floor where dishwasher will help protect floor covering during installation. 7. elbow - If you are installing a power supply cord kit, do...
.... Remove four screws attaching toekick panel and lower panel to dishwasher using conduit, use with dishwashers (i.e. leveling leg 4 toekick screws water inlet valve 4. The dishwasher must be adjusted. • If the door closes too quickly, decrease the spring tension by the two brackets on a protective surface. Check door spring tension With another person holding the dishwasher to floor where dishwasher will help protect floor covering during installation. 7. elbow - If you are installing a power supply cord kit, do...
Installation Instructions
Page 11
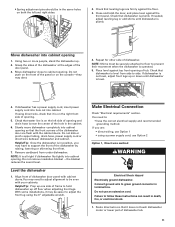
... power supply cord into hole cut into cabinet opening 1. Slowly move dishwasher completely into cabinet opening . 5. Helpful Tip: Prop up off floor when adjusting front legs. If needed, adjust leveling leg or add shims until dishwasher is plumb. Move dishwasher into cabinet. Move dishwasher close to : • have to adjust the front leg using the 6" adjustable wrench. NOTE: Shims must be even with cabinet doors. Do not kink or pinch copper tubing, drain hose, power supply cord or direct wire...
... power supply cord into hole cut into cabinet opening 1. Slowly move dishwasher completely into cabinet opening . 5. Helpful Tip: Prop up off floor when adjusting front legs. If needed, adjust leveling leg or add shims until dishwasher is plumb. Move dishwasher into cabinet. Move dishwasher close to : • have to adjust the front leg using the 6" adjustable wrench. NOTE: Shims must be even with cabinet doors. Do not kink or pinch copper tubing, drain hose, power supply cord or direct wire...
Installation Instructions
Page 12
... during operation, route the water supply line so that it does not touch the dishwasher base, frame or motor. 12 Option 2, Power supply cord method WARNING Helpful Tip: • Select the proper size twist-on connectors sized to connect direct wire to follow these instructions can result in terminal box. Do not remove ground prong. Connect incoming power cord white (or ribbed) wire to dishwasher white wire, black (or smooth) wire to black wire...
... during operation, route the water supply line so that it does not touch the dishwasher base, frame or motor. 12 Option 2, Power supply cord method WARNING Helpful Tip: • Select the proper size twist-on connectors sized to connect direct wire to follow these instructions can result in terminal box. Do not remove ground prong. Connect incoming power cord white (or ribbed) wire to dishwasher white wire, black (or smooth) wire to black wire...
Installation Instructions
Page 13
... or cuts. 1. screw to connect the two hose ends. Check that space between inner door and tub is equal on open dishwasher door, remove lower dishrack and place towel over pump assembly and spray arm of dishwasher. 3. Pan will keep it passes through the cabinet. 2. The drain hose molded end will go, use dishwasher until completely installed. NOTE: Total drain hose length must be secured to the air gap, waste tee or disposer with motor, door springs, water line, cabinet, flooring...
... or cuts. 1. screw to connect the two hose ends. Check that space between inner door and tub is equal on open dishwasher door, remove lower dishrack and place towel over pump assembly and spray arm of dishwasher. 3. Pan will keep it passes through the cabinet. 2. The drain hose molded end will go, use dishwasher until completely installed. NOTE: Total drain hose length must be secured to the air gap, waste tee or disposer with motor, door springs, water line, cabinet, flooring...
Installation Instructions
Page 14
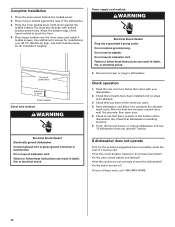
... wash cycle. Place 2-piece toekick against the toekick bracket. Connect ground wire to touch the floor. 4. After the first two minutes, unlatch door, wait five seconds, then open door. 5. Do not remove ground prong. Reconnect power or plug in terminal box. Check that there is working properly. 6. Place the lower panel behind the toekick panel. 2. Use top 4 screw holes Adjust up or down 2-piece toekick Direct wire method: WARNING Electrical...
... wash cycle. Place 2-piece toekick against the toekick bracket. Connect ground wire to touch the floor. 4. After the first two minutes, unlatch door, wait five seconds, then open door. 5. Do not remove ground prong. Reconnect power or plug in terminal box. Check that there is working properly. 6. Place the lower panel behind the toekick panel. 2. Use top 4 screw holes Adjust up or down 2-piece toekick Direct wire method: WARNING Electrical...

Warranty
Page 1
... service company. For assistance or service in -home service is reported to repair or replace appliance light bulbs, air filters or water filters. If you need assistance using your product, you on the right-hand or left-hand side of God, improper installation, installation not in accordance with published installation instructions. 11. Service calls to Whirlpool within 30 days from accident, alteration, misuse, abuse, fire, flood, acts of the dishwasher interior. Repairs...
... service company. For assistance or service in -home service is reported to repair or replace appliance light bulbs, air filters or water filters. If you need assistance using your product, you on the right-hand or left-hand side of God, improper installation, installation not in accordance with published installation instructions. 11. Service calls to Whirlpool within 30 days from accident, alteration, misuse, abuse, fire, flood, acts of the dishwasher interior. Repairs...

