User Manual
Page 4
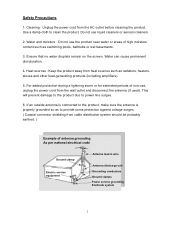
.... 3. Heat sources : Keep the product away from the wall outlet and disconnect the antenna (if used). Use a damp cloth to power line surges. 6. Ensure that no water droplets remain on the screen. For added protection during a lightning storm or for extended periods of... lead in wire Antenna discharge unit Grounding conductors Ground clamps Power service grounding Electrode system 2 Cleaning : Unplug the power cord from cable distribution system should be probably earthed. ) Example of non-use, unplug the power cord from heat sources such as to provide some protection against...
.... 3. Heat sources : Keep the product away from the wall outlet and disconnect the antenna (if used). Use a damp cloth to power line surges. 6. Ensure that no water droplets remain on the screen. For added protection during a lightning storm or for extended periods of... lead in wire Antenna discharge unit Grounding conductors Ground clamps Power service grounding Electrode system 2 Cleaning : Unplug the power cord from cable distribution system should be probably earthed. ) Example of non-use, unplug the power cord from heat sources such as to provide some protection against...
User Manual
Page 5
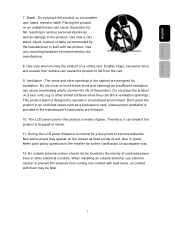
... The vents and other openings in an enclosed space such as a bookcase or rack, unless proper ventilation is made of the product. During the LCD panel lifespan it can cause overheating and/or shorten the life of glass. When installing an outside antenna system should not be fatal. 3 Use ...or green. Do not cover or block these vents and openings as contact with the product. The LCD panel used in serious personal injuries as well as fixed points of overhead power lines or other similar surfaces since they can cause the product to become defective. Placing the product ...
... The vents and other openings in an enclosed space such as a bookcase or rack, unless proper ventilation is made of the product. During the LCD panel lifespan it can cause overheating and/or shorten the life of glass. When installing an outside antenna system should not be fatal. 3 Use ...or green. Do not cover or block these vents and openings as contact with the product. The LCD panel used in serious personal injuries as well as fixed points of overhead power lines or other similar surfaces since they can cause the product to become defective. Placing the product ...
User Manual
Page 7
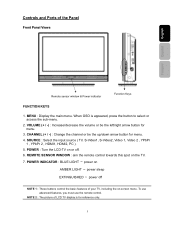
... is for reference only. 5 SOURCE : Select the input source ( TV, S-Video1, S-Video2, Video 1, Video 2 , YPbPr 1 , YPbPr 2 , HDMI1, HDMI2, PC ). 5. POWER INDICATOR : BLUE LIGHT ─ power on AMBER LIGHT ─ power sleep EXTINGUISHED ─ power off . 6. Controls and Ports of your TV, including the on the TV. 7. POWER : Turn the LCD-TV on or off NOTE 1 : These buttons control the basic...
... is for reference only. 5 SOURCE : Select the input source ( TV, S-Video1, S-Video2, Video 1, Video 2 , YPbPr 1 , YPbPr 2 , HDMI1, HDMI2, PC ). 5. POWER INDICATOR : BLUE LIGHT ─ power on AMBER LIGHT ─ power sleep EXTINGUISHED ─ power off . 6. Controls and Ports of your TV, including the on the TV. 7. POWER : Turn the LCD-TV on or off NOTE 1 : These buttons control the basic...
User Manual
Page 8
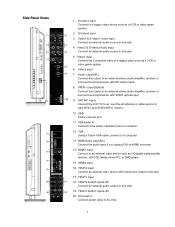
... you using a DVI-to this output to AC inlet. 6 YPbPr2 Audio2 input(L/R) Connect an external audio source to -HDMI converter. 14. AC power in Connect to an external stereo audio amplifier, receiver or surround sound processor with R/L audio inputs. 8. SPDIF output(Optical) Connect this jack. 17... 12. Video2 & S-Video2 Audio input Connect an external audio source to view NTSC and ATSC(HDTV) content. 10. ANT.(RF input) Connect the LCD TV to an over-the-air antenna or cable service to this jack. 4. Side Panel Views 20 1. Video1 & S-Video1 Audio input Connect an external ...
... you using a DVI-to this output to AC inlet. 6 YPbPr2 Audio2 input(L/R) Connect an external audio source to -HDMI converter. 14. AC power in Connect to an external stereo audio amplifier, receiver or surround sound processor with R/L audio inputs. 8. SPDIF output(Optical) Connect this jack. 17... 12. Video2 & S-Video2 Audio input Connect an external audio source to view NTSC and ATSC(HDTV) content. 10. ANT.(RF input) Connect the LCD TV to an over-the-air antenna or cable service to this jack. 4. Side Panel Views 20 1. Video1 & S-Video1 Audio input Connect an external ...
User Manual
Page 10
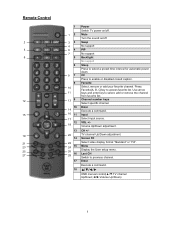
...User setup menu. CH +/TV channel Up/Down adjustment. Last CH Switch to enable or disabled closed caption. VOL +/Volume Up/Down adjustment. CC Press to previous channel. Use arrow keys and enter key to select a preset time interval for automatic power down. Channel number keys... Select, remove or add your favorite channel. Press Favorite(A, B, C)key to access favorite list. Enter Execute a command. OSD menual control(▲/▼:TV channel Up/Down;◄/►:Volume Up/Down) 8 Screen Fit Select video display format "Standard" or "Fill". Remote Control 2 5 8 12 15...
...User setup menu. CH +/TV channel Up/Down adjustment. Last CH Switch to enable or disabled closed caption. VOL +/Volume Up/Down adjustment. CC Press to previous channel. Use arrow keys and enter key to select a preset time interval for automatic power down. Channel number keys... Select, remove or add your favorite channel. Press Favorite(A, B, C)key to access favorite list. Enter Execute a command. OSD menual control(▲/▼:TV channel Up/Down;◄/►:Volume Up/Down) 8 Screen Fit Select video display format "Standard" or "Fill". Remote Control 2 5 8 12 15...
User Manual
Page 14
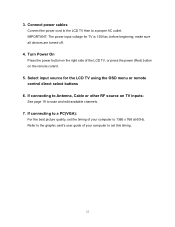
... remote control. 5. Refer to set this timing. 12 IMPORTANT: The power input voltage for the LCD TV using the OSD menu or remote control direct select buttons 6. Select input source for TV is 120Vac, before beginning; 3. Connect power cables Connect the power cord to the LCD TV then to scan and edit available channels. 7. If connecting to a PC...
... remote control. 5. Refer to set this timing. 12 IMPORTANT: The power input voltage for the LCD TV using the OSD menu or remote control direct select buttons 6. Select input source for TV is 120Vac, before beginning; 3. Connect power cables Connect the power cord to the LCD TV then to scan and edit available channels. 7. If connecting to a PC...

User Manual
Page 20
Advanced Selection Use arrow keys to adjust closed caption settings to adjust Menu Language 18 Date & Time Set Date & Time. Menu Language Use arrow keys to use for programs broadcast with basic caption. Caption Preference Select Always Basic/Always Advanced/Automatic. Timers Select automatic power-on bottom of closed caption appearance such as font and size, each change can be previewed on time. Choose the type of menu.
Advanced Selection Use arrow keys to adjust closed caption settings to adjust Menu Language 18 Date & Time Set Date & Time. Menu Language Use arrow keys to use for programs broadcast with basic caption. Caption Preference Select Always Basic/Always Advanced/Automatic. Timers Select automatic power-on bottom of closed caption appearance such as font and size, each change can be previewed on time. Choose the type of menu.

User Manual
Page 21
OFF/no automatic power-on memory; Power Management Set TV power saving modes(Normal/quick boot-up time, but large power consumption; Energy saving/longer boot-up time, but small power consumption.) Power On Plug Set TV power on memory when un-plug power cord and re-plug it.(ON/automatic power-on ) 19 Français Español English Input Autosource Autosource can detect new source which is plugged in TV and switch input source setting of your TV to the source automatically.
OFF/no automatic power-on memory; Power Management Set TV power saving modes(Normal/quick boot-up time, but large power consumption; Energy saving/longer boot-up time, but small power consumption.) Power On Plug Set TV power on memory when un-plug power cord and re-plug it.(ON/automatic power-on ) 19 Français Español English Input Autosource Autosource can detect new source which is plugged in TV and switch input source setting of your TV to the source automatically.
User Manual
Page 29
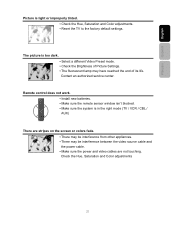
... and Color adjustments 27 The picture is in the right mode (TV / VCR / CBL / AUX) There are stripes on the screen or colors fade. ▪ There may be interference between the video source cable and the power cable. ▪ Make sure the power and video cables are not touching. Remote control does not... life. Français Español English Picture is light or improperly tinted. ▪ Check the Hue, Saturation and Color adjustments. ▪ Reset the TV to the factory default settings. Contact an authorized service center.
... and Color adjustments 27 The picture is in the right mode (TV / VCR / CBL / AUX) There are stripes on the screen or colors fade. ▪ There may be interference between the video source cable and the power cable. ▪ Make sure the power and video cables are not touching. Remote control does not... life. Français Español English Picture is light or improperly tinted. ▪ Check the Hue, Saturation and Color adjustments. ▪ Reset the TV to the factory default settings. Contact an authorized service center.
User Manual
Page 32
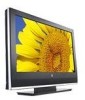
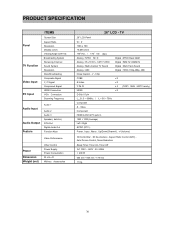
Video Component HDMI to DVI & PC jack in ) RCA Out Digital Audio Out Function Keys Video Performance Power Dimension Weight (net) Other Control Power Supply Power Consumption W x H x D Without Accessories 26" LCD - TV 26" LCD Panel 16:9 1366 x 768 16.2M colors 170o Hor. / 170o Ver. (typ.) Analog : NTSC M / N Digital : ATSC/Clear QAM Analog : PLL181Ch., CATV 125Ch Digital : 54M...
Video Component HDMI to DVI & PC jack in ) RCA Out Digital Audio Out Function Keys Video Performance Power Dimension Weight (net) Other Control Power Supply Power Consumption W x H x D Without Accessories 26" LCD - TV 26" LCD Panel 16:9 1366 x 768 16.2M colors 170o Hor. / 170o Ver. (typ.) Analog : NTSC M / N Digital : ATSC/Clear QAM Analog : PLL181Ch., CATV 125Ch Digital : 54M...


