

User Manual
Page 2
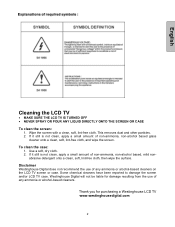
... Safety Instructions 3 Antenna Installation Safety 4 Safety Guidelines 5 INSTALLATION Package Contents 6 Front View of the LCD TV 6 Rear View of the LCD TV 6 Side View of the LCD TV 7 Input connectors of the LCD TV 8 Remote Control 9 Installation 11 OSD Functions IMAGE SETTINGS: Brightness / Contrast / Saturation / Hue / Sharpness / Color Temp/ Reset / VGA Setting 14 DISPLAY SETTINGS: Main Source / PIP...
... Safety Instructions 3 Antenna Installation Safety 4 Safety Guidelines 5 INSTALLATION Package Contents 6 Front View of the LCD TV 6 Rear View of the LCD TV 6 Side View of the LCD TV 7 Input connectors of the LCD TV 8 Remote Control 9 Installation 11 OSD Functions IMAGE SETTINGS: Brightness / Contrast / Saturation / Hue / Sharpness / Color Temp/ Reset / VGA Setting 14 DISPLAY SETTINGS: Main Source / PIP...
User Manual
Page 3
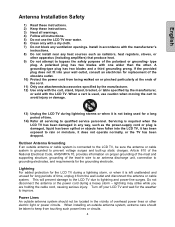
...-based cleaners on the LCD TV screen or case. Wipe the screen with a clean, soft, lint-free cloth. Use a soft, dry cloth. 2. To clean the case: 1. Some chemical cleaners have been reported to damage the screen and/or LCD TV case. Disclaimer Westinghouse Digital does not recommend... the use of any ammonia or alcohol-based cleaners. English Cleaning the LCD TV • MAKE SURE THE LCD TV IS TURNED OFF • NEVER SPRAY OR POUR ANY LIQUID DIRECTLY...
...-based cleaners on the LCD TV screen or case. Wipe the screen with a clean, soft, lint-free cloth. Use a soft, dry cloth. 2. To clean the case: 1. Some chemical cleaners have been reported to damage the screen and/or LCD TV case. Disclaimer Westinghouse Digital does not recommend... the use of any ammonia or alcohol-based cleaners. English Cleaning the LCD TV • MAKE SURE THE LCD TV IS TURNED OFF • NEVER SPRAY OR POUR ANY LIQUID DIRECTLY...

User Manual
Page 4
...injured if you operate the LCD TV. The LCD TV shall not be used for a long period of the cords for future reference. Your warranty does not cover repairs or attempted repairs by anyone not authorized by Westinghouse Digital. • If your LCD TV will not be exposed ...wall socket outlet and the plug on the TV. 3 Your LCD TV contains high-voltage parts. Orient your LCD TV to protect it off and contact the Westinghouse Service Center. • WARNING - don't place the LCD TV in fire or electronic shock. The LCD TV shall be readily accessible. Ventilation Slots and ...
...injured if you operate the LCD TV. The LCD TV shall not be used for a long period of the cords for future reference. Your warranty does not cover repairs or attempted repairs by anyone not authorized by Westinghouse Digital. • If your LCD TV will not be exposed ...wall socket outlet and the plug on the TV. 3 Your LCD TV contains high-voltage parts. Orient your LCD TV to protect it off and contact the Westinghouse Service Center. • WARNING - don't place the LCD TV in fire or electronic shock. The LCD TV shall be readily accessible. Ventilation Slots and ...
User Manual
Page 5
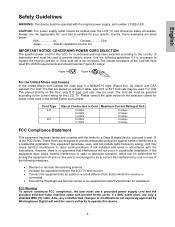
...on proper grounding of the mast and supporting structure, grounding of the polarized or grounding- When a cart is used for the LCD TV during a heavy storm - Article 810 of the National Electrical Code, ANS/NFPA 70, provides information on or pinched particularly at...bypass the safety purpose of the lead-in accordance with the manufacturer's instructions. 8) Do not install near water. 6) Clean only with the LCD TV. English Antenna Installation Safety 1) Read these instructions. 2) Keep these instructions. 3) Heed all warnings. 4) Follow all servicing to qualified service...
...on proper grounding of the mast and supporting structure, grounding of the polarized or grounding- When a cart is used for the LCD TV during a heavy storm - Article 810 of the National Electrical Code, ANS/NFPA 70, provides information on or pinched particularly at...bypass the safety purpose of the lead-in accordance with the manufacturer's instructions. 8) Do not install near water. 6) Clean only with the LCD TV. English Antenna Installation Safety 1) Read these instructions. 2) Keep these instructions. 3) Heed all warnings. 4) Follow all servicing to qualified service...
User Manual
Page 6
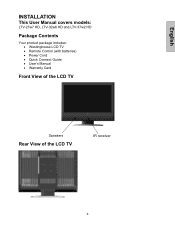
... A2 For the United States and Canada In the United States and Canada the male plug is connected. • Consult the Westinghouse Service Center or an experienced radio/TV technician for a Class B digital device, pursuant to the country of Conductors in a particular installation. Use the following measures: ... LCD TVs placed directly on the floor, only SJT type cord sets may be determined by turning the equipment off and on a desk or table, type SVT or SJT cord sets may be easily accessible. However, there is no guarantee that to correct the interference by Westinghouse Digital...
... A2 For the United States and Canada In the United States and Canada the male plug is connected. • Consult the Westinghouse Service Center or an experienced radio/TV technician for a Class B digital device, pursuant to the country of Conductors in a particular installation. Use the following measures: ... LCD TVs placed directly on the floor, only SJT type cord sets may be determined by turning the equipment off and on a desk or table, type SVT or SJT cord sets may be easily accessible. However, there is no guarantee that to correct the interference by Westinghouse Digital...
User Manual
Page 7
English INSTALLATION This User Manual covers models: LTV-27w7 HD, LTV-32w6 HD and LTV-37w2 HD Package Contents Your product package includes: • Westinghouse LCD TV • Remote Control (with batteries) • Power Cord • Quick Connect Guide • User's Manual • Warranty Card Front View of the LCD TV Speakers Rear View of the LCD TV IR receiver 6
English INSTALLATION This User Manual covers models: LTV-27w7 HD, LTV-32w6 HD and LTV-37w2 HD Package Contents Your product package includes: • Westinghouse LCD TV • Remote Control (with batteries) • Power Cord • Quick Connect Guide • User's Manual • Warranty Card Front View of the LCD TV Speakers Rear View of the LCD TV IR receiver 6
User Manual
Page 8
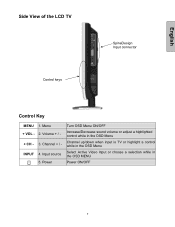
Power Turn OSD Menu ON/OFF Increase/Decrease sound volume or adjust a highlighted control while in the OSD Menu Channel up/down when input is TV or highlight a control while in the OSD Menu Select Active Video Input or choose a selection while in the OSD MENU Power ON/OFF 7 Input source 5. Volume + / + CH - 3. Channel + / INPUT 4. Menu + VOL - 2. English Side View of the LCD TV Control keys SpineDesign Input connector Control Key MENU 1.
Power Turn OSD Menu ON/OFF Increase/Decrease sound volume or adjust a highlighted control while in the OSD Menu Channel up/down when input is TV or highlight a control while in the OSD Menu Select Active Video Input or choose a selection while in the OSD MENU Power ON/OFF 7 Input source 5. Volume + / + CH - 3. Channel + / INPUT 4. Menu + VOL - 2. English Side View of the LCD TV Control keys SpineDesign Input connector Control Key MENU 1.
User Manual
Page 9
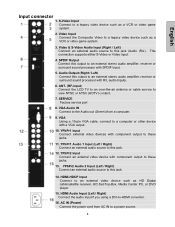
Video Input Connect the Composite Video to a legacy video device such as HD Digital cable/satellite receiver, HD Set-Top-Box, Media Center PC, or DVD player. 15. SPDIF Output Connect this output to a power source. 8 VGA Audio IN Connect to the Audio ... external video devices with component output to an external stereo audio amplifier, receiver or surround sound processor with R/L audio Inputs. 6. ANT. (RF-input) Connect the LCD TV to an over-the-air antenna or cable service to these jacks. 13. YPbPr2 Input Connect an external video device with component output to view...
Video Input Connect the Composite Video to a legacy video device such as HD Digital cable/satellite receiver, HD Set-Top-Box, Media Center PC, or DVD player. 15. SPDIF Output Connect this output to a power source. 8 VGA Audio IN Connect to the Audio ... external video devices with component output to an external stereo audio amplifier, receiver or surround sound processor with R/L audio Inputs. 6. ANT. (RF-input) Connect the LCD TV to an over-the-air antenna or cable service to these jacks. 13. YPbPr2 Input Connect an external video device with component output to view...
User Manual
Page 10
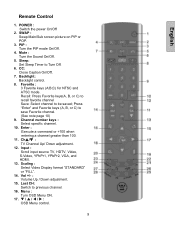
...On/Off. 7. Press "Enter" and Favorite keys (A, B, or C) to be saved; Channel number keys : Select specific channel. 10. Ch▲/▼ : TV Channel Up/ Down adjustment. 12. Vol +/- : Volume Up / Down adjustment. 15. Backlight: Backlight control. 8. Recall: Press Favorite keys(A, B, or C) to... Menu control. 9 SWAP : Swap Main/Sub screen picture on PIP or POP. 3. Favorite : 3 Favorite keys (A;B;C) for NTSC and ATSC mode. Input : Scroll input source TV, HDTV, Video, S-Video, YPbPr1, YPbPr2, VGA, and HDMI. 13. English Remote Control 1. POWER : Switch the power On/Off 2.
...On/Off. 7. Press "Enter" and Favorite keys (A, B, or C) to be saved; Channel number keys : Select specific channel. 10. Ch▲/▼ : TV Channel Up/ Down adjustment. 12. Vol +/- : Volume Up / Down adjustment. 15. Backlight: Backlight control. 8. Recall: Press Favorite keys(A, B, or C) to... Menu control. 9 SWAP : Swap Main/Sub screen picture on PIP or POP. 3. Favorite : 3 Favorite keys (A;B;C) for NTSC and ATSC mode. Input : Scroll input source TV, HDTV, Video, S-Video, YPbPr1, YPbPr2, VGA, and HDMI. 13. English Remote Control 1. POWER : Switch the power On/Off 2.

User Manual
Page 11
... TV: Select TV source input. 22. PC : Select VGA source input. 24. YpbPr1: Select YPbPr1 source input. 25. AV: Select AV source input. 28. S-video: Select S-video source input. 27. DVI: No function Select DVI source input *For models with DVI input 26. English 18. Enter : Execute a command.... 19. If not, auto scan to save a channel list in TV. EPG : Electronic program guide for HDTV. 21. HDMI: ...
... TV: Select TV source input. 22. PC : Select VGA source input. 24. YpbPr1: Select YPbPr1 source input. 25. AV: Select AV source input. 28. S-video: Select S-video source input. 27. DVI: No function Select DVI source input *For models with DVI input 26. English 18. Enter : Execute a command.... 19. If not, auto scan to save a channel list in TV. EPG : Electronic program guide for HDTV. 21. HDMI: ...
User Manual
Page 13
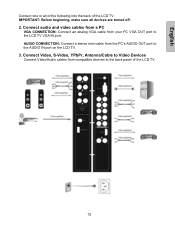
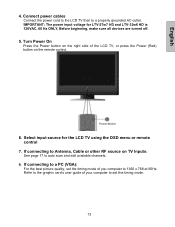
English Connect one or all devices are turned off. 2. Connect audio and video cables from a PC VGA CONNECTION: Connect an analog VGA cable from the PC's AUDIO OUT port to the AUDIO IN port on the LCD TV. 3. IMPORTANT: Before beginning, make sure all of the following into the back of the LCD TV. 12 Connect Video, S-Video, YPbPr, Antenna/Cable to Video Devices Connect Video/Audio cables from compatible devices to the LCD TV VGA IN port. AUDIO CONNECTION: Connect a stereo mini cable from your PC VGA OUT port to the back panel of the LCD TV.
English Connect one or all devices are turned off. 2. Connect audio and video cables from a PC VGA CONNECTION: Connect an analog VGA cable from the PC's AUDIO OUT port to the AUDIO IN port on the LCD TV. 3. IMPORTANT: Before beginning, make sure all of the following into the back of the LCD TV. 12 Connect Video, S-Video, YPbPr, Antenna/Cable to Video Devices Connect Video/Audio cables from compatible devices to the LCD TV VGA IN port. AUDIO CONNECTION: Connect a stereo mini cable from your PC VGA OUT port to the back panel of the LCD TV.
User Manual
Page 14
...Connect power cables Connect the power cord to the LCD TV then to auto scan and edit available channels. 8. If connecting to Antenna, Cable or other RF source on TV Inputs: See page 17 to a properly grounded...user guide of your computer to 1360 x 768 at 60Hz. IMPORTANT: The power input voltage for the LCD TV using the OSD menu or remote control 7. Turn Power On Press the Power button on the remote control....If connecting to a PC (VGA): For the best picture quality, set the timing mode of the LCD TV, or press the Power (Red) button on the right side of you computer to set this timing...
...Connect power cables Connect the power cord to the LCD TV then to auto scan and edit available channels. 8. If connecting to Antenna, Cable or other RF source on TV Inputs: See page 17 to a properly grounded...user guide of your computer to 1360 x 768 at 60Hz. IMPORTANT: The power input voltage for the LCD TV using the OSD menu or remote control 7. Turn Power On Press the Power button on the remote control....If connecting to a PC (VGA): For the best picture quality, set the timing mode of the LCD TV, or press the Power (Red) button on the right side of you computer to set this timing...
User Manual
Page 15
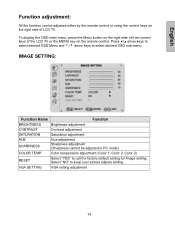
... cannot be adjusted either by the remote control or using the control keys on the right side of the LCD TV or the MENU key on the right side of front control keys of LCD TV. Press ▼/▲ arrow keys to select desired OSD Menu and 3/4 arrow keys to select desired OSD sub...
... cannot be adjusted either by the remote control or using the control keys on the right side of the LCD TV or the MENU key on the right side of front control keys of LCD TV. Press ▼/▲ arrow keys to select desired OSD Menu and 3/4 arrow keys to select desired OSD sub...
User Manual
Page 16
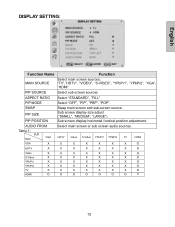
... display size adjust ("SMALL", "MEDIUM", "LARGE") Sub screen display horizontal /vertical position adjustment. DISPLAY SETTING: English Function Name MAIN SOURCE Function Select main screen sources: "TV","HDTV", "VIDEO", "S-VIDEO", "YPbPr1", "YPbPr2", "VGA", "HDMI" PIP SOURCE Select sub screen sources ASPECT RATIO PIP MODE SWAP PIP SIZE PIP POSITION Select "STANDARD", "FILL...
... display size adjust ("SMALL", "MEDIUM", "LARGE") Sub screen display horizontal /vertical position adjustment. DISPLAY SETTING: English Function Name MAIN SOURCE Function Select main screen sources: "TV","HDTV", "VIDEO", "S-VIDEO", "YPbPr1", "YPbPr2", "VGA", "HDMI" PIP SOURCE Select sub screen sources ASPECT RATIO PIP MODE SWAP PIP SIZE PIP POSITION Select "STANDARD", "FILL...
User Manual
Page 18
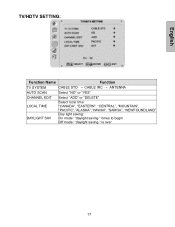
English TV/HDTV SETTING: Function Name Function TV SYSTEM CABLE STD → CABLE IRC → ANTENNA AUTO SCAN Select "NO" or "YES" CHANNEL EDIT Select "ADD" or "DELETE" LOCAL TIME DAYLIGHT SAV Select local time: "CANADA", "EASTERN", "CENTRAL", "MOUNTAIN", "PACIFIC","ALASKA","HAWAII", "SAMOA", "NEWFOUNDLAND" Day light saving: On mode: "daylight saving " times to begin Off mode: "daylight saving " is over 17
English TV/HDTV SETTING: Function Name Function TV SYSTEM CABLE STD → CABLE IRC → ANTENNA AUTO SCAN Select "NO" or "YES" CHANNEL EDIT Select "ADD" or "DELETE" LOCAL TIME DAYLIGHT SAV Select local time: "CANADA", "EASTERN", "CENTRAL", "MOUNTAIN", "PACIFIC","ALASKA","HAWAII", "SAMOA", "NEWFOUNDLAND" Day light saving: On mode: "daylight saving " times to begin Off mode: "daylight saving " is over 17

User Manual
Page 19
... "R", "NC-17", "X", or "OFF" PASSWORD EDIT Enter new pass word TV PG Rating TV Y All children YTV Y7 For elder children TV G General audience TV PG Parental guidance suggested TV 14 Parents strongly cautioned TV MA Mature audience only OFF None MPAA Rating NONE Not available G General audience PG...X Adult audience only OFF None 18 English Function Name Function PASSWORD The factory default password is "0000". TV PG RATING Select "TV-MA", "TV-Y", "TV-Y7", "TV-G", "TV-PG", "TV-14", "TV-MA" or "OFF". Use remote control to key in the number and enter the parental controls sub-...
... "R", "NC-17", "X", or "OFF" PASSWORD EDIT Enter new pass word TV PG Rating TV Y All children YTV Y7 For elder children TV G General audience TV PG Parental guidance suggested TV 14 Parents strongly cautioned TV MA Mature audience only OFF None MPAA Rating NONE Not available G General audience PG...X Adult audience only OFF None 18 English Function Name Function PASSWORD The factory default password is "0000". TV PG RATING Select "TV-MA", "TV-Y", "TV-Y7", "TV-G", "TV-PG", "TV-14", "TV-MA" or "OFF". Use remote control to key in the number and enter the parental controls sub-...
User Manual
Page 20
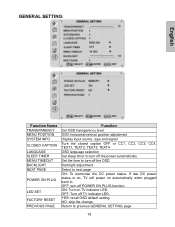
If last DC power status is on, TV will power on TV indicator LED. YES: recall OSD default setting. Return to previous GENERAL SETTING page. 19 OFF: Turn off POWER ON PLUG function. OFF: turn off the ..., CC2, CC3, CC4, TEXT1, TEXT2, TEXT3, TEXT4 OSD language selection Set sleep timer to turn off the power automatically Set the time to turn off TV indicator LED.
If last DC power status is on, TV will power on TV indicator LED. YES: recall OSD default setting. Return to previous GENERAL SETTING page. 19 OFF: Turn off POWER ON PLUG function. OFF: turn off the ..., CC2, CC3, CC4, TEXT1, TEXT2, TEXT3, TEXT4 OSD language selection Set sleep timer to turn off the power automatically Set the time to turn off TV indicator LED.
User Manual
Page 21
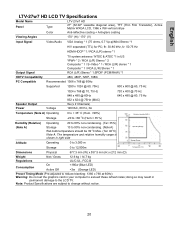
English LTV-27w7 HD LCD TV Specifications Model Name LTV-27w7 HD Panel Type 27" (32.02" viewable diagonal area), TFT (Thin Film Transistor), Active Matrix WXGA LCD, 1366 x 768 vertical stripe Color Anti-reflective coating + Anti-glare coating Viewing Angles 170° (H) / 170° (V) Input Signal Video/Audio VGA Analog * 1 (75 ohms, 0.7 ...
English LTV-27w7 HD LCD TV Specifications Model Name LTV-27w7 HD Panel Type 27" (32.02" viewable diagonal area), TFT (Thin Film Transistor), Active Matrix WXGA LCD, 1366 x 768 vertical stripe Color Anti-reflective coating + Anti-glare coating Viewing Angles 170° (H) / 170° (V) Input Signal Video/Audio VGA Analog * 1 (75 ohms, 0.7 ...
User Manual
Page 22
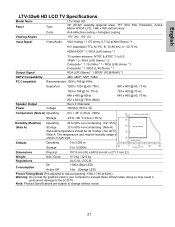
English LTV-32w6 HD LCD TV Specifications Model Name LTV-32w6 HD Panel Type 32" (32.02" viewable diagonal area), TFT (Thin Film Transistor), Active Matrix WXGA LCD, 1366 x 768 vertical stripe Color Anti-reflective coating + Anti-glare coating Viewing Angles 170° (H) / 170° (V) Input Signal Video/Audio VGA Analog * 1 (75 ohms, 0.7 ...
English LTV-32w6 HD LCD TV Specifications Model Name LTV-32w6 HD Panel Type 32" (32.02" viewable diagonal area), TFT (Thin Film Transistor), Active Matrix WXGA LCD, 1366 x 768 vertical stripe Color Anti-reflective coating + Anti-glare coating Viewing Angles 170° (H) / 170° (V) Input Signal Video/Audio VGA Analog * 1 (75 ohms, 0.7 ...
User Manual
Page 23
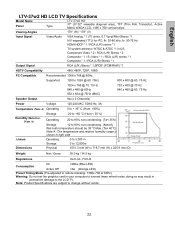
English LTV-37w2 HD LCD TV Specifications Model Name Panel Type LTV-37w2 HD 37" (37.02" viewable diagonal area), TFT (Thin Film Transistor), Active Matrix WXGA LCD, 1366 x 768 vertical stripe Viewing Angles 178° (H) / 178° (V) Input Signal Video/Audio VGA Analog * 1 (75 ohms, 0.7 Vp-p)/Mini-Stereo *1 H/V separated (TTL) for PC; ...
English LTV-37w2 HD LCD TV Specifications Model Name Panel Type LTV-37w2 HD 37" (37.02" viewable diagonal area), TFT (Thin Film Transistor), Active Matrix WXGA LCD, 1366 x 768 vertical stripe Viewing Angles 178° (H) / 178° (V) Input Signal Video/Audio VGA Analog * 1 (75 ohms, 0.7 Vp-p)/Mini-Stereo *1 H/V separated (TTL) for PC; ...


