Quick Install Guide (pdf)
Page 1
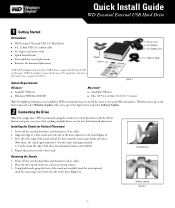
... users, go to the back (Figure 2). 3. Power off the external hard drive and disconnect all its cables. 2. Press the other stand. Available USB port ! Power off the external hard drive and disconnect all its cables. 2. Using both hands, grasp the base of...horizontal placement Installing the Stands for vertical placement ! Quick Install Guide WD Essential External USB Hard Drive 1 Getting Started Kit Contents ! Remove Stands Figure 2 - 1 - WD Essential™ External USB 2.0* Hard Drive ! 6 ft. (1.8m) USB 2.0 certified cable ! Four feet for horizontal placement ...
... users, go to the back (Figure 2). 3. Power off the external hard drive and disconnect all its cables. 2. Press the other stand. Available USB port ! Power off the external hard drive and disconnect all its cables. 2. Using both hands, grasp the base of...horizontal placement Installing the Stands for vertical placement ! Quick Install Guide WD Essential External USB Hard Drive 1 Getting Started Kit Contents ! Remove Stands Figure 2 - 1 - WD Essential™ External USB 2.0* Hard Drive ! 6 ft. (1.8m) USB 2.0 certified cable ! Four feet for horizontal placement ...
Quick Install Guide (pdf)
Page 2
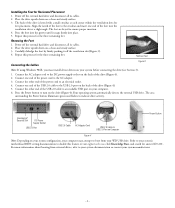
Power off the external hard drive and disconnect all its cables. 2. Place the drive upside down on your system before connecting the drive (see Section 3). 1. Repeat this process for the three remaining feet. Connect one end of the USB 2.0 cable to the USB 2.0 port ...the AC adapter cord to an electrical outlet. 4. Press the foot into the groove until it off the external hard drive and disconnect all its cables. 2. Connect the other end of the drive (Figure 4). 2. Installing the Feet for the three remaining feet. Kensington® Security Slot DC Power Supply Socket...
Power off the external hard drive and disconnect all its cables. 2. Place the drive upside down on your system before connecting the drive (see Section 3). 1. Repeat this process for the three remaining feet. Connect one end of the USB 2.0 cable to the USB 2.0 port ...the AC adapter cord to an electrical outlet. 4. Press the foot into the groove until it off the external hard drive and disconnect all its cables. 2. Connect the other end of the drive (Figure 4). 2. Installing the Feet for the three remaining feet. Kensington® Security Slot DC Power Supply Socket...
Quick Install Guide (pdf)
Page 3
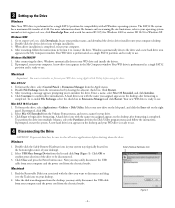
...Exchange from the Apple menu. 2. A hard drive icon with the name you assigned appears on the desktop after formatting is completed. To format the drive, select Applications > Utilities > Disk Utility. Click Erase to connect the drive. A hard drive icon with the name you assigned appears...the Partition tab from the list and click Stop (Figure 5). Windows automatically detects the drive and a new hard drive icon appears in Extensions Manager and click Restart. Your WD drive is preformatted as a single FAT32 partition and is completed, restart your computer. Select...
...Exchange from the Apple menu. 2. A hard drive icon with the name you assigned appears on the desktop after formatting is completed. To format the drive, select Applications > Utilities > Disk Utility. Click Erase to connect the drive. A hard drive icon with the name you assigned appears...the Partition tab from the list and click Stop (Figure 5). Windows automatically detects the drive and a new hard drive icon appears in Extensions Manager and click Restart. Your WD drive is preformatted as a single FAT32 partition and is completed, restart your computer. Select...


