
Quick Install Guide (pdf)
Page 2
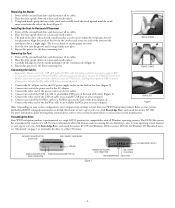
...away from the side of the drive (Figure 2). 2. For more information about file formats and overcoming file size limitations, refer to the DC power supply socket on the back of the drive (Figure 2). 7. Place the drive upside down on a clean and steady surface. 3. INSTALL STANDS ... and/or FireWire cable depending on features you connect only the FireWire cable, USB devices are not supported. Formatting the Drive Your WD Dual-option product is keyed with all its cables. 2. Power off the external hard drive and disconnect all its cables. 2. Repeat this feature or...
...away from the side of the drive (Figure 2). 2. For more information about file formats and overcoming file size limitations, refer to the DC power supply socket on the back of the drive (Figure 2). 7. Place the drive upside down on a clean and steady surface. 3. INSTALL STANDS ... and/or FireWire cable depending on features you connect only the FireWire cable, USB devices are not supported. Formatting the Drive Your WD Dual-option product is keyed with all its cables. 2. Power off the external hard drive and disconnect all its cables. 2. Repeat this feature or...
User Manual (pdf)
Page 13
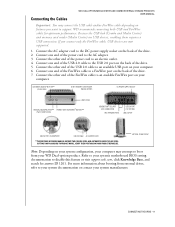
Connect the other end of the power cord to an available USB port on your WD Dual-option product. Connect the other end of the USB 2.0 cable to the AC adapter. 3. AUTOMATIC BACKUP BUTTON** (CLOCK ICON) 8-IN-1 MEMORY CARD READER (MEDIA CENTER) DC POWER SUPPLY SOCKET USB 2.0 HUB MANUAL BACKUP BUTTON** POWER/SAFE SHUTDOWN™ BUTTON** (TWO FOLDERS ICON) KENSINGTON...
Connect the other end of the power cord to an available USB port on your WD Dual-option product. Connect the other end of the USB 2.0 cable to the AC adapter. 3. AUTOMATIC BACKUP BUTTON** (CLOCK ICON) 8-IN-1 MEMORY CARD READER (MEDIA CENTER) DC POWER SUPPLY SOCKET USB 2.0 HUB MANUAL BACKUP BUTTON** POWER/SAFE SHUTDOWN™ BUTTON** (TWO FOLDERS ICON) KENSINGTON...


