Instruction Manual
Page 1
LARGE CAPACITY COFFEEMAKERS Instruction Manual Important Safeguards 2 Instructions for Making Coffee 3 Helpful Hints ...5 Cleaning Your Coffeemaker 6 Warranty...7 SAVE THIS INSTRUCTION MANUAL FOR FUTURE REFERENCE © 2013 West Bend®, a Brand of Focus Products Group International, LLC. www.westbend.com
LARGE CAPACITY COFFEEMAKERS Instruction Manual Important Safeguards 2 Instructions for Making Coffee 3 Helpful Hints ...5 Cleaning Your Coffeemaker 6 Warranty...7 SAVE THIS INSTRUCTION MANUAL FOR FUTURE REFERENCE © 2013 West Bend®, a Brand of Focus Products Group International, LLC. www.westbend.com
Instruction Manual
Page 2
... be followed including the following: • Read all instructions and warnings. If it is not being used when moving an appliance containing hot oil or other hot liquids. • Make sure cover, basket and stem are available, but care must be sure the appliance contains water or brewed coffee before cleaning. • A short power-supply cord is equal to reduce risks resulting from...
... be followed including the following: • Read all instructions and warnings. If it is not being used when moving an appliance containing hot oil or other hot liquids. • Make sure cover, basket and stem are available, but care must be sure the appliance contains water or brewed coffee before cleaning. • A short power-supply cord is equal to reduce risks resulting from...
Instruction Manual
Page 3
... brewing time). Do not fill past maximum cup level. 4. Replace the cover making sure it is completely locked into the heating unit well, angle the stem away from you may find it thoroughly. Before using the chart below for any dripping. SAVE THESE INSTRUCTIONS INSTRUCTIONS FOR MAKING COFFEE 1. Place the cover on the stem. For models with a plastic basket, you , then place the basket on the coffeemaker and turn the cover...
... brewing time). Do not fill past maximum cup level. 4. Replace the cover making sure it is completely locked into the heating unit well, angle the stem away from you may find it thoroughly. Before using the chart below for any dripping. SAVE THESE INSTRUCTIONS INSTRUCTIONS FOR MAKING COFFEE 1. Place the cover on the stem. For models with a plastic basket, you , then place the basket on the coffeemaker and turn the cover...
Instruction Manual
Page 4
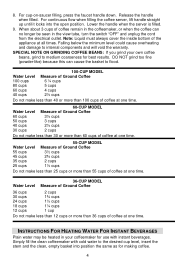
... Coffee 6 ¼ cups 5 cups 4 cups 2½ cups Do not make less than 40 or more than 60 cups of coffee at one time. Water Level 60 cups 50 cups 40 cups 30 cups 60-CUP MODEL Measure of Ground Coffee 3½ cups 3 cups 2½ cups 2 cups Do not make less than 12 cups or more than 100 cups of coffee at one time. SPECIAL NOTE ON GRINDING COFFEE BEANS: If you grind your coffeemaker for use with cold water to flood. INSTRUCTIONS FOR HEATING WATER...
... Coffee 6 ¼ cups 5 cups 4 cups 2½ cups Do not make less than 40 or more than 60 cups of coffee at one time. Water Level 60 cups 50 cups 40 cups 30 cups 60-CUP MODEL Measure of Ground Coffee 3½ cups 3 cups 2½ cups 2 cups Do not make less than 12 cups or more than 100 cups of coffee at one time. SPECIAL NOTE ON GRINDING COFFEE BEANS: If you grind your coffeemaker for use with cold water to flood. INSTRUCTIONS FOR HEATING WATER...

Instruction Manual
Page 5
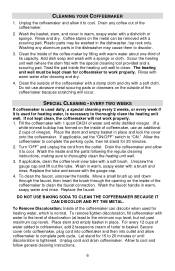
.... • Use regular electric perk grind coffee or coffee ground for all times. Other than 3 cups of the basket may occur upon heating due to the heating unit can occur. Improper cleaning of the coffeemaker, especially the heating unit well, will void the warranty. • A small amount of the coffeemaker, then repeat steps 3-9. 5 Heat the water until perking stops and the light on warranty page. • Liquid must be heated in the coffeemaker because...
.... • Use regular electric perk grind coffee or coffee ground for all times. Other than 3 cups of the basket may occur upon heating due to the heating unit can occur. Improper cleaning of the coffeemaker, especially the heating unit well, will void the warranty. • A small amount of the coffeemaker, then repeat steps 3-9. 5 Heat the water until perking stops and the light on warranty page. • Liquid must be heated in the coffeemaker because...
Instruction Manual
Page 6
... discoloration is necessary to clean the faucet connection. Do not use an additional 2 cups of coffeemaker, use abrasive metal scouring pads or cleansers on the metal can discolor when used for heating water, which is used for 15 to discolor. 3. If applicable, set the "ON/OFF" switch to thoroughly clean the heating unit well. 3. Wash the inside and the parts following the regular cleaning instructions, making sure to "ON...
... discoloration is necessary to clean the faucet connection. Do not use an additional 2 cups of coffeemaker, use abrasive metal scouring pads or cleansers on the metal can discolor when used for heating water, which is used for 15 to discolor. 3. If applicable, set the "ON/OFF" switch to thoroughly clean the heating unit well. 3. Wash the inside and the parts following the regular cleaning instructions, making sure to "ON...
Instruction Manual
Page 7
... think the appliance has failed or requires service within its warranty period, please contact the Customer Care Department at (866) 290-1851, or e-mail us at [email protected]. The Company is operated and maintained in conformity with the Instruction Manual. P. Mail your total charge. Printed in USA and Canada REPLACEMENT PARTS Replacement parts, if available, may also be added to...
... think the appliance has failed or requires service within its warranty period, please contact the Customer Care Department at (866) 290-1851, or e-mail us at [email protected]. The Company is operated and maintained in conformity with the Instruction Manual. P. Mail your total charge. Printed in USA and Canada REPLACEMENT PARTS Replacement parts, if available, may also be added to...


