
Instruction Manual
Page 1
... the following information: • The MODEL NUMBER of the product (WLEVEL28830) • The NAME of the product (WESLO® MOMENTUM 850 elliptical crosstrainer) • The SERIAL NUMBER of the product (see the front cover of this manual) • The KEY NUMBER and DESCRIPTION of the part(s) (see page 14) Part No. 201716 R0903A Printed in this manual before using this manual for future reference. Model No. office, or write: ICON Health & Fitness, Ltd.
... the following information: • The MODEL NUMBER of the product (WLEVEL28830) • The NAME of the product (WESLO® MOMENTUM 850 elliptical crosstrainer) • The SERIAL NUMBER of the product (see the front cover of this manual) • The KEY NUMBER and DESCRIPTION of the part(s) (see page 14) Part No. 201716 R0903A Printed in this manual before using this manual for future reference. Model No. office, or write: ICON Health & Fitness, Ltd.

Instruction Manual
Page 2
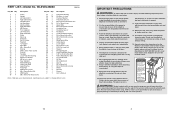
... 27 9 1 32 16 30 31 21 7 38 34 21 42 28 48 62 48 42 38 15 TABLE OF CONTENTS IMPORTANT PRECAUTIONS 3 BEFORE YOU BEGIN 4 ASSEMBLY 5 HOW TO USE THE ELLIPTICAL CROSSTRAINER 9 MAINTENANCE AND TROUBLESHOOTING 12 CONDITIONING GUIDELINES 13 PART LIST 14 EXPLODED DRAWING 15 HOW TO ORDER REPLACEMENT PARTS Back Cover WESLO is a registered trademark of ICON Health & Fitness, Inc. 2 EXPLODED DRAWING-Model No.
... 27 9 1 32 16 30 31 21 7 38 34 21 42 28 48 62 48 42 38 15 TABLE OF CONTENTS IMPORTANT PRECAUTIONS 3 BEFORE YOU BEGIN 4 ASSEMBLY 5 HOW TO USE THE ELLIPTICAL CROSSTRAINER 9 MAINTENANCE AND TROUBLESHOOTING 12 CONDITIONING GUIDELINES 13 PART LIST 14 EXPLODED DRAWING 15 HOW TO ORDER REPLACEMENT PARTS Back Cover WESLO is a registered trademark of ICON Health & Fitness, Inc. 2 EXPLODED DRAWING-Model No.
Instruction Manual
Page 3
... 38mm Bolt 68 6 M8 x 19mm Button Screw 69 2 Wheel # 3 Hex Key # 1 Grease # 1 User's Manual Note: # indicates a non-illustrated part. Use the elliptical crosstrainer only as an exercise aid in determining heart rate trends in a commercial, rental, or institutional setting. 14. Replace any exercise program, consult your physician. Always hold the handlebars when mounting, dismounting, or using the elliptical crosstrainer. tions before using the elliptical crosstrainer. Read all instructions in the location shown. 7. The elliptical crosstrainer is especially...
... 38mm Bolt 68 6 M8 x 19mm Button Screw 69 2 Wheel # 3 Hex Key # 1 Grease # 1 User's Manual Note: # indicates a non-illustrated part. Use the elliptical crosstrainer only as an exercise aid in determining heart rate trends in a commercial, rental, or institutional setting. 14. Replace any exercise program, consult your physician. Always hold the handlebars when mounting, dismounting, or using the elliptical crosstrainer. tions before using the elliptical crosstrainer. Read all instructions in the location shown. 7. The elliptical crosstrainer is especially...

Instruction Manual
Page 4
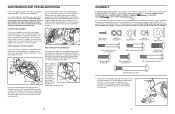
And the unique MOMENTUM 850 features adjustable resistance and a simple-to-use stored fat calories for aerobic exercise. If you get the most from your exercise. The model number is the recommended heart rate for energy. Handlebar Pulse Sensor Water Bottle Holder* Console Resistance Knob FRONT BACK Pedal Disk Pedal Arm Wheel Pedal *No water bottle is between workouts. For aerobic exercise, adjust the intensity of your exercise program, do not keep your heart rate in preparation for...
And the unique MOMENTUM 850 features adjustable resistance and a simple-to-use stored fat calories for aerobic exercise. If you get the most from your exercise. The model number is the recommended heart rate for energy. Handlebar Pulse Sensor Water Bottle Holder* Console Resistance Knob FRONT BACK Pedal Disk Pedal Arm Wheel Pedal *No water bottle is between workouts. For aerobic exercise, adjust the intensity of your exercise program, do not keep your heart rate in preparation for...
Instruction Manual
Page 5
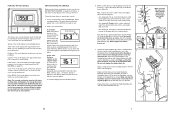
... the elliptical crosstrainer, use the drawings below and locate the Reed Switch (53). During storage, remove the batteries from the Left Side Shield (3). Retighten the Screw. most console problems are pedaling, even when the resistance is adjusted to the Frame with two M8 x 53mm Button Bolts (34), two M8 Washers (48), and two M8 Nylon Locknuts (38). 34 1 10 48 38 48 5 Reattach the console to the upright, being...
... the elliptical crosstrainer, use the drawings below and locate the Reed Switch (53). During storage, remove the batteries from the Left Side Shield (3). Retighten the Screw. most console problems are pedaling, even when the resistance is adjusted to the Frame with two M8 x 53mm Button Bolts (34), two M8 Washers (48), and two M8 Nylon Locknuts (38). 34 1 10 48 38 48 5 Reattach the console to the upright, being...

Instruction Manual
Page 6
... (1), 2 attach the Rear Stabilizer (28) to the Frame with an M4 x 16mm Screw (42). The pulse sensor is detected, the heart-shaped indicator in the display will flash each time your heart rate will automatically turn off feature. If the pedals are not moved and the console buttons are thin sheets of heart rate readings. The Console (23) requires three 1.5V "AA" batteries; Note: If there are not pressed...
... (1), 2 attach the Rear Stabilizer (28) to the Frame with an M4 x 16mm Screw (42). The pulse sensor is detected, the heart-shaped indicator in the display will flash each time your heart rate will automatically turn off feature. If the pedals are not moved and the console buttons are thin sheets of heart rate readings. The Console (23) requires three 1.5V "AA" batteries; Note: If there are not pressed...
Instruction Manual
Page 7
... Handlebar Arm with a sticker. Pulse (BPM)-This mode displays your workouts. When the batteries are inside of the hexagonal holes. To turn on the Upright (2) as shown. • See drawing C. Select one of measurement. Pull up on the metal bracket on the Lower Cable (55), and insert the tip of the control cable into one of calories you stop pedalling for continuous display, press the Mode button repeatedly...
... Handlebar Arm with a sticker. Pulse (BPM)-This mode displays your workouts. When the batteries are inside of the hexagonal holes. To turn on the Upright (2) as shown. • See drawing C. Select one of measurement. Pull up on the metal bracket on the Lower Cable (55), and insert the tip of the control cable into one of calories you stop pedalling for continuous display, press the Mode button repeatedly...
Instruction Manual
Page 8
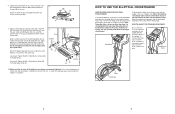
... properly tightened. to a complete stop. Apply grease to 8 the Left Pedal Arm with the resistance knob on the left over after assembly is in the direction shown by the arrow; Note: Some hardware may turn in the same way. Then, step off the highest pedal first. To increase the resistance, turn the knob counterclockwise. See step 6. Attach the Right Pedal Arm (12) to move with the Bolt Set. Handlebars To dismount the elliptical crosstrainer...
... properly tightened. to a complete stop. Apply grease to 8 the Left Pedal Arm with the resistance knob on the left over after assembly is in the direction shown by the arrow; Note: Some hardware may turn in the same way. Then, step off the highest pedal first. To increase the resistance, turn the knob counterclockwise. See step 6. Attach the Right Pedal Arm (12) to move with the Bolt Set. Handlebars To dismount the elliptical crosstrainer...


