
English Manual
Page 2
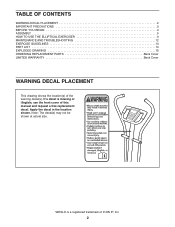
... in the location shown. WESLO is missing or illegible, see the front cover of the warning decal(s). Note: The decal(s) may not be shown at actual size. TABLE OF CONTENTS WARNING DECAL PLACEMENT 2 IMPORTANT PRECAUTIONS 3 BEFORE YOU BEGIN 4 ASSEMBLY 5 HOW TO USE THE ELLIPTICAL EXERCISER 9 MAINTENANCE AND TROUBLESHOOTING 12 EXERCISE GUIDELINES 13 PART LIST...
... in the location shown. WESLO is missing or illegible, see the front cover of the warning decal(s). Note: The decal(s) may not be shown at actual size. TABLE OF CONTENTS WARNING DECAL PLACEMENT 2 IMPORTANT PRECAUTIONS 3 BEFORE YOU BEGIN 4 ASSEMBLY 5 HOW TO USE THE ELLIPTICAL EXERCISER 9 MAINTENANCE AND TROUBLESHOOTING 12 EXERCISE GUIDELINES 13 PART LIST...
English Manual
Page 3
...the risk of serious injury, read all important precautions and instructions in this manual and all warnings on your elliptical exerciser before using the elliptical exerciser. Do not use of heart rate readings. Keep children under age 12 and pets away from moisture and ...dust. Before beginning any worn parts immediately. 14. Wear appropriate exercise clothes while using your elliptical exerciser. Keep your back. 13. Place the elliptical exerciser on each side. 12. Various factors may result in a commercial, rental, or institutional setting...
...the risk of serious injury, read all important precautions and instructions in this manual and all warnings on your elliptical exerciser before using the elliptical exerciser. Do not use of heart rate readings. Keep children under age 12 and pets away from moisture and ...dust. Before beginning any worn parts immediately. 14. Wear appropriate exercise clothes while using your elliptical exerciser. Keep your back. 13. Place the elliptical exerciser on each side. 12. Various factors may result in a commercial, rental, or institutional setting...
English Manual
Page 4
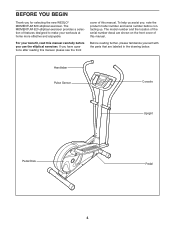
.... Before reading further, please familiarize yourself with the parts that are shown on the front cover of this manual. If you for selecting the new WESLO® MOMENTUM 620 elliptical exerciser. For your workouts at home more effective and enjoyable. To help us . BEFORE YOU BEGIN Thank you have questions after reading this manual, please...
.... Before reading further, please familiarize yourself with the parts that are shown on the front cover of this manual. If you for selecting the new WESLO® MOMENTUM 620 elliptical exerciser. For your workouts at home more effective and enjoyable. To help us . BEFORE YOU BEGIN Thank you have questions after reading this manual, please...
English Manual
Page 5
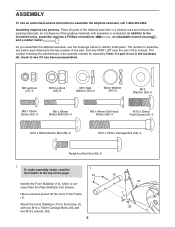
... PART LIST near the end of the packing materials until assembly is the quantity needed for assembly. Have a second person lift the front of the elliptical exerciser in the hardware kit, check to the Frame (1) with two M10 x 75mm Carriage Bolts (34) and two M10 Locknuts (33). 5 10 33 1 33 ...Assembly requires two persons. Note: If a part is not in a cleared area and remove the packing materials; As you assemble the elliptical exerciser, use the drawings below each drawing is narrower than the Rear Stabilizer (not shown). Place all parts of the Frame (1).
... PART LIST near the end of the packing materials until assembly is the quantity needed for assembly. Have a second person lift the front of the elliptical exerciser in the hardware kit, check to the Frame (1) with two M10 x 75mm Carriage Bolts (34) and two M10 Locknuts (33). 5 10 33 1 33 ...Assembly requires two persons. Note: If a part is not in a cleared area and remove the packing materials; As you assemble the elliptical exerciser, use the drawings below each drawing is narrower than the Rear Stabilizer (not shown). Place all parts of the Frame (1).
English Manual
Page 7
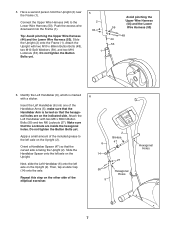
... Bolts yet. 5 2 33 1 Avoid pinching the Upper Wire Harness (44) and the Lower 59 Wire Harness (53) 48 44 53 6. Apply a small amount of the elliptical exerciser. 6 2 Grease 6 47 14 50 5 27 Hexagonal Holes Hexagonal Holes 7 5.
... Bolts yet. 5 2 33 1 Avoid pinching the Upper Wire Harness (44) and the Lower 59 Wire Harness (53) 48 44 53 6. Apply a small amount of the elliptical exerciser. 6 2 Grease 6 47 14 50 5 27 Hexagonal Holes Hexagonal Holes 7 5.
English Manual
Page 8
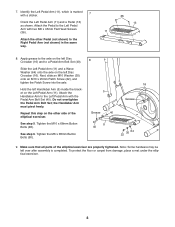
7. Attach the other side of the elliptical exerciser are properly tightened. Next, slide an M10 Washer (35) onto an M10 x 25mm Patch Screw (22), and tighten the Patch Screw into the axle. Tighten ...). Repeat this step on the Left Pedal Arm (11). Make sure that all parts of the elliptical exerciser. 5 Grease 40 16 Grease See step 5. To protect the floor or carpet from damage, place a mat under the elliptical exerciser. 8 Tighten the M6 x 38mm Button Bolts (50). 11 40 35 64 22 9. Attach the Handlebar Arm...
7. Attach the other side of the elliptical exerciser are properly tightened. Next, slide an M10 Washer (35) onto an M10 x 25mm Patch Screw (22), and tighten the Patch Screw into the axle. Tighten ...). Repeat this step on the Left Pedal Arm (11). Make sure that all parts of the elliptical exerciser. 5 Grease 40 16 Grease See step 5. To protect the floor or carpet from damage, place a mat under the elliptical exerciser. 8 Tighten the M6 x 38mm Button Bolts (50). 11 40 35 64 22 9. Attach the Handlebar Arm...

English Manual
Page 9
... on page 10. Then, step onto the other pedal. Indicators Handlebars Pace Guide Thumb Pulse Sensor Pedal Pedal Disk To dismount the elliptical exerciser, wait until the flywheel stops. Before using the built-in either direction. Then, step off the higher pedal first. FEATURES OF THE... of the pedals and prompt you to move the pedal disks in the lower position. HOW TO USE THE ELLIPTICAL EXERCISER HOW TO EXERCISE ON THE ELLIPTICAL EXERCISER CONSOLE DIAGRAM To mount the elliptical exerciser, hold the handlebars and step onto the pedal in the direction shown by the arrow;
... on page 10. Then, step onto the other pedal. Indicators Handlebars Pace Guide Thumb Pulse Sensor Pedal Pedal Disk To dismount the elliptical exerciser, wait until the flywheel stops. Before using the built-in either direction. Then, step off the higher pedal first. FEATURES OF THE... of the pedals and prompt you to move the pedal disks in the lower position. HOW TO USE THE ELLIPTICAL EXERCISER HOW TO EXERCISE ON THE ELLIPTICAL EXERCISER CONSOLE DIAGRAM To mount the elliptical exerciser, hold the handlebars and step onto the pedal in the direction shown by the arrow;

English Manual
Page 11
...pace; See step 5 on the pulse sensor as described above. Make sure you are applying the proper amount of the program. 3. When you are finished exercising, the console will show the duration of pressure to pedal at a pace that is not displayed, lift your heart rate. 6. Select a smart program...., the time will flash in the display and the console will flash in the display. One resistance level and one target pace are finished exercising, the console will prompt you . During the program, the pace guide will turn off automatically. when the center indicator lights, maintain your...
...pace; See step 5 on the pulse sensor as described above. Make sure you are applying the proper amount of the program. 3. When you are finished exercising, the console will show the duration of pressure to pedal at a pace that is not displayed, lift your heart rate. 6. Select a smart program...., the time will flash in the display and the console will flash in the display. One resistance level and one target pace are finished exercising, the console will prompt you . During the program, the pace guide will turn off automatically. when the center indicator lights, maintain your...

English Manual
Page 12
... sunlight. IMPORTANT: Keep liquids away from the console. To replace the batteries, see step 3 on page 6. 12 Replace any worn parts immediately. Before storing the elliptical exerciser, remove the batteries from the console, and keep the console out of low batteries. BATTERY REPLACEMENT If the console display becomes dim, the batteries should...
... sunlight. IMPORTANT: Keep liquids away from the console. To replace the batteries, see step 3 on page 6. 12 Replace any worn parts immediately. Before storing the elliptical exerciser, remove the batteries from the console, and keep the console out of low batteries. BATTERY REPLACEMENT If the console display becomes dim, the batteries should...
English Manual
Page 13
...your training zone for longer than 20 minutes.) Breathe regularly and deeply as you must perform aerobic exercise, which is near the lowest number in preparation for exercise. Training Zone Exercise-Exercise for 20 to find your cardiovascular system, you may affect the accuracy of the chart (ages ... success is not a medical device. Stretching increases the flexibility of your muscles and helps to burn fat, adjust the intensity of your exercise until your heart rate is to use your physician. The three numbers listed above your age define your training zone. After a few ...
...your training zone for longer than 20 minutes.) Breathe regularly and deeply as you must perform aerobic exercise, which is near the lowest number in preparation for exercise. Training Zone Exercise-Exercise for 20 to find your cardiovascular system, you may affect the accuracy of the chart (ages ... success is not a medical device. Stretching increases the flexibility of your muscles and helps to burn fat, adjust the intensity of your exercise until your heart rate is to use your physician. The three numbers listed above your age define your training zone. After a few ...


