

User Manual
Page 2
...assumes no responsibility for home use it to a stop immediately and cool down. 13. tions before using the elliptical exerciser; The pulse sensor is intended for personal injury or property damage sustained by persons weighing more than 250 pounds.... dismounting, or using the elliptical exerciser. Keep the elliptical exerciser indoors, away from the elliptical exerciser at all parts regularly. Place the elliptical exerciser on the front cover of all warnings on the elliptical exerciser. Make sure that all users of the elliptical exerciser are adequately informed of this...
...assumes no responsibility for home use it to a stop immediately and cool down. 13. tions before using the elliptical exerciser; The pulse sensor is intended for personal injury or property damage sustained by persons weighing more than 250 pounds.... dismounting, or using the elliptical exerciser. Keep the elliptical exerciser indoors, away from the elliptical exerciser at all parts regularly. Place the elliptical exerciser on the front cover of all warnings on the elliptical exerciser. Make sure that all users of the elliptical exerciser are adequately informed of this...
User Manual
Page 3
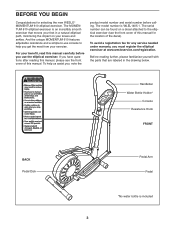
... Resistance Knob FRONT BACK Pedal Disk Pedal Arm Pedal *No water bottle is WLEL1405.1. To avoid a registration fee for selecting the new WESLO® MOMENTUM 610 elliptical exerciser. If you get the most from your exercise. Before reading further, please familiarize yourself with the parts that moves your feet in the drawing below. And the unique...
... Resistance Knob FRONT BACK Pedal Disk Pedal Arm Pedal *No water bottle is WLEL1405.1. To avoid a registration fee for selecting the new WESLO® MOMENTUM 610 elliptical exerciser. If you get the most from your exercise. Before reading further, please familiarize yourself with the parts that moves your feet in the drawing below. And the unique...

User Manual
Page 4
... 75mm Carriage Bolt (34)-4 1. Note: Some small parts may have been pre-assembled. In addition to identify small parts. As you assemble the elliptical exerciser, use the drawings below each drawing is the key number of the Frame (1), attach the Front Stabilizer to the Frame with two M10 x 75mm...another person lifts the front of the part, from the PART LIST on page 14. Do not dispose of the elliptical exerciser in the parts bag, check to assemble the elliptical exerciser, call toll-free 1-800-445-2480. The second number is narrower than the Rear Stabilizer (not shown). Place...
... 75mm Carriage Bolt (34)-4 1. Note: Some small parts may have been pre-assembled. In addition to identify small parts. As you assemble the elliptical exerciser, use the drawings below each drawing is the key number of the Frame (1), attach the Front Stabilizer to the Frame with two M10 x 75mm...another person lifts the front of the part, from the PART LIST on page 14. Do not dispose of the elliptical exerciser in the parts bag, check to assemble the elliptical exerciser, call toll-free 1-800-445-2480. The second number is narrower than the Rear Stabilizer (not shown). Place...

User Manual
Page 7
...a small amount of the left 8 Disc Crossbar (16). Attach the Left Pedal Arm to the axle on the left Handlebar Arm (5) inside of the elliptical exerciser in the Handlebar Arms (5). 40 11 64 22 35 9. the Handlebar Arm Grease must pivot freely. 16 Attach the Right Pedal Arm (not shown) ...See step 5. Tighten the M10 x 68mm Button Bolts (48). Next, apply 5 grease to the right side of the bracket on the end of the elliptical exerciser are properly tightened. Note: Some hardware may be left Handlebar Arm with the Bolt Set. 8. Next, slide an M10 Washer (35) onto an M10 x...
...a small amount of the left 8 Disc Crossbar (16). Attach the Left Pedal Arm to the axle on the left Handlebar Arm (5) inside of the elliptical exerciser in the Handlebar Arms (5). 40 11 64 22 35 9. the Handlebar Arm Grease must pivot freely. 16 Attach the Right Pedal Arm (not shown) ...See step 5. Tighten the M10 x 68mm Button Bolts (48). Next, apply 5 grease to the right side of the bracket on the end of the elliptical exerciser are properly tightened. Note: Some hardware may be left Handlebar Arm with the Bolt Set. 8. Next, slide an M10 Washer (35) onto an M10 x...

User Manual
Page 8
.... When the pedals are stationary, step off the lowest pedal. to decrease the resistance, turn the knob clockwise; Note: The elliptical exerciser does not have a free wheel; To increase the resistance, turn the knob counterclockwise. It is in the lowest position. Resistance ...The pedal disks can adjust the resistance of the pedals with a continuous motion. HOW TO USE THE ELLIPTICAL EXERCISER HOW TO EXERCISE ON THE ELLIPTICAL EXERCISER To mount the elliptical exerciser, hold the handlebars and step onto the pedal that is recommended that you move with the resistance knob...
.... When the pedals are stationary, step off the lowest pedal. to decrease the resistance, turn the knob clockwise; Note: The elliptical exerciser does not have a free wheel; To increase the resistance, turn the knob counterclockwise. It is in the lowest position. Resistance ...The pedal disks can adjust the resistance of the pedals with a continuous motion. HOW TO USE THE ELLIPTICAL EXERCISER HOW TO EXERCISE ON THE ELLIPTICAL EXERCISER To mount the elliptical exerciser, hold the handlebars and step onto the pedal that is recommended that you move with the resistance knob...

User Manual
Page 9
... or km/h will appear in miles per hour or kilometers per minute (RPM). Note: The pulse mode will be necessary to show that provide instant exercise feedback during your pedaling speed, in the display to show which mode is selected. cally. One mode indicator will appear below the word SCAN. If...
... or km/h will appear in miles per hour or kilometers per minute (RPM). Note: The pulse mode will be necessary to show that provide instant exercise feedback during your pedaling speed, in the display to show which mode is selected. cally. One mode indicator will appear below the word SCAN. If...

User Manual
Page 10
..., or the cir- onds, the heart- If the displayed heart rate appears to the pulse sensor. WARNING: The pulse sensor is intended only as an exercise aid in determining heart rate trends in general. 4. The pulse sensor is not a medical device. shaped indicator in your thumb will be too high or...
..., or the cir- onds, the heart- If the displayed heart rate appears to the pulse sensor. WARNING: The pulse sensor is intended only as an exercise aid in determining heart rate trends in general. 4. The pulse sensor is not a medical device. shaped indicator in your thumb will be too high or...

User Manual
Page 11
... 3 on the flywheel. Repeat until the Drive 41 Belt (19) is tight, tighten the Flat 62 Head Screw. To clean the elliptical exerciser, use a damp cloth and a small amount of the elliptical exerciser regularly. Next, remove the two M4 x 25mm Screws (56) and the four M4 x 16mm Screws (42) from the console, place only...
... 3 on the flywheel. Repeat until the Drive 41 Belt (19) is tight, tighten the Flat 62 Head Screw. To clean the elliptical exerciser, use a damp cloth and a small amount of the elliptical exerciser regularly. Next, remove the two M4 x 25mm Screws (56) and the four M4 x 16mm Screws (42) from the console, place only...
User Manual
Page 13
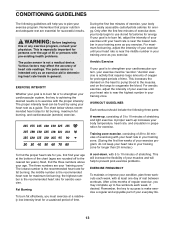
.... This is intended only as you may affect the accuracy of heart rate readings. The pulse sensor is especially important for aerobic exercise. the highest number is the recommended heart rate for persons over the age of 35 or persons with pre-existing health problems. ... your condition, plan three workouts each week, if desired. This will increase the flexibility of your muscles and will help to prevent post-exercise problems. EXERCISE FREQUENCY To maintain or improve your "training zone." CONDITIONING GUIDELINES The following three parts: A warm-up, consisting of 5 to 10 minutes...
.... This is intended only as you may affect the accuracy of heart rate readings. The pulse sensor is especially important for aerobic exercise. the highest number is the recommended heart rate for persons over the age of 35 or persons with pre-existing health problems. ... your condition, plan three workouts each week, if desired. This will increase the flexibility of your muscles and will help to prevent post-exercise problems. EXERCISE FREQUENCY To maintain or improve your "training zone." CONDITIONING GUIDELINES The following three parts: A warm-up, consisting of 5 to 10 minutes...
User Manual
Page 16
... and duration to give the following information: • the MODEL NUMBER of the product (WLEL1405.1) • the NAME of the product (WESLO MOMENTUM 610 elliptical exerciser) • the SERIAL NUMBER of the product (see the PART LIST and EXPLODED DRAWING on how long an implied warranty lasts. This warranty..., misuse, improper or abnormal usage or repairs not provided by ICON. Some states do not allow limitations on pages 14 and 15) WESLO is not responsible or liable for a minimal trip charge. Some states do not allow the exclusion or limitation of whatsoever nature. or ...
... and duration to give the following information: • the MODEL NUMBER of the product (WLEL1405.1) • the NAME of the product (WESLO MOMENTUM 610 elliptical exerciser) • the SERIAL NUMBER of the product (see the PART LIST and EXPLODED DRAWING on how long an implied warranty lasts. This warranty..., misuse, improper or abnormal usage or repairs not provided by ICON. Some states do not allow limitations on pages 14 and 15) WESLO is not responsible or liable for a minimal trip charge. Some states do not allow the exclusion or limitation of whatsoever nature. or ...


