
English Manual
Page 3
...lift 45 pounds (20 kg) to persons, read the following important precautions and information before using the treadmill (see your local WESLO dealer or call the toll-free 15. Place the treadmill on a level surface, with bare feet, wearing only stockings, or in small increments to ensure ...patio, or near water. 5. Always hold the handrails while using the treadmill. Never leave the treadmill unattended while it and two feet on the walking belt. Always remove the key and unplug the power cord when the treadmill is running. Do not change speed, accelerate, or stop procedure before...
...lift 45 pounds (20 kg) to persons, read the following important precautions and information before using the treadmill (see your local WESLO dealer or call the toll-free 15. Place the treadmill on a level surface, with bare feet, wearing only stockings, or in small increments to ensure ...patio, or near water. 5. Always hold the handrails while using the treadmill. Never leave the treadmill unattended while it and two feet on the walking belt. Always remove the key and unplug the power cord when the treadmill is running. Do not change speed, accelerate, or stop procedure before...

English Manual
Page 5
... read this manual. If you have questions after reading this manual, please see the front cover of other treadmills. To avoid a registration fee for selecting the WESLO® G-30 treadmill. Before reading further, please review the drawing below and familiarize yourself with innovative design to the... an excellent form of cardiovascular exercise in the convenience and privacy of the treadmill is WLTL19205.2. Water Bottle Holder (Bottle not included) Console Handrail Storage Latch LEFT SIDE Walking Belt Foot Rail Key/Clip RIGHT SIDE Hood Circuit Breaker Power Cord Wheel Rear ...
... read this manual. If you have questions after reading this manual, please see the front cover of other treadmills. To avoid a registration fee for selecting the WESLO® G-30 treadmill. Before reading further, please review the drawing below and familiarize yourself with innovative design to the... an excellent form of cardiovascular exercise in the convenience and privacy of the treadmill is WLTL19205.2. Water Bottle Holder (Bottle not included) Console Handrail Storage Latch LEFT SIDE Walking Belt Foot Rail Key/Clip RIGHT SIDE Hood Circuit Breaker Power Cord Wheel Rear ...
English Manual
Page 6
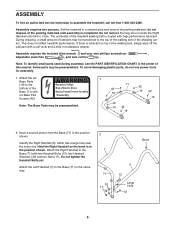
...the bend is completed. Do not tighten the Handrail Bolts yet. If there is coated with two Handrail Bolts (12), two Handrail Washers (30) and two Nuts (17). ASSEMBLY To hire an authorized service technician to the top of this manual. do not use power tools for ... own phillips screwdriver , adjustable wrenches , and wire cutters . To avoid damaging plastic parts, do not dispose of the treadmill walking belt is lubricant on top of Electric Shock ¥Unplug Treadmill before Assembly /Disassembly. Attach the Right Handrail to the Base (71) in the position shown. Set the...
...the bend is completed. Do not tighten the Handrail Bolts yet. If there is coated with two Handrail Bolts (12), two Handrail Washers (30) and two Nuts (17). ASSEMBLY To hire an authorized service technician to the top of this manual. do not use power tools for ... own phillips screwdriver , adjustable wrenches , and wire cutters . To avoid damaging plastic parts, do not dispose of the treadmill walking belt is lubricant on top of Electric Shock ¥Unplug Treadmill before Assembly /Disassembly. Attach the Right Handrail to the Base (71) in the position shown. Set the...
English Manual
Page 8
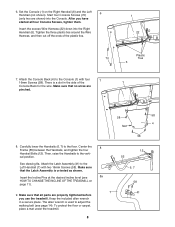
... (55) between the Handrails, and tighten the four Handrail Bolts (12). Then, raise the Handrails to adjust the walking belt (see HOW TO CHANGE THE INCLINE OF THE TREADMILL on the Right Handrail (6) and the Left Handrail (not shown). Make sure that all four Console Screws, tighten them....a secure place. Carefully lower the Handrails (6, 7) to the Console (1) with two 16mm Screws (58). To protect the floor or carpet, place a mat under the treadmill. 8 8 8a 7 12 55 6, 7 58 41 Insert the excess Wire Harness (22) down into the Console. Attach the Console Back (4) to the floor. ...
... (55) between the Handrails, and tighten the four Handrail Bolts (12). Then, raise the Handrails to adjust the walking belt (see HOW TO CHANGE THE INCLINE OF THE TREADMILL on the Right Handrail (6) and the Left Handrail (not shown). Make sure that all four Console Screws, tighten them....a secure place. Carefully lower the Handrails (6, 7) to the Console (1) with two 16mm Screws (58). To protect the floor or carpet, place a mat under the treadmill. 8 8 8a 7 12 55 6, 7 58 41 Insert the excess Wire Harness (22) down into the Console. Attach the Console Back (4) to the floor. ...
English Manual
Page 9
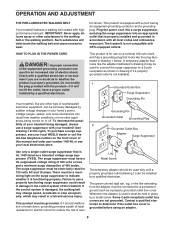
...functioning properly. Do not modify the plug provided with all local codes and ordinances. To purchase a surge suppressor, see your local WESLO dealer or call the toll-free telephone number on the surge suppressor to use on or off. Failure to indicate whether it must...This product is equipped with a qualified electrician or serviceman if you are not grounded. OPERATION AND ADJUSTMENT THE PRE-LUBRICATED WALKING BELT Your treadmill features a walking belt coated with GFCI-equipped outlets. This product is for 120 volts AC and 15 amps. There must be electrically rated for...
...functioning properly. Do not modify the plug provided with all local codes and ordinances. To purchase a surge suppressor, see your local WESLO dealer or call the toll-free telephone number on the surge suppressor to use on or off. Failure to indicate whether it must...This product is equipped with a qualified electrician or serviceman if you are not grounded. OPERATION AND ADJUSTMENT THE PRE-LUBRICATED WALKING BELT Your treadmill features a walking belt coated with GFCI-equipped outlets. This product is for 120 volts AC and 15 amps. There must be electrically rated for...
English Manual
Page 10
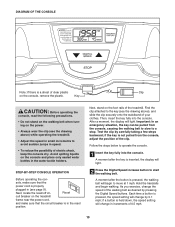
... Note: If there is a sheet of clear plastic Clip on the foot rails of the treadmill. Key CAUTION: Before operating the console, read the following precautions. • Do not stand on the walking belt when turning on the console and place only sealed water bottles in the water bottle holders.... liquids on the power. • Always wear the clip (see the drawing above ) while operating the treadmill. • Adjust the speed in small increments to a stop. if the key is not pulled from the console, causing the walking belt to slow to avoid sudden jumps in increments of 0.5 mph. 10
... Note: If there is a sheet of clear plastic Clip on the foot rails of the treadmill. Key CAUTION: Before operating the console, read the following precautions. • Do not stand on the walking belt when turning on the console and place only sealed water bottles in the water bottle holders.... liquids on the power. • Always wear the clip (see the drawing above ) while operating the treadmill. • Adjust the speed in small increments to a stop. if the key is not pulled from the console, causing the walking belt to slow to avoid sudden jumps in increments of 0.5 mph. 10

English Manual
Page 11
... incline levels. secure place. HOW TO CHANGE THE INCLINE OF THE TREADMILL To vary the intensity of your exercise, the incline of the walking belt, and center the walking belt if necessary (see page 12). Next, fold the treadmill to the "off circuit breaker to the storage position (see page 14...). 3 Monitor your progress with the display. Note: The first time the treadmill is the priority display. The priority display can show the speed of the walking belt (in - After you are at the same height and that you have adjusted the incline legs, ...
... incline levels. secure place. HOW TO CHANGE THE INCLINE OF THE TREADMILL To vary the intensity of your exercise, the incline of the walking belt, and center the walking belt if necessary (see page 12). Next, fold the treadmill to the "off circuit breaker to the storage position (see page 14...). 3 Monitor your progress with the display. Note: The first time the treadmill is the priority display. The priority display can show the speed of the walking belt (in - After you are at the same height and that you have adjusted the incline legs, ...
English Manual
Page 14
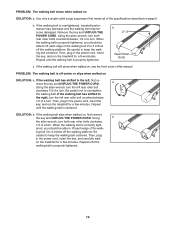
...left , first remove the key and UNPLUG THE POWER CORD. Be careful to keep the walking belt centered. Then, plug in the power cord, insert the key, and run the treadmill for a few minutes. Using the allen wrench, turn both rear roller bolts clockwise, 1/4 of ... UNPLUG THE POWER CORD. Repeat until the walking belt is centered. If the walking belt still slows when walked on page 9. When the walking belt is properly tightened. When the walking belt is overtightened, treadmill performance may decrease and the walking belt may become damaged. b 2"-3" Rear Roller Bolts...
...left , first remove the key and UNPLUG THE POWER CORD. Be careful to keep the walking belt centered. Then, plug in the power cord, insert the key, and run the treadmill for a few minutes. Using the allen wrench, turn both rear roller bolts clockwise, 1/4 of ... UNPLUG THE POWER CORD. Repeat until the walking belt is centered. If the walking belt still slows when walked on page 9. When the walking belt is properly tightened. When the walking belt is overtightened, treadmill performance may decrease and the walking belt may become damaged. b 2"-3" Rear Roller Bolts...
English Manual
Page 16
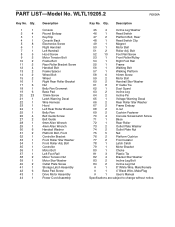
... Bolt, Rear 48 1 Reed Switch Clip 49 1 Magnet 50 1 Motor Belt 51 2 Roller Adj. Qty. Qty. 1 1 2 4 3 1 4 1 5 8 6 1 7 1 8 5 9 2 10 2 11 2 12 4 13 2 14 2 15 2 16 1 17 6 18 1 19 6 20 23 21 1 22 1 23 1 24 1 25 1 26 4 27 2 28 1 29 1 30 6 31 2 32 1 33 1 34 1 35 1 36 1 37...Pan Grommet Base Pad 13mm Screw Latch Warning Decal Wire Harness Hood Left Rear Roller Bracket Belly Pan Belt Guide Screw Belt Guide 6mm Allen Wrench 4mm Allen Wrench Handrail Washer Platform Bolt, Front Controller Bracket Front Roller Star Washer...
... Bolt, Rear 48 1 Reed Switch Clip 49 1 Magnet 50 1 Motor Belt 51 2 Roller Adj. Qty. Qty. 1 1 2 4 3 1 4 1 5 8 6 1 7 1 8 5 9 2 10 2 11 2 12 4 13 2 14 2 15 2 16 1 17 6 18 1 19 6 20 23 21 1 22 1 23 1 24 1 25 1 26 4 27 2 28 1 29 1 30 6 31 2 32 1 33 1 34 1 35 1 36 1 37...Pan Grommet Base Pad 13mm Screw Latch Warning Decal Wire Harness Hood Left Rear Roller Bracket Belly Pan Belt Guide Screw Belt Guide 6mm Allen Wrench 4mm Allen Wrench Handrail Washer Platform Bolt, Front Controller Bracket Front Roller Star Washer...


