

Uk Manual
Page 2
TABLE OF CONTENTS IMPORTANT PRECAUTIONS 3 BEFORE YOU BEGIN 5 ASSEMBLY 6 OPERATION AND ADJUSTMENT 10 HOW TO FOLD AND MOVE THE TREADMILL 15 MAINTENANCE AND TROUBLESHOOTING 17 CONDITIONING GUIDELINES 19 ORDERING REPLACEMENT PARTS Back Cover Note: A PART IDENTIFICATION CHART, an EXPLODED DRAWING, and a PART LIST are attached in the center of ICON IP, Inc. 2 WESLO is a registered trademark of this manual.
TABLE OF CONTENTS IMPORTANT PRECAUTIONS 3 BEFORE YOU BEGIN 5 ASSEMBLY 6 OPERATION AND ADJUSTMENT 10 HOW TO FOLD AND MOVE THE TREADMILL 15 MAINTENANCE AND TROUBLESHOOTING 17 CONDITIONING GUIDELINES 19 ORDERING REPLACEMENT PARTS Back Cover Note: A PART IDENTIFICATION CHART, an EXPLODED DRAWING, and a PART LIST are attached in the center of ICON IP, Inc. 2 WESLO is a registered trademark of this manual.
Uk Manual
Page 3
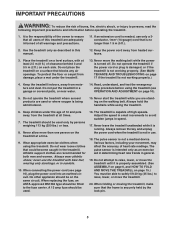
... lbs.) or less. 8. Various factors, including your movement, may affect the accuracy of all warnings and precautions. 11. When folding or moving the treadmill, make sure that the frame is not a medical device. Do not wear loose clothes that all times. 7. Always remove the key and unplug the...ensure that could become caught in a garage or covered patio, or near water. 14. If an extension cord is needed, use . 18. The treadmill is intended only as described in speed. 17. The pulse sensor is capable of high speeds. It is properly assembled. (See ASSEMBLY on page ...
... lbs.) or less. 8. Various factors, including your movement, may affect the accuracy of all warnings and precautions. 11. When folding or moving the treadmill, make sure that the frame is not a medical device. Do not wear loose clothes that all times. 7. Always remove the key and unplug the...ensure that could become caught in a garage or covered patio, or near water. 14. If an extension cord is needed, use . 18. The treadmill is intended only as described in speed. 17. The pulse sensor is capable of high speeds. It is properly assembled. (See ASSEMBLY on page ...
Uk Manual
Page 4
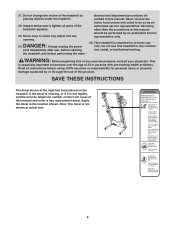
... unless instructed to do so by or through the use this manual should be performed by placing objects under the treadmill. 22. Do not use of the treadmill regularly. 23. WARNING: Before beginning this manual. ICON assumes no responsibility for personal injury or property damage sustained ...by an authorized service representative. Note: The decal is especially important for in this treadmill in any opening. Always unplug the power cord immediately after use only. If the decal is missing, or if it is intended ...
... unless instructed to do so by or through the use this manual should be performed by placing objects under the treadmill. 22. Do not use of the treadmill regularly. 23. WARNING: Before beginning this manual. ICON assumes no responsibility for personal injury or property damage sustained ...by an authorized service representative. Note: The decal is especially important for in this treadmill in any opening. Always unplug the power cord immediately after use only. If the decal is missing, or if it is intended ...
Uk Manual
Page 5
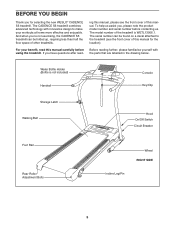
... of other treadmills. To help us . The serial number can be found on a decal attached to make your benefit, read - If you 're not exercising, the CADENCE S5 treadmill can be folded... up, requiring less than half the floor space of the treadmill is not included) Handrail Console Key/Clip Storage ...Leg/Pin Wheel RIGHT SIDE 5 Water Bottle Holder (Bottle is WETL13906.1. The CADENCE S5 treadmill combines advanced technology with the parts that are labelled in the drawing below. Before reading...
... of other treadmills. To help us . The serial number can be found on a decal attached to make your benefit, read - If you 're not exercising, the CADENCE S5 treadmill can be folded... up, requiring less than half the floor space of the treadmill is not included) Handrail Console Key/Clip Storage ...Leg/Pin Wheel RIGHT SIDE 5 Water Bottle Holder (Bottle is WETL13906.1. The CADENCE S5 treadmill combines advanced technology with the parts that are labelled in the drawing below. Before reading...
Uk Manual
Page 6
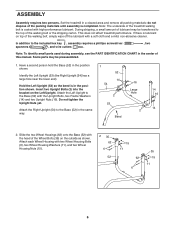
...with the head of the Wheel Bolts (35) on top of the walking belt or the shipping carton. During shipping, a small amount of the treadmill walking belt is lubricant on the outside as shown. Identify the Left Upright (53) (the Right Upright [54] has a large hole near ...Attach each Wheel Housing with the Upright Bolts, two Frame Washers (14) and two Upright Nuts (16). Set the treadmill in the position shown. This does not affect treadmill performance. Some parts may be preassembled. 1. Insert two Upright Bolts (2) into the bracket on the Left Upright. ASSEMBLY ...
...with the head of the Wheel Bolts (35) on top of the walking belt or the shipping carton. During shipping, a small amount of the treadmill walking belt is lubricant on the outside as shown. Identify the Left Upright (53) (the Right Upright [54] has a large hole near ...Attach each Wheel Housing with the Upright Bolts, two Frame Washers (14) and two Upright Nuts (16). Set the treadmill in the position shown. This does not affect treadmill performance. Some parts may be preassembled. 1. Insert two Upright Bolts (2) into the bracket on the Left Upright. ASSEMBLY ...
Uk Manual
Page 7
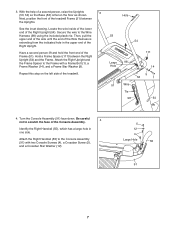
Then, pull the upper end of the wire until the end of the Wire Harness is flat on the left side of the treadmill Frame (51) between the Right Upright (54) and the Frame. Secure the wire to scratch the face of the Right Upright. Turn the Console Assembly (... person, raise the Uprights 3 (53, 54) so the Base (52) is extending from the indicated hole in one side. Next, position the front of the treadmill. Repeat this step on the floor as shown. Be careful 4 not to the Wire Harness (98) using the included plastic tie.
Then, pull the upper end of the wire until the end of the Wire Harness is flat on the left side of the treadmill Frame (51) between the Right Upright (54) and the Frame. Secure the wire to scratch the face of the Right Upright. Turn the Console Assembly (... person, raise the Uprights 3 (53, 54) so the Base (52) is extending from the indicated hole in one side. Next, position the front of the treadmill. Repeat this step on the floor as shown. Be careful 4 not to the Wire Harness (98) using the included plastic tie.
Uk Manual
Page 9
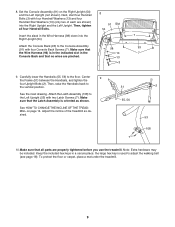
... 108 7 10.Make sure that no wires are pinched. 8 91 Slot 54 98 10 13 3 7 93 7 9. See HOW TO CHANGE THE INCLINE OF THE TREADMILL on the Right Upright (54) and the Left Upright (not shown). Carefully lower the Handrails (55, 56) to the Left Upright (53) with two Latch...down into the Right Upright and the Left Upright. To protect the floor or carpet, place a mat under the treadmill. 9 Adjust the incline of each are properly tightened before you use the treadmill. Note: Extra hardware may be included. Make sure that the Latch Assembly is in the indicated slot in a secure...
... 108 7 10.Make sure that no wires are pinched. 8 91 Slot 54 98 10 13 3 7 93 7 9. See HOW TO CHANGE THE INCLINE OF THE TREADMILL on the Right Upright (54) and the Left Upright (not shown). Carefully lower the Handrails (55, 56) to the Left Upright (53) with two Latch...down into the Right Upright and the Left Upright. To protect the floor or carpet, place a mat under the treadmill. 9 Adjust the incline of each are properly tightened before you use the treadmill. Note: Extra hardware may be included. Make sure that the Latch Assembly is in the indicated slot in a secure...

Uk Manual
Page 10
... the indicated end of the equipment-earthing conductor can result in an in the adapter. Check with GFCI-equipped outlets. Important: The treadmill is equipped with a manufacturer-recommended power cord. See drawing 2. Do not modify the plug provided with the product-if it must ... the power cord into the metal clips in accordance with high-performance lubricant. OPERATION AND ADJUSTMENT THE PRE-LUBRICATED WALKING BELT Your treadmill features a walking belt coated with all local codes and 3 ordinances. IMPORTANT: Never apply silicone spray or other substances to reduce...
... the indicated end of the equipment-earthing conductor can result in an in the adapter. Check with GFCI-equipped outlets. Important: The treadmill is equipped with a manufacturer-recommended power cord. See drawing 2. Do not modify the plug provided with the product-if it must ... the power cord into the metal clips in accordance with high-performance lubricant. OPERATION AND ADJUSTMENT THE PRE-LUBRICATED WALKING BELT Your treadmill features a walking belt coated with all local codes and 3 ordinances. IMPORTANT: Never apply silicone spray or other substances to reduce...
Uk Manual
Page 11
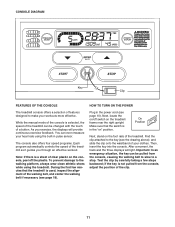
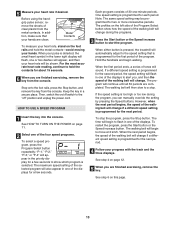
... be changed with the touch of a button. The console also offers four speed programs. Each program automatically controls the speed of the treadmill as it guides you exercise, the displays will light. During the first few steps backward; Plug in pulse sensor. Important: In an ...and slide the clip onto the waistband of your clothes. CONSOLE DIAGRAM Key Clip FEATURES OF THE CONSOLE HOW TO TURN ON THE POWER The treadmill console offers a selection of features designed to the key (see page 18). As you through an effective workout. You can even measure your...
... be changed with the touch of a button. The console also offers four speed programs. Each program automatically controls the speed of the treadmill as it guides you exercise, the displays will light. During the first few steps backward; Plug in pulse sensor. Important: In an ...and slide the clip onto the waistband of your clothes. CONSOLE DIAGRAM Key Clip FEATURES OF THE CONSOLE HOW TO TURN ON THE POWER The treadmill console offers a selection of features designed to the key (see page 18). As you through an effective workout. You can even measure your...
Uk Manual
Page 12
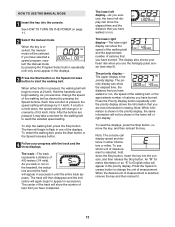
... display shows the information that you use the handgrip pulse sensor (see which unit of measurement. See HOW TO TURN ON THE POWER on the treadmill, the indicators around the track will again begin walking. The lower right display-The lower right display can show the elapsed time and the distance...
... display shows the information that you use the handgrip pulse sensor (see which unit of measurement. See HOW TO TURN ON THE POWER on the treadmill, the indicators around the track will again begin walking. The lower right display-The lower right display can show the elapsed time and the distance...
Uk Manual
Page 13
... 1 Insert the key into the console. The profiles on page 11. 2 Select one of 30 one of the program. When either button is pressed, the treadmill will change during the program, you are finished exercising, remove the key from the console. If a different speed setting is programmed for a few seconds. To...
... 1 Insert the key into the console. The profiles on page 11. 2 Select one of 30 one of the program. When either button is pressed, the treadmill will change during the program, you are finished exercising, remove the key from the console. If a different speed setting is programmed for a few seconds. To...
Uk Manual
Page 14
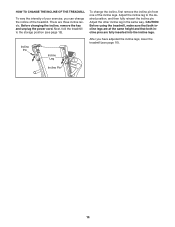
... remove the incline pin from one of the incline legs. HOW TO CHANGE THE INCLINE OF THE TREADMILL To vary the intensity of your exercise, you have adjusted the incline legs, lower the treadmill (see page 15). Adjust the other incline leg in the same way. Incline Pin 14 Before changing... storage position (see page 16). There are fully inserted into the incline legs. Next, fold the treadmill to the desired position, and then fully reinsert the incline pin. CAUTION: Before using the treadmill, make sure that both incline legs are at the same height and that both incline pins are three...
... remove the incline pin from one of the incline legs. HOW TO CHANGE THE INCLINE OF THE TREADMILL To vary the intensity of your exercise, you have adjusted the incline legs, lower the treadmill (see page 15). Adjust the other incline leg in the same way. Incline Pin 14 Before changing... storage position (see page 16). There are fully inserted into the incline legs. Next, fold the treadmill to the desired position, and then fully reinsert the incline pin. CAUTION: Before using the treadmill, make sure that both incline legs are at the same height and that both incline pins are three...
Uk Manual
Page 15
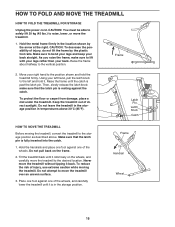
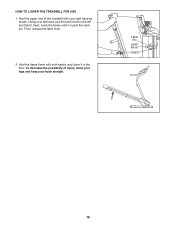
...than your back straight. Frame Handrail Wheel 15 Make sure to the desired location. Raise the frame about halfway to the left and hold the treadmill firmly. Make sure that the latch pin is fully inserted into the catch. 1. Hold the handrails and place one of direct sunlight. To ...to the storage position as described above 30°C (85°F). To protect the floor or carpet from damage, place a mat under the treadmill. Tilt the treadmill back until it is past the latch pin. Place one foot against one foot against the catch. CAUTION: You must be able to safely...
...than your back straight. Frame Handrail Wheel 15 Make sure to the desired location. Raise the frame about halfway to the left and hold the treadmill firmly. Make sure that the latch pin is fully inserted into the catch. 1. Hold the handrails and place one of direct sunlight. To ...to the storage position as described above 30°C (85°F). To protect the floor or carpet from damage, place a mat under the treadmill. Tilt the treadmill back until it is past the latch pin. Place one foot against one foot against the catch. CAUTION: You must be able to safely...
Uk Manual
Page 16
Hold the upper end of injury, bend your legs and keep your back straight. HOW TO LOWER THE TREADMILL FOR USE 1. Next, lower the frame until it . Latch Pin Latch Knob Catch 16 Then, release the latch knob. 2. Hold the frame firmly with your left and hold it is past the latch pin. Using your right hand as shown. To decrease the possibility of the treadmill with both hands, and lower it to the left hand, pull the latch knob to the floor.
Hold the upper end of injury, bend your legs and keep your back straight. HOW TO LOWER THE TREADMILL FOR USE 1. Next, lower the frame until it . Latch Pin Latch Knob Catch 16 Then, release the latch knob. 2. Hold the frame firmly with your left and hold it is past the latch pin. Using your right hand as shown. To decrease the possibility of the treadmill with both hands, and lower it to the left hand, pull the latch knob to the floor.
Uk Manual
Page 17
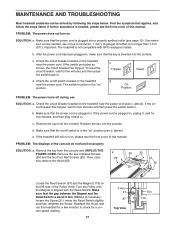
... cord. Check the circuit breaker located on the left side of this manual. d. If the power cord is about 3 mm (1/8 in the "on the treadmill near the power cord. c. Check the on/off switch is in .). above ). Remove the five indicated Screws a 65 20 (20) and the two... Foot Rail Screws (25). b. Remove the key from the console and UNPLUG THE POWER CORD. e. PROBLEM: The power does not turn on the treadmill near the power cord (see c. If necessary, loosen the Screw (21), move the Reed Switch slightly, and then retighten the Screw. Make sure ...
... cord. Check the circuit breaker located on the left side of this manual. d. If the power cord is about 3 mm (1/8 in the "on the treadmill near the power cord. c. Check the on/off switch is in .). above ). Remove the five indicated Screws a 65 20 (20) and the two... Foot Rail Screws (25). b. Remove the key from the console and UNPLUG THE POWER CORD. e. PROBLEM: The power does not turn on the treadmill near the power cord (see c. If necessary, loosen the Screw (21), move the Reed Switch slightly, and then retighten the Screw. Make sure ...
Uk Manual
Page 18
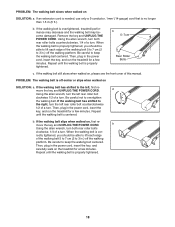
... counterclockwise 1/2 of a turn. Be careful not to the right, turn . Then, plug in the power cord, insert the key, and carefully walk on the treadmill for a few minutes. b Using the allen wrench, turn both rear roller bolts counterclockwise, 1/4 of the walking belt 5 to 7 cm (2 to lift each...3-conductor, 1mm2 (14-gauge) cord that is properly tightened, you should be able to 3 in the power cord, insert the key, and run the treadmill for a few minutes. If the walking belt is properly tightened. Using the allen wrench, turn . Be careful to 3 in.) off the walking platform...
... counterclockwise 1/2 of a turn. Be careful not to the right, turn . Then, plug in the power cord, insert the key, and carefully walk on the treadmill for a few minutes. b Using the allen wrench, turn both rear roller bolts counterclockwise, 1/4 of the walking belt 5 to 7 cm (2 to lift each...3-conductor, 1mm2 (14-gauge) cord that is properly tightened, you should be able to 3 in the power cord, insert the key, and run the treadmill for a few minutes. If the walking belt is properly tightened. Using the allen wrench, turn . Be careful to 3 in.) off the walking platform...
Uk Manual
Page 19
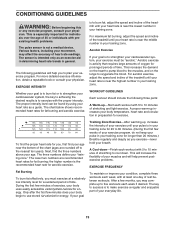
...to strengthen your cardiovascular system, the key to strengthen your cardiovascular system, your exercise must exercise at least one day of the treadmill until your pulse is near the lowest number in preparation for energy. The chart below shows recommended heart rates for 20 to ...numbers define your age. The following three parts: A Warm-up to five workouts each week, with 5 to 10 minutes of the treadmill until your training zone. WORKOUT GUIDELINES Each workout should include the following guidelines will help you exercise-never hold your body begin to oxygenate ...
...to strengthen your cardiovascular system, the key to strengthen your cardiovascular system, your exercise must exercise at least one day of the treadmill until your pulse is near the lowest number in preparation for energy. The chart below shows recommended heart rates for 20 to ...numbers define your age. The following three parts: A Warm-up to five workouts each week, with 5 to 10 minutes of the treadmill until your training zone. WORKOUT GUIDELINES Each workout should include the following guidelines will help you exercise-never hold your body begin to oxygenate ...
Uk Manual
Page 23
... us assist you, please be prepared to provide the following information: • the MODEL NUMBER of the product (WETL13906.1) • the NAME of the product (WESLO CADENCE S5 treadmill) • the SERIAL NUMBER of the product (see the front cover of this manual) • the KEY NUMBER and DESCRIPTION of the needed part(s) (see...
... us assist you, please be prepared to provide the following information: • the MODEL NUMBER of the product (WETL13906.1) • the NAME of the product (WESLO CADENCE S5 treadmill) • the SERIAL NUMBER of the product (see the front cover of this manual) • the KEY NUMBER and DESCRIPTION of the needed part(s) (see...


