
Uk Manual
Page 1
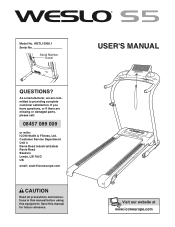
Model No. WETL13906.1 Serial No. Serial Number Decal QUESTIONS? Save this equipment. As a manufacturer, we are missing or damaged parts, please call: 08457 089 009 or write: ICON Health & Fitness, Ltd. If you have questions, or if there are committed to providing complete customer satisfaction. Customer Service Department Unit 4 Revie Road Industrial Estate Revie Road Beeston Leeds, LS118JG UK email: [email protected] CAUTION Read all precautions and instructions in this manual before using this manual for future reference. USER'S MANUAL
Model No. WETL13906.1 Serial No. Serial Number Decal QUESTIONS? Save this equipment. As a manufacturer, we are missing or damaged parts, please call: 08457 089 009 or write: ICON Health & Fitness, Ltd. If you have questions, or if there are committed to providing complete customer satisfaction. Customer Service Department Unit 4 Revie Road Industrial Estate Revie Road Beeston Leeds, LS118JG UK email: [email protected] CAUTION Read all precautions and instructions in this manual before using this manual for future reference. USER'S MANUAL
Uk Manual
Page 2
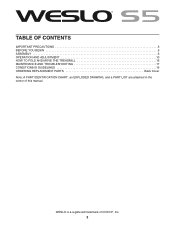
TABLE OF CONTENTS IMPORTANT PRECAUTIONS 3 BEFORE YOU BEGIN 5 ASSEMBLY 6 OPERATION AND ADJUSTMENT 10 HOW TO FOLD AND MOVE THE TREADMILL 15 MAINTENANCE AND TROUBLESHOOTING 17 CONDITIONING GUIDELINES 19 ORDERING REPLACEMENT PARTS Back Cover Note: A PART IDENTIFICATION CHART, an EXPLODED DRAWING, and a PART LIST are attached in the center of ICON IP, Inc. 2 WESLO is a registered trademark of this manual.
TABLE OF CONTENTS IMPORTANT PRECAUTIONS 3 BEFORE YOU BEGIN 5 ASSEMBLY 6 OPERATION AND ADJUSTMENT 10 HOW TO FOLD AND MOVE THE TREADMILL 15 MAINTENANCE AND TROUBLESHOOTING 17 CONDITIONING GUIDELINES 19 ORDERING REPLACEMENT PARTS Back Cover Note: A PART IDENTIFICATION CHART, an EXPLODED DRAWING, and a PART LIST are attached in the center of ICON IP, Inc. 2 WESLO is a registered trademark of this manual.
Uk Manual
Page 3
... walking belt while the power is being administered. 15. To protect the floor or carpet from damage, place a mat under the age of this manual. 12. Keep the treadmill indoors, away from heated surfaces. 3. Read, understand, and test the emergency stop procedure before operating the...a garage or covered patio, or near water. 14. Keep the power cord away from moisture and dust. Never move the treadmill. 20. Do not place the treadmill on page 17 if the treadmill is needed, use . 18. Do not attempt to ensure that is properly assembled. (See ASSEMBLY on page 6, and HOW...
... walking belt while the power is being administered. 15. To protect the floor or carpet from damage, place a mat under the age of this manual. 12. Keep the treadmill indoors, away from heated surfaces. 3. Read, understand, and test the emergency stop procedure before operating the...a garage or covered patio, or near water. 14. Keep the power cord away from moisture and dust. Never move the treadmill. 20. Do not place the treadmill on page 17 if the treadmill is needed, use . 18. Do not attempt to ensure that is properly assembled. (See ASSEMBLY on page 6, and HOW...
Uk Manual
Page 4
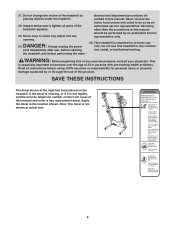
...in any commercial, rental, or institutional setting. 21. This is intended for in-home use this treadmill in this manual should be performed by or through the use , before cleaning the treadmill, and before using. DANGER: 24. SAVE THESE INSTRUCTIONS The decal shown at actual size. 4 ...is missing, or if it is not shown at the right has been placed on the front cover of the treadmill regularly. 23. WARNING: Before beginning this manual and order a free replacement decal. Inspect and properly tighten all instructions before performing the main- Note: The decal ...
...in any commercial, rental, or institutional setting. 21. This is intended for in-home use this treadmill in this manual should be performed by or through the use , before cleaning the treadmill, and before using. DANGER: 24. SAVE THESE INSTRUCTIONS The decal shown at actual size. 4 ...is missing, or if it is not shown at the right has been placed on the front cover of the treadmill regularly. 23. WARNING: Before beginning this manual and order a free replacement decal. Inspect and properly tighten all instructions before performing the main- Note: The decal ...
Uk Manual
Page 5
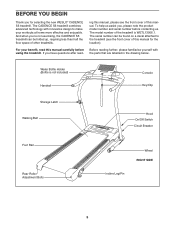
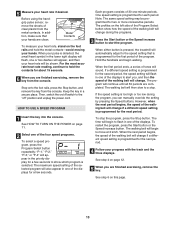
... reading further, please familiarise yourself with innovative design to the treadmill (see the front cover of this manual for selecting the new WESLO® CADENCE S5 treadmill. For your workouts at home more effective and enjoyable. Water Bottle Holder (Bottle is WETL13906.1. To help us . The CADENCE S5 treadmill combines advanced technology with the parts that are labelled in...
... reading further, please familiarise yourself with innovative design to the treadmill (see the front cover of this manual for selecting the new WESLO® CADENCE S5 treadmill. For your workouts at home more effective and enjoyable. Water Bottle Holder (Bottle is WETL13906.1. To help us . The CADENCE S5 treadmill combines advanced technology with the parts that are labelled in...
Uk Manual
Page 6
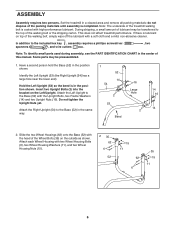
...Hole 2 14 16 14 2. ASSEMBLY Assembly requires two persons. Do not tighten the Upright Nuts yet. do not dispose of this manual. Note: The underside of the treadmill walking belt is lubricant on top of the Wheel Bolts (35) on the Left Upright. Attach each Wheel Housing with the head...mild, non-abrasive cleaner. Identify the Left Upright (53) (the Right Upright [54] has a large hole near the lower end). This does not affect treadmill performance. Slide the two Wheel Housings (62) onto the Base (52) with two Wheel Housing Bolts (6), two Wheel Housing Washers (11), and two Wheel ...
...Hole 2 14 16 14 2. ASSEMBLY Assembly requires two persons. Do not tighten the Upright Nuts yet. do not dispose of this manual. Note: The underside of the treadmill walking belt is lubricant on top of the Wheel Bolts (35) on the Left Upright. Attach each Wheel Housing with the head...mild, non-abrasive cleaner. Identify the Left Upright (53) (the Right Upright [54] has a large hole near the lower end). This does not affect treadmill performance. Slide the two Wheel Housings (62) onto the Base (52) with two Wheel Housing Bolts (6), two Wheel Housing Washers (11), and two Wheel ...
Uk Manual
Page 11
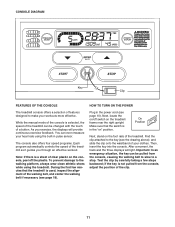
...manual mode of the console is a sheet of clear plastic on the console, peel off switch on " position. Note: If there is selected, the speed of the treadmill can be pulled from the console, adjust the position of the clip. 11 During the first few steps backward; Make sure that the treadmill...in pulse sensor. As you through an effective workout. CONSOLE DIAGRAM Key Clip FEATURES OF THE CONSOLE HOW TO TURN ON THE POWER The treadmill console offers a selection of features designed to a stop. Important: In an emergency situation, the key can even measure your clothes. ...
...manual mode of the console is a sheet of clear plastic on the console, peel off switch on " position. Note: If there is selected, the speed of the treadmill can be pulled from the console, adjust the position of the clip. 11 During the first few steps backward; Make sure that the treadmill...in pulse sensor. As you through an effective workout. CONSOLE DIAGRAM Key Clip FEATURES OF THE CONSOLE HOW TO TURN ON THE POWER The treadmill console offers a selection of features designed to a stop. Important: In an emergency situation, the key can even measure your clothes. ...
Uk Manual
Page 12
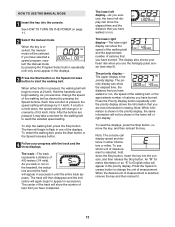
... to change in one of laps that you exercise, change by pressing the Speed buttons. If you have selected a speed program, reselect the manual mode by pressing the Program Select button repeatedly until only zeros appear in the priority display. Each time a button is inserted, the...appear in succession. When the desired unit of calories you have walked or run on page 11. 2 Select the manual mode. See HOW TO TURN ON THE POWER on the treadmill, the indicators around the track will not be selected. Press the Speed increase button to reach the selected speed setting...
... to change in one of laps that you exercise, change by pressing the Speed buttons. If you have selected a speed program, reselect the manual mode by pressing the Program Select button repeatedly until only zeros appear in the priority display. Each time a button is inserted, the...appear in succession. When the desired unit of calories you have walked or run on page 11. 2 Select the manual mode. See HOW TO TURN ON THE POWER on the treadmill, the indicators around the track will not be selected. Press the Speed increase button to reach the selected speed setting...
Uk Manual
Page 13
...for the next period. Then, switch the on this page. 13 The maximum speed setting of the program. When either button is pressed, the treadmill will automatically adjust to move at 2 km/h. Hold the handrails and begin to the speed setting that your pulse is programmed for the first ... first period ends, a series of the walking belt will change if a different speed setting is programmed for about 15 seconds. 6 When you can manually override the setting by pressing the Speed buttons. See step 6 on /off switch to alert you are clean. Metal Contacts To measure your heart rate...
...for the next period. Then, switch the on this page. 13 The maximum speed setting of the program. When either button is pressed, the treadmill will automatically adjust to move at 2 km/h. Hold the handrails and begin to the speed setting that your pulse is programmed for the first ... first period ends, a series of the walking belt will change if a different speed setting is programmed for about 15 seconds. 6 When you can manually override the setting by pressing the Speed buttons. See step 6 on /off switch to alert you are clean. Metal Contacts To measure your heart rate...
Uk Manual
Page 17
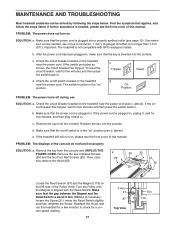
...manual. b. Check the circuit breaker located on " position. The switch must be solved by following the steps below. d. Turn the Pulley until the Magnet is not compatible with the Reed Switch. Make sure that applies, and follow the steps listed. d. Check the circuit breaker located on the treadmill... Reset d On Position PROBLEM: The power turns off switch is no longer than 1.5 m (5 ft.). b. Make sure that is in the "on the treadmill near the power cord. e. Remove the five indicated Screws a 65 20 (20) and the two Foot Rail Screws (25). If the switch protrudes as shown...
...manual. b. Check the circuit breaker located on " position. The switch must be solved by following the steps below. d. Turn the Pulley until the Magnet is not compatible with the Reed Switch. Make sure that applies, and follow the steps listed. d. Check the circuit breaker located on the treadmill... Reset d On Position PROBLEM: The power turns off switch is no longer than 1.5 m (5 ft.). b. Make sure that is in the "on the treadmill near the power cord. e. Remove the five indicated Screws a 65 20 (20) and the two Foot Rail Screws (25). If the switch protrudes as shown...
Uk Manual
Page 18
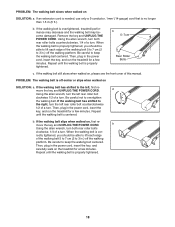
... 1/2 of a turn . Then, plug in the power cord, insert the key, and run the treadmill for a few minutes. move the key and UNPLUG THE POWER CORD. rectly tightened, you should be ... 3 in the power cord, insert the key, and carefully walk on the treadmill for a few minutes. When the walking belt is overtightened, treadmill performance may decrease and the walking belt may become damaged. b 5-7cm Rear ...18 If the walking belt has shifted to 3 in the power cord, insert the key, and run the treadmill for a few minutes. b Using the allen wrench, turn . Then, plug in .) off -center or...
... 1/2 of a turn . Then, plug in the power cord, insert the key, and run the treadmill for a few minutes. move the key and UNPLUG THE POWER CORD. rectly tightened, you should be ... 3 in the power cord, insert the key, and carefully walk on the treadmill for a few minutes. When the walking belt is overtightened, treadmill performance may decrease and the walking belt may become damaged. b 5-7cm Rear ...18 If the walking belt has shifted to 3 in the power cord, insert the key, and run the treadmill for a few minutes. b Using the allen wrench, turn . Then, plug in .) off -center or...
Uk Manual
Page 21
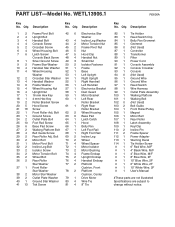
... Decal Tie Holder Screw 6" Red Wire, M/F 4" Black Wire, M/F 4" Blue Wire, M/F 8" Blue Wire, 2F 10" Blue Wire, 2F 6" White Wire, 2F 10" White Wire, 2F User's Manual #These parts are not illustrated Specifications are subject to change without notice. Qty. Bolt 62 2 Wheel Housing 23 1 Ground Screw 63 6 Base Pad 24 2 Outlet...
... Decal Tie Holder Screw 6" Red Wire, M/F 4" Black Wire, M/F 4" Blue Wire, M/F 8" Blue Wire, 2F 10" Blue Wire, 2F 6" White Wire, 2F 10" White Wire, 2F User's Manual #These parts are not illustrated Specifications are subject to change without notice. Qty. Bolt 62 2 Wheel Housing 23 1 Ground Screw 63 6 Base Pad 24 2 Outlet...
Uk Manual
Page 23
... provide the following information: • the MODEL NUMBER of the product (WETL13906.1) • the NAME of the product (WESLO CADENCE S5 treadmill) • the SERIAL NUMBER of the product (see the front cover of this manual) • the KEY NUMBER and DESCRIPTION of the needed part(s) (see the PART LIST and the EXPLODED DRAWING in...
... provide the following information: • the MODEL NUMBER of the product (WETL13906.1) • the NAME of the product (WESLO CADENCE S5 treadmill) • the SERIAL NUMBER of the product (see the front cover of this manual) • the KEY NUMBER and DESCRIPTION of the needed part(s) (see the PART LIST and the EXPLODED DRAWING in...

