
English Manual
Page 1
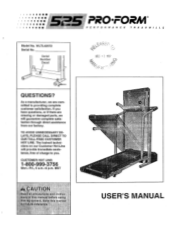
...; • . • in Model No. Serial Number Decal PRO0FORM PERFORMANCE TREADMI LLS EC 1 2 19'.47 QUESTIONS? TO AVOID UNNECESSARY DELAYS, PLEASE CALL DIRECT TO OUR TOLL-FREE CUSTOMER HOT LINE. MST UTIO ad.all precaution4 arid instruc manual before usiPg is.044ipinent pave this manua futuref.„..e. .fej:011 •:* • : el A*. 40, USER'S MANUAL As a manufacturer, we...
...; • . • in Model No. Serial Number Decal PRO0FORM PERFORMANCE TREADMI LLS EC 1 2 19'.47 QUESTIONS? TO AVOID UNNECESSARY DELAYS, PLEASE CALL DIRECT TO OUR TOLL-FREE CUSTOMER HOT LINE. MST UTIO ad.all precaution4 arid instruc manual before usiPg is.044ipinent pave this manua futuref.„..e. .fej:011 •:* • : el A*. 40, USER'S MANUAL As a manufacturer, we...
English Manual
Page 2
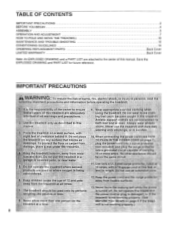
... wcito019ut4 ed 5 aerilje,Vith:#::i347giOge,Cord.:Ofipkteat. TABLE OF CONTENTS IMPORTANT PRECAUTIONS BEFORE YOU BEGIN ASSEMBLY OPERATION AND ADJUSTMENT HOW TO FOLD AND MOVE THE TREADMILL MAINTENANCE AND TROUBLE-SHOOTING CONDITIONING GUIDELINES ORDERING REPLACEMENT PARTS LIMITED WARRANTY 2 4 5 7 10 12 14 Back Cover Back Cover Note: An EXPLODED DRAWING and a PART LIST are attached to the center of this :treadmill are adeqUately using the treadmill. To reduCe the risk of carrying...
... wcito019ut4 ed 5 aerilje,Vith:#::i347giOge,Cord.:Ofipkteat. TABLE OF CONTENTS IMPORTANT PRECAUTIONS BEFORE YOU BEGIN ASSEMBLY OPERATION AND ADJUSTMENT HOW TO FOLD AND MOVE THE TREADMILL MAINTENANCE AND TROUBLE-SHOOTING CONDITIONING GUIDELINES ORDERING REPLACEMENT PARTS LIMITED WARRANTY 2 4 5 7 10 12 14 Back Cover Back Cover Note: An EXPLODED DRAWING and a PART LIST are attached to the center of this :treadmill are adeqUately using the treadmill. To reduCe the risk of carrying...
English Manual
Page 3
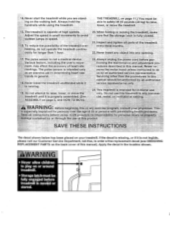
... in this manual). THE TREADMILL on your treadmill. The pulse sensor is fully closed. 21. Servicing other than 1 hour. 20. Do not use only. all parts of heart rate readings. If the decal is missing, or if it is intended for :,persons over the age of high speeds. Inspect and tighten all instructions before per. Always unplug the power cord before using the treadmill. forming the maintenance and adjustment pro cedures...
... in this manual). THE TREADMILL on your treadmill. The pulse sensor is fully closed. 21. Servicing other than 1 hour. 20. Do not use only. all parts of heart rate readings. If the decal is missing, or if it is intended for :,persons over the age of high speeds. Inspect and tighten all instructions before per. Always unplug the power cord before using the treadmill. forming the maintenance and adjustment pro cedures...
English Manual
Page 4
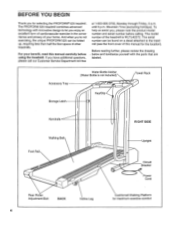
... cover of other treadmills. Mountain Time (excluding holidays). The model number of your benefit, read this manual for the location). The serial number can be found on a decal attached to let you enjoy an excellent form of cardiovascular exercise in the convenience and privacy of the treadmill is not included) Key/Clip Towel Rack Handrails Walking Belt Foot Rail Rear Roller Adjustment Bolt BACK Incline Leg 4 RIGHT SIDE Upright Circuit Breaker Power Cord Cushioned Walking...
... cover of other treadmills. Mountain Time (excluding holidays). The model number of your benefit, read this manual for the location). The serial number can be found on a decal attached to let you enjoy an excellent form of cardiovascular exercise in the convenience and privacy of the treadmill is not included) Key/Clip Towel Rack Handrails Walking Belt Foot Rail Rear Roller Adjustment Bolt BACK Incline Leg 4 RIGHT SIDE Upright Circuit Breaker Power Cord Cushioned Walking...
English Manual
Page 5
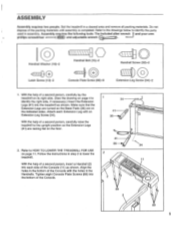
... Extension Leg Screw (34). Follow the instructions in step 2 to identify the parts 8 used in the bottom of the packing materials until assembly is completed. Align the holes in assembly. Assembly requires the following tools: The included alien wrench and your own phillips screwdriver 5 i) and adjustable wrench ===D) . - 0 Handrail Washer (16)-2 \\\\\\\\ Handrail Bolt (15)-2 O Latch Screw (13)-2 Console Plate Screw (89)-8 Handrail Screw (32)-2 O Extension Leg Screw (34)-2 1. Attach each...
... Extension Leg Screw (34). Follow the instructions in step 2 to identify the parts 8 used in the bottom of the packing materials until assembly is completed. Align the holes in assembly. Assembly requires the following tools: The included alien wrench and your own phillips screwdriver 5 i) and adjustable wrench ===D) . - 0 Handrail Washer (16)-2 \\\\\\\\ Handrail Bolt (15)-2 O Latch Screw (13)-2 Console Plate Screw (89)-8 Handrail Screw (32)-2 O Extension Leg Screw (34)-2 1. Attach each...

English Manual
Page 6
... Bolts yet. Tighten a Handrail Screw (32) into the lower end of the Handrail Screws while tightening them. With the help of the Uprights (14) in the bracket on the Uprights (14) as shown. Route the Wire Harness (26) through the notch in 6 the indicated location. Press the Allen Wrench (73) into the right Upright (14). Insert the bracket into the Adhesive Clip. 7. Attach the Storage Latch...
... Bolts yet. Tighten a Handrail Screw (32) into the lower end of the Handrail Screws while tightening them. With the help of the Uprights (14) in the bracket on the Uprights (14) as shown. Route the Wire Harness (26) through the notch in 6 the indicated location. Press the Allen Wrench (73) into the right Upright (14). Insert the bracket into the Adhesive Clip. 7. Attach the Storage Latch...
English Manual
Page 7
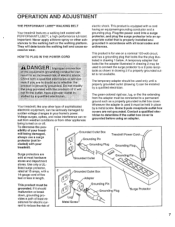
... sudden voltage changes in - being damaged, always use on or off. Grounded Outlet Box Grounding Pin Treadmill Power Cord cluded) with a qualified plectrician.or.service Man if you are not grounded. protector, and plug the surge protector into a surge PERFORMANT LUBEiM, a high-performance lubricant. Do not modify the plug provided with all local codes and They will The temporary adapter should malfunction...
... sudden voltage changes in - being damaged, always use on or off. Grounded Outlet Box Grounding Pin Treadmill Power Cord cluded) with a qualified plectrician.or.service Man if you are not grounded. protector, and plug the surge protector into a surge PERFORMANT LUBEiM, a high-performance lubricant. Do not modify the plug provided with all local codes and They will The temporary adapter should malfunction...
English Manual
Page 8
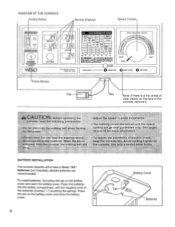
... on the walking belt when turning cohtrot.:are recommended. To install batteries, first press the tab on the battery cover and close the battery cover. DIAGRAM OF THE CONSOLE Incline Button Monitor Displays Speed Control V CD Pnws law palw Nebr., maw wit a rat • rrostwally erniEd araa. v...., Mama,ad(Jam warnings ced z:= inabobob.4.,1:m itta 31.4 end dernv• b SPEED TRAlt, ING ZONES .x) S OW RESET FAST OPERATION POWER 0 INSERT KEY 0 RESET SPEED 0 SET SPEED Pulse Sensor Clip Key Note: If...
... on the walking belt when turning cohtrot.:are recommended. To install batteries, first press the tab on the battery cover and close the battery cover. DIAGRAM OF THE CONSOLE Incline Button Monitor Displays Speed Control V CD Pnws law palw Nebr., maw wit a rat • rrostwally erniEd araa. v...., Mama,ad(Jam warnings ced z:= inabobob.4.,1:m itta 31.4 end dernv• b SPEED TRAlt, ING ZONES .x) S OW RESET FAST OPERATION POWER 0 INSERT KEY 0 RESET SPEED 0 SET SPEED Pulse Sensor Clip Key Note: If...
English Manual
Page 9
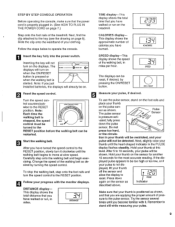
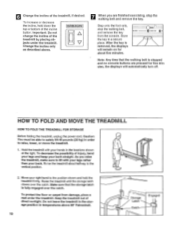
... power switch. Note: If you just ?)% installed batteries, the displays will not turn the speed control to the RESET position. played, lift your pulse is NJ : stopped, the speed SLOW FAST control must be RESET turned to the RESET position before the walking belt can be shown. Make sure that your pulse, if desired. Change the speed of the walking belt as shown, and that the power cord is positioned as desired by pressing the ON/RESET button...
... power switch. Note: If you just ?)% installed batteries, the displays will not turn the speed control to the RESET position. played, lift your pulse is NJ : stopped, the speed SLOW FAST control must be RESET turned to the RESET position before the walking belt can be shown. Make sure that your pulse, if desired. Change the speed of the walking belt as shown, and that the power cord is positioned as desired by pressing the ON/RESET button...
English Manual
Page 10
... not A change the incline of direct sunlight. HOW TO FOLD AND MOVE THE TREADMILL HOW TO FOLD THE TREADMILL FOR STORAGE Before folding the treadmill, unplug the power cord. Move your back. To protect the floor or carpet from the console. Do not leave the treadmill in the storage position in a secure place. After the key is removed, the displays will remain on for five minutes, the displays will automatically turn off...
... not A change the incline of direct sunlight. HOW TO FOLD AND MOVE THE TREADMILL HOW TO FOLD THE TREADMILL FOR STORAGE Before folding the treadmill, unplug the power cord. Move your back. To protect the floor or carpet from the console. Do not leave the treadmill in the storage position in a secure place. After the key is removed, the displays will remain on for five minutes, the displays will automatically turn off...
English Manual
Page 11
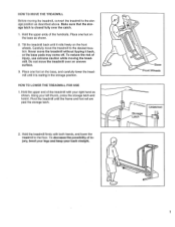
... upper ends of injury, use extreme caution while moving the treadmill, convert the treadmill to the desired location. Place one foot on the base, and carefully lower the treadmill until it back, or the base pads may come off. Hold the upper end of injury, bend your legs and keep your left thumb, press the storage latch and hold it rolls...
... upper ends of injury, use extreme caution while moving the treadmill, convert the treadmill to the desired location. Place one foot on the base, and carefully lower the treadmill until it back, or the base pads may come off. Hold the upper end of injury, bend your legs and keep your left thumb, press the storage latch and hold it rolls...
English Manual
Page 12
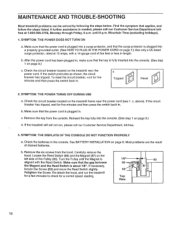
..., 6 a.m. Locate the Reed Switch (86) and the Magnet (87) on the left side of drained batteries. Make sure that the key is plugged in . Check the batteries in length. b. Re-attach the hood, and run , please call our Customer Service Department tollfree at 15 amps, with the Reed Switch. Carefully remove the hood. Turn the Pulley until 6 p.m. MAINTENANCE AND TROUBLE-SHOOTING Most treadmill problems can be solved by following the steps...
..., 6 a.m. Locate the Reed Switch (86) and the Magnet (87) on the left side of drained batteries. Make sure that the key is plugged in . Check the batteries in length. b. Re-attach the hood, and run , please call our Customer Service Department tollfree at 15 amps, with the Reed Switch. Carefully remove the hood. Turn the Pulley until 6 p.m. MAINTENANCE AND TROUBLE-SHOOTING Most treadmill problems can be solved by following the steps...
English Manual
Page 13
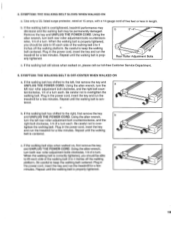
... treadmill for a few minutes. tered. Repeat until the walking belt is centered. Remove the key and UNPLUG THE POWER CORD. SYMPTOM: THE WALKING BELT IS OFF-CENTER WHEN WALKED ON a. Be careful to keep the walking belt centered. Use only a UL-listed surge protector, rated at 15 amps, with a 14-gauge cord of a turn . c. If the walking belt slips when walked on , please call our toll-free Customer Service Department. 5. tighten the walking belt. SYMPTOM: THE WALKING BELT...
... treadmill for a few minutes. tered. Repeat until the walking belt is centered. Remove the key and UNPLUG THE POWER CORD. SYMPTOM: THE WALKING BELT IS OFF-CENTER WHEN WALKED ON a. Be careful to keep the walking belt centered. Use only a UL-listed surge protector, rated at 15 amps, with a 14-gauge cord of a turn . c. If the walking belt slips when walked on , please call our toll-free Customer Service Department. 5. tighten the walking belt. SYMPTOM: THE WALKING BELT...
English Manual
Page 14
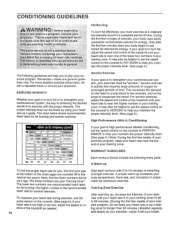
... exercise, your heart rate as needed. For aerobic exercise, adjust the speed and incline of the chart (ages are recommended heart rates for fat burning and aerobic exercise. ration for energy. Aerobic exercise is near one of your exercise program. WORKOUT GUIDELINES Each workout should include the following guidelines will help you exercise-never hold your training zone. To measure your heart rate during exercise, use stored fat calories for 20 pulse sensor on the console...
... exercise, your heart rate as needed. For aerobic exercise, adjust the speed and incline of the chart (ages are recommended heart rates for fat burning and aerobic exercise. ration for energy. Aerobic exercise is near one of your exercise program. WORKOUT GUIDELINES Each workout should include the following guidelines will help you exercise-never hold your training zone. To measure your heart rate during exercise, use stored fat calories for 20 pulse sensor on the console...
English Manual
Page 15
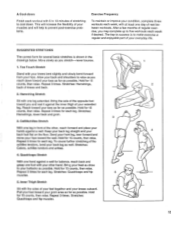
A Cool-down Finish each workout with 5 to 10 minutes of your feet together and your knees outward. Allow your back and shoulders to relax as you stretch-never bounce. 1. Stretches: Hamstrings, lower back and groin. 3 3. Keep your back leg straight and your toes as far as possible..... Repeat 3 times. Bring your heel as close to make exercise a regular and enjoyable part of the achilles tendons, bend your everyday life. Hamstring Stretch Sit with your extended leg. Bend your front leg, lean forward and move your toes as far as you reach down . Stretches: Calves...
A Cool-down Finish each workout with 5 to 10 minutes of your feet together and your knees outward. Allow your back and shoulders to relax as you stretch-never bounce. 1. Stretches: Hamstrings, lower back and groin. 3 3. Keep your back leg straight and your toes as far as possible..... Repeat 3 times. Bring your heel as close to make exercise a regular and enjoyable part of the achilles tendons, bend your everyday life. Hamstring Stretch Sit with your extended leg. Bend your front leg, lean forward and move your toes as far as you reach down . Stretches: Calves...
English Manual
Page 16
... SERIAL NUMBER OF THE PRODUCT (see the front cover of this manual). • The KEY NUMBER OF THE PART(S) (see the EXPLODED DRAWING and PART LIST attached to the center of this manual). • The DESCRIPTION OF THE PART(S) (see the EXPLODED DRAWING and PART LIST attached to the center of this product to you specific legal rights. This warranty extends only to products used as store display models. The warranty...
... SERIAL NUMBER OF THE PRODUCT (see the front cover of this manual). • The KEY NUMBER OF THE PART(S) (see the EXPLODED DRAWING and PART LIST attached to the center of this manual). • The DESCRIPTION OF THE PART(S) (see the EXPLODED DRAWING and PART LIST attached to the center of this product to you specific legal rights. This warranty extends only to products used as store display models. The warranty...
English Manual
Page 17
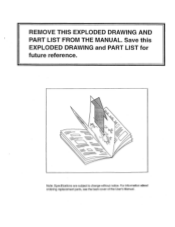
For information about ordering replacement parts, see the back cover of the User's Manual. Save this EXPLODED DRAWING and PART LIST for future reference. -Ow Note: Specifications are subject to change without notice. REMOVE THIS EXPLODED DRAWING AND PART LIST FROM THE MANUAL.
For information about ordering replacement parts, see the back cover of the User's Manual. Save this EXPLODED DRAWING and PART LIST for future reference. -Ow Note: Specifications are subject to change without notice. REMOVE THIS EXPLODED DRAWING AND PART LIST FROM THE MANUAL.

English Manual
Page 18
... Incline Motor Rear Isolator Screw Left Console Attachment Speed Control Knob Speed Potentiometer Battery Cover Electronic Bracket Console Assembly Storage Latch Latch Screw Upright Base Handrail Bolt Handrail Washer Motor Belt Motor Swivel Nut Motor/Pulley/Flywheel/Fan Pulley/Flywheel/Fan Motor Motor Tension Bolt Motor Tension Washer Motor Tension Star Washer Motor Swivel Bolt Wire Harness Ground Wire Screw Hood Hood Shield Screw Latch Decal Handrail Screw Frame Pivot Bolt Extension Leg Screw Utility Screw Base Pad Wheel Bolt Wheel Wheel Nut Controller Extension Leg Circuit Breaker Power Cord...
... Incline Motor Rear Isolator Screw Left Console Attachment Speed Control Knob Speed Potentiometer Battery Cover Electronic Bracket Console Assembly Storage Latch Latch Screw Upright Base Handrail Bolt Handrail Washer Motor Belt Motor Swivel Nut Motor/Pulley/Flywheel/Fan Pulley/Flywheel/Fan Motor Motor Tension Bolt Motor Tension Washer Motor Tension Star Washer Motor Swivel Bolt Wire Harness Ground Wire Screw Hood Hood Shield Screw Latch Decal Handrail Screw Frame Pivot Bolt Extension Leg Screw Utility Screw Base Pad Wheel Bolt Wheel Wheel Nut Controller Extension Leg Circuit Breaker Power Cord...


