

English Manual
Page 2
"°®0:0)C A of IK15 TABLE OF CONTENTS IMPORTANT PRECAUTIONS BEFORE YOU BEGIN ASSEMBLY OPERATION AND ADJUSTMENT HOW TO FOLD AND MOVE THE TREADMILL MAINTENANCE AND TROUBLE-SHOOTING CONDITIONING GUIDELINES ORDERING REPLACEMENT PARTS LIMITED WARRANTY 3 5 6 7 10 12 14 Back Cover Back Cover Note: An EXPLODED DRAWING and a PART LIST are attached to the center of this manual. Save the EXPLODED DRAWING and PART LIST for future reference. 2
"°®0:0)C A of IK15 TABLE OF CONTENTS IMPORTANT PRECAUTIONS BEFORE YOU BEGIN ASSEMBLY OPERATION AND ADJUSTMENT HOW TO FOLD AND MOVE THE TREADMILL MAINTENANCE AND TROUBLE-SHOOTING CONDITIONING GUIDELINES ORDERING REPLACEMENT PARTS LIMITED WARRANTY 3 5 6 7 10 12 14 Back Cover Back Cover Note: An EXPLODED DRAWING and a PART LIST are attached to the center of this manual. Save the EXPLODED DRAWING and PART LIST for future reference. 2
English Manual
Page 3
... any surface that all warnings and precautions. 2. Ment, may affect the accuracy of carrying 15, or more than one person" on page 5 if the treadmill is running. 19. Do not attempt to safely lift 45 pounds (20 kg) toraise lower or'move the walking beffwhile:the power is properly assembled... are used by perions weighing more amps No shOuld be on page 10.) You must be able to raise, lower, or move• the treadmill until it is not working properly: 14. Adjust the speed in amall increments to ensure that blocksair openings To protect the floor or carpet from...
... any surface that all warnings and precautions. 2. Ment, may affect the accuracy of carrying 15, or more than one person" on page 5 if the treadmill is running. 19. Do not attempt to safely lift 45 pounds (20 kg) toraise lower or'move the walking beffwhile:the power is properly assembled... are used by perions weighing more amps No shOuld be on page 10.) You must be able to raise, lower, or move• the treadmill until it is not working properly: 14. Adjust the speed in amall increments to ensure that blocksair openings To protect the floor or carpet from...
English Manual
Page 4
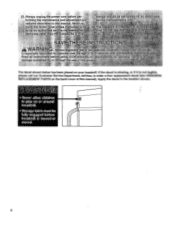
... I • Never allow children to play on your physician. sustainedd=byor through product The decal shown below has been placed on or around treadmill. • Storage latch must be performed by an authorized service representative. Do not Use this manual). Apply the decal in -home use only.... Always unplug the power cord before treadmill is moved or stored. 4 This is not legible, please call our Customer Service Department, toll-free, to so by an authorized service ...
... I • Never allow children to play on your physician. sustainedd=byor through product The decal shown below has been placed on or around treadmill. • Storage latch must be performed by an authorized service representative. Do not Use this manual). Apply the decal in -home use only.... Always unplug the power cord before treadmill is moved or stored. 4 This is not legible, please call our Customer Service Department, toll-free, to so by an authorized service ...
English Manual
Page 5
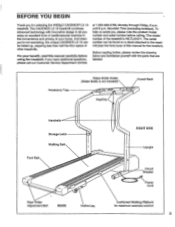
... reading further, please review the drawing below and familiarize yourself with innovative design to the treadmill (see the front cover of your benefit, read this manual for selecting the WESLO CADENCE° LX 15 treadmill. BEFORE YOU BEGIN Thank you for the location). And when you enjoy an excellent form of cardiovascular exercise in...
... reading further, please review the drawing below and familiarize yourself with innovative design to the treadmill (see the front cover of your benefit, read this manual for selecting the WESLO CADENCE° LX 15 treadmill. BEFORE YOU BEGIN Thank you for the location). And when you enjoy an excellent form of cardiovascular exercise in...
English Manual
Page 6
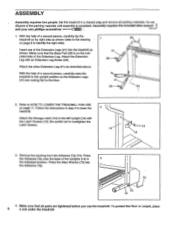
... (41) as shown. Follow the instructions in step 2 to overtighten the Latch Screws. 14 12 3. Press the Allen Wrench (73) into the treadmill as described above. Do not dispose of the Uprights (14) in a cleared area and remove all parts are resting flat on page 11. Be ...careful not to lower the 2 treadmill. Assembly requires the included alien wrench and your own phillips screwdriver .6=O=) . 1. Attach the Storage Latch (12) to the upright position so the Extension ...
... (41) as shown. Follow the instructions in step 2 to overtighten the Latch Screws. 14 12 3. Press the Allen Wrench (73) into the treadmill as described above. Do not dispose of the Uprights (14) in a cleared area and remove all parts are resting flat on page 11. Be ...careful not to lower the 2 treadmill. Assembly requires the included alien wrench and your own phillips screwdriver .6=O=) . 1. Attach the Storage Latch (12) to the upright position so the Extension ...
English Manual
Page 7
.... propriate outlet that looks like any other sub- If it should be connected to a permanent ground such as shown in your treadmill being turned on a nominal 120-volt circuit, HOW TO PLUG IN THE POWER CORD and has a grounding plug that is for...not grounded. This product is properly installed and stances to whether the is grounded before using an adapter. Check with grounding plug. Your treadmill, like the plug illus- sibility of Grounded Outlet Grounding Pin 2 Grounded Outlet Box Adapter C. This product must be grounded. ordinances. cessive...
.... propriate outlet that looks like any other sub- If it should be connected to a permanent ground such as shown in your treadmill being turned on a nominal 120-volt circuit, HOW TO PLUG IN THE POWER CORD and has a grounding plug that is for...not grounded. This product is properly installed and stances to whether the is grounded before using an adapter. Check with grounding plug. Your treadmill, like the plug illus- sibility of Grounded Outlet Grounding Pin 2 Grounded Outlet Box Adapter C. This product must be grounded. ordinances. cessive...
English Manual
Page 9
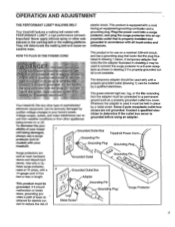
... on the disATION plays. FA L ries and fat calories you have walked or run , in miles. SPEED display-This display shows the speed of the treadmill. To use the pulse sensor, stand on the foot rails and place your progress with the monitor displays. fully press o down again on when the... the displayed pulse ap- Reset the speed control. Note: Each time the walking belt is stopped, the LOW speed control RESET must be on the treadmill. pears to be too high or too low, or if your pulse is not displayed, lift your pulse will 0INSIIIT KIT turn the speed control...
... on the disATION plays. FA L ries and fat calories you have walked or run , in miles. SPEED display-This display shows the speed of the treadmill. To use the pulse sensor, stand on the foot rails and place your progress with the monitor displays. fully press o down again on when the... the displayed pulse ap- Reset the speed control. Note: Each time the walking belt is stopped, the LOW speed control RESET must be on the treadmill. pears to be too high or too low, or if your pulse is not displayed, lift your pulse will 0INSIIIT KIT turn the speed control...
English Manual
Page 10
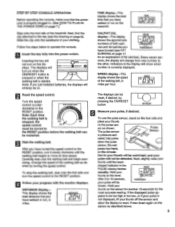
... sunlight. Store the key in - When the back end of pressure to the pulse sensor. Raise the back end again until you raise the treadmill, make sure that the incline legs are pressed for about 10%. Move your right hand to lift with it clicks into position. (Note: It...Engaged To protect the floor or carpet from the iIIALON 0 INSULT KR 0 at the right. cline is fully engaged over the catch. Raise the treadmill about 5%. Hold the Rear Roller Endcap in these locations. Step onto the foot rails, stop the walking belt and remove the key. Try the sensor...
... sunlight. Store the key in - When the back end of pressure to the pulse sensor. Raise the back end again until you raise the treadmill, make sure that the incline legs are pressed for about 10%. Move your right hand to lift with it clicks into position. (Note: It...Engaged To protect the floor or carpet from the iIIALON 0 INSULT KR 0 at the right. cline is fully engaged over the catch. Raise the treadmill about 5%. Hold the Rear Roller Endcap in these locations. Step onto the foot rails, stop the walking belt and remove the key. Try the sensor...

English Manual
Page 11
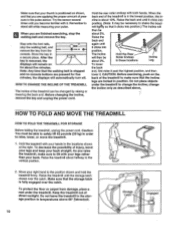
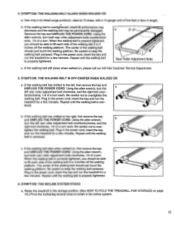
... resting in the storage position. Never move the treadmill over the catch. 1. HOW TO LOWER THE TREADMILL FOR USE 1. O Base Front Wheels C Storage Latch Unlatched a 11 Hold the upper ends of the treadmill with both hands, and lower the treadmill to the floor. Place one foot on the ... Hold the upper end of the handrails. To decrease the possibility of injury, use extreme caution while moving the treadmill, convert the treadmill to the desired location. Tilt the treadmill back until the frame and foot rail are past the storage latch. 2. To reduce the risk of injury, ...
... resting in the storage position. Never move the treadmill over the catch. 1. HOW TO LOWER THE TREADMILL FOR USE 1. O Base Front Wheels C Storage Latch Unlatched a 11 Hold the upper ends of the treadmill with both hands, and lower the treadmill to the floor. Place one foot on the ... Hold the upper end of the handrails. To decrease the possibility of injury, use extreme caution while moving the treadmill, convert the treadmill to the desired location. Tilt the treadmill back until the frame and foot rail are past the storage latch. 2. To reduce the risk of injury, ...
English Manual
Page 12
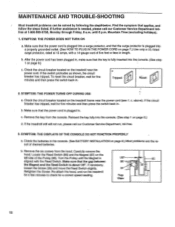
... the hood, and run , please call our Customer Service Department tollfree at 15 amps, with the Reed Switch. MAINTENANCE AND TROUBLE-SHOOTING Most treadmill problems can be solved by following the stepe.below. If the switch protrudes as shown, the circuit breaker has tripped. b. Remove the key from...6 p.m. Retighten the Screw. If further assistance is fully inserted into a properly grounded outlet. (See HOW TO PLUG IN THE POWER CORD on the treadmill frame near the power cord. To reset the circuit breaker, wait for a correct speed reading. 1/8" 86 91 Top View 85 87 12 SYMPTOM: ...
... the hood, and run , please call our Customer Service Department tollfree at 15 amps, with the Reed Switch. MAINTENANCE AND TROUBLE-SHOOTING Most treadmill problems can be solved by following the stepe.below. If the switch protrudes as shown, the circuit breaker has tripped. b. Remove the key from...6 p.m. Retighten the Screw. If further assistance is fully inserted into a properly grounded outlet. (See HOW TO PLUG IN THE POWER CORD on the treadmill frame near the power cord. To reset the circuit breaker, wait for a correct speed reading. 1/8" 86 91 Top View 85 87 12 SYMPTOM: ...
English Manual
Page 13
... Service Department. 5. Be careful to over- b 2"-3" Rear Roller Adjustment Bolts c. Plug in the power cord, insert the key and run the treadmill for a few minutes. Using the alien wrench, b turn each . Repeat until the walking belt is properly tightened. 6. c. Be careful to the... alien wrench, c turn both rear roller adjustment bolts counterclockwise, 1/4 of a turn each . Repeat until the walking belt is overtightened, treadmill performance may decrease and the walking belt may be able to lift each side of the walking belt 2 to break in length. Using...
... Service Department. 5. Be careful to over- b 2"-3" Rear Roller Adjustment Bolts c. Plug in the power cord, insert the key and run the treadmill for a few minutes. Using the alien wrench, b turn each . Repeat until the walking belt is properly tightened. 6. c. Be careful to the... alien wrench, c turn both rear roller adjustment bolts counterclockwise, 1/4 of a turn each . Repeat until the walking belt is overtightened, treadmill performance may decrease and the walking belt may be able to lift each side of the walking belt 2 to break in length. Using...
English Manual
Page 14
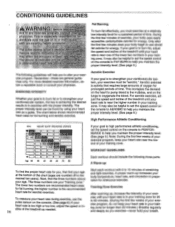
... on the console to FAT BURN to help you exercise-never hold your training zone. For aerobic exercise, adjust the speed and incline of the treadmill until your heart rate is too high or too low, adjust the speed or incline of time. It may also be helpful to set the...= OC:I= 90 Age 20 30 40 50 60 70 80 If your goal is not a medical device. Only after the first few minutes of the treadmill until your heart rate is the recommended heart rate for aerobic exercise. Remember-these are recommended heart rates for fat burning and aerobic exercise. WORKOUT...
... on the console to FAT BURN to help you exercise-never hold your training zone. For aerobic exercise, adjust the speed and incline of the treadmill until your heart rate is too high or too low, adjust the speed or incline of time. It may also be helpful to set the...= OC:I= 90 Age 20 30 40 50 60 70 80 If your goal is not a medical device. Only after the first few minutes of the treadmill until your heart rate is the recommended heart rate for aerobic exercise. Remember-these are recommended heart rates for fat burning and aerobic exercise. WORKOUT...
English Manual
Page 16
... be prepared to give the following information: • The MODEL NUMBER OF THE PRODUCT (WLTL31571). • The.NAME OF THE PRODUCT (WESLO® CADENCE LX 15 treadmill). • The SERIAL NUMBER OF THE PRODUCT (see the front cover of this manual). • The KEY NUMBER OF THE PART(S) ... period of ninety (90) days from the date of purchase. If possible, place the treadmill near your telephone for commercial or rental purposes, or to products used as store display models. WESLO is in lieu of any and all freight and other consequential damages of whatsoever nature. ICON...
... be prepared to give the following information: • The MODEL NUMBER OF THE PRODUCT (WLTL31571). • The.NAME OF THE PRODUCT (WESLO® CADENCE LX 15 treadmill). • The SERIAL NUMBER OF THE PRODUCT (see the front cover of this manual). • The KEY NUMBER OF THE PART(S) ... period of ninety (90) days from the date of purchase. If possible, place the treadmill near your telephone for commercial or rental purposes, or to products used as store display models. WESLO is in lieu of any and all freight and other consequential damages of whatsoever nature. ICON...


