

English Manual
Page 1
JIBING 1115 Model No. Serial Number Decal WLTL31571 Serial No.
JIBING 1115 Model No. Serial Number Decal WLTL31571 Serial No.
English Manual
Page 2
Save the EXPLODED DRAWING and PART LIST for future reference. 2 "°®0:0)C A of IK15 TABLE OF CONTENTS IMPORTANT PRECAUTIONS BEFORE YOU BEGIN ASSEMBLY OPERATION AND ADJUSTMENT HOW TO FOLD AND MOVE THE TREADMILL MAINTENANCE AND TROUBLE-SHOOTING CONDITIONING GUIDELINES ORDERING REPLACEMENT PARTS LIMITED WARRANTY 3 5 6 7 10 12 14 Back Cover Back Cover Note: An EXPLODED DRAWING and a PART LIST are attached to the center of this manual.
Save the EXPLODED DRAWING and PART LIST for future reference. 2 "°®0:0)C A of IK15 TABLE OF CONTENTS IMPORTANT PRECAUTIONS BEFORE YOU BEGIN ASSEMBLY OPERATION AND ADJUSTMENT HOW TO FOLD AND MOVE THE TREADMILL MAINTENANCE AND TROUBLE-SHOOTING CONDITIONING GUIDELINES ORDERING REPLACEMENT PARTS LIMITED WARRANTY 3 5 6 7 10 12 14 Back Cover Back Cover Note: An EXPLODED DRAWING and a PART LIST are attached to the center of this manual.
English Manual
Page 3
... not Place the treadmill on page 7), plug the power cord into a surge protector (riCt inclilded)and plug the surgeSproteOtor into any surface that the storage latch is not a medical qevice, Variou0 factore, including the msers move the walking beffwhile:the power is not working properly. (Bee BEFORE YOU BEGIN on the same circuit 11.Use only a UL-listed surge protector, rated at 15 linps...
... not Place the treadmill on page 7), plug the power cord into a surge protector (riCt inclilded)and plug the surgeSproteOtor into any surface that the storage latch is not a medical qevice, Variou0 factore, including the msers move the walking beffwhile:the power is not working properly. (Bee BEFORE YOU BEGIN on the same circuit 11.Use only a UL-listed surge protector, rated at 15 linps...
English Manual
Page 4
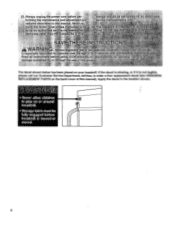
... the Motor'aod $inless instructed to play on or around treadmill. • Storage latch must be performed by an authorized service representative. Do not Use this manual). If the decal is missing, or if it is not legible, please call our Customer Service Department, toll-free, to order a free replacement decal (See ORDERING REPLACEMENT PARTS on your physician. SAVE THESE INSTRUCTIONS WARNING: Before beginning this manual...
... the Motor'aod $inless instructed to play on or around treadmill. • Storage latch must be performed by an authorized service representative. Do not Use this manual). If the decal is missing, or if it is not legible, please call our Customer Service Department, toll-free, to order a free replacement decal (See ORDERING REPLACEMENT PARTS on your physician. SAVE THESE INSTRUCTIONS WARNING: Before beginning this manual...
English Manual
Page 5
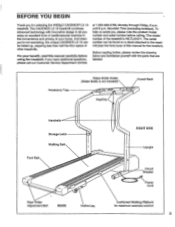
... Customer Service Department toll-free at 1-800-999-3756, Monday through Friday, 6 a.m. And when you're not exercising, the unique CADENCE LX 15 can be folded up, requiring less than half the floor space of the treadmill is not included) •••• r2S7A63, Key/Clip Towel Rack Handrails Storage Latch Walking Belt Foot Rail Rear Roller Adjustment Bolt BACK Incline Leg RIGHT SIDE Upright Circuit Breaker Power Cord Cushioned Walking...
... Customer Service Department toll-free at 1-800-999-3756, Monday through Friday, 6 a.m. And when you're not exercising, the unique CADENCE LX 15 can be folded up, requiring less than half the floor space of the treadmill is not included) •••• r2S7A63, Key/Clip Towel Rack Handrails Storage Latch Walking Belt Foot Rail Rear Roller Adjustment Bolt BACK Incline Leg RIGHT SIDE Upright Circuit Breaker Power Cord Cushioned Walking...
English Manual
Page 6
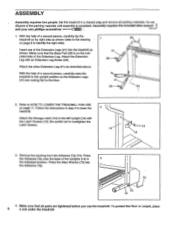
... the left Upright (14) with an Extension Leg Screw (34). 41 36 Attach the other Extension Leg (41) as described above. Attach the Storage Latch (12) to identify the right side). Remove the backing from the Adhesive Clip (74). Insert one of the packing materials until assembly is on its right side as shown. Set the treadmill in step 2 to overtighten the Latch Screws. 14...
... the left Upright (14) with an Extension Leg Screw (34). 41 36 Attach the other Extension Leg (41) as described above. Attach the Storage Latch (12) to identify the right side). Remove the backing from the Adhesive Clip (74). Insert one of the packing materials until assembly is on its right side as shown. Set the treadmill in step 2 to overtighten the Latch Screws. 14...
English Manual
Page 7
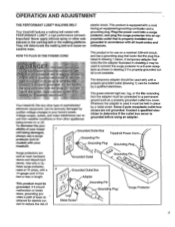
... home's power. sibility of electric shock. not fifthe outlet, have a p""roperoutlet it will deteriorate the walking belt and cause ex- Grounding Pin O.° Grounding Plug Lug Metal Screw Surge Protector 7 OPERATION AND ADJUSTMENT THE PERFORMANT LUBEn" WALKING BELT electric shock. Check with all local codes and They will The temporary adapter should malfunction or break down, grounding provides a path of least resistance for use...
... home's power. sibility of electric shock. not fifthe outlet, have a p""roperoutlet it will deteriorate the walking belt and cause ex- Grounding Pin O.° Grounding Plug Lug Metal Screw Surge Protector 7 OPERATION AND ADJUSTMENT THE PERFORMANT LUBEn" WALKING BELT electric shock. Check with all local codes and They will The temporary adapter should malfunction or break down, grounding provides a path of least resistance for use...
English Manual
Page 8
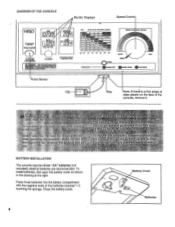
... 60 70 00 POWER SPEED TRAINING ZONES SLOW RESET FAST OPERATION 0 INSERT 'ay 0 RESET SPIED 0 SIT SPIED Pulse Sensor Clip Key Note: If there is removed froth the console, the walking belt will step. • Adjust the speed all in the drawing at the right. Close the battery cover. e • 8 Battery Cover Batteries drawing above) When the,key is a thin sheet of the console, remove it. BATTERY INSTALLATION The console requires three "AA" batteries (not included); II...
... 60 70 00 POWER SPEED TRAINING ZONES SLOW RESET FAST OPERATION 0 INSERT 'ay 0 RESET SPIED 0 SIT SPIED Pulse Sensor Clip Key Note: If there is removed froth the console, the walking belt will step. • Adjust the speed all in the drawing at the right. Close the battery cover. e • 8 Battery Cover Batteries drawing above) When the,key is a thin sheet of the console, remove it. BATTERY INSTALLATION The console requires three "AA" batteries (not included); II...
English Manual
Page 9
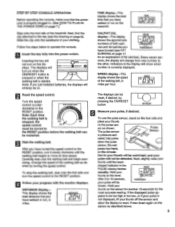
... clothing. After 5 to reset. To stop the walking belt, step onto the foot rails and turn it slowly clockwise until the heart- fully press o down again on the treadmill. Insert the key fully into the power switch. Press down the pulse sensor. DISTANCE display- FA L ries and fat calories you have walked or run , in . (See HOW TO PLUG IN THE POWER CORD on page 8). shaped indicator in miles per hour. pears...
... clothing. After 5 to reset. To stop the walking belt, step onto the foot rails and turn it slowly clockwise until the heart- fully press o down again on the treadmill. Insert the key fully into the power switch. Press down the pulse sensor. DISTANCE display- FA L ries and fat calories you have walked or run , in . (See HOW TO PLUG IN THE POWER CORD on page 8). shaped indicator in miles per hour. pears...
English Manual
Page 10
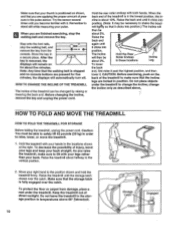
...° Fahrenheit. 10 Storage Latch Catch Engaged To protect the floor or carpet from the iIIALON 0 INSULT KR 0 at the right. Note: Any time that it . change the incline; HOW TO FOLD AND MOVE THE TREADMILL HOW TO FOLD THE TREADMILL FOR STORAGE Before folding the treadmill, unplug the power cord. Make sure that your thumb is stopped and no console buttons are pressed for about five minutes...
...° Fahrenheit. 10 Storage Latch Catch Engaged To protect the floor or carpet from the iIIALON 0 INSULT KR 0 at the right. Note: Any time that it . change the incline; HOW TO FOLD AND MOVE THE TREADMILL HOW TO FOLD THE TREADMILL FOR STORAGE Before folding the treadmill, unplug the power cord. Make sure that your thumb is stopped and no console buttons are pressed for about five minutes...

English Manual
Page 11
... of injury, bend your legs and keep your left thumb, press the storage latch and hold it back, or the base pads may come off. HOW TO LOWER THE TREADMILL FOR USE 1. To decrease the possibility of the treadmill with both hands, and lower the treadmill to the desired location. Carefully move the treadmill to the floor. O Base Front Wheels C Storage Latch Unlatched a 11 Tilt...
... of injury, bend your legs and keep your left thumb, press the storage latch and hold it back, or the base pads may come off. HOW TO LOWER THE TREADMILL FOR USE 1. To decrease the possibility of the treadmill with both hands, and lower the treadmill to the desired location. Carefully move the treadmill to the floor. O Base Front Wheels C Storage Latch Unlatched a 11 Tilt...
English Manual
Page 12
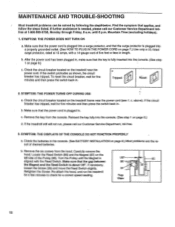
...: THE POWER TURNS OFF DURING USE a. Check the circuit breaker located on the treadmill frame near the power cord. If necessary, loosen the Screw (35) and move the Reed Switch slightly. Make sure that the power cord is plugged into a properly grounded outlet. (See HOW TO PLUG IN THE POWER CORD on page 9.) c. c Tripped Reset 2. c. Reinsert the key fully into the console. (See step 1 on page 7.) Use only a UL-listed surge protector, rated at...
...: THE POWER TURNS OFF DURING USE a. Check the circuit breaker located on the treadmill frame near the power cord. If necessary, loosen the Screw (35) and move the Reed Switch slightly. Make sure that the power cord is plugged into a properly grounded outlet. (See HOW TO PLUG IN THE POWER CORD on page 9.) c. c Tripped Reset 2. c. Reinsert the key fully into the console. (See step 1 on page 7.) Use only a UL-listed surge protector, rated at...
English Manual
Page 13
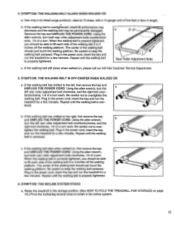
... rear roller adjustment bolts counterclockwise, 1/4 of the walking belt should be permanently damaged. Use only a UL-listed surge protector, rated at 15 amps, with a 14-gauge cord of a turn the a left , first remove the key and UNPLUG THE POWER CORD. Using the alien wrench, turn each side of the walking belt 2 to the left rear roller adjustment bolt clockwise, and the right bolt coun- b. tighten the walking belt. If the walking belt slips when walked on , please call our toll-free Customer Service...
... rear roller adjustment bolts counterclockwise, 1/4 of the walking belt should be permanently damaged. Use only a UL-listed surge protector, rated at 15 amps, with a 14-gauge cord of a turn the a left , first remove the key and UNPLUG THE POWER CORD. Using the alien wrench, turn each side of the walking belt 2 to the left rear roller adjustment bolt clockwise, and the right bolt coun- b. tighten the walking belt. If the walking belt slips when walked on , please call our toll-free Customer Service...
English Manual
Page 14
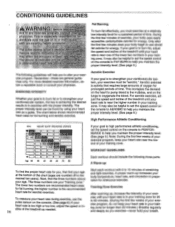
... regularly and deeply as needed. 14 Start each workout with pre-existing health ,problems. The pulse sensor is near one of the lower two numbers in your exercise must exercise at the bottom of the chart (ages are recommended heart rates for a sustained period of the treadmill until your exercise program. Remember-these are your goal is the recommended heart rate for strenuous exercise. Aerobic Exercise If your "training zone." A proper warm...
... regularly and deeply as needed. 14 Start each workout with pre-existing health ,problems. The pulse sensor is near one of the lower two numbers in your exercise must exercise at the bottom of the chart (ages are recommended heart rates for a sustained period of the treadmill until your exercise program. Remember-these are your goal is the recommended heart rate for strenuous exercise. Aerobic Exercise If your "training zone." A proper warm...

English Manual
Page 15
... exercise, you stretch-never bounce. 1. SUGGESTED STRETCHES The correct form for 15 counts, then relax. Repeat 3 times. Stretches: Hamstrings, back of the other hand. Keep your back leg straight and your hips toward the wall. Bend your front leg, lean forward and move your...exercise problems. Exercise Frequency To maintain or improve your condition, complete three workouts each week if desired. Reach toward your hands against a wall for 15 counts, then relax. Stretches: Hamstrings, lower back and groin. 3 3. Calf/Achilles Stretch With one foot with at least one leg...
... exercise, you stretch-never bounce. 1. SUGGESTED STRETCHES The correct form for 15 counts, then relax. Repeat 3 times. Stretches: Hamstrings, back of the other hand. Keep your back leg straight and your hips toward the wall. Bend your front leg, lean forward and move your...exercise problems. Exercise Frequency To maintain or improve your condition, complete three workouts each week if desired. Reach toward your hands against a wall for 15 counts, then relax. Stretches: Hamstrings, lower back and groin. 3 3. Calf/Achilles Stretch With one foot with at least one leg...
English Manual
Page 16
... MODEL NUMBER OF THE PRODUCT (WLTL31571). • The.NAME OF THE PRODUCT (WESLO® CADENCE LX 15 treadmill). • The SERIAL NUMBER OF THE PRODUCT (see the front cover of this manual). • The KEY NUMBER OF THE PART(S) (see the EXPLODED DRAWING and PART LIST attached to the center of enjoyment or use and service conditions, for easy reference when calling. Accordingly, the above is limited to...
... MODEL NUMBER OF THE PRODUCT (WLTL31571). • The.NAME OF THE PRODUCT (WESLO® CADENCE LX 15 treadmill). • The SERIAL NUMBER OF THE PRODUCT (see the front cover of this manual). • The KEY NUMBER OF THE PART(S) (see the EXPLODED DRAWING and PART LIST attached to the center of enjoyment or use and service conditions, for easy reference when calling. Accordingly, the above is limited to...
English Manual
Page 17
A Note: Specifications are subject to change without notice. REMOVE THIS EXPLODED DRAWING AND PART LIST FROM THE MANUAL. Save this EXPLODED DRAWING and PART LIST for future reference. For information about ordering replacement parts, see the back cover of the user's manual.
A Note: Specifications are subject to change without notice. REMOVE THIS EXPLODED DRAWING AND PART LIST FROM THE MANUAL. Save this EXPLODED DRAWING and PART LIST for future reference. For information about ordering replacement parts, see the back cover of the user's manual.

English Manual
Page 18
... Screw Ratchet Screw Rear Isolator Screw Left Console Attachment Speed Control Knob Speed Potentiometer Battery Cover Strain Relief Console Assembly Storage Latch Latch Screw Upright Base Frame Washer Motor Belt Motor Swivel Nut Motor/Pulley/FlywheeVFan Pulley/FlywheeVFan Motor Motor Tension Bolt Motor Tension Washer Motor Tension Star Washer Motor Swivel Bolt Console Plate Ground Wire Screw Hood Hood Shield Screw Latch Decal Right Console Attachment Frame Pivot Bolt Extension Leg Screw Electronics Screw Base Pad Wheel Bolt Wheel Wheel Nut Controller Extension Leg Circuit Breaker Power Cord...
... Screw Ratchet Screw Rear Isolator Screw Left Console Attachment Speed Control Knob Speed Potentiometer Battery Cover Strain Relief Console Assembly Storage Latch Latch Screw Upright Base Frame Washer Motor Belt Motor Swivel Nut Motor/Pulley/FlywheeVFan Pulley/FlywheeVFan Motor Motor Tension Bolt Motor Tension Washer Motor Tension Star Washer Motor Swivel Bolt Console Plate Ground Wire Screw Hood Hood Shield Screw Latch Decal Right Console Attachment Frame Pivot Bolt Extension Leg Screw Electronics Screw Base Pad Wheel Bolt Wheel Wheel Nut Controller Extension Leg Circuit Breaker Power Cord...


