

English Manual
Page 1
... immediate assistance, free of charge to you have questions, or if there are missing or damaged parts, we will guarantee complete satisfaction through direct assistance from our factory. MST CAUTION Read all precautions and instructions in the space above for future reference. WLTL39201 Serial No. Write the serial number in this manual before using this manual for future reference. ® Model No.
... immediate assistance, free of charge to you have questions, or if there are missing or damaged parts, we will guarantee complete satisfaction through direct assistance from our factory. MST CAUTION Read all precautions and instructions in the space above for future reference. WLTL39201 Serial No. Write the serial number in this manual before using this manual for future reference. ® Model No.
English Manual
Page 2
... OF CONTENTS IMPORTANT PRECAUTIONS 2 BEFORE YOU BEGIN 4 ASSEMBLY 5 OPERATION AND ADJUSTMENT 7 HOW TO FOLD AND MOVE THE TREADMILL 10 MAINTENANCE AND TROUBLE-SHOOTING 12 CONDITIONING GUIDELINES 14 ORDERING REPLACEMENT PARTS Back Cover LIMITED WARRANTY Back Cover Note: A PART LIST and an EXPLODED DRAWING are attached in a garage or covered patio, or near water. 5. Never use an extension cord. 11. Keep the power cord and the surge suppressor away from damage, place...
... OF CONTENTS IMPORTANT PRECAUTIONS 2 BEFORE YOU BEGIN 4 ASSEMBLY 5 OPERATION AND ADJUSTMENT 7 HOW TO FOLD AND MOVE THE TREADMILL 10 MAINTENANCE AND TROUBLE-SHOOTING 12 CONDITIONING GUIDELINES 14 ORDERING REPLACEMENT PARTS Back Cover LIMITED WARRANTY Back Cover Note: A PART LIST and an EXPLODED DRAWING are attached in a garage or covered patio, or near water. 5. Never use an extension cord. 11. Keep the power cord and the surge suppressor away from damage, place...
English Manual
Page 3
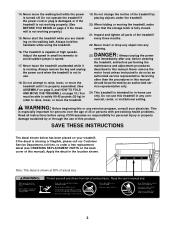
... turned off. Always hold the handrails while using . When folding or moving the treadmill, make sure that the storage latch is shown at 38% of this or any opening. Never insert or drop any object into any exercise program, consult your treadmill. Never remove the motor hood unless instructed to order a free replacement decal (see ORDERING REPLACEMENT PARTS on the walking belt. Servicing other than the procedures in -home use of actual size. 3 Never start the treadmill...
... turned off. Always hold the handrails while using . When folding or moving the treadmill, make sure that the storage latch is shown at 38% of this or any opening. Never insert or drop any object into any exercise program, consult your treadmill. Never remove the motor hood unless instructed to order a free replacement decal (see ORDERING REPLACEMENT PARTS on the walking belt. Servicing other than the procedures in -home use of actual size. 3 Never start the treadmill...
English Manual
Page 4
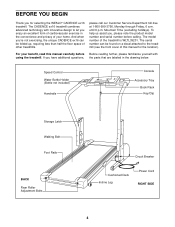
... treadmill is WLTL39201. Speed Control Water Bottle Holder (Bottle not included) Handrails Console Accessory Tray Book Rack Key/Clip Storage Latch Walking Belt Foot Rails BACK Rear Roller Adjustment Bolts Circuit Breaker Cushioned Deck Incline Leg Power Cord RIGHT SIDE 4 To help us assist you, please note the product model number and serial number before Before reading further, please familiarize yourself with innovative design to the treadmill (see the front cover of other treadmills...
... treadmill is WLTL39201. Speed Control Water Bottle Holder (Bottle not included) Handrails Console Accessory Tray Book Rack Key/Clip Storage Latch Walking Belt Foot Rails BACK Rear Roller Adjustment Bolts Circuit Breaker Cushioned Deck Incline Leg Power Cord RIGHT SIDE 4 To help us assist you, please note the product model number and serial number before Before reading further, please familiarize yourself with innovative design to the treadmill (see the front cover of other treadmills...
English Manual
Page 5
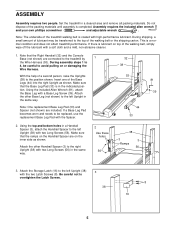
... phillips screwdriver and adjustable wrench . Note: One replacement Base Leg Pad (33) and Spacer (not shown) are connected to the left Upright in a cleared area and remove all packing materials. Do not dispose of the walking belt, simply wipe off the lubricant with two Long Screws (56) in a Handrail Spacer (3), attach the Handrail Spacer to the treadmill by 1 the Wire Harness (53). If...
... phillips screwdriver and adjustable wrench . Note: One replacement Base Leg Pad (33) and Spacer (not shown) are connected to the left Upright in a cleared area and remove all packing materials. Do not dispose of the walking belt, simply wipe off the lubricant with two Long Screws (56) in a Handrail Spacer (3), attach the Handrail Spacer to the treadmill by 1 the Wire Harness (53). If...
English Manual
Page 6
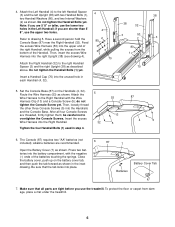
... than 5' 8", use the treadmill. if you use the upper two holes. Attach the 5 Wire Harness to the left Handrail Spacer 4 (3) and the left Upright (38) with the Wire 53 87 Harness Clip (13) and a Console Screw (5); do not tighten the Console Screw yet. Open the Battery Cover (7) as shown. Feed 4 2 80 3 53 2 3 the excess Wire Harness (53) into the Right Handrail. 32 5 4 5 Tighten the four Handrail Bolts (1) used in...
... than 5' 8", use the treadmill. if you use the upper two holes. Attach the 5 Wire Harness to the left Handrail Spacer 4 (3) and the left Upright (38) with the Wire 53 87 Harness Clip (13) and a Console Screw (5); do not tighten the Console Screw yet. Open the Battery Cover (7) as shown. Feed 4 2 80 3 53 2 3 the excess Wire Harness (53) into the Right Handrail. 32 5 4 5 Tighten the four Handrail Bolts (1) used in...
English Manual
Page 7
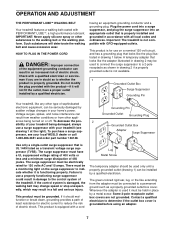
... change speed or stop unexpectedly, which may be used it will deteriorate the walking belt and cause excessive wear. If the control system is properly grounded. This product must be electrically rated for use on or off. OPERATION AND ADJUSTMENT THE PERFORMANT LUBETM WALKING BELT Your treadmill features a walking belt coated with the product-if it must be grounded. HOW TO PLUG IN THE POWER CORD DANGER: Improper connection...
... change speed or stop unexpectedly, which may be used it will deteriorate the walking belt and cause excessive wear. If the control system is properly grounded. This product must be electrically rated for use on or off. OPERATION AND ADJUSTMENT THE PERFORMANT LUBETM WALKING BELT Your treadmill features a walking belt coated with the product-if it must be grounded. HOW TO PLUG IN THE POWER CORD DANGER: Improper connection...
English Manual
Page 8
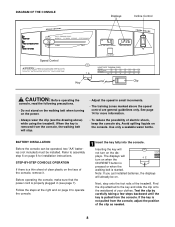
... steps backward until the key is started. See page 14 for installation instructions. Note: If you just installed batteries, the displays will stop. • Adjust the speed in (see the drawing above the speed control are general guidelines only. Before operating the console, make sure that the power cord is removed from the console. When the key is properly plugged in small increments. • The training zones marked above ) while using the treadmill...
... steps backward until the key is started. See page 14 for installation instructions. Note: If you just installed batteries, the displays will stop. • Adjust the speed in (see the drawing above the speed control are general guidelines only. Before operating the console, make sure that the power cord is removed from the console. When the key is properly plugged in small increments. • The training zones marked above ) while using the treadmill...

English Manual
Page 9
..., stop the walking belt and remove the key from one number to the other. Slide the speed control to conserve the batteries. 9 TIME/DISTANCE display-This display shows the elapsed time and distance that the walking belt is stopped and the ON/RESET button is stopped, the speed control must be moved to the RESET position. After you are finished exercising, stop the walking belt, step onto the foot rails and slide the speed control to the RESET position before the walking belt...
..., stop the walking belt and remove the key from one number to the other. Slide the speed control to conserve the batteries. 9 TIME/DISTANCE display-This display shows the elapsed time and distance that the walking belt is stopped and the ON/RESET button is stopped, the speed control must be moved to the RESET position. After you are finished exercising, stop the walking belt, step onto the foot rails and slide the speed control to the RESET position before the walking belt...

English Manual
Page 10
... attach each Handrail (4, 32). 87 5 5 4 32 38 2 53 80 2 1 80 1 70 70 HOW TO FOLD AND MOVE THE TREADMILL HOW TO FOLD THE TREADMILL FOR STORAGE Before folding the treadmill, unplug the power cord. Hold the treadmill with two Handrail Bolts.) Reattach the Console Base (87) (see assembly step 4 on page 6). Close the storage latch over the catch. Using your back. CAUTION: You must be adjusted to either of direct sunlight...
... attach each Handrail (4, 32). 87 5 5 4 32 38 2 53 80 2 1 80 1 70 70 HOW TO FOLD AND MOVE THE TREADMILL HOW TO FOLD THE TREADMILL FOR STORAGE Before folding the treadmill, unplug the power cord. Hold the treadmill with two Handrail Bolts.) Reattach the Console Base (87) (see assembly step 4 on page 6). Close the storage latch over the catch. Using your back. CAUTION: You must be adjusted to either of direct sunlight...
English Manual
Page 11
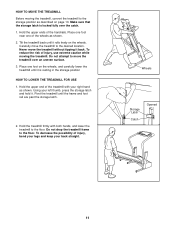
... the storage latch is resting in the storage position HOW TO LOWER THE TREADMILL FOR USE 1. Do not attempt to move the treadmill to the desired location. Using your left thumb, press the storage latch and hold it rolls freely on the wheels. Hold the treadmill firmly with your back straight. Tilt the treadmill back ... end of the treadmill with both hands, and lower the treadmill to the floor. Do not drop the treadmill frame to the floor. To decrease the possibility of the handrails. Wheels Storage Latch Catch Opened 11 Hold the upper ends of injury, bend your legs and keep your ...
... the storage latch is resting in the storage position HOW TO LOWER THE TREADMILL FOR USE 1. Do not attempt to move the treadmill to the desired location. Using your left thumb, press the storage latch and hold it rolls freely on the wheels. Hold the treadmill firmly with your back straight. Tilt the treadmill back ... end of the treadmill with both hands, and lower the treadmill to the floor. Do not drop the treadmill frame to the floor. To decrease the possibility of the handrails. Wheels Storage Latch Catch Opened 11 Hold the upper ends of injury, bend your legs and keep your ...
English Manual
Page 12
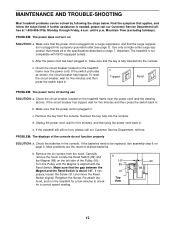
... that the power cord is needed, please call our Customer Service Department, toll-free. b. MAINTENANCE AND TROUBLE-SHOOTING Most treadmill problems can be replaced, see assembly step 6 on page 6. c. Make sure that applies, and follow the steps listed. If the circuit breaker has tripped, wait for five minutes and then press the switch back in . Remove the six screws from the console. Retighten the Screw. c. Remove the key from the hood. Most problems are...
... that the power cord is needed, please call our Customer Service Department, toll-free. b. MAINTENANCE AND TROUBLE-SHOOTING Most treadmill problems can be replaced, see assembly step 6 on page 6. c. Make sure that applies, and follow the steps listed. If the circuit breaker has tripped, wait for five minutes and then press the switch back in . Remove the six screws from the console. Retighten the Screw. c. Remove the key from the hood. Most problems are...
English Manual
Page 13
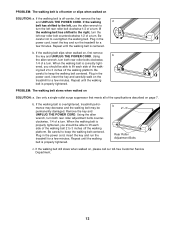
... the walking belt slips when walked on , please call our toll-free Customer Service Department. 13 If the walking belt still slows when walked on , first remove the key and UNPLUG THE POWER CORD. Repeat until the walking belt is overtightened, treadmill performance may decrease and the walking belt may be able to lift each side of the walking belt 2 to turn the left rear roller bolt counterclockwise 1/2 of a turn . b 2"-3" Rear Roller Adjustment Bolts c. PROBLEM: The walking belt is properly tightened. If the walking a belt...
... the walking belt slips when walked on , please call our toll-free Customer Service Department. 13 If the walking belt still slows when walked on , first remove the key and UNPLUG THE POWER CORD. Repeat until the walking belt is overtightened, treadmill performance may decrease and the walking belt may be able to lift each side of the walking belt 2 to turn the left rear roller bolt counterclockwise 1/2 of a turn . b 2"-3" Rear Roller Adjustment Bolts c. PROBLEM: The walking belt is properly tightened. If the walking a belt...
English Manual
Page 14
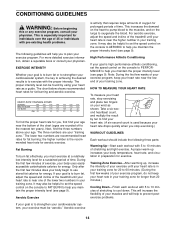
... your exercise program, do not keep your heart rate near the bottom of your body uses easily accessible carbohydrate calories for fat burning and aerobic exercise. A proper warm-up , increase the intensity of your exercise until your heart rate is high performance athletic conditioning, set the speed control on the console to AEROBIC to 10 minutes of the treadmill until your heart rate is in your training zone...
... your exercise program, do not keep your heart rate near the bottom of your body uses easily accessible carbohydrate calories for fat burning and aerobic exercise. A proper warm-up , increase the intensity of your exercise until your heart rate is high performance athletic conditioning, set the speed control on the console to AEROBIC to 10 minutes of the treadmill until your heart rate is in your training zone...

English Manual
Page 15
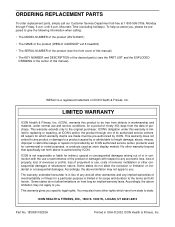
... is to make exercise a regular and enjoyable part of knees and back. 2. Hold for 15 counts, then relax. EXERCISE FREQUENCY To maintain or improve your condition, complete three workouts each week if desired. SUGGESTED STRETCHES The correct form for balance, reach back and grasp one leg in the drawings at least one leg extended. Move slowly as you...
... is to make exercise a regular and enjoyable part of knees and back. 2. Hold for 15 counts, then relax. EXERCISE FREQUENCY To maintain or improve your condition, complete three workouts each week if desired. SUGGESTED STRETCHES The correct form for balance, reach back and grasp one leg in the drawings at least one leg extended. Move slowly as you...
English Manual
Page 16
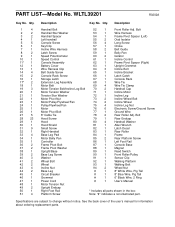
... (WESLO CADENCE® ex16 treadmill) • The SERIAL NUMBER of the product (see the front cover of this manual) • The KEY NUMBER and DESCRIPTION of the desired part(s) (see the PART LIST and the EXPLODED DRAWING in workmanship and material, under this manual). ICON's obligation under normal use , costs of removal, installation or other warranty beyond that specifically set forth herein. This warranty gives you . This warranty extends only to be free from...
... (WESLO CADENCE® ex16 treadmill) • The SERIAL NUMBER of the product (see the front cover of this manual) • The KEY NUMBER and DESCRIPTION of the desired part(s) (see the PART LIST and the EXPLODED DRAWING in workmanship and material, under this manual). ICON's obligation under normal use , costs of removal, installation or other warranty beyond that specifically set forth herein. This warranty gives you . This warranty extends only to be free from...

English Manual
Page 17
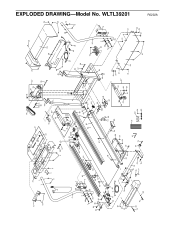
REMOVE THIS EXPLODED DRAWING AND PART LIST FROM THE MANUAL Save this EXPLODED DRAWING and PART LIST for future reference. Note: Specifications are subject to change without notice. For information about ordering replacement parts, see the back cover of the User's Manual. 34
REMOVE THIS EXPLODED DRAWING AND PART LIST FROM THE MANUAL Save this EXPLODED DRAWING and PART LIST for future reference. Note: Specifications are subject to change without notice. For information about ordering replacement parts, see the back cover of the User's Manual. 34
English Manual
Page 18
... Latch Screw Speed Potentiometer Speed Control Console Assembly Battery Cover Wire Harness Clip Belt Guide Screw Console Rack Screw Storage Latch Extension Leg Assembly Motor Belt Motor Tension Bolt/Incline Leg Bolt Motor Tension Washer Tension Star Washer Motor Pivot Nut Motor/Pulley/Flywheel/Fan Pulley/Flywheel/Fan Motor Motor Pivot Bolt 8" Cable Tie Hood Screw Hood Hood Shield Small Screw Right Handrail Base Leg Pad Motor Belly Pan Controller Frame Pivot Bolt Frame Pivot Washer Upright/Base Base Leg Screw Washer Wheel Bolt Wheel Incline Nut Base Leg Circuit Breaker Grommet Power Cord Motor...
... Latch Screw Speed Potentiometer Speed Control Console Assembly Battery Cover Wire Harness Clip Belt Guide Screw Console Rack Screw Storage Latch Extension Leg Assembly Motor Belt Motor Tension Bolt/Incline Leg Bolt Motor Tension Washer Tension Star Washer Motor Pivot Nut Motor/Pulley/Flywheel/Fan Pulley/Flywheel/Fan Motor Motor Pivot Bolt 8" Cable Tie Hood Screw Hood Hood Shield Small Screw Right Handrail Base Leg Pad Motor Belly Pan Controller Frame Pivot Bolt Frame Pivot Washer Upright/Base Base Leg Screw Washer Wheel Bolt Wheel Incline Nut Base Leg Circuit Breaker Grommet Power Cord Motor...
English Manual
Page 19
... 28 29 30 46 45 28 28 28 13 5 76 32 56 35 2 80 1 3 56 70 31 31 33 28 31 31 R0202A EXPLODED DRAWING-Model No.
... 28 29 30 46 45 28 28 28 13 5 76 32 56 35 2 80 1 3 56 70 31 31 33 28 31 31 R0202A EXPLODED DRAWING-Model No.


