
English Manual
Page 1
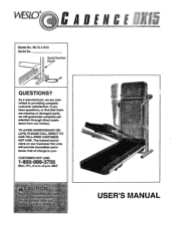
...;V USER'S MANUAL CUS8TOMER HOT LIN7E:5 6 1 0 09 993 Mon.-Fri., 6 a.m.-6 p.m. As a manufacturer, we are missing or damaged parts, we will provide immediate assistance, free of charge to you have questions, or find that there are committed to providing complete customer satisfaction. WLTL11570 Serial No. Serial Number Decal QUESTIONS? TO AVOID UNNECESSARY DELAYS, PLEASE CALL DIRECT TO OUR TOLL-FREE CUSTOMER...
...;V USER'S MANUAL CUS8TOMER HOT LIN7E:5 6 1 0 09 993 Mon.-Fri., 6 a.m.-6 p.m. As a manufacturer, we are missing or damaged parts, we will provide immediate assistance, free of charge to you have questions, or find that there are committed to providing complete customer satisfaction. WLTL11570 Serial No. Serial Number Decal QUESTIONS? TO AVOID UNNECESSARY DELAYS, PLEASE CALL DIRECT TO OUR TOLL-FREE CUSTOMER...

English Manual
Page 2
... treadmill etas onsibili Of the owner to the center of this manual. ss n ian is, e e rolac 4:taXpi.-0 6.611 r eep, Otte biliterchr an a s'ut 6. TABLE OF CONTENTS IMPORTANT PRECAUTIONS BEFORE YOU BEGIN ASSEMBLY OPERATION AND ADJUSTMENT HOW TO FOLD AND MOVE THE TREADMILL MAINTENANCE AND TROUBLE-SHOOTING CONDITIONING GUIDELINES ORDERING REPLACEMENT PARTS LIMITED WARRANTY 2 4 5 7 11 12 14 Back Cover Back Cover Note: An EXPLODED DRAWING and a PART LIST are attached...
... treadmill etas onsibili Of the owner to the center of this manual. ss n ian is, e e rolac 4:taXpi.-0 6.611 r eep, Otte biliterchr an a s'ut 6. TABLE OF CONTENTS IMPORTANT PRECAUTIONS BEFORE YOU BEGIN ASSEMBLY OPERATION AND ADJUSTMENT HOW TO FOLD AND MOVE THE TREADMILL MAINTENANCE AND TROUBLE-SHOOTING CONDITIONING GUIDELINES ORDERING REPLACEMENT PARTS LIMITED WARRANTY 2 4 5 7 11 12 14 Back Cover Back Cover Note: An EXPLODED DRAWING and a PART LIST are attached...
English Manual
Page 3
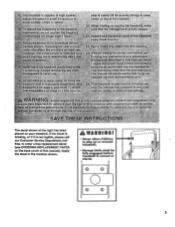
... REPLACEMENT PARTS on or around treadmill. • Storage latch must be fully engaged before pe rmin t e.rilartdrianceeri, 6 0r,u, ,n•n6i0n6g, e treadmiii unattended,W 6* vi *A 011 ,;e:no s ro onsibiti rp icist.i.i..i.g.. : • r...y.. ten''a Ofts of adjustthe speed in ;anycc meroiafi; rental, or_Institutional settings s a a ej:i tl Before ::e.)cerclseprpgrami.:porisUltr.your treadmill. vet ns an obiect.irlt0:AtI eni ways`unplug"the power.cord...
... REPLACEMENT PARTS on or around treadmill. • Storage latch must be fully engaged before pe rmin t e.rilartdrianceeri, 6 0r,u, ,n•n6i0n6g, e treadmiii unattended,W 6* vi *A 011 ,;e:no s ro onsibiti rp icist.i.i..i.g.. : • r...y.. ten''a Ofts of adjustthe speed in ;anycc meroiafi; rental, or_Institutional settings s a a ej:i tl Before ::e.)cerclseprpgrami.:porisUltr.your treadmill. vet ns an obiect.irlt0:AtI eni ways`unplug"the power.cord...
English Manual
Page 4
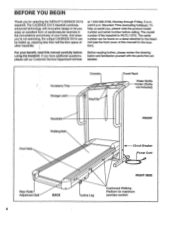
... Storage Latch Console rr Towel Rack Water Bottle Holder (Bottle not included) Foot Rails Handrails Walking Belt FRONT -4-- at 1-800-999-3756, Monday through Friday, 6 a.m. If you for selecting the WESLO® CADENCE DX15 treadmill. The CADENCE DX15 treadmill combines advanced technology with the parts that are labeled. until 6 p.m. The model number of your benefit, read this manual for maximum exercise comfort For your home. Circuit Breaker Power Cord Rear Roller Adjustment Bolt 4 BACK 0 Incline Leg...
... Storage Latch Console rr Towel Rack Water Bottle Holder (Bottle not included) Foot Rails Handrails Walking Belt FRONT -4-- at 1-800-999-3756, Monday through Friday, 6 a.m. If you for selecting the WESLO® CADENCE DX15 treadmill. The CADENCE DX15 treadmill combines advanced technology with the parts that are labeled. until 6 p.m. The model number of your benefit, read this manual for maximum exercise comfort For your home. Circuit Breaker Power Cord Rear Roller Adjustment Bolt 4 BACK 0 Incline Leg...
English Manual
Page 5
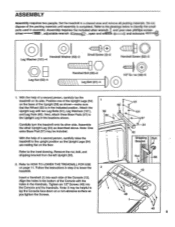
... floor. Set the treadmill in the locations shown. Attach the Upright Leg with the holes in the Handrails. Assembly requires the Included alien wrench and your own phillips screwdriver.----- Position one of the Upright Legs (54) on its other Upright Leg (54) as described above. Next, attach three Base Pads (57) to lower the 2 treadmill. With the help of the Console with two Leg Bolts (61), Leg Washers...
... floor. Set the treadmill in the locations shown. Attach the Upright Leg with the holes in the Handrails. Assembly requires the Included alien wrench and your own phillips screwdriver.----- Position one of the Upright Legs (54) on its other Upright Leg (54) as described above. Next, attach three Base Pads (57) to lower the 2 treadmill. With the help of the Console with two Leg Bolts (61), Leg Washers...

English Manual
Page 6
... 6 location. Set the Handrails (1) on the right Handrail (1) as shown. 3 Connect the Console Wire Harness (104) to the Upright Wire Harness (42). Press the Adhesive Clip onto the Upright (58) in the other Wire Ties. 3. Insert the 11 1/2" Wire Tie (107) through the bracket on the Uprights (58) as shown. If there is included, attach the Guide Spacer with a Handrail Washer (83) into the lower...
... 6 location. Set the Handrails (1) on the right Handrail (1) as shown. 3 Connect the Console Wire Harness (104) to the Upright Wire Harness (42). Press the Adhesive Clip onto the Upright (58) in the other Wire Ties. 3. Insert the 11 1/2" Wire Tie (107) through the bracket on the Uprights (58) as shown. If there is included, attach the Guide Spacer with a Handrail Washer (83) into the lower...
English Manual
Page 7
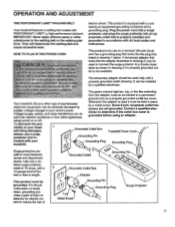
... be installed by a metal screw. Some 2-pole receptacle outlet box covers are sold at 15 amps, with all local codes and ordinances. being damaged, always use on or off. Grounded Outlet Box Grounding Pin Treadmill Power Cord cluded) with your treadmill. 0 Grounding Plug Grounding Plug 0° Surge protectors are not grounded. Grounded Outlet Grounded Outlet Box Adapter Grounding Pin o® This product must be connected...
... be installed by a metal screw. Some 2-pole receptacle outlet box covers are sold at 15 amps, with all local codes and ordinances. being damaged, always use on or off. Grounded Outlet Box Grounding Pin Treadmill Power Cord cluded) with your treadmill. 0 Grounding Plug Grounding Plug 0° Surge protectors are not grounded. Grounded Outlet Grounded Outlet Box Adapter Grounding Pin o® This product must be connected...
English Manual
Page 8
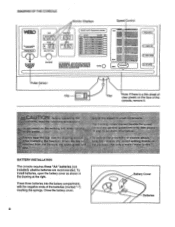
... negative ends of the console, remove it. moved from flip {see t ad cnnsoie"t rawing' ak. enthe walking elf wlit Age BATTERY INSTALLATION The console requires three "AA" batteries (not included); Close the battery cover. 4,Kti training z000 003:401*! taisiiimiz0ita4 FAST FM t&ola RESET ( Operation (1 INSERT KEY (2 RESET SPEED (3 SET SPEED Pulse Sensor Clip Key Note: If there is a thin sheet of clear plastic on the walking e when turn 0 sways wear t e.:(iperA...
... negative ends of the console, remove it. moved from flip {see t ad cnnsoie"t rawing' ak. enthe walking elf wlit Age BATTERY INSTALLATION The console requires three "AA" batteries (not included); Close the battery cover. 4,Kti training z000 003:401*! taisiiimiz0ita4 FAST FM t&ola RESET ( Operation (1 INSERT KEY (2 RESET SPEED (3 SET SPEED Pulse Sensor Clip Key Note: If there is a thin sheet of clear plastic on the walking e when turn 0 sways wear t e.:(iperA...
English Manual
Page 9
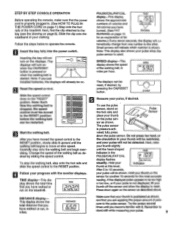
... will indicate which number is used. Insert the key fully into the power switch. Press down again on page 7.) Step onto the foot rails of pres- Change the speed of the walking belt, in miles per hour. Small arrows will be too high or too low, or if your pulse is not displayed, lift your thumb off the sensor and allow the display to stand still...
... will indicate which number is used. Insert the key fully into the power switch. Press down again on page 7.) Step onto the foot rails of pres- Change the speed of the walking belt, in miles per hour. Small arrows will be too high or too low, or if your pulse is not displayed, lift your thumb off the sensor and allow the display to stand still...
English Manual
Page 10
... Rear Roller Cover in these locations Incline Leg When the back end of the treadmill is about 10%. Raise the back end until it . Hold the treadmill with your back straight. As you are finished exercising, stop the, walking belt, and remove the key from the console. After the key is stopped and no console buttons are pressed for about 5%. CAUTION: Before exercising, push on for five minutes, the displays will automatically turn...
... Rear Roller Cover in these locations Incline Leg When the back end of the treadmill is about 10%. Raise the back end until it . Hold the treadmill with your back straight. As you are finished exercising, stop the, walking belt, and remove the key from the console. After the key is stopped and no console buttons are pressed for about 5%. CAUTION: Before exercising, push on for five minutes, the displays will automatically turn...
English Manual
Page 11
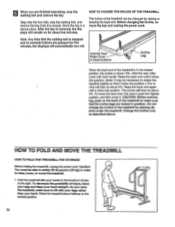
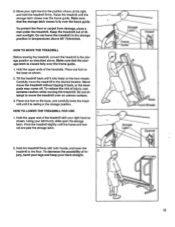
... lower the treadmill to the desired location. Hold the treadmill firmly with your right hand to the position shown at 6 • _ Storage Latch Opened 2. Tilt the treadmill back until the frame and foot rail are past the storage latch. _ ) Storage .•• Latch Closed Frame Guide ..---- Make sure that the storage latch Is closed fully over the frame guide. Do not leave the treadmill in the storage position...
... lower the treadmill to the desired location. Hold the treadmill firmly with your right hand to the position shown at 6 • _ Storage Latch Opened 2. Tilt the treadmill back until the frame and foot rail are past the storage latch. _ ) Storage .•• Latch Closed Frame Guide ..---- Make sure that the storage latch Is closed fully over the frame guide. Do not leave the treadmill in the storage position...
English Manual
Page 12
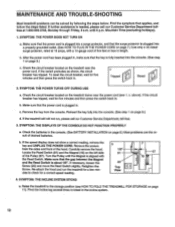
... the speed display does not show a correct reading, remove the key and UNPLUG THE POWER CORD. Top 0 View utes to break in length. Pivot the incline leg several times to check for a few min- Mountain Time (excluding holidays). 1. Raise the treadmill to the storage position (see 1. Turn the Pulley until 6 p.m. If necessary, loosen the 20 Screw (20) and move the Reed Switch slightly. MAINTENANCE AND TROUBLE-SHOOTING Most treadmill problems...
... the speed display does not show a correct reading, remove the key and UNPLUG THE POWER CORD. Top 0 View utes to break in length. Pivot the incline leg several times to check for a few min- Mountain Time (excluding holidays). 1. Raise the treadmill to the storage position (see 1. Turn the Pulley until 6 p.m. If necessary, loosen the 20 Screw (20) and move the Reed Switch slightly. MAINTENANCE AND TROUBLE-SHOOTING Most treadmill problems...
English Manual
Page 13
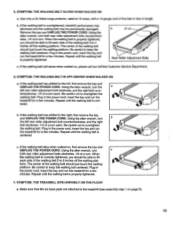
... the walking belt 3 to the treadmill (see assembly step 1 on page 5). 13 Use only a UL-listed surge protector, rated at 15 amps, with a 14-gauge cord of the walking belt 2 to 3 inches off the walking platform. Be careful not to keep the walking belt centered. If the walking belt slips when walked on , please call our toll-free Customer Service Department. 6. 5. b Rear Roller Adjustment Bolts c. If the walking belt still slows when walked on , first remove the key and...
... the walking belt 3 to the treadmill (see assembly step 1 on page 5). 13 Use only a UL-listed surge protector, rated at 15 amps, with a 14-gauge cord of the walking belt 2 to 3 inches off the walking platform. Be careful not to keep the walking belt centered. If the walking belt slips when walked on , please call our toll-free Customer Service Department. 6. 5. b Rear Roller Adjustment Bolts c. If the walking belt still slows when walked on , first remove the key and...
English Manual
Page 14
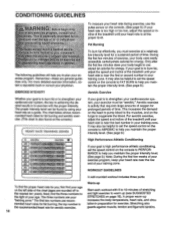
... console.) HEART RATE TRAINING ZONES • w MIN BPM MAX BPM AGE IMO 20 MS 30 40 tt 50 60 70 80 If your heart rate during exercise, use stored fat calories for energy. To measure your goal is high performance athletic conditioning, set the speed control on the console. (See page 9.) If your heart rate is too high or too low, adjust the speed or incline of the treadmill...
... console.) HEART RATE TRAINING ZONES • w MIN BPM MAX BPM AGE IMO 20 MS 30 40 tt 50 60 70 80 If your heart rate during exercise, use stored fat calories for energy. To measure your goal is high performance athletic conditioning, set the speed control on the console. (See page 9.) If your heart rate is too high or too low, adjust the speed or incline of the treadmill...

English Manual
Page 15
After a few weeks of your exercise program, do not keep your pulse in your training zone for longer than 20 minutes.) Breathe regularly and deeply as you stretch-never bounce. 1. Repeat 3 times for each leg. Stretches: Quadriceps and hip 5 muscles. 5. Allow your back and shoulders to relax as you exercise-never hold your breath. Repeat 3 times. Hamstring...
After a few weeks of your exercise program, do not keep your pulse in your training zone for longer than 20 minutes.) Breathe regularly and deeply as you stretch-never bounce. 1. Repeat 3 times for each leg. Stretches: Quadriceps and hip 5 muscles. 5. Allow your back and shoulders to relax as you exercise-never hold your breath. Repeat 3 times. Hamstring...
English Manual
Page 16
... MODEL NUMBER OF THE PRODUCT (WLTL11570). • The NAME OF THE PRODUCT (WESLO® CADENCE DX15 treadmill). • The SERIAL NUMBER OF THE PRODUCT (see the front cover of this manual). • The KEY NUMBER OF THE PART(S) (see the EXPLODED DRAWING and PART LIST attached to the center of this manual). • The DESCRIPTION OF THE PART(S) (see the EXPLODED DRAWING and PART LIST attached to the center of this warranty...
... MODEL NUMBER OF THE PRODUCT (WLTL11570). • The NAME OF THE PRODUCT (WESLO® CADENCE DX15 treadmill). • The SERIAL NUMBER OF THE PRODUCT (see the front cover of this manual). • The KEY NUMBER OF THE PART(S) (see the EXPLODED DRAWING and PART LIST attached to the center of this manual). • The DESCRIPTION OF THE PART(S) (see the EXPLODED DRAWING and PART LIST attached to the center of this warranty...
English Manual
Page 17
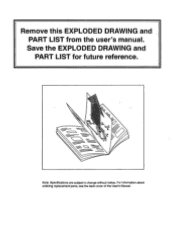
Save the EXPLODED DRAWING and PART LIST for future reference. - Note: Specifications are subject to change without notice. For information about ordering replacement parts, see the back cover of the User's Manual. Remove this EXPLODED DRAWING and PART LIST from the user's manual.
Save the EXPLODED DRAWING and PART LIST for future reference. - Note: Specifications are subject to change without notice. For information about ordering replacement parts, see the back cover of the User's Manual. Remove this EXPLODED DRAWING and PART LIST from the user's manual.

English Manual
Page 18
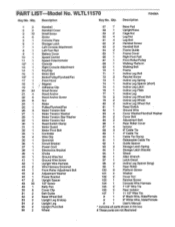
O 47 60 2 6 60 53 17 42 83 1-20 42 23 52 01 WLTL11570 10 • 11 14 12* R0498A 26 29 27 28 15 4 88 897-- 107 105 97 19 50 85 v 3 84 86 85 104 25 16* 24 1 13 81 r. 20 18 48 100 87 64 100 20 92 100 99 106 102 102 48 • 78 • 80 -750 23 20 48 83 76 23 80 • 79 78 68 69 67 23 87 66 87 5 70 2 103 71 73 74 26 98 65 48 5p3. 32 34 33 36 37 35 22 rF 21 • 48 2 20 61 20 1 20 39 20 2 38 94 93 45 44 63 83 J 59 95 56 a 23 60 • • 47 • I,-,./4•"••.' EXPLODED DRAWING-Model No.
O 47 60 2 6 60 53 17 42 83 1-20 42 23 52 01 WLTL11570 10 • 11 14 12* R0498A 26 29 27 28 15 4 88 897-- 107 105 97 19 50 85 v 3 84 86 85 104 25 16* 24 1 13 81 r. 20 18 48 100 87 64 100 20 92 100 99 106 102 102 48 • 78 • 80 -750 23 20 48 83 76 23 80 • 79 78 68 69 67 23 87 66 87 5 70 2 103 71 73 74 26 98 65 48 5p3. 32 34 33 36 37 35 22 rF 21 • 48 2 20 61 20 1 20 39 20 2 38 94 93 45 44 63 83 J 59 95 56 a 23 60 • • 47 • I,-,./4•"••.' EXPLODED DRAWING-Model No.
English Manual
Page 19
... Storage Latch Left Console Attachment Left Foot Rail Battery Cover Speed Control Speed Potentiometer Console Right Console Attachment Key/Clip Motor Belt Motor/Pulley/FlywheeVFan Front Hood Magnet Adhesive Clip Small Screw Hood Anchor Hood Anchor Screw Nut Motor Pulley/FlywheeVFan Motor Tension Bolt Motor Tension Washer Motor Tension Star Washer Motor Tension Nut Reed Switch Clamp Motor Guard Motor Pivot Bolt Controller Wire Clip Grommet Circuit Breaker Power Cord Electronics Bracket Choke Ground Wire Nut Ground Wire Screw Upright Wire Harness Wire Harness Grommet Front Roller Adjustment Bolt...
... Storage Latch Left Console Attachment Left Foot Rail Battery Cover Speed Control Speed Potentiometer Console Right Console Attachment Key/Clip Motor Belt Motor/Pulley/FlywheeVFan Front Hood Magnet Adhesive Clip Small Screw Hood Anchor Hood Anchor Screw Nut Motor Pulley/FlywheeVFan Motor Tension Bolt Motor Tension Washer Motor Tension Star Washer Motor Tension Nut Reed Switch Clamp Motor Guard Motor Pivot Bolt Controller Wire Clip Grommet Circuit Breaker Power Cord Electronics Bracket Choke Ground Wire Nut Ground Wire Screw Upright Wire Harness Wire Harness Grommet Front Roller Adjustment Bolt...


