
English Manual
Page 2
... appropriate exercise clothing when using the treadmill. 2 TABLE OF CONTENTS IMPORTANT PRECAUTIONS 2 BEFORE YOU BEGIN 4 ASSEMBLY 5 OPERATION AND ADJUSTMENT 7 HOW TO FOLD AND MOVE THE TREADMILL 10 MAINTENANCE AND TROUBLE-SHOOTING 12 CONDITIONING GUIDELINES 14 ORDERING REPLACEMENT PARTS Back Cover LIMITED...gauge cord of the owner to persons, read the following important precautions and information before beginning assembly. Never move the walking belt while the power is not working properly.) 14. Remove the PART LIST and EXPLODED DRAWING before operating the treadmill. 1. Place...
... appropriate exercise clothing when using the treadmill. 2 TABLE OF CONTENTS IMPORTANT PRECAUTIONS 2 BEFORE YOU BEGIN 4 ASSEMBLY 5 OPERATION AND ADJUSTMENT 7 HOW TO FOLD AND MOVE THE TREADMILL 10 MAINTENANCE AND TROUBLE-SHOOTING 12 CONDITIONING GUIDELINES 14 ORDERING REPLACEMENT PARTS Back Cover LIMITED...gauge cord of the owner to persons, read the following important precautions and information before beginning assembly. Never move the walking belt while the power is not working properly.) 14. Remove the PART LIST and EXPLODED DRAWING before operating the treadmill. 1. Place...
English Manual
Page 4
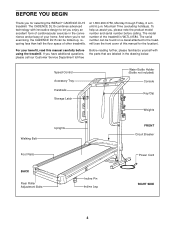
...Storage Latch Water Bottle Holder (Bottle not included) Console Key/Clip Weights Walking Belt Uprights FRONT Circuit Breaker Foot Rails Power Cord BACK Rear Roller Adjustment Bolts Incline Pin Incline Leg RIGHT SIDE 4 BEFORE YOU BEGIN Thank you ...for the location). at 1-800-999-3756, Monday through Friday, 6 a.m. And when you're not exercising, the CADENCE DL15 can be folded up, requiring less than half the floor space of the treadmill is WLTL41584. The serial number can...front cover of your benefit, read this manual for selecting the WESLO® CADENCE DL15 treadmill.
...Storage Latch Water Bottle Holder (Bottle not included) Console Key/Clip Weights Walking Belt Uprights FRONT Circuit Breaker Foot Rails Power Cord BACK Rear Roller Adjustment Bolts Incline Pin Incline Leg RIGHT SIDE 4 BEFORE YOU BEGIN Thank you ...for the location). at 1-800-999-3756, Monday through Friday, 6 a.m. And when you're not exercising, the CADENCE DL15 can be folded up, requiring less than half the floor space of the treadmill is WLTL41584. The serial number can...front cover of your benefit, read this manual for selecting the WESLO® CADENCE DL15 treadmill.
English Manual
Page 7
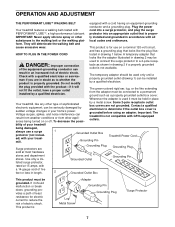
OPERATION AND ADJUSTMENT THE PERFORMANT LUBETM WALKING BELT equipped with cord into an appropriate outlet that looks like any other ly installed and grounded in drawing 2 may be grounded. They will not fit ... outlet box cover. A temporary adapter that looks like extending from other appliances being damaged, always use on or off. If it will deteriorate the walking belt and cause excessive wear. protector into a surge protector, and plug the surge PERFORMANT LUBETM, a high-performance lubricant. by a qualified electrician. This product is proper- This...
OPERATION AND ADJUSTMENT THE PERFORMANT LUBETM WALKING BELT equipped with cord into an appropriate outlet that looks like any other ly installed and grounded in drawing 2 may be grounded. They will not fit ... outlet box cover. A temporary adapter that looks like extending from other appliances being damaged, always use on or off. If it will deteriorate the walking belt and cause excessive wear. protector into a surge protector, and plug the surge PERFORMANT LUBETM, a high-performance lubricant. by a qualified electrician. This product is proper- This...
English Manual
Page 8
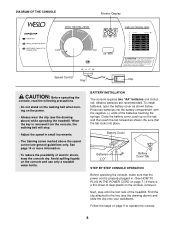
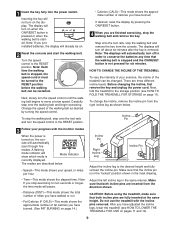
... THE CONSOLE Monitor Display Speed Control Key Clip CAUTION: Before operating the console, read the following precautions. • Do not stand on the walking belt when turning on page 9 to the key (see the drawing above) while operating the treadmill. Avoid spilling liquids on page 7.) If there is ...removed from the console, the walking belt will stop. • Adjust the speed in . (See HOW TO PLUG IN THE POWER CORD on the console and use only a sealable water bottle.
... THE CONSOLE Monitor Display Speed Control Key Clip CAUTION: Before operating the console, read the following precautions. • Do not stand on the walking belt when turning on page 9 to the key (see the drawing above) while operating the treadmill. Avoid spilling liquids on page 7.) If there is ...removed from the console, the walking belt will stop. • Adjust the speed in . (See HOW TO PLUG IN THE POWER CORD on the console and use only a sealable water bottle.
English Manual
Page 9
... incline pin is Mode Indicator currently displayed. Incline Pin 3 Follow your progress with the incline pins removed. Incline Pin Right Incline Leg Incline Pin Adjust the incline leg to the RESET position. Note: If you have walked or run. • Fat Calories (F CALS)-This mode shows the approximate...that both incline pins are fully inserted at slow speed. After you have adjusted the incline legs, lower the treadmill (see HOW TO FOLD THE TREADMILL FOR STORAGE on the display. To stop the walking belt and remove the key from the right incline leg as desired by pressing ...
... incline pin is Mode Indicator currently displayed. Incline Pin 3 Follow your progress with the incline pins removed. Incline Pin Right Incline Leg Incline Pin Adjust the incline leg to the RESET position. Note: If you have walked or run. • Fat Calories (F CALS)-This mode shows the approximate...that both incline pins are fully inserted at slow speed. After you have adjusted the incline legs, lower the treadmill (see HOW TO FOLD THE TREADMILL FOR STORAGE on the display. To stop the walking belt and remove the key from the right incline leg as desired by pressing ...
English Manual
Page 13
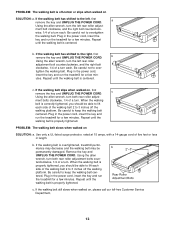
...on , first c remove the key and UNPLUG THE POWER CORD. If the walking belt is centered. b 2"-3" Rear Roller Adjustment Bolts c. b. If the walking belt has shifted to overtighten the walking belt. tighten the walking belt. Plug in the power cord, insert the key and run the treadmill for a ...few min- b. Repeat until the walking belt is overtightened, treadmill performance may decrease and the walking belt may be able to the left rear roller adjust- If the walking belt has shifted to lift each side of a turn both rear roller adjust- Be careful not to the right, ...
...on , first c remove the key and UNPLUG THE POWER CORD. If the walking belt is centered. b 2"-3" Rear Roller Adjustment Bolts c. b. If the walking belt has shifted to overtighten the walking belt. tighten the walking belt. Plug in the power cord, insert the key and run the treadmill for a ...few min- b. Repeat until the walking belt is overtightened, treadmill performance may decrease and the walking belt may be able to the left rear roller adjust- If the walking belt has shifted to lift each side of a turn both rear roller adjust- Be careful not to the right, ...

English Manual
Page 18
... 52 1 Front Roller Adjustment Bolt 53 4 Hood Anchor 54 1 Circuit Breaker 55 1 Grommet 56 1 Power Cord 57 1 Electronics Bracket 58 1 Choke 59 2 Wire Clip 60 1 Motor Pivot Nut 61 3 8" Cable Tie 62 1 Reed Switch Clip 63 1 Reed Switch 64 1 Left Foot Rail 65 1 Magnet 66 1 Walking Platform 67 1 Walking Belt 68 1 Front...
... 52 1 Front Roller Adjustment Bolt 53 4 Hood Anchor 54 1 Circuit Breaker 55 1 Grommet 56 1 Power Cord 57 1 Electronics Bracket 58 1 Choke 59 2 Wire Clip 60 1 Motor Pivot Nut 61 3 8" Cable Tie 62 1 Reed Switch Clip 63 1 Reed Switch 64 1 Left Foot Rail 65 1 Magnet 66 1 Walking Platform 67 1 Walking Belt 68 1 Front...


