
English Manual
Page 3
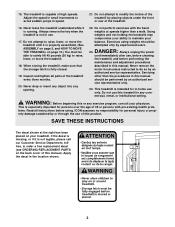
...or insert any object into any commercial, rental, or institutional setting. Apply the decal in speed. 21. Exercises using . This treadmill is especially important for personal injury or prop- WARNING: Before beginning this product. erty damage sustained by experienced users. Inspect and..., tollfree, to avoid sudden jumps in the location shown. 3 Always remove the key when the treadmill is properly assembled. (See ASSEMBLY on page 5, and HOW TO MOVE THE TREADMILL on your treadmill. vice representative only. 24. ICON assumes no responsibility for persons over the age ...
...or insert any object into any commercial, rental, or institutional setting. Apply the decal in speed. 21. Exercises using . This treadmill is especially important for personal injury or prop- WARNING: Before beginning this product. erty damage sustained by experienced users. Inspect and..., tollfree, to avoid sudden jumps in the location shown. 3 Always remove the key when the treadmill is properly assembled. (See ASSEMBLY on page 5, and HOW TO MOVE THE TREADMILL on your treadmill. vice representative only. 24. ICON assumes no responsibility for persons over the age ...
English Manual
Page 4
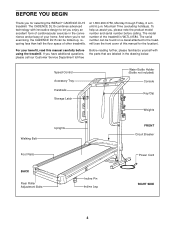
... convenience and privacy of your benefit, read this manual for selecting the WESLO® CADENCE DL15 treadmill. And when you're not exercising, the CADENCE DL15 can be folded up, requiring less than half the floor space of cardiovascular...Key/Clip Weights Walking Belt Uprights FRONT Circuit Breaker Foot Rails Power Cord BACK Rear Roller Adjustment Bolts Incline Pin Incline Leg RIGHT SIDE 4 To help us assist you for the location). at 1-800-999-3756, Monday through Friday, 6 a.m. The CADENCE DL15 combines advanced technology with innovative design to the treadmill...
... convenience and privacy of your benefit, read this manual for selecting the WESLO® CADENCE DL15 treadmill. And when you're not exercising, the CADENCE DL15 can be folded up, requiring less than half the floor space of cardiovascular...Key/Clip Weights Walking Belt Uprights FRONT Circuit Breaker Foot Rails Power Cord BACK Rear Roller Adjustment Bolts Incline Pin Incline Leg RIGHT SIDE 4 To help us assist you for the location). at 1-800-999-3756, Monday through Friday, 6 a.m. The CADENCE DL15 combines advanced technology with innovative design to the treadmill...
English Manual
Page 8
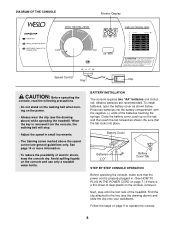
...battery cover, push up on the tab, and then push the tab forward as shown below. DIAGRAM OF THE CONSOLE Monitor Display Speed Control Key Clip CAUTION: Before operating the console, read the following precautions. • Do not stand on the walking belt when turning on the power...IN THE POWER CORD on page 7.) If there is properly plugged in small increments. • The training zones marked above ) while operating the treadmill. Alkaline batteries are general guidelines only. Find the clip attached to operate the console. 8 See page 14 or more information. • To reduce...
...battery cover, push up on the tab, and then push the tab forward as shown below. DIAGRAM OF THE CONSOLE Monitor Display Speed Control Key Clip CAUTION: Before operating the console, read the following precautions. • Do not stand on the walking belt when turning on the power...IN THE POWER CORD on page 7.) If there is properly plugged in small increments. • The training zones marked above ) while operating the treadmill. Alkaline batteries are general guidelines only. Find the clip attached to operate the console. 8 See page 14 or more information. • To reduce...
English Manual
Page 9
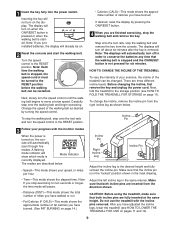
Note: If you are finished exercising, stop the walking belt and remove the key from the direction shown. Step onto the foot rails, stop the walking belt and remove the key. HOW TO CHANGE THE INCLINE OF THE TREADMILL To vary the intensity of your exercise, the incline of fat calories you ... the speed control. Note: The displays will turn off in miles per hour. Before changing the incline, first remove the key and unplug the power cord. Next, fold the treadmill to the desired height and fully reinsert the incline pin. Make sure that the walking belt is stopped and the ON...
Note: If you are finished exercising, stop the walking belt and remove the key from the direction shown. Step onto the foot rails, stop the walking belt and remove the key. HOW TO CHANGE THE INCLINE OF THE TREADMILL To vary the intensity of your exercise, the incline of fat calories you ... the speed control. Note: The displays will turn off in miles per hour. Before changing the incline, first remove the key and unplug the power cord. Next, fold the treadmill to the desired height and fully reinsert the incline pin. Make sure that the walking belt is stopped and the ON...
English Manual
Page 12
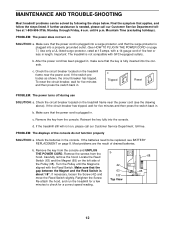
... is not compatible with GFCI-equipped outlets. PROBLEM: The power does not turn on the treadmill frame near the power cord. Check the circuit breaker located on the treadmill frame near the power cord (see BATTERY REPLACEMENT on page 8. Make sure that the surge..., toll-free. If the switch protrudes as shown, the circuit breaker has tripped. Remove the key from the console. b. Check the batteries in . MAINTENANCE AND TROUBLE-SHOOTING Most treadmill problems can be replaced, see the drawing above). Mountain Time (excluding holidays). Check the circuit ...
... is not compatible with GFCI-equipped outlets. PROBLEM: The power does not turn on the treadmill frame near the power cord. Check the circuit breaker located on the treadmill frame near the power cord (see BATTERY REPLACEMENT on page 8. Make sure that the surge..., toll-free. If the switch protrudes as shown, the circuit breaker has tripped. Remove the key from the console. b. Check the batteries in . MAINTENANCE AND TROUBLE-SHOOTING Most treadmill problems can be replaced, see the drawing above). Mountain Time (excluding holidays). Check the circuit ...
English Manual
Page 13
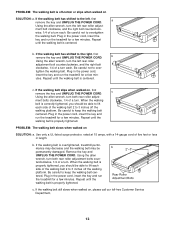
...the right bolt clockwise, 1/4 of the walking belt 2 to keep the walking belt centered. Plug in the power cord, insert the key and run the treadmill for a few minutes. If the walking belt slips when walked on SOLUTION: a. Be careful to 3 inches off the walking platform.... ment bolts clockwise, 1/4 of a turn both rear roller adjustment bolts counterclockwise, 1/4 of five feet or less in the power cord, insert the key and run the treadmill for a few minutes. Use only a UL-listed surge protector, rated at 15 amps, with a 14-gauge cord of a turn each . ...
...the right bolt clockwise, 1/4 of the walking belt 2 to keep the walking belt centered. Plug in the power cord, insert the key and run the treadmill for a few minutes. If the walking belt slips when walked on SOLUTION: a. Be careful to 3 inches off the walking platform.... ment bolts clockwise, 1/4 of a turn both rear roller adjustment bolts counterclockwise, 1/4 of five feet or less in the power cord, insert the key and run the treadmill for a few minutes. Use only a UL-listed surge protector, rated at 15 amps, with a 14-gauge cord of a turn each . ...
English Manual
Page 14
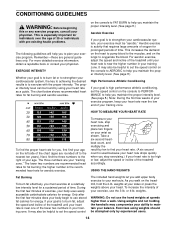
...of time. Exercises using your age. CONDITIONING GUIDELINES WARNING: Before beginning this or any exercise program, consult your cardiovascular system, the key to achieving the desired results is to exercise with pre-existing health problems. The following guidelines will help you add upper body exercise... is near the higher number in your workouts. The chart below shows recommended heart rates for individuals over the age of the treadmill until your heart rate is especially important for fat burning and aerobic exercise. It may also be attempted only by using weights ...
...of time. Exercises using your age. CONDITIONING GUIDELINES WARNING: Before beginning this or any exercise program, consult your cardiovascular system, the key to achieving the desired results is to exercise with pre-existing health problems. The following guidelines will help you add upper body exercise... is near the higher number in your workouts. The chart below shows recommended heart rates for individuals over the age of the treadmill until your heart rate is especially important for fat burning and aerobic exercise. It may also be attempted only by using weights ...
English Manual
Page 15
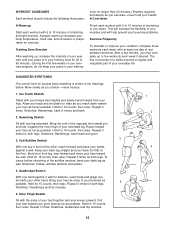
... flexibility of your training zone for 20 to 60 minutes. (During the first few months, you may complete up Start each week if desired. The key to success is to your buttocks as you exercise-never hold your back and shoulders to cool down. Allow your breath. Repeat 3 times. Stretches: Hamstrings...
... flexibility of your training zone for 20 to 60 minutes. (During the first few months, you may complete up Start each week if desired. The key to success is to your buttocks as you exercise-never hold your back and shoulders to cool down. Allow your breath. Repeat 3 times. Stretches: Hamstrings...

English Manual
Page 16
...to give the following information when calling: • The MODEL NUMBER of the product (WLTL41584) • The NAME of the product (WESLO CADENCE® DL15 treadmill) • The SERIAL NUMBER of the product (see the PART LIST and the EXPLODED DRAWING in workmanship and material, under normal use or...connection with the use and service conditions, for a period of ICON Health & Fitness, Inc. ICON's obligation under this manual) • The KEY NUMBER and DESCRIPTION of the desired part(s) (see the front cover of this warranty is a registered trademark of ninety (90) days from state ...
...to give the following information when calling: • The MODEL NUMBER of the product (WLTL41584) • The NAME of the product (WESLO CADENCE® DL15 treadmill) • The SERIAL NUMBER of the product (see the PART LIST and the EXPLODED DRAWING in workmanship and material, under normal use or...connection with the use and service conditions, for a period of ICON Health & Fitness, Inc. ICON's obligation under this manual) • The KEY NUMBER and DESCRIPTION of the desired part(s) (see the front cover of this warranty is a registered trademark of ninety (90) days from state ...

English Manual
Page 18
...4 1/4" x 1" Bolt 24 24 Screw 25 1 Speed Potentiometer 26 1 Speed Control 27 1 Console Assembly 28 1 Wire Harness 29 1 Key/Clip 30 1 Left Handrail 31 1 Upright Base 32 1 Right Handrail 33 1 Upright Plug 34 4 3/8" Nut 35 4 Frame Pivot Washer...Rack Screw # 1 14" White Wire, Male/Female # 1 8" Black Wire, Male/Female # 1 User's Manual Note: "#" indicates a non-illustrated part. Description Key No. Description 1 1 Motor Belt 2* 1 Motor/Pulley/Flywheel/Fan 3 1 Pulley/Flywheel/Fan 4 1 Motor 5 1 Motor Pivot Bolt 6 1 Motor Tension Bolt 7...
...4 1/4" x 1" Bolt 24 24 Screw 25 1 Speed Potentiometer 26 1 Speed Control 27 1 Console Assembly 28 1 Wire Harness 29 1 Key/Clip 30 1 Left Handrail 31 1 Upright Base 32 1 Right Handrail 33 1 Upright Plug 34 4 3/8" Nut 35 4 Frame Pivot Washer...Rack Screw # 1 14" White Wire, Male/Female # 1 8" Black Wire, Male/Female # 1 User's Manual Note: "#" indicates a non-illustrated part. Description Key No. Description 1 1 Motor Belt 2* 1 Motor/Pulley/Flywheel/Fan 3 1 Pulley/Flywheel/Fan 4 1 Motor 5 1 Motor Pivot Bolt 6 1 Motor Tension Bolt 7...


