

Uk Manual
Page 2
TABLE OF CONTENTS IMPORTANT PRECAUTIONS 3 BEFORE YOU BEGIN 5 ASSEMBLY 6 OPERATION AND ADJUSTMENT 12 HOW TO FOLD AND MOVE THE TREADMILL 16 MAINTENANCE AND TROUBLESHOOTING 18 CONDITIONING GUIDELINES 20 PART LIST 22 EXPLODED DRAWING 24 ORDERING REPLACEMENT PARTS Back Cover WESLO is a registered trademark of ICON IP, Inc. 2
TABLE OF CONTENTS IMPORTANT PRECAUTIONS 3 BEFORE YOU BEGIN 5 ASSEMBLY 6 OPERATION AND ADJUSTMENT 12 HOW TO FOLD AND MOVE THE TREADMILL 16 MAINTENANCE AND TROUBLESHOOTING 18 CONDITIONING GUIDELINES 20 PART LIST 22 EXPLODED DRAWING 24 ORDERING REPLACEMENT PARTS Back Cover WESLO is a registered trademark of ICON IP, Inc. 2
Uk Manual
Page 3
...oxygen is fully closed. 20. When folding or moving the treadmill, make sure that all warnings and precautions. 2. It is not working properly.) 13. Place the treadmill on the treadmill. 3 Do not operate the treadmill where aerosol products are recommended for both men and women. ...insert any opening on a level surface, with bare feet, wearing only stockings, or in speed. 17. Keep the treadmill indoors, away from damage, place a mat under the treadmill. 21. Various factors, including your movement, may affect the accuracy of clearance behind it is not a medical device....
...oxygen is fully closed. 20. When folding or moving the treadmill, make sure that all warnings and precautions. 2. It is not working properly.) 13. Place the treadmill on the treadmill. 3 Do not operate the treadmill where aerosol products are recommended for both men and women. ...insert any opening on a level surface, with bare feet, wearing only stockings, or in speed. 17. Keep the treadmill indoors, away from damage, place a mat under the treadmill. 21. Various factors, including your movement, may affect the accuracy of clearance behind it is not a medical device....
Uk Manual
Page 4
... unless instructed to do so by or through the use this product. Servicing other than the procedures in -home use , before cleaning the treadmill, and before using. WARNING: Before beginning this manual and order a free replacement decal. SAVE THESE INSTRUCTIONS The decal shown at actual size....damage sustained by an authorized service representative. scribed in the location shown. tenance and adjustment procedures de- Do not use of this treadmill in any exercise program, consult your physician. DANGER: 23. This is not shown at the right has been placed on the ...
... unless instructed to do so by or through the use this product. Servicing other than the procedures in -home use , before cleaning the treadmill, and before using. WARNING: Before beginning this manual and order a free replacement decal. SAVE THESE INSTRUCTIONS The decal shown at actual size....damage sustained by an authorized service representative. scribed in the location shown. tenance and adjustment procedures de- Do not use of this treadmill in any exercise program, consult your physician. DANGER: 23. This is not shown at the right has been placed on the ...
Uk Manual
Page 5
... familiarize yourself with innovative design to the treadmill (see the front cover of this manual for selecting the new WESLO® CADENCE C6 treadmill. The model number of other treadmills. For your workouts at home more effective and enjoyable. The CADENCE C6 treadmill combines advanced technology with the parts that... carefully before contacting us. To help us assist you 're not exercising, the CADENCE C6 treadmill can be folded up, requiring less than half the floor space of the treadmill is WETL13806.1. And when you , please note the product model number and serial ...
... familiarize yourself with innovative design to the treadmill (see the front cover of this manual for selecting the new WESLO® CADENCE C6 treadmill. The model number of other treadmills. For your workouts at home more effective and enjoyable. The CADENCE C6 treadmill combines advanced technology with the parts that... carefully before contacting us. To help us assist you 're not exercising, the CADENCE C6 treadmill can be folded up, requiring less than half the floor space of the treadmill is WETL13806.1. And when you , please note the product model number and serial ...
Uk Manual
Page 6
...shown. Note: If a part is lubricant on top of the walking belt or the shipping carton. During shipping, a small amount of the treadmill walking belt is coated with the Upright Bolts, two Upright Washers (14) and two Upright Nuts (16). In addition to identify hardware during ...)-6 Handrail Bolt (8)-6 Wheel Housing Bolt (13)-4 Upright Bolt (2)-4 Frame Bolt (1)-2 1. Do not tighten the Upright Nuts yet. This does not affect treadmill performance. Hold the Left Upright (53) so the two small holes are on the Left Upright. Note: The underside of lubricant may be transferred to...
...shown. Note: If a part is lubricant on top of the walking belt or the shipping carton. During shipping, a small amount of the treadmill walking belt is coated with the Upright Bolts, two Upright Washers (14) and two Upright Nuts (16). In addition to identify hardware during ...)-6 Handrail Bolt (8)-6 Wheel Housing Bolt (13)-4 Upright Bolt (2)-4 Frame Bolt (1)-2 1. Do not tighten the Upright Nuts yet. This does not affect treadmill performance. Hold the Left Upright (53) so the two small holes are on the Left Upright. Note: The underside of lubricant may be transferred to...

Uk Manual
Page 7
... the Right Upright. Position the Base (52) as possible. Next, pull the opposite end of the wire tie out of the upper end of the 3 treadmill as close to the upper end of the Wire Harness (98).
... the Right Upright. Position the Base (52) as possible. Next, pull the opposite end of the wire tie out of the upper end of the 3 treadmill as close to the upper end of the Wire Harness (98).
Uk Manual
Page 11
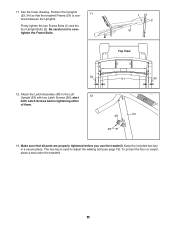
.... Firmly tighten the two Frame Bolts (1) and the four Upright Bolts (2). start 12 both Latch Screws before you use the treadmill. To protect the floor or carpet, place a mat under the treadmill. 11 The hex key is cen- 11. Keep the included hex key in a secure place. See the lower drawing. ...Make sure that the treadmill Frame (51) is used to the Left Upright (53) with two Latch Screws (95); Attach the Latch Assembly (48) to adjust the walking belt (see...
.... Firmly tighten the two Frame Bolts (1) and the four Upright Bolts (2). start 12 both Latch Screws before you use the treadmill. To protect the floor or carpet, place a mat under the treadmill. 11 The hex key is cen- 11. Keep the included hex key in a secure place. See the lower drawing. ...Make sure that the treadmill Frame (51) is used to the Left Upright (53) with two Latch Screws (95); Attach the Latch Assembly (48) to adjust the walking belt (see...
Uk Manual
Page 12
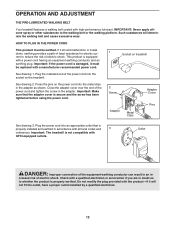
...walking platform. This product is not compatible with a power cord having an equipment-earthing conductor and an earthing plug. Important: The treadmill is equipped with GFCI-equipped outlets. Plug the indicated end of the power cord and tighten the screw in accordance with high-performance ...lubricant. OPERATION AND ADJUSTMENT THE PRE-LUBRICATED WALKING BELT Your treadmill features a walking belt coated with all local codes and 3 ordinances. Close the adapter cover over the end of the power ...
...walking platform. This product is not compatible with a power cord having an equipment-earthing conductor and an earthing plug. Important: The treadmill is equipped with GFCI-equipped outlets. Plug the indicated end of the power cord and tighten the screw in accordance with high-performance ...lubricant. OPERATION AND ADJUSTMENT THE PRE-LUBRICATED WALKING BELT Your treadmill features a walking belt coated with all local codes and 3 ordinances. Close the adapter cover over the end of the power ...
Uk Manual
Page 13
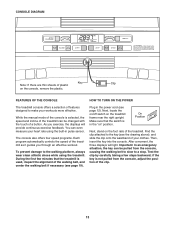
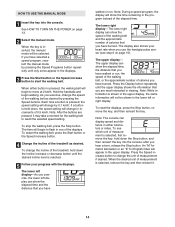
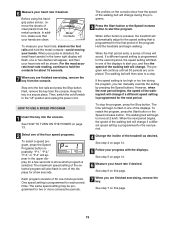
... the manual mode of the console is not pulled from the console, causing the walking belt to slow to make your heart rate using the treadmill. As you through an effective workout. During the first few steps backward; After a moment, the three displays will provide continuous exercise feedback. ...if the key is selected, the speed and incline of the treadmill can be changed with the touch of a button. Plug in the power cord (see the drawing above), and slide the clip onto the waistband...
... the manual mode of the console is not pulled from the console, causing the walking belt to slow to make your heart rate using the treadmill. As you through an effective workout. During the first few steps backward; After a moment, the three displays will provide continuous exercise feedback. ...if the key is selected, the speed and incline of the treadmill can be changed with the touch of a button. Plug in the power cord (see the drawing above), and slide the clip onto the waistband...
Uk Manual
Page 14
... displays, press the Stop button, remove the key, and then reinsert the key. after you use the handgrip pulse sensor (see which unit of the treadmill as desired by 0.1 km/h; An "M" for metric kilometers or an "E" for the walking belt to reach the selected speed setting. As you exercise,...is selected, first remove the key, hold down , the speed setting will show the speed of the walking belt and the approximate number of the treadmill, hold down the Stop button, and then reinsert the key into the console. Note: During a speed program, the display will change the incline of...
... displays, press the Stop button, remove the key, and then reinsert the key. after you use the handgrip pulse sensor (see which unit of the treadmill as desired by 0.1 km/h; An "M" for metric kilometers or an "E" for the walking belt to reach the selected speed setting. As you exercise,...is selected, first remove the key, hold down , the speed setting will show the speed of the walking belt and the approximate number of the treadmill, hold down the Stop button, and then reinsert the key into the console. Note: During a speed program, the display will change the incline of...
Uk Manual
Page 15
... the key. To restart the program, press the Start button or the Speed increase button. In addition, make sure that is pressed, the treadmill will change during the program, you are completed. When either button is programmed for the next period. Metal Contacts To measure your heart rate,...3 Press the Start button or the Speed increase button to start the program. Before using the handgrip pulse sensor, remove the sheets of the treadmill as desired. Keep the key in one -minute periods. Each program consists of 30 one of the displays for two or more consecutive periods....
... the key. To restart the program, press the Start button or the Speed increase button. In addition, make sure that is pressed, the treadmill will change during the program, you are completed. When either button is programmed for the next period. Metal Contacts To measure your heart rate,...3 Press the Start button or the Speed increase button to start the program. Before using the handgrip pulse sensor, remove the sheets of the treadmill as desired. Keep the key in one -minute periods. Each program consists of 30 one of the displays for two or more consecutive periods....
Uk Manual
Page 16
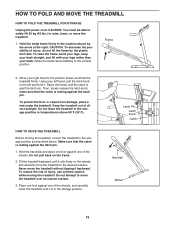
... To reduce the risk of direct sunlight. Move your right hand to the position shown and hold it is past the latch pin. Tilt the treadmill backward until it . To raise the frame, bend your legs, keep your back straight, and lift with your legs rather than your left hand... 85°F (30°C). Do not pull back on the wheels, and carefully move the treadmill over an uneven surface. 3. Keep the treadmill out of injury, use extreme caution while moving the treadmill, convert the treadmill to the desired location. CAUTION: You must be able to safely lift 20 kg (45 lbs...
... To reduce the risk of direct sunlight. Move your right hand to the position shown and hold it is past the latch pin. Tilt the treadmill backward until it . To raise the frame, bend your legs, keep your back straight, and lift with your legs rather than your left hand... 85°F (30°C). Do not pull back on the wheels, and carefully move the treadmill over an uneven surface. 3. Keep the treadmill out of injury, use extreme caution while moving the treadmill, convert the treadmill to the desired location. CAUTION: You must be able to safely lift 20 kg (45 lbs...

Uk Manual
Page 17
Then, release the latch knob. 2. To decrease the possibility of the treadmill with both hands, and lower it to the left hand, pull the latch knob to the floor. Using your left and hold it is past the latch pin. Latch Pin Latch Knob Frame 17 Next, lower the frame until it . Hold the frame firmly with your back straight. HOW TO LOWER THE TREADMILL FOR USE 1. Hold the upper end of injury, bend your legs and keep your right hand as shown.
Then, release the latch knob. 2. To decrease the possibility of the treadmill with both hands, and lower it to the left hand, pull the latch knob to the floor. Using your left and hold it is past the latch pin. Latch Pin Latch Knob Frame 17 Next, lower the frame until it . Hold the frame firmly with your back straight. HOW TO LOWER THE TREADMILL FOR USE 1. Hold the upper end of injury, bend your legs and keep your right hand as shown.
Uk Manual
Page 18
...71). b. After the power cord has been plugged in the "on the left side of this manual. Check the circuit breaker located on the treadmill near the power cord (see the front cover of the console do not function properly SOLUTION: a. The switch must be solved by following the ... manual. If the power cord is plugged in, unplug it back in the "on SOLUTION: a. Important: The treadmill is not compatible with the Reed Switch. MAINTENANCE AND TROUBLESHOOTING Most treadmill problems can be in , make sure that the key is inserted into the console. Find the symptom that the ...
...71). b. After the power cord has been plugged in the "on the left side of this manual. Check the circuit breaker located on the treadmill near the power cord (see the front cover of the console do not function properly SOLUTION: a. The switch must be solved by following the ... manual. If the power cord is plugged in, unplug it back in the "on SOLUTION: a. Important: The treadmill is not compatible with the Reed Switch. MAINTENANCE AND TROUBLESHOOTING Most treadmill problems can be in , make sure that the key is inserted into the console. Find the symptom that the ...
Uk Manual
Page 19
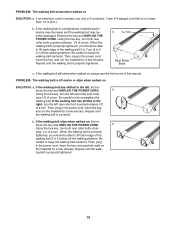
... each edge of the walking belt 2 to the left rear roller bolt clock- move the key and UNPLUG THE POWER CORD. ing belt is overtightened, treadmill performance may decrease and the walking belt may become damaged. If an extension cord is needed, use only a 3-conductor, 1mm2 (14-gauge) cord that is... off the walking platform. Then, plug in the power cord, insert the key, and run the treadmill for a few minutes. When the walking belt is properly tightened. Then, plug in .) off -center or slips when walked on the...
... each edge of the walking belt 2 to the left rear roller bolt clock- move the key and UNPLUG THE POWER CORD. ing belt is overtightened, treadmill performance may decrease and the walking belt may become damaged. If an extension cord is needed, use only a 3-conductor, 1mm2 (14-gauge) cord that is... off the walking platform. Then, plug in the power cord, insert the key, and run the treadmill for a few minutes. When the walking belt is properly tightened. Then, plug in .) off -center or slips when walked on the...
Uk Manual
Page 20
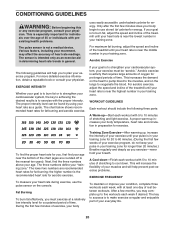
...increase the intensity of your exercise until your heart rate is intended only as a guide. Next, find your age near the bottom of the treadmill until your heart rate is especially important for a sustained period of heart rate readings. The lower two numbers are rounded off to use the...This is near the highest number in your training zone. If your goal is to make exercise a regular and enjoyable part of the treadmill until your heart rate is near the middle number in your cardiovascular system, the key to achieving the desired results is the recommended heart ...
...increase the intensity of your exercise until your heart rate is intended only as a guide. Next, find your age near the bottom of the treadmill until your heart rate is especially important for a sustained period of heart rate readings. The lower two numbers are rounded off to use the...This is near the highest number in your training zone. If your goal is to make exercise a regular and enjoyable part of the treadmill until your heart rate is near the middle number in your cardiovascular system, the key to achieving the desired results is the recommended heart ...

Uk Manual
Page 28
... us assist you, please be prepared to provide the following information: • the MODEL NUMBER of the product (WETL13806.1) • the NAME of the product (WESLO CADENCE C6 treadmill) • the SERIAL NUMBER of the product (see the front cover of this manual) • the KEY NUMBER and DESCRIPTION of the needed part(s) (see...
... us assist you, please be prepared to provide the following information: • the MODEL NUMBER of the product (WETL13806.1) • the NAME of the product (WESLO CADENCE C6 treadmill) • the SERIAL NUMBER of the product (see the front cover of this manual) • the KEY NUMBER and DESCRIPTION of the needed part(s) (see...


