
Uk Manual
Page 1
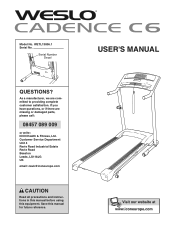
Customer Service Department Unit 4 Revie Road Industrial Estate Revie Road Beeston Leeds, LS118JG UK email: [email protected] CAUTION Read all precautions and instructions in this manual before using this manual for future reference. USER'S MANUAL Model No. As a manufacturer, we are missing or damaged parts, please call: 08457 089 009 or write: ICON Health & Fitness, Ltd. Serial Number Decal QUESTIONS? Save this equipment. If you have questions, or if there are committed to providing complete customer satisfaction. WETL13806.1 Serial No.
Customer Service Department Unit 4 Revie Road Industrial Estate Revie Road Beeston Leeds, LS118JG UK email: [email protected] CAUTION Read all precautions and instructions in this manual before using this manual for future reference. USER'S MANUAL Model No. As a manufacturer, we are missing or damaged parts, please call: 08457 089 009 or write: ICON Health & Fitness, Ltd. Serial Number Decal QUESTIONS? Save this equipment. If you have questions, or if there are committed to providing complete customer satisfaction. WETL13806.1 Serial No.
Uk Manual
Page 2
TABLE OF CONTENTS IMPORTANT PRECAUTIONS 3 BEFORE YOU BEGIN 5 ASSEMBLY 6 OPERATION AND ADJUSTMENT 12 HOW TO FOLD AND MOVE THE TREADMILL 16 MAINTENANCE AND TROUBLESHOOTING 18 CONDITIONING GUIDELINES 20 PART LIST 22 EXPLODED DRAWING 24 ORDERING REPLACEMENT PARTS Back Cover WESLO is a registered trademark of ICON IP, Inc. 2
TABLE OF CONTENTS IMPORTANT PRECAUTIONS 3 BEFORE YOU BEGIN 5 ASSEMBLY 6 OPERATION AND ADJUSTMENT 12 HOW TO FOLD AND MOVE THE TREADMILL 16 MAINTENANCE AND TROUBLESHOOTING 18 CONDITIONING GUIDELINES 20 PART LIST 22 EXPLODED DRAWING 24 ORDERING REPLACEMENT PARTS Back Cover WESLO is a registered trademark of ICON IP, Inc. 2
Uk Manual
Page 3
... key and unplug the power cord when the treadmill is fully closed. 20. Wear appropriate exercise clothes when using the treadmill. 15. never use . 9. When folding or moving the treadmill, make sure that the storage latch is not in use the treadmill with at a time. 12. Place the treadmill on the walking belt. Never move the treadmill. 19. Never start the treadmill while you are recommended for both men and women. The pulse sensor...
... key and unplug the power cord when the treadmill is fully closed. 20. Wear appropriate exercise clothes when using the treadmill. 15. never use . 9. When folding or moving the treadmill, make sure that the storage latch is not in use the treadmill with at a time. 12. Place the treadmill on the walking belt. Never move the treadmill. 19. Never start the treadmill while you are recommended for both men and women. The pulse sensor...
Uk Manual
Page 4
... motor hood unless instructed to do so by an authorized service representative only. 24. This treadmill is not shown at the right has been placed on the front cover of this treadmill in the location shown. ICON assumes no responsibility for personal injury or property damage sustained by or through the use this manual and order a free replacement decal. DANGER: 23. tenance and adjustment...
... motor hood unless instructed to do so by an authorized service representative only. 24. This treadmill is not shown at the right has been placed on the front cover of this treadmill in the location shown. ICON assumes no responsibility for personal injury or property damage sustained by or through the use this manual and order a free replacement decal. DANGER: 23. tenance and adjustment...
Uk Manual
Page 5
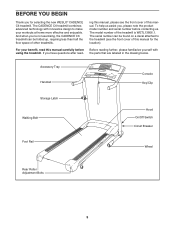
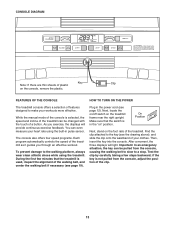
..., read - The CADENCE C6 treadmill combines advanced technology with the parts that are labeled in the drawing below. ing this manual, please see the front cover of this manual. If you have questions after read this manual for selecting the new WESLO® CADENCE C6 treadmill. Accessory Tray Handrail Console Key/Clip Storage Latch Walking Belt Hood On/Off Switch Circuit Breaker Foot Rail Wheel Rear Roller Adjustment Bolts 5 For your workouts at home more effective...
..., read - The CADENCE C6 treadmill combines advanced technology with the parts that are labeled in the drawing below. ing this manual, please see the front cover of this manual. If you have questions after read this manual for selecting the new WESLO® CADENCE C6 treadmill. Accessory Tray Handrail Console Key/Clip Storage Latch Walking Belt Hood On/Off Switch Circuit Breaker Foot Rail Wheel Rear Roller Adjustment Bolts 5 For your workouts at home more effective...
Uk Manual
Page 6
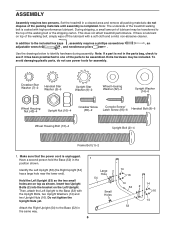
... 6 Upright Bolt (2)-4 Identify the Left Upright (53) (the Right Upright [54] has a large hole near the lower end). Do not tighten the Upright Nuts yet. do not use power tools for assembly. During shipping, a small amount of the treadmill walking belt is lubricant on top as shown. Have a second person hold the Base (52) in a cleared area and remove all packing materials; Then, attach the Left Upright...
... 6 Upright Bolt (2)-4 Identify the Left Upright (53) (the Right Upright [54] has a large hole near the lower end). Do not tighten the Upright Nuts yet. do not use power tools for assembly. During shipping, a small amount of the treadmill walking belt is lubricant on top as shown. Have a second person hold the Base (52) in a cleared area and remove all packing materials; Then, attach the Left Upright...

Uk Manual
Page 9
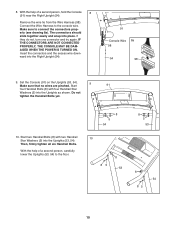
... the hole near the Console. Tighten the Crossbar Screw and then tighten the two Console Screws; Using needlenose pliers, pull the console wire out of the Right Handrail (33). Next, insert the console wire into the Right Handrail. Start a Crossbar Screw (85) with a Crossbar Star Washer (7) into the Right Handrail, and then start two Console Screws (95) into the hole in the location shown, near the bracket...
... the hole near the Console. Tighten the Crossbar Screw and then tighten the two Console Screws; Using needlenose pliers, pull the console wire out of the Right Handrail (33). Next, insert the console wire into the Right Handrail. Start a Crossbar Screw (85) with a Crossbar Star Washer (7) into the Right Handrail, and then start two Console Screws (95) into the hole in the location shown, near the bracket...
Uk Manual
Page 10
Connect the Wire Harness to connect the connectors properly (see drawing 8a). Start 91 four Handrail Bolts (8) with two Handrail Star Washers (5) into the Uprights as shown. Then, firmly tighten all six Handrail Bolts. Remove the wire tie from the Wire Harness (98). 8. IF THE CONNECTORS ARE NOT CONNECTED PROPERLY, THE CONSOLE MAY BE DAMAGED WHEN THE POWER IS TURNED ON. Set the Console (91) on the Uprights (53...
Connect the Wire Harness to connect the connectors properly (see drawing 8a). Start 91 four Handrail Bolts (8) with two Handrail Star Washers (5) into the Uprights as shown. Then, firmly tighten all six Handrail Bolts. Remove the wire tie from the Wire Harness (98). 8. IF THE CONNECTORS ARE NOT CONNECTED PROPERLY, THE CONSOLE MAY BE DAMAGED WHEN THE POWER IS TURNED ON. Set the Console (91) on the Uprights (53...
Uk Manual
Page 11
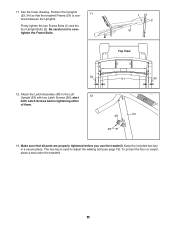
... treadmill Frame (51) is used to adjust the walking belt (see page 19). Firmly tighten the two Frame Bolts (1) and the four Upright Bolts (2). Be careful not to the Left Upright (53) with two Latch Screws (95); Keep the included hex key in a secure place. See the lower drawing. The hex key is cen- Position the Uprights 11 (53, 54) so that all parts are properly tightened before tightening...
... treadmill Frame (51) is used to adjust the walking belt (see page 19). Firmly tighten the two Frame Bolts (1) and the four Upright Bolts (2). Be careful not to the Left Upright (53) with two Latch Screws (95); Keep the included hex key in a secure place. See the lower drawing. The hex key is cen- Position the Uprights 11 (53, 54) so that all parts are properly tightened before tightening...
Uk Manual
Page 12
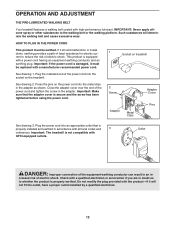
... high-performance lubricant. Outlet IT GR DANGER: Improper connection of least resistance for electric cur- 1 rent to the walking belt or the walking platform. Such substances will FR/SP not fit the outlet, have a proper outlet installed by a qualified electrician. 12 HOW TO PLUG IN THE POWER CORD This product must be earthed. Socket on the treadmill. See drawing 2. Close the adapter cover over...
... high-performance lubricant. Outlet IT GR DANGER: Improper connection of least resistance for electric cur- 1 rent to the walking belt or the walking platform. Such substances will FR/SP not fit the outlet, have a proper outlet installed by a qualified electrician. 12 HOW TO PLUG IN THE POWER CORD This product must be earthed. Socket on the treadmill. See drawing 2. Close the adapter cover over...
Uk Manual
Page 13
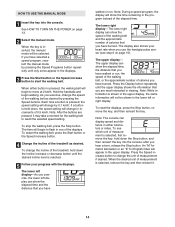
... a button. Plug in the power cord (see page 19). Make sure that the treadmill is selected, the speed and incline of the treadmill can even measure your workouts more effective. On Position Next, stand on the console, remove the plastic. While the manual mode of the console is used, inspect the alignment of the treadmill as it guides you exercise, the displays will light. The console also offers four speed programs. Each program...
... a button. Plug in the power cord (see page 19). Make sure that the treadmill is selected, the speed and incline of the treadmill can even measure your workouts more effective. On Position Next, stand on the console, remove the plastic. While the manual mode of the console is used, inspect the alignment of the treadmill as it guides you exercise, the displays will light. The console also offers four speed programs. Each program...
Uk Manual
Page 14
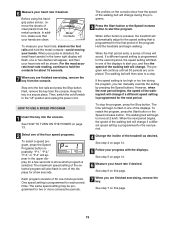
... reach the selected speed setting. To restart the walking belt, press the Start button or the Speed increase button. 4 Change the incline of the treadmill as desired by pressing the Speed Programs button repeatedly until the upper display shows the information that you have burned. The upper display can display speed and distance in one of measurement is pressed, the walking belt will show the elapsed time, the distance that you use the handgrip pulse sensor (see which unit...
... reach the selected speed setting. To restart the walking belt, press the Start button or the Speed increase button. 4 Change the incline of the treadmill as desired by pressing the Speed Programs button repeatedly until the upper display shows the information that you have burned. The upper display can display speed and distance in one of measurement is pressed, the walking belt will show the elapsed time, the distance that you use the handgrip pulse sensor (see which unit...
Uk Manual
Page 15
... and unplug the power cord. Next, remove the key from the metal contacts. The walking belt will then slow to flash in one -minute periods. The walking belt will flash, one of the walking belt will begin to a stop the program, press the Stop button. See step 5 on the console show which program is pressed, the treadmill will automatically adjust to alert you can manually override the setting by pressing the Speed buttons. When your hands...
... and unplug the power cord. Next, remove the key from the metal contacts. The walking belt will then slow to flash in one -minute periods. The walking belt will flash, one of the walking belt will begin to a stop the program, press the Stop button. See step 5 on the console show which program is pressed, the treadmill will automatically adjust to alert you can manually override the setting by pressing the Speed buttons. When your hands...
Uk Manual
Page 16
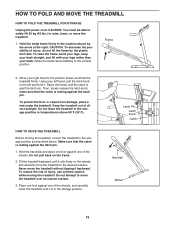
... place one of the wheels, and carefully lower the treadmill until the catch is in temperatures above . Latch Pin Latch Knob Catch Handrail Wheel 16 make sure that the catch is resting against one foot against the latch pin. 1. Never move the treadmill. 1. HOW TO FOLD AND MOVE THE TREADMILL HOW TO FOLD THE TREADMILL FOR STORAGE Unplug the power cord. CAUTION: You must be able to safely...
... place one of the wheels, and carefully lower the treadmill until the catch is in temperatures above . Latch Pin Latch Knob Catch Handrail Wheel 16 make sure that the catch is resting against one foot against the latch pin. 1. Never move the treadmill. 1. HOW TO FOLD AND MOVE THE TREADMILL HOW TO FOLD THE TREADMILL FOR STORAGE Unplug the power cord. CAUTION: You must be able to safely...
Uk Manual
Page 18
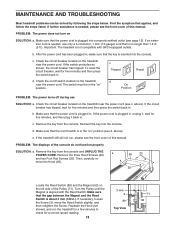
...: a. Make sure that the key is needed , use SOLUTION: a. PROBLEM: The displays of the Pulley (71). Check the circuit breaker located on the treadmill near the power cord (see the front cover of this manual. Check the on/off switch is plugged into a properly earthed outlet (see page 12). above ). Remove the three Hood Screws (20) and two Foot Rail Screws (25). Turn the Pulley until the Magnet is no...
...: a. Make sure that the key is needed , use SOLUTION: a. PROBLEM: The displays of the Pulley (71). Check the circuit breaker located on the treadmill near the power cord (see the front cover of this manual. Check the on/off switch is plugged into a properly earthed outlet (see page 12). above ). Remove the three Hood Screws (20) and two Foot Rail Screws (25). Turn the Pulley until the Magnet is no...
Uk Manual
Page 19
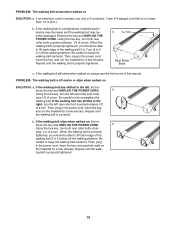
... rear roller bolts clock- PROBLEM: The walking belt is correctly tightened, you should be able to lift each edge of a turn . Then, plug in the power cord, insert the key, and run the treadmill for a few minutes. If the walking belt slips when walked on SOLUTION: a. Remove the key and UNPLUG THE POWER CORD. wise 1/2 of the walking belt 2 to lift each edge of a turn . b. b Using the hex key, turn . When the walking belt is off the walking platform. b 5-7cm Rear Roller Bolts c. move...
... rear roller bolts clock- PROBLEM: The walking belt is correctly tightened, you should be able to lift each edge of a turn . Then, plug in the power cord, insert the key, and run the treadmill for a few minutes. If the walking belt slips when walked on SOLUTION: a. Remove the key and UNPLUG THE POWER CORD. wise 1/2 of the walking belt 2 to lift each edge of a turn . b. b Using the hex key, turn . When the walking belt is off the walking platform. b 5-7cm Rear Roller Bolts c. move...
Uk Manual
Page 20
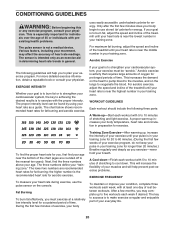
... this or any exercise program, consult your "training zone." For maximum fat burning, adjust the speed and incline of the treadmill until your pulse is to burn fat or to cool down. The proper intensity level can be "aerobic." The lower two numbers are rounded off to plan your age. The chart below shows recommended heart rates for fat burning; The pulse sensor is near...
... this or any exercise program, consult your "training zone." For maximum fat burning, adjust the speed and incline of the treadmill until your pulse is to burn fat or to cool down. The proper intensity level can be "aerobic." The lower two numbers are rounded off to plan your age. The chart below shows recommended heart rates for fat burning; The pulse sensor is near...

Uk Manual
Page 22
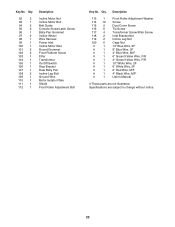
...1 Front Roller/Pulley 72 1 Incline Leg 73 1 Access Door 74 2 Frame Endcap 75 4 Handrail Endcap 76 1 Walking Belt 77 2 Front Isolator 78 2 Platform Cushion 79 1 Drive Motor 80 2 Wire Tie 81 9 8" Tie 82 2 U-Nut 83 1 Reed Switch Clip 84 1 Console Ground Wire 85 2 Crossbar Screw 86 1 Walking Platform 87 1 Controller 88 1 Console Crossbar 89 1 Reed Switch 90 1 Power Cord 91 1 Console 22 Qty. Description Key No. Key No. Qty. PART LIST-Model No. Description 1 2 Frame Bolt 2 4 Upright Bolt 3 2 Wire Tie Screw/Reed Switch Screw...
...1 Front Roller/Pulley 72 1 Incline Leg 73 1 Access Door 74 2 Frame Endcap 75 4 Handrail Endcap 76 1 Walking Belt 77 2 Front Isolator 78 2 Platform Cushion 79 1 Drive Motor 80 2 Wire Tie 81 9 8" Tie 82 2 U-Nut 83 1 Reed Switch Clip 84 1 Console Ground Wire 85 2 Crossbar Screw 86 1 Walking Platform 87 1 Controller 88 1 Console Crossbar 89 1 Reed Switch 90 1 Power Cord 91 1 Console 22 Qty. Description Key No. Key No. Qty. PART LIST-Model No. Description 1 2 Frame Bolt 2 4 Upright Bolt 3 2 Wire Tie Screw/Reed Switch Screw...
Uk Manual
Page 23
... change without notice. 23 Key No. Qty. 92 2 93 1 94 2 95 6 96 1 97 2 98 1 99 1 100 1 101 2 102 2 103 1 104 1 105 1 106 1 107 1 108 2 109 1 110 1 111 1 112 1 Description Incline Motor Nut Incline Motor Bolt Belt Guide Console Screw/Latch Screw Belly Pan Grommet Incline Wheel Wire Harness Power Inlet Incline Motor Wire Round Grommet Front Platform Screw Filter Transformer On/Off Switch Stop Bracket Rear Belly Pan Incline Leg Bolt Ground Wire Motor Isolator Plate Shield Front Roller Adjustment Bolt Key...
... change without notice. 23 Key No. Qty. 92 2 93 1 94 2 95 6 96 1 97 2 98 1 99 1 100 1 101 2 102 2 103 1 104 1 105 1 106 1 107 1 108 2 109 1 110 1 111 1 112 1 Description Incline Motor Nut Incline Motor Bolt Belt Guide Console Screw/Latch Screw Belly Pan Grommet Incline Wheel Wire Harness Power Inlet Incline Motor Wire Round Grommet Front Platform Screw Filter Transformer On/Off Switch Stop Bracket Rear Belly Pan Incline Leg Bolt Ground Wire Motor Isolator Plate Shield Front Roller Adjustment Bolt Key...
Uk Manual
Page 28
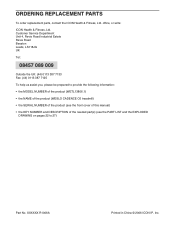
... R1006A Printed in China © 2006 ICON IP, Inc. ORDERING REPLACEMENT PARTS To order replacement parts, contact the ICON Health & Fitness, Ltd. Customer Service Department Unit 4, Revie Road Industrial Estate Revie...information: • the MODEL NUMBER of the product (WETL13806.1) • the NAME of the product (WESLO CADENCE C6 treadmill) • the SERIAL NUMBER of the product (see the front cover of this manual) • the KEY NUMBER and DESCRIPTION of the needed part(s) (see the PART LIST and the EXPLODED DRAWING on pages 22 to 27) Part No. office, or write: ICON Health & Fitness...
... R1006A Printed in China © 2006 ICON IP, Inc. ORDERING REPLACEMENT PARTS To order replacement parts, contact the ICON Health & Fitness, Ltd. Customer Service Department Unit 4, Revie Road Industrial Estate Revie...information: • the MODEL NUMBER of the product (WETL13806.1) • the NAME of the product (WESLO CADENCE C6 treadmill) • the SERIAL NUMBER of the product (see the front cover of this manual) • the KEY NUMBER and DESCRIPTION of the needed part(s) (see the PART LIST and the EXPLODED DRAWING on pages 22 to 27) Part No. office, or write: ICON Health & Fitness...


