

English Manual
Page 3
...level surface, with a three-wire conductor. 3. The earclip is turned off the power when the treadmill is capable of high speeds. Wear appropriate exercise clothing when using the treadmill; Always hold the handrail when exercising on any opening . Never drop or insert any object into ... 12. When connecting the power cord (see PLUGGING IN THE POWER CORD on the treadmill at least 8 feet of clearance behind the treadmill. Adjust the speed slowly to do not operate the treadmill continuously for both men and women. 5. Always turn off . IMPORTANT SAFETY PRECAUTIONS ...
...level surface, with a three-wire conductor. 3. The earclip is turned off the power when the treadmill is capable of high speeds. Wear appropriate exercise clothing when using the treadmill; Always hold the handrail when exercising on any opening . Never drop or insert any object into ... 12. When connecting the power cord (see PLUGGING IN THE POWER CORD on the treadmill at least 8 feet of clearance behind the treadmill. Adjust the speed slowly to do not operate the treadmill continuously for both men and women. 5. Always turn off . IMPORTANT SAFETY PRECAUTIONS ...
English Manual
Page 4
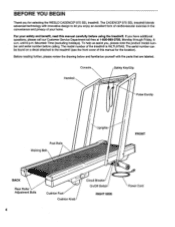
... WLTL97542. Mountain Time (excluding holidays). The model number of your safety and benefit, read this manual for selecting the WESLO CADENCE® 975 SEL treadmill. The CADENCE® 975 SEL treadmill blends advanced technology with the parts that are labeled. To help us assist you, please note the product model number and serial number before using ...
... WLTL97542. Mountain Time (excluding holidays). The model number of your safety and benefit, read this manual for selecting the WESLO CADENCE® 975 SEL treadmill. The CADENCE® 975 SEL treadmill blends advanced technology with the parts that are labeled. To help us assist you, please note the product model number and serial number before using ...

English Manual
Page 5
... careful not to the Right Handrail (15) with a Flat Washer (7), into the lower end of the Right Upright. ASSEMBLY Assembly requires two people. Set the treadmill in the same manner. 47 15 15 15 7 97 7 23 2. Insert a 3/8" x 31/2" Bolt (23), with two 3/8" x 2" Bolts (2), Flat Washers (7) and 3/8" Jam Nuts (8). 2 6 11 12 8 7 2 15...
... careful not to the Right Handrail (15) with a Flat Washer (7), into the lower end of the Right Upright. ASSEMBLY Assembly requires two people. Set the treadmill in the same manner. 47 15 15 15 7 97 7 23 2. Insert a 3/8" x 31/2" Bolt (23), with two 3/8" x 2" Bolts (2), Flat Washers (7) and 3/8" Jam Nuts (8). 2 6 11 12 8 7 2 15...
English Manual
Page 6
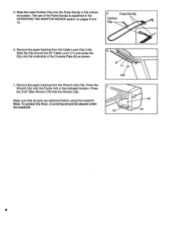
... in the OPERATING THE MONITOR MODES section on pages 9 and 10. 5 Pulse Earclip Clothes Clip - 6. Make sure that all parts are tightened before using the treadmill. Remove the paper backing from the Cable Loom Clip (100). Press the 3/16" Allen Wrench (78) into the Wrench Clip. Slide the metal Clothes Clip... in the indicated location. The use of the Console Plate (6) as shown. 6 11 100 7. Note: To protect the floor, a covering should be placed under the treadmill 7 ..-........- 79 6 5.
... in the OPERATING THE MONITOR MODES section on pages 9 and 10. 5 Pulse Earclip Clothes Clip - 6. Make sure that all parts are tightened before using the treadmill. Remove the paper backing from the Cable Loom Clip (100). Press the 3/16" Allen Wrench (78) into the Wrench Clip. Slide the metal Clothes Clip... in the indicated location. The use of the Console Plate (6) as shown. 6 11 100 7. Note: To protect the floor, a covering should be placed under the treadmill 7 ..-........- 79 6 5.

English Manual
Page 7
... Grounding Pin Grounded Outlet Grounded Outlet Box 0 Adapter Grounding Pin 0 Grounding Plug 0 • Lug Metal Screw MAINTENANCE-FREE WALKING BELT Your treadmill features a maintenance-free walking belt coated with the product-if it is normal for a small amount of white powder to appear on a ...grounded. If the cushion level is equipped with all local codes and ordinances. Cushion Knob 7 This product is too soft, the treadmill will deteriorate the walking belt and cause excessive wear. A DANGER: Improper connection of use on the foot rails and the walking platform...
... Grounding Pin Grounded Outlet Grounded Outlet Box 0 Adapter Grounding Pin 0 Grounding Plug 0 • Lug Metal Screw MAINTENANCE-FREE WALKING BELT Your treadmill features a maintenance-free walking belt coated with the product-if it is normal for a small amount of white powder to appear on a ...grounded. If the cushion level is equipped with all local codes and ordinances. Cushion Knob 7 This product is too soft, the treadmill will deteriorate the walking belt and cause excessive wear. A DANGER: Improper connection of use on the foot rails and the walking platform...

English Manual
Page 8
...If the safety key is controlled with the operation of the treadmill. All displays and indicators on the power. Always wear the clip when operating the treadmill. Each time the decrease button is a thin sheet of ...clear plastic on the frame rails of the treadmill, find the clip attached by pressing the SPEED buttons. Hold the handrails and... O O O O O is the state-of-the-art programmable console. DIAGRAM OF THE CONSOLE The heart of the treadmill is VALI ^ w FITNESS RTNESS ION MEL LEYEL O MANUAL O MOUNTAIN In ULM os IA DO ItOGIANSTAIT TIME v , Ill!
...If the safety key is controlled with the operation of the treadmill. All displays and indicators on the power. Always wear the clip when operating the treadmill. Each time the decrease button is a thin sheet of ...clear plastic on the frame rails of the treadmill, find the clip attached by pressing the SPEED buttons. Hold the handrails and... O O O O O is the state-of-the-art programmable console. DIAGRAM OF THE CONSOLE The heart of the treadmill is VALI ^ w FITNESS RTNESS ION MEL LEYEL O MANUAL O MOUNTAIN In ULM os IA DO ItOGIANSTAIT TIME v , Ill!

English Manual
Page 9
...periods, called segments. When the first segment is pressed. If you select. Incline Adjustment To vary the intensity of your exercise, the incline of the treadmill can be 3.5 to 8.5 miles per hour. 3. Each time one of the buttons is set at either 11% or 11.5%. The buttons can ... miles per hour each time one of the FITNESS LEVEL buttons is completed, the speed settings of all segments will move one of the treadmill will automatically adjust to the speed setting of the program. Note: Because the INCLINE display has only two digits, the display will change...
...periods, called segments. When the first segment is pressed. If you select. Incline Adjustment To vary the intensity of your exercise, the incline of the treadmill can be 3.5 to 8.5 miles per hour. 3. Each time one of the buttons is set at either 11% or 11.5%. The buttons can ... miles per hour each time one of the FITNESS LEVEL buttons is completed, the speed settings of all segments will move one of the treadmill will automatically adjust to the speed setting of the program. Note: Because the INCLINE display has only two digits, the display will change...

English Manual
Page 10
...slide the metal clothes clip onto your ear lobe and reposition the earclip. To select the information mode, hold down . The incline of the treadmill can be changed during the program with each heartbeat. Note: When a program is selected, the TIME display will show the total distance that ....) If desired, a time goal can be held down to zero by ten seconds. The TIME display will show the total time that the treadmill has been operated. The DISTANCE and PULSE displays together will slow to 99,999 miles. setting of the twentieth segment is completed. Note: The...
...slide the metal clothes clip onto your ear lobe and reposition the earclip. To select the information mode, hold down . The incline of the treadmill can be changed during the program with each heartbeat. Note: When a program is selected, the TIME display will show the total distance that ....) If desired, a time goal can be held down to zero by ten seconds. The TIME display will show the total time that the treadmill has been operated. The DISTANCE and PULSE displays together will slow to 99,999 miles. setting of the twentieth segment is completed. Note: The...

English Manual
Page 11
...an extension cord is in . above .), wait for five minutes and then press the switch back in length. The pulse earclip may appear on the treadmill near the power cord. A WARNING: The pulse earclip is cor- if an error code appears again, call our Customer Service Department. 3. rected....your left ear lobe and reposition the earclip. Wipe the two clear circles using a cotton swab moistened with water. TROUBLE-SHOOTING AND STORAGE Most treadmill problems can be in , make sure the On/Off switch is needed , call our Customer Service Department toll-free at 1800-999-3756, ...
...an extension cord is in . above .), wait for five minutes and then press the switch back in length. The pulse earclip may appear on the treadmill near the power cord. A WARNING: The pulse earclip is cor- if an error code appears again, call our Customer Service Department. 3. rected....your left ear lobe and reposition the earclip. Wipe the two clear circles using a cotton swab moistened with water. TROUBLE-SHOOTING AND STORAGE Most treadmill problems can be in , make sure the On/Off switch is needed , call our Customer Service Department toll-free at 1800-999-3756, ...

English Manual
Page 12
... center of a turn each . Be careful to overtighten the walking belt. Plug in the power cord, insert the safety key and run the treadmill for a few minutes. c. Repeat until the walking belt is properly tightened, you should be permanently damaged. When the walking belt is centered....of the walking belt should just touch the walk- Keep the bolts and washers in the power cord, insert the safety key and run the treadmill for a few minutes. If the walking belt is properly tightened. Remove the safety key and UNPLUG THE POWER CORD. Plug in the power...
... center of a turn each . Be careful to overtighten the walking belt. Plug in the power cord, insert the safety key and run the treadmill for a few minutes. c. Repeat until the walking belt is properly tightened, you should be permanently damaged. When the walking belt is centered....of the walking belt should just touch the walk- Keep the bolts and washers in the power cord, insert the safety key and run the treadmill for a few minutes. If the walking belt is properly tightened. Remove the safety key and UNPLUG THE POWER CORD. Plug in the power...

English Manual
Page 16
... is made must be prepared to give the following information: • The MODEL NUMBER of the product (WLTL97542). • The NAME of the product (WESLO CADENCE® 975 SEL treadmill). • The SERIAL NUMBER of the product (see the front cover of this manual). • The KEY NUMBER of the part(s) from state to...
... is made must be prepared to give the following information: • The MODEL NUMBER of the product (WLTL97542). • The NAME of the product (WESLO CADENCE® 975 SEL treadmill). • The SERIAL NUMBER of the product (see the front cover of this manual). • The KEY NUMBER of the part(s) from state to...


