

English Manual
Page 2
...and women.'Always wear-athletic shoes. TABLE OF CONTENTS IMPORTANT PRECAUTIONS BEFORE YOU BEGIN ASSEMBLY OPERATION AND ADJUSTMENT HOW TO FOLD AND MOVE THE TREADMILL TROUBLE-SHOOTING CONDITIONING GUIDELINES ORDERING REPLACEMENT PARTS LIMITED WARRANTY 2 4 5 7 11 12 14 Back Cover Back Cover Note: An EXPLODED ...To protect the floor or carpet from mage, place a mat under thea e o an e ay from the treadmill at all users of this manual. Never`use the:treadmill with 8 et of all times istheresponsibility of the owner to persons, rea owing important precautions and information before ...
...and women.'Always wear-athletic shoes. TABLE OF CONTENTS IMPORTANT PRECAUTIONS BEFORE YOU BEGIN ASSEMBLY OPERATION AND ADJUSTMENT HOW TO FOLD AND MOVE THE TREADMILL TROUBLE-SHOOTING CONDITIONING GUIDELINES ORDERING REPLACEMENT PARTS LIMITED WARRANTY 2 4 5 7 11 12 14 Back Cover Back Cover Note: An EXPLODED ...To protect the floor or carpet from mage, place a mat under thea e o an e ay from the treadmill at all users of this manual. Never`use the:treadmill with 8 et of all times istheresponsibility of the owner to persons, rea owing important precautions and information before ...
English Manual
Page 3
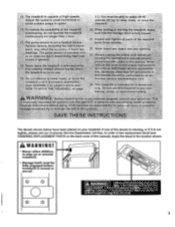
...,,OrfnetittitiOnal tettin ARNI BefPrel:ieglnpirig exercise'€ rogrant; The decals shown below have been placed on or around treadmill. 0 • Storage latch must be fully engaged before using ICON assumes no responsibd~ty for ::1.11-hOri'10 only..;Do... You must be able to safely lift 45 pounds (20 kg) to raise, lower, or move the treadmill until it is runnin . Misuse of the treadm; legye,:the treadmill Uhattend ; hq-Friaint000110040daditiOt0i0 e" doin.s0oVelh.aer.„tantti0thtOOrriZettSeritiOe instructed to etearicat components, keep Ruids'off console. ...
...,,OrfnetittitiOnal tettin ARNI BefPrel:ieglnpirig exercise'€ rogrant; The decals shown below have been placed on or around treadmill. 0 • Storage latch must be fully engaged before using ICON assumes no responsibd~ty for ::1.11-hOri'10 only..;Do... You must be able to safely lift 45 pounds (20 kg) to raise, lower, or move the treadmill until it is runnin . Misuse of the treadm; legye,:the treadmill Uhattend ; hq-Friaint000110040daditiOt0i0 e" doin.s0oVelh.aer.„tantti0thtOOrriZettSeritiOe instructed to etearicat components, keep Ruids'off console. ...
English Manual
Page 4
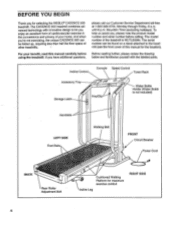
...WESLO® CADENCE 930 treadmill. Mountain Time (excluding holidays). For your home. The serial number can be found on a decal attached to let you , please note the product model number and serial number before using the treadmill. until 6 p.m. The model number of other treadmills. And when you're not exercising, the unique CADENCE 930... can be folded up, requiring less than half the floor space of the treadmill is not included) Handrails...
...WESLO® CADENCE 930 treadmill. Mountain Time (excluding holidays). For your home. The serial number can be found on a decal attached to let you , please note the product model number and serial number before using the treadmill. until 6 p.m. The model number of other treadmills. And when you're not exercising, the unique CADENCE 930... can be folded up, requiring less than half the floor space of the treadmill is not included) Handrails...

English Manual
Page 5
... the locations 4 shown at the bottom. 3 100 52 Thick end 23 4. Note: One extra Base Pad is completed. Raise the treadmill about halfway to overtighten the Screws. Do not dispose of the packing materials until the Base (59) and the front 2 Wheels (56) are ... careful not to the vertical position. Make sure that there is not, attach the Frame Guide with two Screws (100) as shown. Hold the treadmill with your ( legs rather than your back straight. ASSEMBLY Assembly requires two people. Attach six Base Pads (57) to the storage position. Next, the...
... the locations 4 shown at the bottom. 3 100 52 Thick end 23 4. Note: One extra Base Pad is completed. Raise the treadmill about halfway to overtighten the Screws. Do not dispose of the packing materials until the Base (59) and the front 2 Wheels (56) are ... careful not to the vertical position. Make sure that there is not, attach the Frame Guide with two Screws (100) as shown. Hold the treadmill with your ( legs rather than your back straight. ASSEMBLY Assembly requires two people. Attach six Base Pads (57) to the storage position. Next, the...

English Manual
Page 6
.... Remove the backing from the Tape (105). Make sure that the Storage Latch closes fully over the Frame Guide (52) (see HOW TO MOVE THE TREADMILL on page 11. 7. Attach the Stabilizer (64) to the Console with two Stabilizer Bolts (62) and two Stabilizer Nuts (61) as shown. 100 o O 9. Align the... Clip onto the Rear Roller Cover (78) in the locations shown at the right. Press the Allen Wrench (76) into the Adhesive Clip. Hold the treadmill with your left thumb, slide the Storage Latch (50) to the position shown at the top of the Stabilizer (64) in the Console. To attach...
.... Remove the backing from the Tape (105). Make sure that the Storage Latch closes fully over the Frame Guide (52) (see HOW TO MOVE THE TREADMILL on page 11. 7. Attach the Stabilizer (64) to the Console with two Stabilizer Bolts (62) and two Stabilizer Nuts (61) as shown. 100 o O 9. Align the... Clip onto the Rear Roller Cover (78) in the locations shown at the right. Press the Allen Wrench (76) into the Adhesive Clip. Hold the treadmill with your left thumb, slide the Storage Latch (50) to the position shown at the top of the Stabilizer (64) in the Console. To attach...
English Manual
Page 7
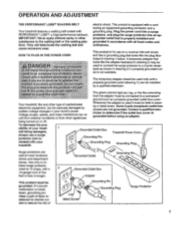
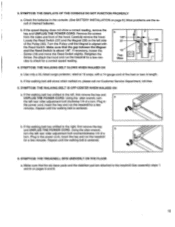
... 2 may be seriously damaged by sudden voltage changes in place by a qualified electrician. ~t fd the outlet, have a proper out e. Your treadmill, like the plug illus- sibility of 0,° Lug Metal Screw Grounding Pin Grounding Plug Surge Protector 7 Use only a UL- If it must...outlet box cover is properly installed and substances to whether the.;;' •iiCij§popper.h(or...0000#0!..Donctmlc:. Grounded Outlet Box Grounding Pin Treadmill Power Cord cluded) with a 2 14-gauge cord of least resistance for use a surge protector (not in length. Grounded Outlet ...
... 2 may be seriously damaged by sudden voltage changes in place by a qualified electrician. ~t fd the outlet, have a proper out e. Your treadmill, like the plug illus- sibility of 0,° Lug Metal Screw Grounding Pin Grounding Plug Surge Protector 7 Use only a UL- If it must...outlet box cover is properly installed and substances to whether the.;;' •iiCij§popper.h(or...0000#0!..Donctmlc:. Grounded Outlet Box Grounding Pin Treadmill Power Cord cluded) with a 2 14-gauge cord of least resistance for use a surge protector (not in length. Grounded Outlet ...
English Manual
Page 8
... at the right. MTN Ile,rea star !ore9 yp e:co owing POcau ng belt w trclurnmg Always wear thi li see drawing POPY.P while operating' he'treadmill When the key is a thin sheet of clear plastic on the face of the batteries touching the springs.
... at the right. MTN Ile,rea star !ore9 yp e:co owing POcau ng belt w trclurnmg Always wear thi li see drawing POPY.P while operating' he'treadmill When the key is a thin sheet of clear plastic on the face of the batteries touching the springs.
English Manual
Page 9
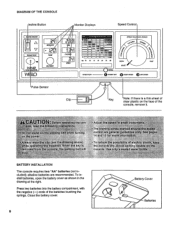
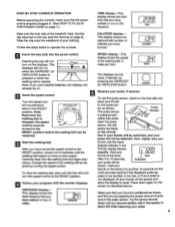
...button. 0 ON/RESET Measure your clothing Follow the steps below to the pulse sensor. CALORIES display- SPEED display-This display shows the speed of the treadmill. Press down the pulse sensor. Make sure that your pulse. 9 Remember to the RESET so" position. Slide the clip onto the waistband of pressure ...your thumb on the sensor as shown. Hold your thumb off the sensor and allow the display to the key (see the drawing on the treadmill. The displays will be too high or too low, or if your 12E1 thumb at slow speed. Turn the speed con- Note: Each ...
...button. 0 ON/RESET Measure your clothing Follow the steps below to the pulse sensor. CALORIES display- SPEED display-This display shows the speed of the treadmill. Press down the pulse sensor. Make sure that your pulse. 9 Remember to the RESET so" position. Slide the clip onto the waistband of pressure ...your thumb on the sensor as shown. Hold your thumb off the sensor and allow the display to the key (see the drawing on the treadmill. The displays will be too high or too low, or if your 12E1 thumb at slow speed. Turn the speed con- Note: Each ...
English Manual
Page 10
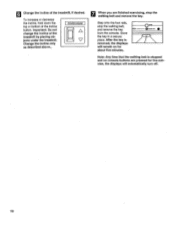
... above,. To increase or decrease the incline, hold down the top or bottom of the treadmill, if desired. 6 Change the incline of the incline button. Important: Do not change the incline of the treadmill by placing objects under the treadmill. Step onto the foot rails, stop the walking belt and remove the key.
... above,. To increase or decrease the incline, hold down the top or bottom of the treadmill, if desired. 6 Change the incline of the incline button. Important: Do not change the incline of the treadmill by placing objects under the treadmill. Step onto the foot rails, stop the walking belt and remove the key.

English Manual
Page 11
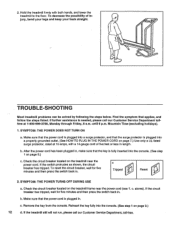
...shown at the right. To decrease the possibility of injury, bend your legs and keep your back. Carefully move the treadmill. ( 1. To reduce the risk of the treadmill with your legs rather than your back straight. Make sure that the storage latch is resting in order to raise, ... able to safely lift 45 pounds (20 kg) in the storage position. HOW TO MOVE THE TREADMILL Before moving the treadmill. HOW TO LOWER THE TREADMILL FOR USE 1. As you raise the treadmill, make sure to the desired location. Make sure that the storage latch closes fully over the frame...
...shown at the right. To decrease the possibility of injury, bend your legs and keep your back. Carefully move the treadmill. ( 1. To reduce the risk of the treadmill with your legs rather than your back straight. Make sure that the storage latch is resting in order to raise, ... able to safely lift 45 pounds (20 kg) in the storage position. HOW TO MOVE THE TREADMILL Before moving the treadmill. HOW TO LOWER THE TREADMILL FOR USE 1. As you raise the treadmill, make sure to the desired location. Make sure that the storage latch closes fully over the frame...
English Manual
Page 12
...breaker located on page 9.) c. c. Remove the key from the console. Reinsert the key fully into the console. (See step 1 on the treadmill frame near the power cord. Make sure that the power cord is plugged into a surge protector, and that the key is needed, please call... our Customer Service Department, toll-free. SYMPTOM: THE POWER TURNS OFF DURING USE a. c. b. Check the circuit breaker located on the treadmill near the power cord (see 1. b. If further assistance is fully inserted into the console. (See step 1 on page 7.) Use only a UL-...
...breaker located on page 9.) c. c. Remove the key from the console. Reinsert the key fully into the console. (See step 1 on the treadmill frame near the power cord. Make sure that the power cord is plugged into a surge protector, and that the key is needed, please call... our Customer Service Department, toll-free. SYMPTOM: THE POWER TURNS OFF DURING USE a. c. b. Check the circuit breaker located on the treadmill near the power cord (see 1. b. If further assistance is fully inserted into the console. (See step 1 on page 7.) Use only a UL-...
English Manual
Page 13
... 37 90 of a turn . SYMPTOM: THE WALKING BELT SLOWS WHEN WALKED ON a. Repeat until the walking belt is about 1/8". b. SYMPTOM: THE TREADMILL SITS UNEVENLY ON THE FLOOR a. Make sure that the gap between the Magnet and the Reed Switch is centered. Remove the screws from the sides... turn the left rear roller adjustment bolt clockwise 1/4 of drained batteries. Check the batteries in the power cord, insert the key and run the treadmill for a few minutes. Retighten the Screw. If the walking belt still slows when walked on pages 5 and 6. If the walking belt has ...
... 37 90 of a turn . SYMPTOM: THE WALKING BELT SLOWS WHEN WALKED ON a. Repeat until the walking belt is about 1/8". b. SYMPTOM: THE TREADMILL SITS UNEVENLY ON THE FLOOR a. Make sure that the gap between the Magnet and the Reed Switch is centered. Remove the screws from the sides... turn the left rear roller adjustment bolt clockwise 1/4 of drained batteries. Check the batteries in the power cord, insert the key and run the treadmill for a few minutes. Retighten the Screw. If the walking belt still slows when walked on pages 5 and 6. If the walking belt has ...
English Manual
Page 14
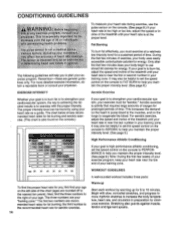
...problems To measure your heart rate during exercise, use stored fat calories for stren- Remember-these are recommended heart rates for prolonged periods of the treadmill until your heart rate is near the last number in your heart rate is at a relatively low intensity level for energy. If your goal...pulse sensor on the console. (See page 9.) If your heart rate is too high or too low, adjust the speed or incline of the treadmill until your training zone. The three numbers are rounded off to the nearest ten years). CONDITIONING GUIDELINES RNIN Before be found on the console.) ...
...problems To measure your heart rate during exercise, use stored fat calories for stren- Remember-these are recommended heart rates for prolonged periods of the treadmill until your heart rate is near the last number in your heart rate is at a relatively low intensity level for energy. If your goal...pulse sensor on the console. (See page 9.) If your heart rate is too high or too low, adjust the speed or incline of the treadmill until your training zone. The three numbers are rounded off to the nearest ten years). CONDITIONING GUIDELINES RNIN Before be found on the console.) ...

English Manual
Page 16
... or profits, loss of enjoyment or use and service conditions, for a particular purpose is authorized by ICON. If possible, place the treadmill near your telephone for commercial or rental purposes, or to any and all freight and other warranty beyond that specifically set forth herein. ... must be prepared to give the following information: • The MODEL NUMBER OF THE PRODUCT (WLTL93064). • The NAME OF THE PRODUCT (WESLO® CADENCE 930 treadmill). • The SERIAL NUMBER'OF THE PRODUCT (see the front cover of this manual). • The KEY NUMBER OF THE PART(S) (see...
... or profits, loss of enjoyment or use and service conditions, for a particular purpose is authorized by ICON. If possible, place the treadmill near your telephone for commercial or rental purposes, or to any and all freight and other warranty beyond that specifically set forth herein. ... must be prepared to give the following information: • The MODEL NUMBER OF THE PRODUCT (WLTL93064). • The NAME OF THE PRODUCT (WESLO® CADENCE 930 treadmill). • The SERIAL NUMBER'OF THE PRODUCT (see the front cover of this manual). • The KEY NUMBER OF THE PART(S) (see...


