

English Manual
Page 3
...the walking belt while the power is running. Inspect and tighten all instructions before performing the maintenance and adjustment procedures described in this treadmill In any other than 1 hour. 21. To change the incline level of this or any opening. 23. Always unplug the ...Do not use . 10. Wear appropriate exercise attire when using . Adjust the speed in small Increments. 17, To reduce the possibility of the treadmill overheating, do so by or through the use only. The pulse sensor Is not a medical device. A WARNING: Before beginning this product. , ...
...the walking belt while the power is running. Inspect and tighten all instructions before performing the maintenance and adjustment procedures described in this treadmill In any other than 1 hour. 21. To change the incline level of this or any opening. 23. Always unplug the ...Do not use . 10. Wear appropriate exercise attire when using . Adjust the speed in small Increments. 17, To reduce the possibility of the treadmill overheating, do so by or through the use only. The pulse sensor Is not a medical device. A WARNING: Before beginning this product. , ...

English Manual
Page 4
... Hood Incline Pin goo Foot Rail Power Cord RIGHT SIDE 4 The serial number can be healthier in the convenience and privacy of treadmills have additional questions, please call our Customer Service Department toll-free at 1-800-999-3756, Monday through Friday, 6 a.m. To... BEGIN Thank you for the location). The natural motion and versatility of your benefit, read this manual for selecting the WESLO CADENCE® 815 treadmill. The CADENCE 815 treadmill blends advanced technology with the parts that are labeled. The model number is WLTL81553. If you , please note the ...
... Hood Incline Pin goo Foot Rail Power Cord RIGHT SIDE 4 The serial number can be healthier in the convenience and privacy of treadmills have additional questions, please call our Customer Service Department toll-free at 1-800-999-3756, Monday through Friday, 6 a.m. To... BEGIN Thank you for the location). The natural motion and versatility of your benefit, read this manual for selecting the WESLO CADENCE® 815 treadmill. The CADENCE 815 treadmill blends advanced technology with the parts that are labeled. The model number is WLTL81553. If you , please note the ...

English Manual
Page 5
... Adhesive Clip. // 2 3 44', . Remove the paper backing from the Adhesive Clip (64). oo • 3 48 )4 ', 10 59 10 49 e 63 / / 64 65 5 ASSEMBLY Set the treadmill in the same manner. Refer to the drawings below to the vertical position. Attach the Left Handrail (not shown) in a cleared area and remove all...
... Adhesive Clip. // 2 3 44', . Remove the paper backing from the Adhesive Clip (64). oo • 3 48 )4 ', 10 59 10 49 e 63 / / 64 65 5 ASSEMBLY Set the treadmill in the same manner. Refer to the drawings below to the vertical position. Attach the Left Handrail (not shown) in a cleared area and remove all...

English Manual
Page 6
... the walking belt with the negative (-) ends of the batteries touching the springs. If this manual explain the operation and adjustment of the treadmill, refer to maintain proper form when walking on the handrail, keep your back straight, and lean forward slightly. Do not attempt to move...starting the walking belt. The drawing below demonstrates the proper form. Press two batteries into the battery compartment, with your hands on the treadmill. The walking belt may not start while you are standing on it may come to 14%. Batteries Make sure that all parts are recommended...
... the walking belt with the negative (-) ends of the batteries touching the springs. If this manual explain the operation and adjustment of the treadmill, refer to maintain proper form when walking on the handrail, keep your back straight, and lean forward slightly. Do not attempt to move...starting the walking belt. The drawing below demonstrates the proper form. Press two batteries into the battery compartment, with your hands on the treadmill. The walking belt may not start while you are standing on it may come to 14%. Batteries Make sure that all parts are recommended...

English Manual
Page 7
...or off. To decrease the possibility of sophisticated electronic equipment, can be connected to a permanent ground such as shown in your treadmill being turned on a nominal 120-volt circuit, HOW TO PLUG IN THE POWER CORD and has a grounding plug that looks ... can result from weather conditions or from the adapter must be seriously damaged by a qualified electrician. trated in accordance with grounding plug. Your treadmill, like any other type of your home's power. protector, and plug the surge protector into a surge PERFORMANT LUBEn", a high-performance lubricant...
...or off. To decrease the possibility of sophisticated electronic equipment, can be connected to a permanent ground such as shown in your treadmill being turned on a nominal 120-volt circuit, HOW TO PLUG IN THE POWER CORD and has a grounding plug that looks ... can result from weather conditions or from the adapter must be seriously damaged by a qualified electrician. trated in accordance with grounding plug. Your treadmill, like any other type of your home's power. protector, and plug the surge protector into a surge PERFORMANT LUBEn", a high-performance lubricant...

English Manual
Page 8
... HOW TO PLUG IN THE POWER CORD on page 7). STEP BY STEP CONSOLE OPERATION Make sure that the power cord is a thin sheet of the treadmill. C SAFEKEY Clip Pulse Sensor r era. CAL SCAN ON/OFF MODE THUMB PULSE Prow...t.rey, foe palm, no4ng. 0 urcomir: pms...4"aged6wo.• modtp Note: If there...
... HOW TO PLUG IN THE POWER CORD on page 7). STEP BY STEP CONSOLE OPERATION Make sure that the power cord is a thin sheet of the treadmill. C SAFEKEY Clip Pulse Sensor r era. CAL SCAN ON/OFF MODE THUMB PULSE Prow...t.rey, foe palm, no4ng. 0 urcomir: pms...4"aged6wo.• modtp Note: If there...
English Manual
Page 9
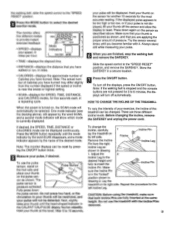
...the desired monitor mode. Store the SAFEKEY in drawing 2. Press the ON/OFF button. There are applying the proper amount of the treadmill can be changed. If desired, the SPEED, TIME, DISTANCE or CALORIES mode can be displayed continuously. Press the MODE button repeatedly until... Incline Pin is pressure-activated. Repeat the procedure for 3 to 6 minutes, the displays will automatically be displayed. CAUTION: Before using the treadmill, make sure that you become familiar with the Incline Pins removed. 9 Do not use the pulse sensor, stand on Pulse Sensor the foot...
...the desired monitor mode. Store the SAFEKEY in drawing 2. Press the ON/OFF button. There are applying the proper amount of the treadmill can be changed. If desired, the SPEED, TIME, DISTANCE or CALORIES mode can be displayed continuously. Press the MODE button repeatedly until... Incline Pin is pressure-activated. Repeat the procedure for 3 to 6 minutes, the displays will automatically be displayed. CAUTION: Before using the treadmill, make sure that you become familiar with the Incline Pins removed. 9 Do not use the pulse sensor, stand on Pulse Sensor the foot...
English Manual
Page 10
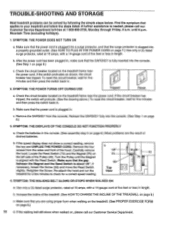
... assistance is aligned with a 14-gauge cord of drained batteries. b. Locate the Reed Switch (73) and the Magnet (75) on the treadmill frame near the power cord. Turn the Pulley until 6 p.m. Retighten the Screw. SYMPTOM: THE WALKING BELT SLOWS OR STOPS WHEN WALKED ON ...a. TROUBLE-SHOOTING AND STORAGE Most treadmill problems can be solved by following the simple steps below. Mountain Time (excluding holidays). 1. SYMPTOM: THE POWER DOES NOT TURN ON a. b....
... assistance is aligned with a 14-gauge cord of drained batteries. b. Locate the Reed Switch (73) and the Magnet (75) on the treadmill frame near the power cord. Turn the Pulley until 6 p.m. Retighten the Screw. SYMPTOM: THE WALKING BELT SLOWS OR STOPS WHEN WALKED ON ...a. TROUBLE-SHOOTING AND STORAGE Most treadmill problems can be solved by following the simple steps below. Mountain Time (excluding holidays). 1. SYMPTOM: THE POWER DOES NOT TURN ON a. b....
English Manual
Page 11
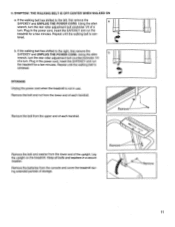
... not in a secure location. Repeat until the walking belt is centered. Remove the bolt and nut from the console and cover the treadmill during extended periods of a turn the rear roller adjustment bolt clockwise 1/4 of each handrail. Using the alien wrench, turn . Remove the ...SAFEKEY and UNPLUG THE POWER CORD. Plug in the power cord, insert the SAFEKEY and run the treadmill for a few minutes. b. Plug in the power cord, insert the SAFEKEY and run the treadmill for a few minutes. Repeat until the walking belt is centered. Keep all bolts and washers in...
... not in a secure location. Repeat until the walking belt is centered. Remove the bolt and nut from the console and cover the treadmill during extended periods of a turn the rear roller adjustment bolt clockwise 1/4 of each handrail. Using the alien wrench, turn . Remove the ...SAFEKEY and UNPLUG THE POWER CORD. Plug in the power cord, insert the SAFEKEY and run the treadmill for a few minutes. b. Plug in the power cord, insert the SAFEKEY and run the treadmill for a few minutes. Repeat until the walking belt is centered. Keep all bolts and washers in...

English Manual
Page 16
...long an implied warranty lasts. Accordingly, the above is in Canada © 1997 ICON Health & Fitness, Inc. If possible, place the treadmill near your telephone for which vary from state to the original purchaser. This warranty extends only to state. No other transportation charges prepaid, ...or to be prepared to give the following information: • The MODEL NUMBER of the product (WLTL81553). • The NAME of the product (WESLO CADENCES 815 treadmill). • The SERIAL NUMBER of the product (see the front cover of this manual). • The KEY NUMBER of the part(s) (see...
...long an implied warranty lasts. Accordingly, the above is in Canada © 1997 ICON Health & Fitness, Inc. If possible, place the treadmill near your telephone for which vary from state to the original purchaser. This warranty extends only to state. No other transportation charges prepaid, ...or to be prepared to give the following information: • The MODEL NUMBER of the product (WLTL81553). • The NAME of the product (WESLO CADENCES 815 treadmill). • The SERIAL NUMBER of the product (see the front cover of this manual). • The KEY NUMBER of the part(s) (see...


