

English Manual
Page 1
...questions, or if parts are committed to providing complete customer satisfaction. MST ON THE WEB: www.wesloservice.com CAUTION Visit our website at www.weslo.com new products, prizes, fitness tips, and much more ! tions in the space above ) before contacting us: CALL TOLL-FREE: 1-866...-699-3756 Mon.-Fri. 6 a.m.-6 p.m. Write the serial number in this manuawl bwefwor.epurosifnogrm.com this manual for future reference. As a manufacturer, we are missing, PLEASE DO NOT CONTACT THE STORE; please contact Customer Care. IMPORTANT: You must note the ...
...questions, or if parts are committed to providing complete customer satisfaction. MST ON THE WEB: www.wesloservice.com CAUTION Visit our website at www.weslo.com new products, prizes, fitness tips, and much more ! tions in the space above ) before contacting us: CALL TOLL-FREE: 1-866...-699-3756 Mon.-Fri. 6 a.m.-6 p.m. Write the serial number in this manuawl bwefwor.epurosifnogrm.com this manual for future reference. As a manufacturer, we are missing, PLEASE DO NOT CONTACT THE STORE; please contact Customer Care. IMPORTANT: You must note the ...

English Manual
Page 2
... MOVE THE TREADMILL 18 TROUBLESHOOTING 20 EXERCISE GUIDELINES 22 PART LIST 23 EXPLODED DRAWING 24 ORDERING REPLACEMENT PARTS Back Cover LIMITED WARRANTY Back Cover WARNING DECAL PLACEMENT The decals shown here have been placed on the front cover of ICON IP, Inc. 2 If a decal is a registered trademark of this manual and request...
... MOVE THE TREADMILL 18 TROUBLESHOOTING 20 EXERCISE GUIDELINES 22 PART LIST 23 EXPLODED DRAWING 24 ORDERING REPLACEMENT PARTS Back Cover LIMITED WARRANTY Back Cover WARNING DECAL PLACEMENT The decals shown here have been placed on the front cover of ICON IP, Inc. 2 If a decal is a registered trademark of this manual and request...

English Manual
Page 3
... that all users of this manual and order part number 146148, or see your local electronics store. 4. To purchase a surge suppressor, see your local WESLO dealer or call the telephone number on the treadmill at a time. 10. Do not operate the treadmill where aerosol products are standing ...on the walking belt. The treadmill should be used or where oxygen is not working properly.) 16...
... that all users of this manual and order part number 146148, or see your local electronics store. 4. To purchase a surge suppressor, see your local WESLO dealer or call the telephone number on the treadmill at a time. 10. Do not operate the treadmill where aerosol products are standing ...on the walking belt. The treadmill should be used or where oxygen is not working properly.) 16...

English Manual
Page 4
... procedures in a commercial, rental, or institutional setting. SAVE THESE INSTRUCTIONS 4 scribed in this treadmill in this manual should be able to safely lift 45 lbs. (20 kg) to raise, lower, or move the treadmill. 22. Do not use , before cleaning the treadmill, and before performing the main- Always remove the key, unplug the power cord...
... procedures in a commercial, rental, or institutional setting. SAVE THESE INSTRUCTIONS 4 scribed in this treadmill in this manual should be able to safely lift 45 lbs. (20 kg) to raise, lower, or move the treadmill. 22. Do not use , before cleaning the treadmill, and before performing the main- Always remove the key, unplug the power cord...

English Manual
Page 5
... designed to make your benefit, read this manual carefully before contacting us assist you, note the product model number and serial number before using the treadmill. ual. To avoid a registration fee for selecting the new WESLO® CADENCE 45 treadmill. The model number and the location of ...the serial number decal are shown on the front cover of this manual. For your workouts at www.wesloservice.com...
... designed to make your benefit, read this manual carefully before contacting us assist you, note the product model number and serial number before using the treadmill. ual. To avoid a registration fee for selecting the new WESLO® CADENCE 45 treadmill. The model number and the location of ...the serial number decal are shown on the front cover of this manual. For your workouts at www.wesloservice.com...

English Manual
Page 6
...an authorized service technician to one of the manual. Set the treadmill in the bottom of the Extension Leg, and thread a 2 1/4" Bolt (93) with a 5/16" Star Washer (101) into the top of the treadmill walking belt is a normal condition and does not affect treadmill performance. During shipping, a small amount ..., rubber Silver Ground Screw (G)-1 Use the drawings below each drawing is completely assembled. With the help of the packing materials until the treadmill is the key number of the part, from the PART LIST near the end of the parts to identify the assembly hardware. Do ...
...an authorized service technician to one of the manual. Set the treadmill in the bottom of the Extension Leg, and thread a 2 1/4" Bolt (93) with a 5/16" Star Washer (101) into the top of the treadmill walking belt is a normal condition and does not affect treadmill performance. During shipping, a small amount ..., rubber Silver Ground Screw (G)-1 Use the drawings below each drawing is completely assembled. With the help of the packing materials until the treadmill is the key number of the part, from the PART LIST near the end of the parts to identify the assembly hardware. Do ...

English Manual
Page 10
...by a metal screw. Whenever the adapter is not compatible with the product-if it is grounded before using an adapter. 10 Your treadmill, like the plug illustrated in your home's power. The surge suppressor must be installed by sudden voltage changes in drawing 1 below.... manual and order part number 146148, or see drawing 1 at the right). Failure to use on the surge suppressor to the control system of the treadmill. OPERATION AND ADJUSTMENT THE PRE-LUBRICATED WALKING BELT Your treadmill features a walking belt coated with your treadmill (see your local WESLO...
...by a metal screw. Whenever the adapter is not compatible with the product-if it is grounded before using an adapter. 10 Your treadmill, like the plug illustrated in your home's power. The surge suppressor must be installed by sudden voltage changes in drawing 1 below.... manual and order part number 146148, or see drawing 1 at the right). Failure to use on the surge suppressor to the control system of the treadmill. OPERATION AND ADJUSTMENT THE PRE-LUBRICATED WALKING BELT Your treadmill features a walking belt coated with your treadmill (see your local WESLO...
English Manual
Page 11
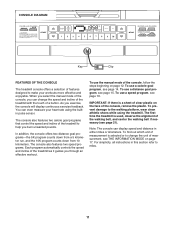
... programs that control the speed and incline of the console, follow the steps beginning on page 17. To use the manual mode of the treadmill to help you through an effective workout. The console also features two speed programs. Each program automatically controls the speed ...guides you burn unwanted pounds. CONSOLE DIAGRAM Key Clip FEATURES OF THE CONSOLE The treadmill console offers a selection of features designed to make your heart rate using the treadmill. When you select the manual mode of the console, you exercise, the console will display continuous exercise feedback....
... programs that control the speed and incline of the console, follow the steps beginning on page 17. To use the manual mode of the treadmill to help you through an effective workout. The console also features two speed programs. Each program automatically controls the speed ...guides you burn unwanted pounds. CONSOLE DIAGRAM Key Clip FEATURES OF THE CONSOLE The treadmill console offers a selection of features designed to make your heart rate using the treadmill. When you select the manual mode of the console, you exercise, the console will display continuous exercise feedback....
English Manual
Page 12
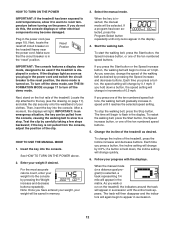
...buttons. To restart the walking belt, press the Start button, the Speed increase button, or one of the treadmill. See HOW TO TURN ON THE POWER above. 2. Select the manual mode. If you press the Start button or the Speed increase button, the walking belt will change in memory..., enter your progress with the displays. if a button is inserted, the manual mode will be used if the treadmill is selected, a track representing 1/4 mile will be pulled from the console, adjust the position of the treadmill as desired by pressing the Speed increase and decrease buttons. As you exercise,...
...buttons. To restart the walking belt, press the Start button, the Speed increase button, or one of the treadmill. See HOW TO TURN ON THE POWER above. 2. Select the manual mode. If you press the Start button or the Speed increase button, the walking belt will change in memory..., enter your progress with the displays. if a button is inserted, the manual mode will be used if the treadmill is selected, a track representing 1/4 mile will be pulled from the console, adjust the position of the treadmill as desired by pressing the Speed increase and decrease buttons. As you exercise,...

English Manual
Page 14
... to flash. To restart the program, press the Start button or the Speed increase button. At the end of the program begins, the treadmill will last. The walking belt will begin to enter your weight before using a calorie goal program. When the next segment of each segment.... page 12. 2. See step 9 on page 13. 9. then the display will show Current Segment your weight. 3. To stop . In addition, if you manually change the speed or incline of the profile will then slow to alert you burn will begin walking. 5. Change the incline of the program. Measure...
... to flash. To restart the program, press the Start button or the Speed increase button. At the end of the program begins, the treadmill will last. The walking belt will begin to enter your weight before using a calorie goal program. When the next segment of each segment.... page 12. 2. See step 9 on page 13. 9. then the display will show Current Segment your weight. 3. To stop . In addition, if you manually change the speed or incline of the profile will then slow to alert you burn will begin walking. 5. Change the incline of the program. Measure...

English Manual
Page 16
... your progress with the displays. If a different speed setting See step 7 on the fan if desired. The maximum speed setting of the treadmill as desired. Each program consists of the walking belt will flash in the display for the next segment, the speed setting will change during ...next segment. Turn on page 13. 7. Insert the key into the console. If the speed setting for consecutive segments. When you can manually override the setting by pressing the Speed buttons. Hold the handrails and begin to the speed setting for the current segment. The walking ...
... your progress with the displays. If a different speed setting See step 7 on the fan if desired. The maximum speed setting of the treadmill as desired. Each program consists of the walking belt will flash in the display for the next segment, the speed setting will change during ...next segment. Turn on page 13. 7. Insert the key into the console. If the speed setting for consecutive segments. When you can manually override the setting by pressing the Speed buttons. Hold the handrails and begin to the speed setting for the current segment. The walking ...

English Manual
Page 20
TROUBLESHOOTING Most treadmill problems can be solved by following the simple steps below. If you need further assistance, please call the telephone number on the left side of this manual. b. c. c Tripped Reset PROBLEM: The power turns off circuit breaker located on page 10. If the circuit... switch protrudes as shown, the circuit breaker has tripped. Remove the key from the console and UNPLUG THE POWER CORD. Important: The treadmill is aligned with GFCI-equipped outlets. Remove the Hood Screws (26) from a the Hood (1), and carefully pivot the Hood off circuit...
TROUBLESHOOTING Most treadmill problems can be solved by following the simple steps below. If you need further assistance, please call the telephone number on the left side of this manual. b. c. c Tripped Reset PROBLEM: The power turns off circuit breaker located on page 10. If the circuit... switch protrudes as shown, the circuit breaker has tripped. Remove the key from the console and UNPLUG THE POWER CORD. Important: The treadmill is aligned with GFCI-equipped outlets. Remove the Hood Screws (26) from a the Hood (1), and carefully pivot the Hood off circuit...

English Manual
Page 21
...CORD. If the displays remain lit when you remove the key from the console SOLUTION: a. Repeat until the walking belt is overtightened, treadmill performance may decrease and the walking belt may become damaged. If the walking belt still slows when walked on, please see THE INFORMATION... when walked on . Repeat until the walking belt is properly tightened. Using b the hex key, turn both rear roller bolts counterclockwise, 1/4 of this manual. If the displays are still lit, see the front cover of a turn off -center or slips when walked on SOLUTION: a. b. Then, plug ...
...CORD. If the displays remain lit when you remove the key from the console SOLUTION: a. Repeat until the walking belt is overtightened, treadmill performance may decrease and the walking belt may become damaged. If the walking belt still slows when walked on, please see THE INFORMATION... when walked on . Repeat until the walking belt is properly tightened. Using b the hex key, turn both rear roller bolts counterclockwise, 1/4 of this manual. If the displays are still lit, see the front cover of a turn off -center or slips when walked on SOLUTION: a. b. Then, plug ...
English Manual
Page 23
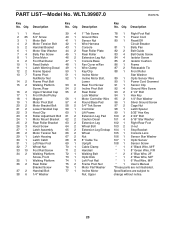
... 5 2 Handrail Bracket 43 1 Console 81 1 Belly Pan 6 1 Motor Star Washer 44 2 Rear Roller Plate 82 2 Belt Guide 7 4 Belly Pan Screw 45 1 Rear Roller 83 4 Belt Guide Screw 8 1 Drive Motor 46 2 Extension Leg Nut 84 4 Isolator Screw 9 2 Foot Rail Decal 47 1 Console Base ... 4" Blue Wire, M/F 35 1 Walking Platform 74 1 Left Foot Rail * 1 6" Red Wire, M/F 36 2 Rear Roller 75 2 Frame Pivot Nut * 1 User's Manual Bracket Screw 76 1 Motor Flat Washer *These parts are not illustrated. 37 2 Handrail Bolt 77 1 Incline Motor Specifications are subject to 38 6 1/4" Washer Nut, Upper...
... 5 2 Handrail Bracket 43 1 Console 81 1 Belly Pan 6 1 Motor Star Washer 44 2 Rear Roller Plate 82 2 Belt Guide 7 4 Belly Pan Screw 45 1 Rear Roller 83 4 Belt Guide Screw 8 1 Drive Motor 46 2 Extension Leg Nut 84 4 Isolator Screw 9 2 Foot Rail Decal 47 1 Console Base ... 4" Blue Wire, M/F 35 1 Walking Platform 74 1 Left Foot Rail * 1 6" Red Wire, M/F 36 2 Rear Roller 75 2 Frame Pivot Nut * 1 User's Manual Bracket Screw 76 1 Motor Flat Washer *These parts are not illustrated. 37 2 Handrail Bolt 77 1 Incline Motor Specifications are subject to 38 6 1/4" Washer Nut, Upper...

English Manual
Page 28
... us : • the model number and serial number of the product (see the front cover of this manual) • the name of the product (see the front cover of this manual) • the key number and description of the replacement part(s) (see the front cover of this product to... be the customer's responsibility. Some states do not allow the exclusion or limitation of this manual) LIMITED WARRANTY ICON Health & Fitness, Inc. (ICON) warrants this manual. The warranty extended hereunder is not responsible or liable for a minimal trip charge.
... us : • the model number and serial number of the product (see the front cover of this manual) • the name of the product (see the front cover of this manual) • the key number and description of the replacement part(s) (see the front cover of this product to... be the customer's responsibility. Some states do not allow the exclusion or limitation of this manual) LIMITED WARRANTY ICON Health & Fitness, Inc. (ICON) warrants this manual. The warranty extended hereunder is not responsible or liable for a minimal trip charge.

