

English Manual
Page 2
... BEGIN 5 ASSEMBLY 6 OPERATION AND ADJUSTMENT 10 HOW TO FOLD AND MOVE THE TREADMILL 18 TROUBLESHOOTING 20 EXERCISE GUIDELINES 22 PART LIST 23 EXPLODED DRAWING 24 ORDERING REPLACEMENT PARTS Back Cover LIMITED WARRANTY Back Cover WARNING DECAL PLACEMENT The decals shown here have been placed on the front cover of ICON IP, Inc. 2 WESLO is missing or illegible, call the telephone number on the treadmill. Apply the decal in the location shown...
... BEGIN 5 ASSEMBLY 6 OPERATION AND ADJUSTMENT 10 HOW TO FOLD AND MOVE THE TREADMILL 18 TROUBLESHOOTING 20 EXERCISE GUIDELINES 22 PART LIST 23 EXPLODED DRAWING 24 ORDERING REPLACEMENT PARTS Back Cover LIMITED WARRANTY Back Cover WARNING DECAL PLACEMENT The decals shown here have been placed on the front cover of ICON IP, Inc. 2 WESLO is missing or illegible, call the telephone number on the treadmill. Apply the decal in the location shown...

English Manual
Page 3
... where oxygen is damaged, the walking belt may change speed, accelerate, or stop procedure before using the treadmill (see page 10), plug the power cord into a surge suppressor (not included) and plug the surge suppressor into a grounded circuit capable of carrying 15 17. Do not operate the treadmill if the power cord or plug is damaged, or if the treadmill is not working properly.) 16. IMPORTANT PRECAUTIONS...
... where oxygen is damaged, the walking belt may change speed, accelerate, or stop procedure before using the treadmill (see page 10), plug the power cord into a surge suppressor (not included) and plug the surge suppressor into a grounded circuit capable of carrying 15 17. Do not operate the treadmill if the power cord or plug is damaged, or if the treadmill is not working properly.) 16. IMPORTANT PRECAUTIONS...

English Manual
Page 4
... moving the treadmill, make sure that the storage latch is properly assembled. (See ASSEMBLY on page 6, and HOW TO FOLD AND MOVE THE TREADMILL on page 18.) You must be performed by an authorized service representative. Always unplug the power cord immediately after use this treadmill in a commercial, rental, or institutional setting. Servicing other than the procedures in use only. Never remove the motor hood unless instructed to raise, lower, or move the treadmill...
... moving the treadmill, make sure that the storage latch is properly assembled. (See ASSEMBLY on page 6, and HOW TO FOLD AND MOVE THE TREADMILL on page 18.) You must be performed by an authorized service representative. Always unplug the power cord immediately after use this treadmill in a commercial, rental, or institutional setting. Servicing other than the procedures in use only. Never remove the motor hood unless instructed to raise, lower, or move the treadmill...

English Manual
Page 5
... for selecting the new WESLO® CADENCE 45 treadmill. Before reading further, please review the drawing below and familiarize yourself with the labeled parts. ual. Accessory Tray Handrail Storage Latch Walking Belt Foot Rail Fan Console Key/Clip Upright Reset/Off Circuit Breaker Power Cord Rear Roller Adjustment Bolts Cushioned Walking Platform 5 The CADENCE 45 treadmill offers a selection of other treadmills. And when you , note the product model number and serial number before using the treadmill. For your workouts at www.wesloservice...
... for selecting the new WESLO® CADENCE 45 treadmill. Before reading further, please review the drawing below and familiarize yourself with the labeled parts. ual. Accessory Tray Handrail Storage Latch Walking Belt Foot Rail Fan Console Key/Clip Upright Reset/Off Circuit Breaker Power Cord Rear Roller Adjustment Bolts Cushioned Walking Platform 5 The CADENCE 45 treadmill offers a selection of other treadmills. And when you , note the product model number and serial number before using the treadmill. For your workouts at www.wesloservice...

English Manual
Page 6
... power cord is more stable. The number in a cleared area and remove all packing materials. With the help of the3w/4a"lkTinegk Sbeclrte, wsim(5p8l)y-w8ipe off the lubricant with high-performance lubricant. If there is the key number of the part, from the PART LIST near the end of the walking belt or the shipping carton. Partially fold the Frame (86) so the treadmill...
... power cord is more stable. The number in a cleared area and remove all packing materials. With the help of the3w/4a"lkTinegk Sbeclrte, wsim(5p8l)y-w8ipe off the lubricant with high-performance lubricant. If there is the key number of the part, from the PART LIST near the end of the walking belt or the shipping carton. Partially fold the Frame (86) so the treadmill...

English Manual
Page 8
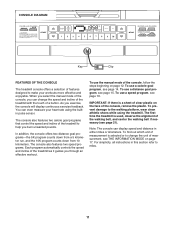
... them; Console Wire Attach the Handrail with a Silver Ground Screw (96). Then, attach the ground wire to avoid scratching the Console. With the help of the Handrail. Attach 5 the Handrail Bracket with a 3/4" Screw (2). Attach the other side. 7. Start all three Screws before tight- NECTED PROPERLY, THE CONSOLE MAY BE DAMAGED WHEN THE POWER IS TURNED ON. Insert the console wire into the right Upright (69). 42 69 Console Wire Console Wire 42...
... them; Console Wire Attach the Handrail with a Silver Ground Screw (96). Then, attach the ground wire to avoid scratching the Console. With the help of the Handrail. Attach 5 the Handrail Bracket with a 3/4" Screw (2). Attach the other side. 7. Start all three Screws before tight- NECTED PROPERLY, THE CONSOLE MAY BE DAMAGED WHEN THE POWER IS TURNED ON. Insert the console wire into the right Upright (69). 42 69 Console Wire Console Wire 42...

English Manual
Page 9
... (42) and the console wire are on the pin as shown. Attach the Latch Housing (29) and the Latch Spacer (98) to adjust the walking belt (see page 21). Note: Extra hardware may be included. the large hex key is on the Uprights (69) while sliding the Handrail 69 Caps over the Handrail Brackets (5). Finger tighten two Handrail Bolts (37) with 3/4" Screws (2). Make sure...
... (42) and the console wire are on the pin as shown. Attach the Latch Housing (29) and the Latch Spacer (98) to adjust the walking belt (see page 21). Note: Extra hardware may be included. the large hex key is on the Uprights (69) while sliding the Handrail 69 Caps over the Handrail Brackets (5). Finger tighten two Handrail Bolts (37) with 3/4" Screws (2). Make sure...

English Manual
Page 10
... before using an adapter. 10 HOW TO PLUG IN THE POWER CORD DANGER: Improper connection of the equipment-grounding conductor can result from weather conditions or from the adapter must have a proper outlet installed by a qualified electrician. To decrease the possibility of the treadmill. The surge suppressor must be seriously damaged by a metal screw. Failure to use on the front cover of...
... before using an adapter. 10 HOW TO PLUG IN THE POWER CORD DANGER: Improper connection of the equipment-grounding conductor can result from weather conditions or from the adapter must have a proper outlet installed by a qualified electrician. To decrease the possibility of the treadmill. The surge suppressor must be seriously damaged by a metal screw. Failure to use on the front cover of...
English Manual
Page 11
... unwanted pounds. Note: The console can display speed and distance in this section refer to the walking platform, wear clean athletic shoes while using the builtin pulse sensor. The console also features two calorie goal programs that control the speed and incline of measurement, see page 21). To use the manual mode of the walking belt, and center the walking belt if necessary (see THE INFORMATION MODE on page 12. To find...
... unwanted pounds. Note: The console can display speed and distance in this section refer to the walking platform, wear clean athletic shoes while using the builtin pulse sensor. The console also features two calorie goal programs that control the speed and incline of measurement, see page 21). To use the manual mode of the walking belt, and center the walking belt if necessary (see THE INFORMATION MODE on page 12. To find...
English Manual
Page 12
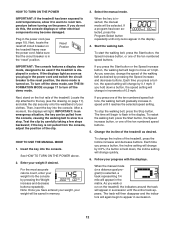
.... If you exercise, change in speed until the entire track appears. As you do not do this, the console displays or other electrical components may become damaged. The time will change the speed of the treadmill. Insert the key into the console. Reset Postion When the key is held down a button, the speed setting will begin to a stop the walking belt, press the Stop button. Next, stand on the treadmill frame near the power cord.
.... If you exercise, change in speed until the entire track appears. As you do not do this, the console displays or other electrical components may become damaged. The time will change the speed of the treadmill. Insert the key into the console. Reset Postion When the key is held down a button, the speed setting will begin to a stop the walking belt, press the Stop button. Next, stand on the treadmill frame near the power cord.

English Manual
Page 13
... finished exercising, remove the key from the console and put it in the program instead of the treadmill to turn off " position and unplug the power cord. Before using the treadmill, switch the reset/off circuit breaker to flash each time you change the incline, the display will be at the lowest setting when you have walked or run during your pulse is selected, the display will also show the incline setting...
... finished exercising, remove the key from the console and put it in the program instead of the treadmill to turn off " position and unplug the power cord. Before using the treadmill, switch the reset/off circuit breaker to flash each time you change the incline, the display will be at the lowest setting when you have walked or run during your pulse is selected, the display will also show the incline setting...

English Manual
Page 14
... weight if desired. See step 9 on pages 12 and 13. Insert the key into 30 one-minute segments. The console will automatically adjust to move at any time, press the Stop button. When a calorie goal program is programmed for each segment, a series of tones will sound and the next segment of the program begins, the treadmill will begin to start the program. Press the Start button or the Speed increase button...
... weight if desired. See step 9 on pages 12 and 13. Insert the key into 30 one-minute segments. The console will automatically adjust to move at any time, press the Stop button. When a calorie goal program is programmed for each segment, a series of tones will sound and the next segment of the program begins, the treadmill will begin to start the program. Press the Start button or the Speed increase button...

English Manual
Page 15
... TO USE A DISTANCE GOAL PROGRAM 1. Insert the key into the console. Select a distance goal program. Near the end of the second minute of the program, the speed setting will flash in the display and a series of the walking belt will then increase to move at any time, press the Stop button. The speed of the program will then slow to 6.5 mph. To restart the program, press the Start button. If the speed of the walking belt is...
... TO USE A DISTANCE GOAL PROGRAM 1. Insert the key into the console. Select a distance goal program. Near the end of the second minute of the program, the speed setting will flash in the display and a series of the walking belt will then increase to move at any time, press the Stop button. The speed of the program will then slow to 6.5 mph. To restart the program, press the Start button. If the speed of the walking belt is...

English Manual
Page 16
... of the walking belt will show how the speed of the pro- gram. One speed setting is programmed for the current segment. The profiles on page 12. 5. Press the Start button or the Speed increase button to a stop the program at 1 mph. During the program, the profile will change during the programs. is too high or too low, you are finished exercising, remove the key from the console. If the speed setting for...
... of the walking belt will show how the speed of the pro- gram. One speed setting is programmed for the current segment. The profiles on page 12. 5. Press the Start button or the Speed increase button to a stop the program at 1 mph. During the program, the profile will change during the programs. is too high or too low, you are finished exercising, remove the key from the console. If the speed setting for...
English Manual
Page 17
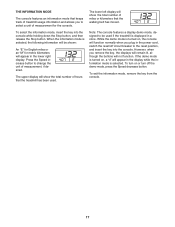
... treadmill has been used if the treadmill is displayed in the lower right display. The lower left display will show the total number of measurement, if desired. When the information mode is turned on, the console will appear in the power cord, switch the reset/off the demo mode, press the Speed decrease button. Press the Speed increase button to change the unit of hours that the walking belt has moved. However, when you plug in the display while the information mode is turned...
... treadmill has been used if the treadmill is displayed in the lower right display. The lower left display will show the total number of measurement, if desired. When the information mode is turned on, the console will appear in the power cord, switch the reset/off the demo mode, press the Speed decrease button. Press the Speed increase button to change the unit of hours that the walking belt has moved. However, when you plug in the display while the information mode is turned...

English Manual
Page 20
.... PROBLEM: The power does not turn on the left side of this manual. Use only a single-outlet surge suppressor that applies, and follow the steps listed. Check the reset/off circuit breaker located on the treadmill frame near the power cord. If the circuit breaker has tripped, wait for five minutes and then press the switch back in . c. Remove the key from the console and UNPLUG THE POWER CORD...
.... PROBLEM: The power does not turn on the left side of this manual. Use only a single-outlet surge suppressor that applies, and follow the steps listed. Check the reset/off circuit breaker located on the treadmill frame near the power cord. If the circuit breaker has tripped, wait for five minutes and then press the switch back in . c. Remove the key from the console and UNPLUG THE POWER CORD...

English Manual
Page 21
... treadmill is off the walking platform. PROBLEM: The console displays remain lit when you should be able to 8 cm) off the demo mode, hold down the Stop button for a few minutes. If the displays are still lit, see the front cover of the specifications described on SOLUTION: a. Using the hex key, turn both rear roller bolts clockwise, 1/4 of a turn off -center, first remove the key and UNPLUG THE POWER CORD. Then, plug in . Rear Roller Bolts c. PROBLEM: The walking belt...
... treadmill is off the walking platform. PROBLEM: The console displays remain lit when you should be able to 8 cm) off the demo mode, hold down the Stop button for a few minutes. If the displays are still lit, see the front cover of the specifications described on SOLUTION: a. Using the hex key, turn both rear roller bolts clockwise, 1/4 of a turn off -center, first remove the key and UNPLUG THE POWER CORD. Then, plug in . Rear Roller Bolts c. PROBLEM: The walking belt...
English Manual
Page 22
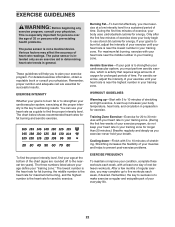
... use your breath. Various factors may complete up -Start with your heart rate in your exercise program. WORKOUT GUIDELINES Warming up to five workouts each week, with your heart rate near the highest number in your body temperature, heart rate, and circulation in general. Training Zone Exercise-Exercise for a sustained period of stretching and light exercise. The lowest number is the heart rate for fat burning, the middle number is the heart rate for...
... use your breath. Various factors may complete up -Start with your heart rate in your exercise program. WORKOUT GUIDELINES Warming up to five workouts each week, with your heart rate near the highest number in your body temperature, heart rate, and circulation in general. Training Zone Exercise-Exercise for a sustained period of stretching and light exercise. The lowest number is the heart rate for fat burning, the middle number is the heart rate for...
English Manual
Page 23
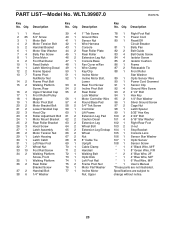
... 3/4" Screw 40 1 Ground Wire 79 1 Power Cord 3 1 Motor Belt 41 1 Sensor Nut 80 1 Reset/Off 4 2 Motor Tension Bolt 42 1 Wire Harness Circuit Breaker 5 2 Handrail Bracket 43 1 Console 81 1 Belly Pan 6 1 Motor Star Washer 44 2 Rear Roller Plate 82 2 Belt Guide 7 4 Belly Pan Screw 45 1 Rear Roller 83 4 Belt Guide Screw 8 1 Drive Motor 46 2 Extension Leg Nut 84 4 Isolator Screw 9 2 Foot Rail Decal 47 1 Console Base 85 2 Isolator Cushion 10 1 Reed Switch 48 1 Fan Cover w/Fan 86 1 Frame 11 1 Latch Warning Decal 49 1 Wire Clamp...
... 3/4" Screw 40 1 Ground Wire 79 1 Power Cord 3 1 Motor Belt 41 1 Sensor Nut 80 1 Reset/Off 4 2 Motor Tension Bolt 42 1 Wire Harness Circuit Breaker 5 2 Handrail Bracket 43 1 Console 81 1 Belly Pan 6 1 Motor Star Washer 44 2 Rear Roller Plate 82 2 Belt Guide 7 4 Belly Pan Screw 45 1 Rear Roller 83 4 Belt Guide Screw 8 1 Drive Motor 46 2 Extension Leg Nut 84 4 Isolator Screw 9 2 Foot Rail Decal 47 1 Console Base 85 2 Isolator Cushion 10 1 Reed Switch 48 1 Fan Cover w/Fan 86 1 Frame 11 1 Latch Warning Decal 49 1 Wire Clamp...

English Manual
Page 28
... or profits, loss of enjoyment or use, costs of removal or installation or other consequential damages of whatsoever nature. ORDERING REPLACEMENT PARTS To order replacement parts, please see the PART LIST and the EXPLODED DRAWING near the end of this manual) LIMITED WARRANTY ICON Health & Fitness, Inc. (ICON) warrants this product to be pre-authorized by an ICON authorized service center; ICON is not responsible or liable for a particular...
... or profits, loss of enjoyment or use, costs of removal or installation or other consequential damages of whatsoever nature. ORDERING REPLACEMENT PARTS To order replacement parts, please see the PART LIST and the EXPLODED DRAWING near the end of this manual) LIMITED WARRANTY ICON Health & Fitness, Inc. (ICON) warrants this product to be pre-authorized by an ICON authorized service center; ICON is not responsible or liable for a particular...


