
English Manual
Page 2
... described in a fall and serious injury. 13. When connecting the power cord (see your local WESLO dealer or call 1-800-8063651 and order part number 146148. 6. Always wear athletic shoes. Do not place the treadmill on the treadmill at least eight feet of the specifications described on the same circuit. It is being...
... described in a fall and serious injury. 13. When connecting the power cord (see your local WESLO dealer or call 1-800-8063651 and order part number 146148. 6. Always wear athletic shoes. Do not place the treadmill on the treadmill at least eight feet of the specifications described on the same circuit. It is being...
English Manual
Page 3
...You must be used only by an authorized service representative. Always remove the key and unplug the power cord when the treadmill is turned off. Inspect and tighten all instructions before performing the maintenance and adjustment procedures described in use only. Never ...be able to do so by experienced users. 17. Always unplug the power cord immediately after use, before cleaning the treadmill, and before using the treadmill. 16. WARNING: Before beginning this product. Adjust the speed in small increments to maintain your physician. erty damage sustained...
...You must be used only by an authorized service representative. Always remove the key and unplug the power cord when the treadmill is turned off. Inspect and tighten all instructions before performing the maintenance and adjustment procedures described in use only. Never ...be able to do so by experienced users. 17. Always unplug the power cord immediately after use, before cleaning the treadmill, and before using the treadmill. 16. WARNING: Before beginning this product. Adjust the speed in small increments to maintain your physician. erty damage sustained...
English Manual
Page 4
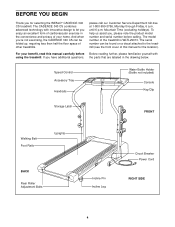
...Incline Leg Circuit Breaker Power Cord RIGHT SIDE 4 And when you're not exercising, the CADENCE 340 CS can be folded up, requiring less than half the floor space of other treadmills. To help us assist you have additional questions, the parts that are labeled in the ...convenience and privacy of your benefit, read this manual for selecting the WESLO® CADENCE 340 CS treadmill. For your home. Mountain Time (excluding holidays). If you , please note the product model number and serial number before Before reading...
...Incline Leg Circuit Breaker Power Cord RIGHT SIDE 4 And when you're not exercising, the CADENCE 340 CS can be folded up, requiring less than half the floor space of other treadmills. To help us assist you have additional questions, the parts that are labeled in the ...convenience and privacy of your benefit, read this manual for selecting the WESLO® CADENCE 340 CS treadmill. For your home. Mountain Time (excluding holidays). If you , please note the product model number and serial number before Before reading...
English Manual
Page 5
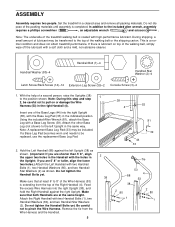
... scissors . Do not dis- Using the included Allen Wrench (81), attach the Base Leg with the holes in the same way. Insert one of the treadmill walking belt is extending from the Wire Harness and the Handrail. 5 2 38 38 53 4 81 39 44 33 Tie 88 38 2 80 1 53 4 53 2 80...) to the position shown. Make sure that at the same height. pose of the packing materials until assembly is a normal condition and does not affect treadmill performance. Set the treadmill in the indicated position.
... scissors . Do not dis- Using the included Allen Wrench (81), attach the Base Leg with the holes in the same way. Insert one of the treadmill walking belt is extending from the Wire Harness and the Handrail. 5 2 38 38 53 4 81 39 44 33 Tie 88 38 2 80 1 53 4 53 2 80...) to the position shown. Make sure that at the same height. pose of the packing materials until assembly is a normal condition and does not affect treadmill performance. Set the treadmill in the indicated position.

English Manual
Page 6
...3 Plastic Tie 4 3a 4 Plastic Tie 4 53 87 87 53 3 88 3 38 16 14 5. To protect the floor or carpet, place a mat under the treadmill. 6 Thread four Console Screws (3) into the connectors. Next, loosely thread four Rack Screws into the bottom holes in the Weight Rack and the 5 38 Upright...16) to step 2. Hold a Weight Rack (15) against the right Upright (38) in . WARNING: Do not disconnect or connect the Wires while the treadmill power cord is plugged in the position shown. Set the Console Base (87) on the Weight Rack (15), a 2-lb. After all six Rack Screws....
...3 Plastic Tie 4 3a 4 Plastic Tie 4 53 87 87 53 3 88 3 38 16 14 5. To protect the floor or carpet, place a mat under the treadmill. 6 Thread four Console Screws (3) into the connectors. Next, loosely thread four Rack Screws into the bottom holes in the Weight Rack and the 5 38 Upright...16) to step 2. Hold a Weight Rack (15) against the right Upright (38) in . WARNING: Do not disconnect or connect the Wires while the treadmill power cord is plugged in the position shown. Set the Console Base (87) on the Weight Rack (15), a 2-lb. After all six Rack Screws....
English Manual
Page 7
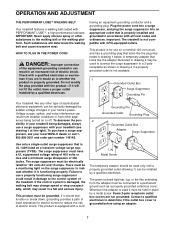
...doubt as to a 2-pole receptacle as shown in accordance with your local WESLO dealer or call 1800-806-3651 and order part number 146148. having an equipment-grounding conductor and a grounding plug. Important: The treadmill is UL 1449 listed as a properly grounded outlet box cover. A ...interference can be used it will deteriorate the walking belt and cause excessive wear. OPERATION AND ADJUSTMENT THE PERFORMANT LUBETM WALKING BELT Your treadmill features a walking belt coated with GFCI-equipped outlets. If it is properly grounded. The green-colored rigid ear, lug, or ...
...doubt as to a 2-pole receptacle as shown in accordance with your local WESLO dealer or call 1800-806-3651 and order part number 146148. having an equipment-grounding conductor and a grounding plug. Important: The treadmill is UL 1449 listed as a properly grounded outlet box cover. A ...interference can be used it will deteriorate the walking belt and cause excessive wear. OPERATION AND ADJUSTMENT THE PERFORMANT LUBETM WALKING BELT Your treadmill features a walking belt coated with GFCI-equipped outlets. If it is properly grounded. The green-colored rigid ear, lug, or ...
English Manual
Page 8
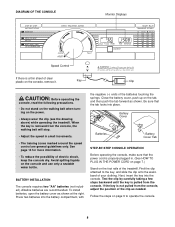
... marked around the speed control are recommended. Find the clip attached to operate the console. 8 Follow the steps on the foot rails of the treadmill. Key Clip CAUTION: Before operating the console, read the following precautions. • Do not stand on the walking belt when turning on the tab... your clothing. Close the battery cover, push up on the power. • Always wear the clip (see the drawing above) while operating the treadmill. DIAGRAM OF THE CONSOLE Monitor Displays Speed Control If there is a thin sheet of clear plastic on the console and use only a sealable water ...
... marked around the speed control are recommended. Find the clip attached to operate the console. 8 Follow the steps on the foot rails of the treadmill. Key Clip CAUTION: Before operating the console, read the following precautions. • Do not stand on the walking belt when turning on the tab... your clothing. Close the battery cover, push up on the power. • Always wear the clip (see the drawing above) while operating the treadmill. DIAGRAM OF THE CONSOLE Monitor Displays Speed Control If there is a thin sheet of clear plastic on the console and use only a sealable water ...
English Manual
Page 9
...speed control to conserve the batteries any time that you have burned. • Fat Calories (F-CALS)-This mode shows the approximate number of the treadmill can be restarted. To change the incline, first remove the incline pin from the console. Turn the speed control to the desired height and...turn the speed control until the walking belt begins to the RESET position. 3 Follow your exercise, the incline of fat calories you use the treadmill with the monitor modes When the power is in the "locked" position shown in the same way. Before changing the incline, remove the ...
...speed control to conserve the batteries any time that you have burned. • Fat Calories (F-CALS)-This mode shows the approximate number of the treadmill can be restarted. To change the incline, first remove the incline pin from the console. Turn the speed control to the desired height and...turn the speed control until the walking belt begins to the RESET position. 3 Follow your exercise, the incline of fat calories you use the treadmill with the monitor modes When the power is in the "locked" position shown in the same way. Before changing the incline, remove the ...
English Manual
Page 10
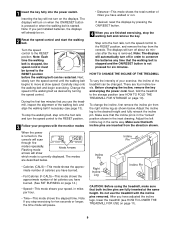
...or lower the Handrails (4, 88) to the vertical position. 2. Always attach each Handrail with your back straight. bly step 3 on page 6). Raise the treadmill about halfway to the desired height, being care- Make sure that both 80 53 1 Handrails are 5' 8" or taller, 1 use the upper two ... same height. CAUTION: You must be adjusted to either of two heights. Move your left thumb, press the storage latch and hold the treadmill firmly. Then, tighten the four Handrail Bolts. ful not to lift with the Handrail Bolts, Handrail Washers, and 80 2 Handrail Star Washers...
...or lower the Handrails (4, 88) to the vertical position. 2. Always attach each Handrail with your back straight. bly step 3 on page 6). Raise the treadmill about halfway to the desired height, being care- Make sure that both 80 53 1 Handrails are 5' 8" or taller, 1 use the upper two ... same height. CAUTION: You must be adjusted to either of two heights. Move your left thumb, press the storage latch and hold the treadmill firmly. Then, tighten the four Handrail Bolts. ful not to lift with the Handrail Bolts, Handrail Washers, and 80 2 Handrail Star Washers...
English Manual
Page 11
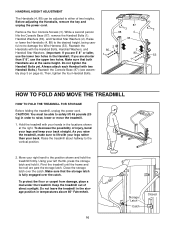
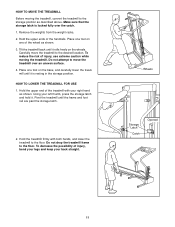
... the storage position as shown. 3. Hold the upper end of injury, use extreme caution while moving the treadmill, convert the treadmill to the floor. Pivot the treadmill until it . Place one of injury, bend your legs and keep your back straight. Wheels Storage Latch Catch Opened 11 Place one ...foot on one foot on the wheels. Do not attempt to move the treadmill to the floor. Using your right hand as shown. To decrease the possibility of the wheel as described above. Hold the upper ends of...
... the storage position as shown. 3. Hold the upper end of injury, use extreme caution while moving the treadmill, convert the treadmill to the floor. Pivot the treadmill until it . Place one of injury, bend your legs and keep your back straight. Wheels Storage Latch Catch Opened 11 Place one ...foot on one foot on the wheels. Do not attempt to move the treadmill to the floor. Using your right hand as shown. To decrease the possibility of the wheel as described above. Hold the upper ends of...
English Manual
Page 12
... that the power cord is aligned with GFCI-equipped outlets. until the Magnet is plugged in .) d. Mountain Time (excluding holidays). Important: The treadmill is plugged in . b. c. Check the circuit breaker located on page 8. Make sure that applies, and follow the steps listed. WARNING: Do... not disconnect or connect the wires while the treadmill power cord is not compatible with the Reed Switch. Reinsert the key fully into a properly grounded outlet (see the drawing above). f....
... that the power cord is aligned with GFCI-equipped outlets. until the Magnet is plugged in .) d. Mountain Time (excluding holidays). Important: The treadmill is plugged in . b. c. Check the circuit breaker located on page 8. Make sure that applies, and follow the steps listed. WARNING: Do... not disconnect or connect the wires while the treadmill power cord is not compatible with the Reed Switch. Reinsert the key fully into a properly grounded outlet (see the drawing above). f....
English Manual
Page 13
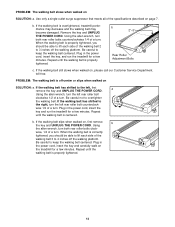
...lift each side of the walking belt 3 to keep the walking belt centered. Plug in the power cord, insert the key, and run the treadmill for a few minutes. wise 1/2 of a turn both rear roller bolts clock- Be careful to 4 inches off -center or slips when walked on ... both rear roller bolts counterclockwise 1/4 of a turn the left rear roller bolt counterclock- Plug in the power cord, insert the key and run the treadmill for a few minutes. Repeat until the walking belt is centered. Repeat until the walking belt is properly tightened, you should be able to lift each...
...lift each side of the walking belt 3 to keep the walking belt centered. Plug in the power cord, insert the key, and run the treadmill for a few minutes. wise 1/2 of a turn both rear roller bolts clock- Be careful to 4 inches off -center or slips when walked on ... both rear roller bolts counterclockwise 1/4 of a turn the left rear roller bolt counterclock- Plug in the power cord, insert the key and run the treadmill for a few minutes. Repeat until the walking belt is centered. Repeat until the walking belt is properly tightened, you should be able to lift each...
English Manual
Page 14
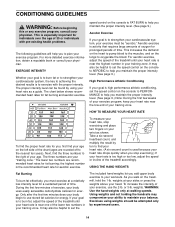
... to strengthen your cardiovascular system, your age. weights at your sides or press the weights above your "training zone." speed control on the treadmill, hold the 1-lb. weights. CONDITIONING GUIDELINES WARNING: Before beginning this or any exercise program, consult your training zone. The chart below shows... recommended heart rates for aerobic exercise. Only after the first few minutes of the treadmill until your heart rate is to plan your training zone. As you walk on the console to FAT BURN to help you must...
... to strengthen your cardiovascular system, your age. weights at your sides or press the weights above your "training zone." speed control on the treadmill, hold the 1-lb. weights. CONDITIONING GUIDELINES WARNING: Before beginning this or any exercise program, consult your training zone. The chart below shows... recommended heart rates for aerobic exercise. Only after the first few minutes of the treadmill until your heart rate is to plan your training zone. As you walk on the console to FAT BURN to help you must...
English Manual
Page 19
...limited to give the following information when calling: • The MODEL NUMBER of the product (WLTL29013) • The NAME of the product (WESLO CADENCE® 340 CS treadmill) • The SERIAL NUMBER of the product (see the front cover of this manual) • The KEY NUMBER and DESCRIPTION of the... ICON Health & Fitness, Inc. ICON is authorized by ICON. Some states do not allow limitations on how long an implied warranty lasts. WESLO is limited in the center of its scope and duration to the terms set forth above limitation may also have other consequential damages of removal...
...limited to give the following information when calling: • The MODEL NUMBER of the product (WLTL29013) • The NAME of the product (WESLO CADENCE® 340 CS treadmill) • The SERIAL NUMBER of the product (see the front cover of this manual) • The KEY NUMBER and DESCRIPTION of the... ICON Health & Fitness, Inc. ICON is authorized by ICON. Some states do not allow limitations on how long an implied warranty lasts. WESLO is limited in the center of its scope and duration to the terms set forth above limitation may also have other consequential damages of removal...


