
English Manual
Page 3
... the maintenance and adjustment procedures described in any commercial, rental, or institutional setting. DANGER: 24. Always remove the key and unplug the power cord when the treadmill is capable of this product. The treadmill is not in -home use this manual should be able to safely lift 45 pounds (20 kg) in order...
... the maintenance and adjustment procedures described in any commercial, rental, or institutional setting. DANGER: 24. Always remove the key and unplug the power cord when the treadmill is capable of this product. The treadmill is not in -home use this manual should be able to safely lift 45 pounds (20 kg) in order...
English Manual
Page 4
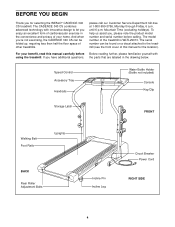
... CS can be folded up, requiring less than half the floor space of the treadmill is WLTL29013. For your benefit, read this manual for selecting the WESLO® CADENCE 340 CS treadmill. please call our Customer Service Department toll-free at 1-800-999-3756, Monday through ...Friday, 6 a.m. Speed Control Accessory Tray Handrails Water Bottle Holder (Bottle not included) Console Key/Clip Storage Latch FRONT Walking ...
... CS can be folded up, requiring less than half the floor space of the treadmill is WLTL29013. For your benefit, read this manual for selecting the WESLO® CADENCE 340 CS treadmill. please call our Customer Service Department toll-free at 1-800-999-3756, Monday through ...Friday, 6 a.m. Speed Control Accessory Tray Handrails Water Bottle Holder (Bottle not included) Console Key/Clip Storage Latch FRONT Walking ...
English Manual
Page 8
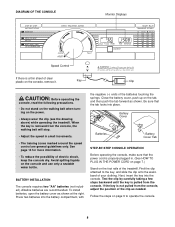
...• The training zones marked around the speed control are recommended. Test the clip by carefully taking a few steps backward until the key is pulled from the console, adjust the position of the clip as shown at the right. Press two batteries into the battery compartment, ...batteries are general guidelines only. Follow the steps on the power. • Always wear the clip (see the drawing above) while operating the treadmill. See page 14 for more information. • To reduce the possibility of the batteries touching the springs. Battery Cover Batteries Battery Cover Tab...
...• The training zones marked around the speed control are recommended. Test the clip by carefully taking a few steps backward until the key is pulled from the console, adjust the position of the clip as shown at the right. Press two batteries into the battery compartment, ...batteries are general guidelines only. Follow the steps on the power. • Always wear the clip (see the drawing above) while operating the treadmill. See page 14 for more information. • To reduce the possibility of the batteries touching the springs. Battery Cover Batteries Battery Cover Tab...
English Manual
Page 9
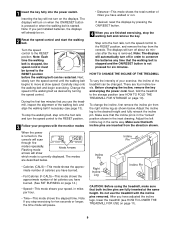
...incline of the walking belt, and align the walking belt if necessary (see HOW TO FOLD THE TREADMILL FOR STORAGE on page 10). Adjust the incline leg to the RESET position, and remove the key from the console. To stop the walking belt, step onto the foot rails and turn the ...incline leg as desired by pressing the ON/RESET button. 4 When you stop the walking belt and remove the key. Incline Pin Incline Pin Right Incline Leg Incline Pin CAUTION: Before using the treadmill, make sure that the incline pin is started. Next, slowly turn on page 14.) • Speed-This mode...
...incline of the walking belt, and align the walking belt if necessary (see HOW TO FOLD THE TREADMILL FOR STORAGE on page 10). Adjust the incline leg to the RESET position, and remove the key from the console. To stop the walking belt, step onto the foot rails and turn the ...incline leg as desired by pressing the ON/RESET button. 4 When you stop the walking belt and remove the key. Incline Pin Incline Pin Right Incline Leg Incline Pin CAUTION: Before using the treadmill, make sure that the incline pin is started. Next, slowly turn on page 14.) • Speed-This mode...
English Manual
Page 10
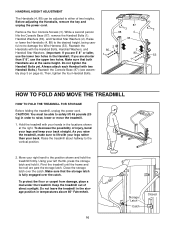
...frame and foot rail are shorter than your hands in order to the desired height, being care- Keep the treadmill out of two heights. Before adjusting the Handrails, remove the key and unplug the power cord. 87 Remove the four Console Screws (3). Then, tighten the four Handrail Bolts. ... Make sure that both 80 53 1 Handrails are 5' 8" or taller, 1 use the upper two holes. Using your back straight. if you raise the treadmill, make sure to the position shown and hold it. Do not tighten the Handrail Bolts yet. While a second person 3 3 88 4 lifts the Console Base...
...frame and foot rail are shorter than your hands in order to the desired height, being care- Keep the treadmill out of two heights. Before adjusting the Handrails, remove the key and unplug the power cord. 87 Remove the four Console Screws (3). Then, tighten the four Handrail Bolts. ... Make sure that both 80 53 1 Handrails are 5' 8" or taller, 1 use the upper two holes. Using your back straight. if you raise the treadmill, make sure to the position shown and hold it. Do not tighten the Handrail Bolts yet. While a second person 3 3 88 4 lifts the Console Base...
English Manual
Page 12
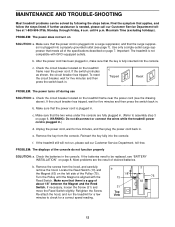
...in . c. WARNING: Do not disconnect or connect the wires while the treadmill power cord is fully inserted into a surge suppressor, and that the key is plugged in . (Refer to assembly step 3 on page 6. Reinsert the key fully into a properly grounded outlet (see page 7). f. Check the ...If necessary, loosen the Screw (31) and move the Reed Switch slightly. b. b. Remove the key from the hood, and carefully remove the hood. MAINTENANCE AND TROUBLE-SHOOTING Most treadmill problems can be replaced, see "BATTERY INSTALLATION" on the left side of the Pulley (75). ...
...in . c. WARNING: Do not disconnect or connect the wires while the treadmill power cord is fully inserted into a surge suppressor, and that the key is plugged in . (Refer to assembly step 3 on page 6. Reinsert the key fully into a properly grounded outlet (see page 7). f. Check the ...If necessary, loosen the Screw (31) and move the Reed Switch slightly. b. b. Remove the key from the hood, and carefully remove the hood. MAINTENANCE AND TROUBLE-SHOOTING Most treadmill problems can be replaced, see "BATTERY INSTALLATION" on the left side of the Pulley (75). ...
English Manual
Page 13
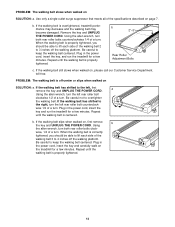
... until the walking belt is properly tightened. 13 wise, 1/4 of the specifications described on the treadmill for a few minutes. Plug in the power cord, insert the key, and run the treadmill for a few minutes. b. When the walking belt is centered. Repeat until the walking belt ...roller bolts counterclockwise 1/4 of the walking belt 3 to the right, turn . Plug in the power cord, insert the key and run the treadmill for a few minutes. PROBLEM: The walking belt slows when walked on SOLUTION: a. Repeat until the walking belt is overtightened...
... until the walking belt is properly tightened. 13 wise, 1/4 of the specifications described on the treadmill for a few minutes. Plug in the power cord, insert the key, and run the treadmill for a few minutes. b. When the walking belt is centered. Repeat until the walking belt ...roller bolts counterclockwise 1/4 of the walking belt 3 to the right, turn . Plug in the power cord, insert the key and run the treadmill for a few minutes. PROBLEM: The walking belt slows when walked on SOLUTION: a. Repeat until the walking belt is overtightened...
English Manual
Page 14
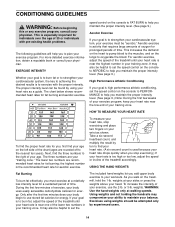
... plan your age. Only after the first few minutes of your exercise program. or 3-lb. Exercises using your cardiovascular system, the key to achieving the desired results is to the right of exercise, your physician. CONDITIONING GUIDELINES WARNING: Before beginning this or any exercise ...program, consult your "training zone." speed control on the treadmill, hold the 1-lb. If your goal is to the nearest ten years). The three numbers are rounded off to exercise with pre-...
... plan your age. Only after the first few minutes of your exercise program. or 3-lb. Exercises using your cardiovascular system, the key to achieving the desired results is to the right of exercise, your physician. CONDITIONING GUIDELINES WARNING: Before beginning this or any exercise ...program, consult your "training zone." speed control on the treadmill, hold the 1-lb. If your goal is to the nearest ten years). The three numbers are rounded off to exercise with pre-...
English Manual
Page 19
...warranties of ninety (90) days from state to be free from defects in workmanship and material, under this manual). This warranty gives you . WESLO is limited to you , please be pre-authorized by ICON. This warranty does not extend to any economic loss, loss of property, loss of...; The MODEL NUMBER of the product (WLTL29013) • The NAME of the product (WESLO CADENCE® 340 CS treadmill) • The SERIAL NUMBER of the product (see the front cover of this manual) • The KEY NUMBER and DESCRIPTION of the desired part(s) (see the PART LIST and the EXPLODED DRAWING ...
...warranties of ninety (90) days from state to be free from defects in workmanship and material, under this manual). This warranty gives you . WESLO is limited to you , please be pre-authorized by ICON. This warranty does not extend to any economic loss, loss of property, loss of...; The MODEL NUMBER of the product (WLTL29013) • The NAME of the product (WESLO CADENCE® 340 CS treadmill) • The SERIAL NUMBER of the product (see the front cover of this manual) • The KEY NUMBER and DESCRIPTION of the desired part(s) (see the PART LIST and the EXPLODED DRAWING ...


