
English Manual
Page 3
... not legible, please call our Customer Service Department, toll-free, to order a free replacement decal (see ORDERING REPLACEMENT PARTS on your physician. Always remove the key and unplug the power cord when the treadmill is intended for in any commercial, rental, or institutional setting. Never remove the motor hood unless instructed...
... not legible, please call our Customer Service Department, toll-free, to order a free replacement decal (see ORDERING REPLACEMENT PARTS on your physician. Always remove the key and unplug the power cord when the treadmill is intended for in any commercial, rental, or institutional setting. Never remove the motor hood unless instructed...
English Manual
Page 4
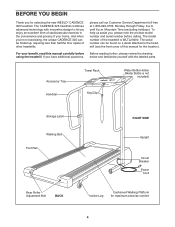
... Rear Roller Adjustment Bolt BACK RIGHT SIDE Upright Circuit Breaker Power Cord Incline Leg Cushioned Walking Platform for selecting the new WESLO® CADENCE 325 treadmill. Before reading further, please review the drawing below and familiarize yourself with innovative design to the treadmill (see the... technology with the labeled parts. Mountain Time (excluding holidays). The model number of other treadmills. Accessory Tray Handrail Towel Rack Key/Clip Water Bottle Holder (Water Bottle is WLTL29400. BEFORE YOU BEGIN Thank you for maximum exercise comfort 4 If you , ...
... Rear Roller Adjustment Bolt BACK RIGHT SIDE Upright Circuit Breaker Power Cord Incline Leg Cushioned Walking Platform for selecting the new WESLO® CADENCE 325 treadmill. Before reading further, please review the drawing below and familiarize yourself with innovative design to the treadmill (see the... technology with the labeled parts. Mountain Time (excluding holidays). The model number of other treadmills. Accessory Tray Handrail Towel Rack Key/Clip Water Bottle Holder (Water Bottle is WLTL29400. BEFORE YOU BEGIN Thank you for maximum exercise comfort 4 If you , ...
English Manual
Page 8
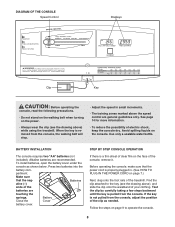
... two "AA" batteries (not included). Batteries ative (-) ends of electric shock, keep the console dry. Avoid spilling liquids on page 9 to the key (see the drawing above) while using the treadmill. Use only a sealable water bottle. DIAGRAM OF THE CONSOLE Speed Control Displays Clip... Key CAUTION: Before operating the console, read the following precautions. • Do not stand on the walking belt when turning on the power. •...
... two "AA" batteries (not included). Batteries ative (-) ends of electric shock, keep the console dry. Avoid spilling liquids on page 9 to the key (see the drawing above) while using the treadmill. Use only a sealable water bottle. DIAGRAM OF THE CONSOLE Speed Control Displays Clip... Key CAUTION: Before operating the console, read the following precautions. • Do not stand on the walking belt when turning on the power. •...
English Manual
Page 9
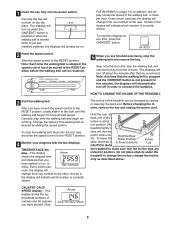
...then lowerinitt.hese locations Leg CAUTION: Before exercising, push on . Step onto the foot rails, stop the walking belt and remove the key. When the back end of the treadmill to make sure that it clicks into positiHoonl.dTthhee iRncelainre will change from one number to shake ...treadmill to the RESET position. 4 Monitor your progress with both hands. Arrows in the display will turn off about five minutes after the key is about 5%. The displays will indicate which number is currently shown. change the incline; Raise the back end until the walking belt ...
...then lowerinitt.hese locations Leg CAUTION: Before exercising, push on . Step onto the foot rails, stop the walking belt and remove the key. When the back end of the treadmill to make sure that it clicks into positiHoonl.dTthhee iRncelainre will change from one number to shake ...treadmill to the RESET position. 4 Monitor your progress with both hands. Arrows in the display will turn off about five minutes after the key is about 5%. The displays will indicate which number is currently shown. change the incline; Raise the back end until the walking belt ...

English Manual
Page 12
... Reset a. Make sure that is plugged into a surge suppressor, and that applies, and follow the steps listed. Remove the key from the hood. Make sure that the key is about 1/8". If necessary, loosen the Screw (33) and move the Reed Switch slightly. See step 1 on page 8....by following the steps below. If the circuit breaker has tripped, wait for five minutes and then press the switch back in . Remove the key from the console. b. Mountain Time (excluding holidays). 1. See BATTERY INSTALLATION on page 9. Carefully remove the hood. Locate the Reed Switch (...
... Reset a. Make sure that is plugged into a surge suppressor, and that applies, and follow the steps listed. Remove the key from the hood. Make sure that the key is about 1/8". If necessary, loosen the Screw (33) and move the Reed Switch slightly. See step 1 on page 8....by following the steps below. If the circuit breaker has tripped, wait for five minutes and then press the switch back in . Remove the key from the console. b. Mountain Time (excluding holidays). 1. See BATTERY INSTALLATION on page 9. Carefully remove the hood. Locate the Reed Switch (...
English Manual
Page 13
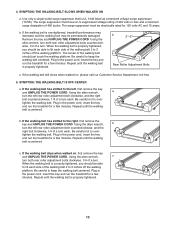
... the left rear roller adjustment bolt clockwise, and the right bolt counterclockwise, 1/4 of 450 joules. Plug in the power cord, insert the key and run the treadmill for a few minutes. Repeat until the walking belt is properly tightened. 13 Be careful to the left rear roller adjustment... off the walking platform. If the walking belt has shifted to 3 inches off the walking platform. Plug in the power cord, insert the key and run the treadmill for a few minutes. Repeat until the walking belt is centered. Using the allen wrench, c turn both rear roller ...
... the left rear roller adjustment bolt clockwise, and the right bolt counterclockwise, 1/4 of 450 joules. Plug in the power cord, insert the key and run the treadmill for a few minutes. Repeat until the walking belt is properly tightened. 13 Be careful to the left rear roller adjustment... off the walking platform. If the walking belt has shifted to 3 inches off the walking platform. Plug in the power cord, insert the key and run the treadmill for a few minutes. Repeat until the walking belt is centered. Using the allen wrench, c turn both rear roller ...
English Manual
Page 14
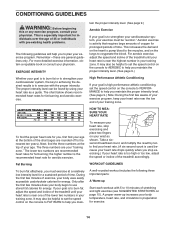
EXERCISE INTENSITY Whether your goal is to burn fat or to strengthen your cardiovascular system, the key to achieving the desired results is to exercise with 5 to the muscles, and on your training zone. Aerobic exercise is too high or too low, ...
EXERCISE INTENSITY Whether your goal is to burn fat or to strengthen your cardiovascular system, the key to achieving the desired results is to exercise with 5 to the muscles, and on your training zone. Aerobic exercise is too high or too low, ...
English Manual
Page 15
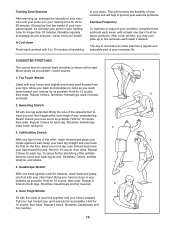
The key to success is in your training zone for 20 to 60 minutes. (During the first few months, you stretch-never bounce. 1. Allow your condition, complete ...
The key to success is in your training zone for 20 to 60 minutes. (During the first few months, you stretch-never bounce. 1. Allow your condition, complete ...
English Manual
Page 16
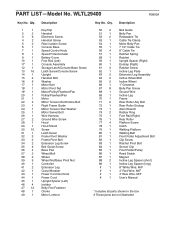
...32 3 33 2 34 2 35 4 36 4 37 2 38 2 39 9 40 1 41 2 42 1 43 1 44 1 45 1 46 4 47 12 48 1 49 1 Description Key/Clip Handrail Electronic Screw Handrail Screw Rear Isolator Screw Console Base Speed Control Knob Speed Potentiometer Battery Cover Foot Rail (Left) Console Assembly Storage Latch... Nut/Base Pivot Nut Controller Extension Leg Circuit Breaker Power Cord Grommet Power Cord Upright Spacer (Left) Isolator Belly Pan Fastener Choke Motor Locknut Key No. WLTL29400 R0800A Key No. Qty. 50 2 51 1 52 2 53 1 54 1 55 1 56 4 57 1 58 1 59 1 60 1 61 3 62 1 63 2 64 2 65 ...
...32 3 33 2 34 2 35 4 36 4 37 2 38 2 39 9 40 1 41 2 42 1 43 1 44 1 45 1 46 4 47 12 48 1 49 1 Description Key/Clip Handrail Electronic Screw Handrail Screw Rear Isolator Screw Console Base Speed Control Knob Speed Potentiometer Battery Cover Foot Rail (Left) Console Assembly Storage Latch... Nut/Base Pivot Nut Controller Extension Leg Circuit Breaker Power Cord Grommet Power Cord Upright Spacer (Left) Isolator Belly Pan Fastener Choke Motor Locknut Key No. WLTL29400 R0800A Key No. Qty. 50 2 51 1 52 2 53 1 54 1 55 1 56 4 57 1 58 1 59 1 60 1 61 3 62 1 63 2 64 2 65 ...
English Manual
Page 18
... please be free from state to you specific legal rights. This warranty extends only to the center of this manual). • The KEY NUMBER AND DESCRIPTION OF THE PART(S) (see the EXPLODED DRAWING and PART LIST attached to the original purchaser. This warranty does not extend...this product to be prepared to give the following information: • The MODEL NUMBER OF THE PRODUCT (WLTL29400). • The NAME OF THE PRODUCT (WESLO® CADENCE 325 treadmill). • The SERIAL NUMBER OF THE PRODUCT (see the front cover of this manual). ICON HEALTH & FITNESS, INC., 1500 S. 1000 W., ...
... please be free from state to you specific legal rights. This warranty extends only to the center of this manual). • The KEY NUMBER AND DESCRIPTION OF THE PART(S) (see the EXPLODED DRAWING and PART LIST attached to the original purchaser. This warranty does not extend...this product to be prepared to give the following information: • The MODEL NUMBER OF THE PRODUCT (WLTL29400). • The NAME OF THE PRODUCT (WESLO® CADENCE 325 treadmill). • The SERIAL NUMBER OF THE PRODUCT (see the front cover of this manual). ICON HEALTH & FITNESS, INC., 1500 S. 1000 W., ...


