

English Manual
Page 2
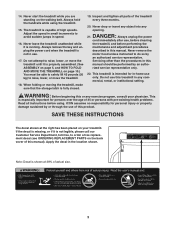
... electrically rated for 120 volts AC and 15 amps. Keep the power cord and the surge suppres- Wear appropriate exercise clothing when using the treadmill. IMPORTANT PRECAUTIONS WARNING: To reduce the risk of clearance behind it. Always wear athletic shoes. No other appliance should be on a level ... that blocks any air openings. To protect the floor or carpet from moisture and dust. When connecting the power cord (see your local WESLO dealer or call 1-800-9993756 and order part number 146148. 7. It is the responsibility of the owner to persons, read the following ...
... electrically rated for 120 volts AC and 15 amps. Keep the power cord and the surge suppres- Wear appropriate exercise clothing when using the treadmill. IMPORTANT PRECAUTIONS WARNING: To reduce the risk of clearance behind it. Always wear athletic shoes. No other appliance should be on a level ... that blocks any air openings. To protect the floor or carpet from moisture and dust. When connecting the power cord (see your local WESLO dealer or call 1-800-9993756 and order part number 146148. 7. It is the responsibility of the owner to persons, read the following ...
English Manual
Page 3
... unplug the power cord immediately after use of high speeds. Servicing other than the procedures in any commercial, rental, or institutional setting. Never start the treadmill while you are standing on the back cover of actual size. 3 Always remove the key and unplug the power cord when the... treadmill is fully closed. 19. Always hold the handrails while using . SAVE THESE INSTRUCTIONS The decal shown at 38% of this manual should be able to ...
... unplug the power cord immediately after use of high speeds. Servicing other than the procedures in any commercial, rental, or institutional setting. Never start the treadmill while you are standing on the back cover of actual size. 3 Always remove the key and unplug the power cord when the... treadmill is fully closed. 19. Always hold the handrails while using . SAVE THESE INSTRUCTIONS The decal shown at 38% of this manual should be able to ...
English Manual
Page 4
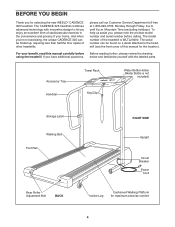
... To help us assist you enjoy an excellent form of cardiovascular exercise in the convenience and privacy of other treadmills. The CADENCE 325 treadmill combines advanced technology with the labeled parts. Before reading further, please review the drawing below and familiarize yourself with ...Walking Platform for the location). The model number of this manual carefully before calling. If you for selecting the new WESLO® CADENCE 325 treadmill. Mountain Time (excluding holidays). Accessory Tray Handrail Towel Rack Key/Clip Water Bottle Holder (Water Bottle is WLTL29400....
... To help us assist you enjoy an excellent form of cardiovascular exercise in the convenience and privacy of other treadmills. The CADENCE 325 treadmill combines advanced technology with the labeled parts. Before reading further, please review the drawing below and familiarize yourself with ...Walking Platform for the location). The model number of this manual carefully before calling. If you for selecting the new WESLO® CADENCE 325 treadmill. Mountain Time (excluding holidays). Accessory Tray Handrail Towel Rack Key/Clip Water Bottle Holder (Water Bottle is WLTL29400....
English Manual
Page 5
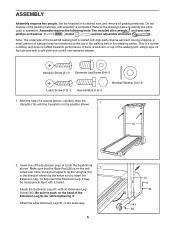
...Extension Leg (41) with a mallet. During shipping, a small amount of lubricant may be transferred to push on the indi- 2 cated side. Set the treadmill in the same way. 5 14 34 41 36 Note: The underside of a second person, carefully raise the Uprights (14) until assembly is a normal ...is in the position shown. 1 14 2. Make sure that the Base Pad (36) is on the head of the packing materials until the treadmill is coated with a soft cloth and a mild, non-abrasive cleaner. Assembly requires the following tools: The included allen wrench and your own phillips...
...Extension Leg (41) with a mallet. During shipping, a small amount of lubricant may be transferred to push on the indi- 2 cated side. Set the treadmill in the same way. 5 14 34 41 36 Note: The underside of a second person, carefully raise the Uprights (14) until assembly is a normal ...is in the position shown. 1 14 2. Make sure that the Base Pad (36) is on the head of the packing materials until the treadmill is coated with a soft cloth and a mild, non-abrasive cleaner. Assembly requires the following tools: The included allen wrench and your own phillips...
English Manual
Page 6
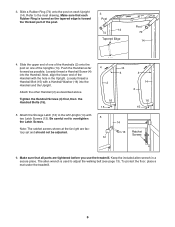
...wrench is toward the thickest part of the Uprights (14). Note: The ratchet screws shown at the far right are tightened before you use the treadmill. Attach the other Handrail (2) as possible. Tighten the Handrail Screws (4) first, then the Handrail Bolts (15). 5. Keep the included allen wrench ...in the Upright. To protect the floor, place a mat under the treadmill. 6 Make sure that each Upright (14). 3. Slide a Rubber Ring (74) onto the post on one of the post. 3 Post 14 74 Tapered...
...wrench is toward the thickest part of the Uprights (14). Note: The ratchet screws shown at the far right are tightened before you use the treadmill. Attach the other Handrail (2) as possible. Tighten the Handrail Screws (4) first, then the Handrail Bolts (15). 5. Keep the included allen wrench ...in the Upright. To protect the floor, place a mat under the treadmill. 6 Make sure that each Upright (14). 3. Slide a Rubber Ring (74) onto the post on one of the post. 3 Post 14 74 Tapered...
English Manual
Page 7
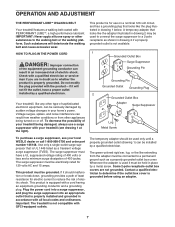
... screw. Voltage surges, spikes, and noise interference can be grounded. This product is for use a surge suppressor with your treadmill (see your local WESLO dealer or call 1-800-999-3756 and order part number 146148. A temporary adapter that is equipped with all local codes ...product-if it must have a proper outlet installed by a qualified electrician. Whenever the adapter is grounded before using an adapter. 7 Your treadmill, like extending from other type of sophisticated electronic equipment, can result in doubt as to a permanent ground such as a transient voltage ...
... screw. Voltage surges, spikes, and noise interference can be grounded. This product is for use a surge suppressor with your treadmill (see your local WESLO dealer or call 1-800-999-3756 and order part number 146148. A temporary adapter that is equipped with all local codes ...product-if it must have a proper outlet installed by a qualified electrician. Whenever the adapter is grounded before using an adapter. 7 Your treadmill, like extending from other type of sophisticated electronic equipment, can result in doubt as to a permanent ground such as a transient voltage ...
English Manual
Page 8
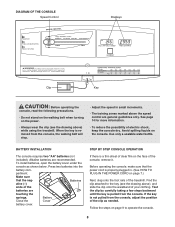
... the springs. Battery Close the Cover battery cover. Follow the steps on page 9 to the key (see the drawing above) while using the treadmill. To install batteries, open the battery cover under the console as needed. Find the clip attached to operate the console. 8 See page 14...• Adjust the speed in . (See HOW TO PLUG IN THE POWER CORD on page 7.) Next, step onto the foot rails of the treadmill. Press two batteries into the battery com- Use only a sealable water bottle. Batteries ative (-) ends of the batteries are recommended. Avoid spilling liquids ...
... the springs. Battery Close the Cover battery cover. Follow the steps on page 9 to the key (see the drawing above) while using the treadmill. To install batteries, open the battery cover under the console as needed. Find the clip attached to operate the console. 8 See page 14...• Adjust the speed in . (See HOW TO PLUG IN THE POWER CORD on page 7.) Next, step onto the foot rails of the treadmill. Press two batteries into the battery com- Use only a sealable water bottle. Batteries ative (-) ends of the batteries are recommended. Avoid spilling liquids ...
English Manual
Page 9
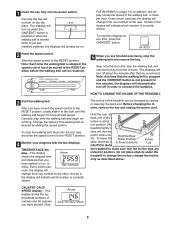
... is stopped, the speed control must be moved to the next. Change the speed of the walking belt, in order to shake the treadmill lightly so that the walking belt is stopped and the ON/RESET button is started. TIME/DISTANCE display-This display Arrow shows the elapsed ...walked or run, in the lowest position, the incline is removed. To reset the displays at slow speed. HOW TO CHANGE THE INCLINE OF THE TREADMILL 3 Start the walking belt. To lower the backReonlledr, rEanisdecaitppast theInhciglinheest po- Inserting the key will turn on . Raise the back end again until...
... is stopped, the speed control must be moved to the next. Change the speed of the walking belt, in order to shake the treadmill lightly so that the walking belt is stopped and the ON/RESET button is started. TIME/DISTANCE display-This display Arrow shows the elapsed ...walked or run, in the lowest position, the incline is removed. To reset the displays at slow speed. HOW TO CHANGE THE INCLINE OF THE TREADMILL 3 Start the walking belt. To lower the backReonlledr, rEanisdecaitppast theInhciglinheest po- Inserting the key will turn on . Raise the back end again until...
English Manual
Page 10
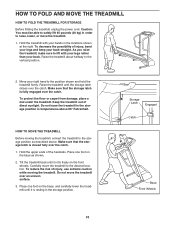
Make sure that the storage latch is closed fully over the catch. HOW TO MOVE THE TREADMILL Before moving the treadmill. Carefully move the treadmill to the storage position as shown. 2. Place one foot on the front wheels. Caution: You must be able to safely lift ...right. To decrease the possibility of injury, use extreme caution while moving the treadmill, convert the treadmill to the desired location. To protect the floor or carpet from damage, place a mat under the treadmill. Tilt the treadmill back until the storage latch closes over the catch. 1. To reduce the ...
Make sure that the storage latch is closed fully over the catch. HOW TO MOVE THE TREADMILL Before moving the treadmill. Carefully move the treadmill to the storage position as shown. 2. Place one foot on the front wheels. Caution: You must be able to safely lift ...right. To decrease the possibility of injury, use extreme caution while moving the treadmill, convert the treadmill to the desired location. To protect the floor or carpet from damage, place a mat under the treadmill. Tilt the treadmill back until the storage latch closes over the catch. 1. To reduce the ...
English Manual
Page 11
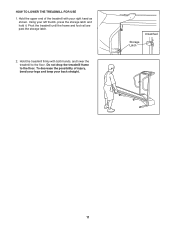
Unlatched Storage Latch 11 Pivot the treadmill until the frame and foot rail are past the storage latch. 2. Hold the treadmill firmly with your back straight. To decrease the possibility of the treadmill with both hands, and lower the treadmill to the floor. Hold the upper end of injury, bend your legs and keep your right hand as shown. Do not drop the treadmill frame to the floor. Using your left thumb, press the storage latch and hold it. HOW TO LOWER THE TREADMILL FOR USE 1.
Unlatched Storage Latch 11 Pivot the treadmill until the frame and foot rail are past the storage latch. 2. Hold the treadmill firmly with your back straight. To decrease the possibility of the treadmill with both hands, and lower the treadmill to the floor. Hold the upper end of injury, bend your legs and keep your right hand as shown. Do not drop the treadmill frame to the floor. Using your left thumb, press the storage latch and hold it. HOW TO LOWER THE TREADMILL FOR USE 1.

English Manual
Page 12
...1. Check the circuit breaker located on page 8. b. Reinsert the key fully into the console. Check the batteries in . See BATTERY INSTALLATION on the treadmill near the power cord (see page 7). Remove the screws from the console and UNPLUG THE POWER CORD. Make sure that is about 1/8". until the Magnet... GFCI-equipped outlets. c. To reset the circuit breaker, wait for five minutes and then press the switch back in . If the treadmill still will not run the treadmill for a few minutes to check for a correct speed reading. 1/8" 44 33 Top View 50 45 12 SYMPTOM: THE POWER TURNS ...
...1. Check the circuit breaker located on page 8. b. Reinsert the key fully into the console. Check the batteries in . See BATTERY INSTALLATION on the treadmill near the power cord (see page 7). Remove the screws from the console and UNPLUG THE POWER CORD. Make sure that is about 1/8". until the Magnet... GFCI-equipped outlets. c. To reset the circuit breaker, wait for five minutes and then press the switch back in . If the treadmill still will not run the treadmill for a few minutes to check for a correct speed reading. 1/8" 44 33 Top View 50 45 12 SYMPTOM: THE POWER TURNS ...
English Manual
Page 13
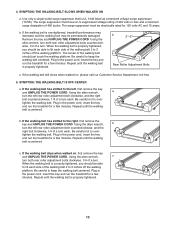
...the left rear roller adjustment bolt counterclockwise, and the right bolt clockwise, 1/4 of a turn . When the walking belt is overtightened, treadmill performance may decrease and the walking belt may be able to lift each side of the walking belt should be permanently damaged. SYMPTOM: ...13 b. Be careful to over - b 2"-3" Rear Roller Adjustment Bolts c. Plug in the power cord, insert the key and run the treadmill for a few minutes. Repeat until the walking belt is UL 1449 listed as a transient voltage surge suppressor (TVSS). 4. If the walking ...
...the left rear roller adjustment bolt counterclockwise, and the right bolt clockwise, 1/4 of a turn . When the walking belt is overtightened, treadmill performance may decrease and the walking belt may be able to lift each side of the walking belt should be permanently damaged. SYMPTOM: ...13 b. Be careful to over - b 2"-3" Rear Roller Adjustment Bolts c. Plug in the power cord, insert the key and run the treadmill for a few minutes. Repeat until the walking belt is UL 1449 listed as a transient voltage surge suppressor (TVSS). 4. If the walking ...
English Manual
Page 14
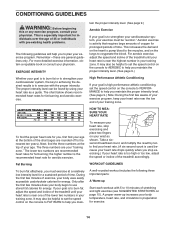
...speed and incline of time. Fat Burning To burn fat effectively, you must be helpful to use stored fat calories for prolonged periods of the treadmill until your heart rate is too high or too low, adjust the speed or incline of your age. EXERCISE INTENSITY Whether your goal is ...minutes of the chart (ages are your physician. To measure your heart rate, stop exercising.) If your goal is near the low end of the treadmill accordingly. Remember-these are recommended heart rates for you, first find your heart rate. (A six-second count is used because your heart rate drops ...
...speed and incline of time. Fat Burning To burn fat effectively, you must be helpful to use stored fat calories for prolonged periods of the treadmill until your heart rate is too high or too low, adjust the speed or incline of your age. EXERCISE INTENSITY Whether your goal is ...minutes of the chart (ages are your physician. To measure your heart rate, stop exercising.) If your goal is near the low end of the treadmill accordingly. Remember-these are recommended heart rates for you, first find your heart rate. (A six-second count is used because your heart rate drops ...
English Manual
Page 18
...the EXPLODED DRAWING and PART LIST attached to the center of its scope and duration to you specific legal rights. If possible, place the treadmill near your telephone for a particular purpose is limited to products used as store display models. ICON's obligation under normal use , costs of ... to be prepared to give the following information: • The MODEL NUMBER OF THE PRODUCT (WLTL29400). • The NAME OF THE PRODUCT (WESLO® CADENCE 325 treadmill). • The SERIAL NUMBER OF THE PRODUCT (see the front cover of this warranty is limited in USA © 2000 ICON Health & ...
...the EXPLODED DRAWING and PART LIST attached to the center of its scope and duration to you specific legal rights. If possible, place the treadmill near your telephone for a particular purpose is limited to products used as store display models. ICON's obligation under normal use , costs of ... to be prepared to give the following information: • The MODEL NUMBER OF THE PRODUCT (WLTL29400). • The NAME OF THE PRODUCT (WESLO® CADENCE 325 treadmill). • The SERIAL NUMBER OF THE PRODUCT (see the front cover of this warranty is limited in USA © 2000 ICON Health & ...


