
English Manual
Page 4
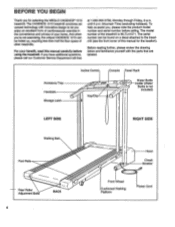
The CADENCE 1015 treadmill combines advanced technology with the parts that are labeled. until 6 p.m. The serial number can be found on a decal attached to let you have additional ... is WLTL41571. Rear Roller Adjustment Bolts 4 BACK Hood Circuit Breaker Front Wheel Cushioned Walking Platform Power Cord To help us assist you 're not exercising, the unique CADENCE 1015 can be folded up, requiring less than half the floor space of your benefit, read this manual for selecting the WESLO CADENCE° 1015 treadmill. For your...
The CADENCE 1015 treadmill combines advanced technology with the parts that are labeled. until 6 p.m. The serial number can be found on a decal attached to let you have additional ... is WLTL41571. Rear Roller Adjustment Bolts 4 BACK Hood Circuit Breaker Front Wheel Cushioned Walking Platform Power Cord To help us assist you 're not exercising, the unique CADENCE 1015 can be folded up, requiring less than half the floor space of your benefit, read this manual for selecting the WESLO CADENCE° 1015 treadmill. For your...

English Manual
Page 6
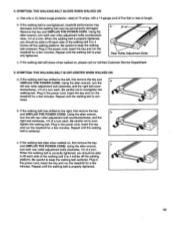
4. Make sure that all parts are tightened before you use the treadmill. Press the Allen Wrench (95) into the Adhesive Clip. 95 94 96 5. To protect the floor or carpet, place a mat under the treadmill. 6 Press the Adhesive Clip onto the Rear Roller Endcap (94) in 4 the indicated location. Remove the backing from the Adhesive Clip (96).
4. Make sure that all parts are tightened before you use the treadmill. Press the Allen Wrench (95) into the Adhesive Clip. 95 94 96 5. To protect the floor or carpet, place a mat under the treadmill. 6 Press the Adhesive Clip onto the Rear Roller Endcap (94) in 4 the indicated location. Remove the backing from the Adhesive Clip (96).
English Manual
Page 13
...SLOWS WHEN WALKED ON a. Remove the key and UNPLUG THE POWER CORD. Repeat until the walking belt is properly tightened. 3"-4" Rear Roller Adjustment Bolts c. Repeat until the walking belt is cen- Repeat until the walking belt is centered. Plug in the power cord, insert... the key and run the treadmill for a few minutes. Be careful to the left rear roller adjustment bolt clockwise, and the right bolt coun- tered. 4 b. c. If the walking belt has shifted to keep the walking belt centered...
...SLOWS WHEN WALKED ON a. Remove the key and UNPLUG THE POWER CORD. Repeat until the walking belt is properly tightened. 3"-4" Rear Roller Adjustment Bolts c. Repeat until the walking belt is cen- Repeat until the walking belt is centered. Plug in the power cord, insert... the key and run the treadmill for a few minutes. Be careful to the left rear roller adjustment bolt clockwise, and the right bolt coun- tered. 4 b. c. If the walking belt has shifted to keep the walking belt centered...
English Manual
Page 18
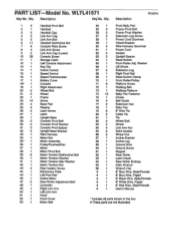
... Tension Bolt/Incline Bolt Motor Tension Washer Motor Tension Star Washer Motor Tension Nut Rear Isolator Screw Electronics Plate Left Foot Rail Incline Motor Rear Roller Adjustment Bolt Controller Right Link Arm Left Link Arm Hood Hood Cover Motor Belt 54 1 55 2 56 2 57 2 58 1 59 1 60 2 61 ... Tie Cable Tie Tie Wheel Bolt Wheel Link Arm Nut Solid Isolator Wheel Nut Incline Bracket Incline Leg Ground Wire Ground Screw Magnet Rear Roller Latch Decal Rear Roller Endcap Allen Wrench Wrench Clip 8" Blue Wire, Male/Female 8" Blue Wire, Pigtail 9" Black Wire, Male/Female 8" White Wire, Pigtail ...
... Tension Bolt/Incline Bolt Motor Tension Washer Motor Tension Star Washer Motor Tension Nut Rear Isolator Screw Electronics Plate Left Foot Rail Incline Motor Rear Roller Adjustment Bolt Controller Right Link Arm Left Link Arm Hood Hood Cover Motor Belt 54 1 55 2 56 2 57 2 58 1 59 1 60 2 61 ... Tie Cable Tie Tie Wheel Bolt Wheel Link Arm Nut Solid Isolator Wheel Nut Incline Bracket Incline Leg Ground Wire Ground Screw Magnet Rear Roller Latch Decal Rear Roller Endcap Allen Wrench Wrench Clip 8" Blue Wire, Male/Female 8" Blue Wire, Pigtail 9" Black Wire, Male/Female 8" White Wire, Pigtail ...
