
English Manual
Page 1
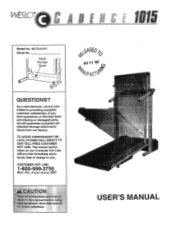
.... Serial Number Decal VSE0i. NOV 0 6 1997 1/11/11FAC-° < QUESTIONS? CUSTOMER HOT LINE: 1-800-999-3756 Mon.-Fri., 6 a.m.-6 p.m. I Model No. The trained technicians on our Customer Hot Line will guarantee complete satisfaction through direct assistance from our factory. TO AVOID UNNECESSARY DELAYS, PLEASE CALL DIRECT TO OUR TOLL-FREE CUSTOMER HOT LINE. Save this manual before using; WLTL41571 Serial No...
.... Serial Number Decal VSE0i. NOV 0 6 1997 1/11/11FAC-° < QUESTIONS? CUSTOMER HOT LINE: 1-800-999-3756 Mon.-Fri., 6 a.m.-6 p.m. I Model No. The trained technicians on our Customer Hot Line will guarantee complete satisfaction through direct assistance from our factory. TO AVOID UNNECESSARY DELAYS, PLEASE CALL DIRECT TO OUR TOLL-FREE CUSTOMER HOT LINE. Save this manual before using; WLTL41571 Serial No...
English Manual
Page 2
en conneCtirigjhe power cord: see:H :TOPPLLUG.IN.THE.POWERippRp ompage, plug the 0.4tire40.icVInt4..- ii*geikotectb not included) plug the: into.0 gro00000.0froWt:Oepeble of clearance.0phihd the: oi..i:iirw!...BEGIN ASSEMBLY OPERATION AND ADJUSTMENT HOW TO FOLD AND MOVE THE TREADMILL MAINTENANCE AND TROUBLE-SHOOTING CONDITIONING GUIDELINES ORDERING REPLACEMENT PARTS LIMITED WARRANTY 2 4 5 7 10 12 14 Back Cover Back Cover Note: An EXPLODED DRAWING and a PART LIST are attached to :ensure iiaa OSerS.Of this manual. e treadmill only as:described in sandals. Player use the treadmill with...
en conneCtirigjhe power cord: see:H :TOPPLLUG.IN.THE.POWERippRp ompage, plug the 0.4tire40.icVInt4..- ii*geikotectb not included) plug the: into.0 gro00000.0froWt:Oepeble of clearance.0phihd the: oi..i:iirw!...BEGIN ASSEMBLY OPERATION AND ADJUSTMENT HOW TO FOLD AND MOVE THE TREADMILL MAINTENANCE AND TROUBLE-SHOOTING CONDITIONING GUIDELINES ORDERING REPLACEMENT PARTS LIMITED WARRANTY 2 4 5 7 10 12 14 Back Cover Back Cover Note: An EXPLODED DRAWING and a PART LIST are attached to :ensure iiaa OSerS.Of this manual. e treadmill only as:described in sandals. Player use the treadmill with...
English Manual
Page 3
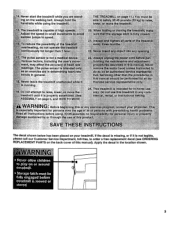
... 0,..iatc is moved or stored. 3 Me treadmill is not legible, please call our Customer Service Department, toll-free, to avold :'`sudden jumps in the location shown. 4 • Never allow children to raise, lowerior:movethe treadmill until it is capable of high:Spe s Adjust the speed in small increments to order a free replacement decal (see ORDERING REPLACEMENT PARTS on the back cover of the...
... 0,..iatc is moved or stored. 3 Me treadmill is not legible, please call our Customer Service Department, toll-free, to avold :'`sudden jumps in the location shown. 4 • Never allow children to raise, lowerior:movethe treadmill until it is capable of high:Spe s Adjust the speed in small increments to order a free replacement decal (see ORDERING REPLACEMENT PARTS on the back cover of the...
English Manual
Page 4
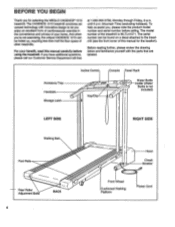
... this manual carefully before calling. Accessory Tray Handrails Storage Latch Incline Control Key/Clip Console Towel Rack Water Bottle Holder (Water Bottle is WLTL41571. BEFORE YOU BEGIN Thank you for the location). If you have additional questions, please call our Customer Service Department toll-free at 1-800-999-3756, Monday through Friday, 6 a.m. Rear Roller Adjustment Bolts 4 BACK Hood Circuit Breaker Front Wheel Cushioned Walking Platform Power Cord The CADENCE 1015 treadmill...
... this manual carefully before calling. Accessory Tray Handrails Storage Latch Incline Control Key/Clip Console Towel Rack Water Bottle Holder (Water Bottle is WLTL41571. BEFORE YOU BEGIN Thank you for the location). If you have additional questions, please call our Customer Service Department toll-free at 1-800-999-3756, Monday through Friday, 6 a.m. Rear Roller Adjustment Bolts 4 BACK Hood Circuit Breaker Front Wheel Cushioned Walking Platform Power Cord The CADENCE 1015 treadmill...
English Manual
Page 5
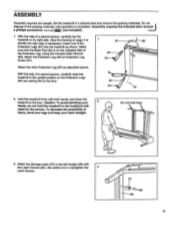
.... Set the treadmill in the locations indicated by the arrows. Attach the Storage Latch (27) to the floor. Using the included Allen Wrench (95), attach the Extension Leg with two Latch Screws (26). Do not dispose of a second person, carefully raise the treadmill to overtighten the 3 Latch Screws. 27 28 5 ASSEMBLY Assembly requires two people. Hold the treadmill firmly with both hands, and lower the treadmill to the left Upright...
.... Set the treadmill in the locations indicated by the arrows. Attach the Storage Latch (27) to the floor. Using the included Allen Wrench (95), attach the Extension Leg with two Latch Screws (26). Do not dispose of a second person, carefully raise the treadmill to overtighten the 3 Latch Screws. 27 28 5 ASSEMBLY Assembly requires two people. Hold the treadmill firmly with both hands, and lower the treadmill to the left Upright...

English Manual
Page 6
Make sure that all parts are tightened before you use the treadmill. To protect the floor or carpet, place a mat under the treadmill. 6 Press the Adhesive Clip onto the Rear Roller Endcap (94) in 4 the indicated location. 4. Press the Allen Wrench (95) into the Adhesive Clip. 95 94 96 5. Remove the backing from the Adhesive Clip (96).
Make sure that all parts are tightened before you use the treadmill. To protect the floor or carpet, place a mat under the treadmill. 6 Press the Adhesive Clip onto the Rear Roller Endcap (94) in 4 the indicated location. 4. Press the Allen Wrench (95) into the Adhesive Clip. 95 94 96 5. Remove the backing from the Adhesive Clip (96).
English Manual
Page 7
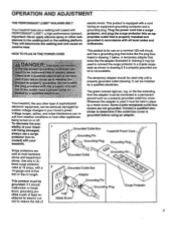
... be connected to the walking belt or the walking platform. cer:outii The green-colored rigid ear, lug, or the like the plug illus- Contact a qualified electrician to a 2-pole receptacle as a properly grounded outlet box cover. Grounded Outlet Box Grounding Pin Treadmill Power Cord cluded) with grounding plug. Plug the power cord Into a surge PERFORMANT LUBETM, a high-performance lubricant. ordinances. Use only a ULiisted surge protector, rated at...
... be connected to the walking belt or the walking platform. cer:outii The green-colored rigid ear, lug, or the like the plug illus- Contact a qualified electrician to a 2-pole receptacle as a properly grounded outlet box cover. Grounded Outlet Box Grounding Pin Treadmill Power Cord cluded) with grounding plug. Plug the power cord Into a surge PERFORMANT LUBETM, a high-performance lubricant. ordinances. Use only a ULiisted surge protector, rated at...
English Manual
Page 8
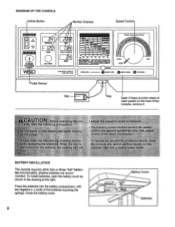
DIAGRAM OF THE CONSOLE Incline Button Monitor Displays Speed Control A V 55610164 Cie ) P.m lob lb rib kr boo flitszhn..ote. w • :w 40 ez see e. silla n re e rairnrg -4600*T114r •0. ,],a• .r.O.• •g••n•••.. alkaline batteries are recommended. lb WESO DISTANCE n I LI PULSE CALS./ FAT ON/ RESET CUSTOMER SERVICE 1 800 999 3756 WART PATE TRAINING LOWS SPEED TRAI NG ZONES OPERATION O SLOW FAST...
DIAGRAM OF THE CONSOLE Incline Button Monitor Displays Speed Control A V 55610164 Cie ) P.m lob lb rib kr boo flitszhn..ote. w • :w 40 ez see e. silla n re e rairnrg -4600*T114r •0. ,],a• .r.O.• •g••n•••.. alkaline batteries are recommended. lb WESO DISTANCE n I LI PULSE CALS./ FAT ON/ RESET CUSTOMER SERVICE 1 800 999 3756 WART PATE TRAINING LOWS SPEED TRAI NG ZONES OPERATION O SLOW FAST...
English Manual
Page 9
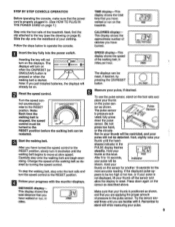
Inserting the key will not turn on the sensor as desired by pressing the ON/RESET button. 0 ON/RESET Measure your pulse, if desired. Reset the speed control. SPEED TRAINING ZONES wise to operate the console. Start the walking belt. To stop the walking belt, step onto the foot rails and turn it . SPEED display-This display shows the speed of your thumb until the walking belt begins to reset. The pulse sensor Pulse Sensor is started. Next, slightly raise your clothing. Hold your thumb...
Inserting the key will not turn on the sensor as desired by pressing the ON/RESET button. 0 ON/RESET Measure your pulse, if desired. Reset the speed control. SPEED TRAINING ZONES wise to operate the console. Start the walking belt. To stop the walking belt, step onto the foot rails and turn it . SPEED display-This display shows the speed of your thumb until the walking belt begins to reset. The pulse sensor Pulse Sensor is started. Next, slightly raise your clothing. Hold your thumb...
English Manual
Page 10
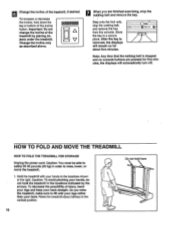
... FOLD AND MOVE THE TREADMILL HOW TO FOLD THE TREADMILL FOR STORAGE Unplug the power cord. To decrease the possibility of the t-fr•Wrrr treadmill by the arrows. Do not hold the treadmill in order to the vertical position. 6 Change the incline of the incline button. Step onto the foot rails, stop the walking belt and remove the key. After the key is removed, the displays will automatically turn off. As you are pressed...
... FOLD AND MOVE THE TREADMILL HOW TO FOLD THE TREADMILL FOR STORAGE Unplug the power cord. To decrease the possibility of the t-fr•Wrrr treadmill by the arrows. Do not hold the treadmill in order to the vertical position. 6 Change the incline of the incline button. Step onto the foot rails, stop the walking belt and remove the key. After the key is removed, the displays will automatically turn off. As you are pressed...
English Manual
Page 11
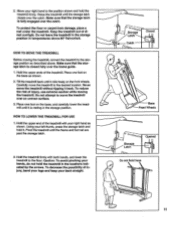
..., and lower the treadmill to the floor. Storage Latch Catch Closed Base Front Wheels Storage Latch Opened Do not hold the treadmill in the locations indicated by the arrows. Tilt the treadmill back until it . Never move the treadmill over the catch. Place one foot on the base, and carefully lower the treadmill until it back. Using your left thumb, press the storage latch and hold the treadmill firmly...
..., and lower the treadmill to the floor. Storage Latch Catch Closed Base Front Wheels Storage Latch Opened Do not hold the treadmill in the locations indicated by the arrows. Tilt the treadmill back until it . Never move the treadmill over the catch. Place one foot on the base, and carefully lower the treadmill until it back. Using your left thumb, press the storage latch and hold the treadmill firmly...
English Manual
Page 12
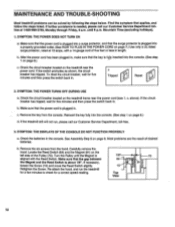
..., the circuit breaker has tripped. Remove the key from the hood. Remove the six screws from the console. Make sure that the power cord is fully inserted into the console. (See step 1 on the treadmill frame near the power cord. MAINTENANCE AND TROUBLE-SHOOTING Most treadmill problems can be solved by following the steps below. SYMPTOM: THE POWER DOES NOT TURN ON a. SYMPTOM: THE POWER TURNS OFF DURING USE a. above). If the circuit...
..., the circuit breaker has tripped. Remove the key from the hood. Remove the six screws from the console. Make sure that the power cord is fully inserted into the console. (See step 1 on the treadmill frame near the power cord. MAINTENANCE AND TROUBLE-SHOOTING Most treadmill problems can be solved by following the steps below. SYMPTOM: THE POWER DOES NOT TURN ON a. SYMPTOM: THE POWER TURNS OFF DURING USE a. above). If the circuit...
English Manual
Page 13
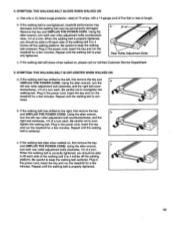
... POWER CORD. tered. 4 b. If the walking belt has shifted to overtighten the walking belt. c. Plug in the power cord, insert the key and run the treadmill for a few minutes. Remove the key and UNPLUG THE POWER CORD. If the walking belt has shifted to over- Be careful not to the left rear roller adjustment bolt clockwise, and the right bolt coun- Plug in length. Repeat until the walking belt is properly tightened. 3"-4" Rear Roller Adjustment Bolts c. Use only a UL-listed surge protector, rated...
... POWER CORD. tered. 4 b. If the walking belt has shifted to overtighten the walking belt. c. Plug in the power cord, insert the key and run the treadmill for a few minutes. Remove the key and UNPLUG THE POWER CORD. If the walking belt has shifted to over- Be careful not to the left rear roller adjustment bolt clockwise, and the right bolt coun- Plug in length. Repeat until the walking belt is properly tightened. 3"-4" Rear Roller Adjustment Bolts c. Use only a UL-listed surge protector, rated...
English Manual
Page 14
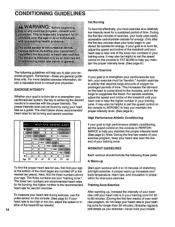
... Conditioning BPM HEART RATE TRAINING ZONES D 4 , .•OOO MP" is activity that requires large amounts of the chart (ages are recommended heart rates for ii 0a0k..X.a.. 0, usrise sensor ..fF actors; If your heart rate near one of time. For aerobic exercise, adjust the speed and incline of the treadmill until your heart rate is high performance athletic conditioning, set the speed control on the console. (See page 9.) If your heart rate is...
... Conditioning BPM HEART RATE TRAINING ZONES D 4 , .•OOO MP" is activity that requires large amounts of the chart (ages are recommended heart rates for ii 0a0k..X.a.. 0, usrise sensor ..fF actors; If your heart rate near one of time. For aerobic exercise, adjust the speed and incline of the treadmill until your heart rate is high performance athletic conditioning, set the speed control on the console. (See page 9.) If your heart rate is...
English Manual
Page 15
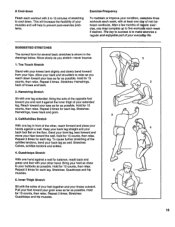
... to prevent post-exercise problems. Exercise Frequency To maintain or improve your condition, complete three workouts each week, with at least one leg in the drawings below. Reach toward your hands against a wall. Stretches: Hamstrings, lower back and groin. 3 3. Keep your back leg straight and your ... other , reach forward and place your groin area as far as possible. The key to make exercise a regular and enjoyable part ofyour everyday life. SUGGESTED STRETCHES The correct form for each leg. Repeat 3 times for several basic stretches is to success is shown in front ...
... to prevent post-exercise problems. Exercise Frequency To maintain or improve your condition, complete three workouts each week, with at least one leg in the drawings below. Reach toward your hands against a wall. Stretches: Hamstrings, lower back and groin. 3 3. Keep your back leg straight and your ... other , reach forward and place your groin area as far as possible. The key to make exercise a regular and enjoyable part ofyour everyday life. SUGGESTED STRETCHES The correct form for each leg. Repeat 3 times for several basic stretches is to success is shown in front ...
English Manual
Page 16
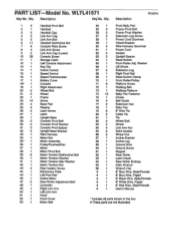
... (WESLO® CADENCE 1015 treadmill). • The SERIAL NUMBER OF THE PRODUCT (see the front cover of this manual). • The KEY NUMBER OF THE PART(S) (see the EXPLODED DRAWING and PART LIST attached to the center of this manual). • The DESCRIPTION OF THE PART(S) (see the EXPLODED DRAWING and PART LIST attached to the center of this product to be pre-authorized by ICON. LIMITED WARRANTY ICON Health & Fitness, Inc. (ICON), warrants this manual). The warranty...
... (WESLO® CADENCE 1015 treadmill). • The SERIAL NUMBER OF THE PRODUCT (see the front cover of this manual). • The KEY NUMBER OF THE PART(S) (see the EXPLODED DRAWING and PART LIST attached to the center of this manual). • The DESCRIPTION OF THE PART(S) (see the EXPLODED DRAWING and PART LIST attached to the center of this product to be pre-authorized by ICON. LIMITED WARRANTY ICON Health & Fitness, Inc. (ICON), warrants this manual). The warranty...

English Manual
Page 17
O Note: Specifications are subject to change without notice. For information about ordering replacement parts, see the back cover of the User's Manual. REMOVE THIS EXPLODED DRAWING AND PART LIST FROM THE MANUAL Save this EXPLODED DRAWING and PART LIST for future reference.
O Note: Specifications are subject to change without notice. For information about ordering replacement parts, see the back cover of the User's Manual. REMOVE THIS EXPLODED DRAWING AND PART LIST FROM THE MANUAL Save this EXPLODED DRAWING and PART LIST for future reference.
English Manual
Page 18
... Key Clip Incline Control Speed Control Speed Potentiometer Battery Cover Console Right Attachment Wheel Bolt Wheel Frame Screw Base Pad Washer Latch Screw Latch Upright Base Console Pivot Bolt Console Pivot Washer Console Pivot Spacer Upright Base Bracket Wire Harness Motor Nut Motor Assembly Pulley/FlywheeVFan Motor Motor Pivot Bolt Motor Tension Bolt/Incline Bolt Motor Tension Washer Motor Tension Star Washer Motor Tension Nut Rear Isolator Screw Electronics Plate Left Foot Rail Incline Motor Rear Roller Adjustment Bolt Controller Right Link Arm Left Link Arm Hood Hood Cover Motor Belt...
... Key Clip Incline Control Speed Control Speed Potentiometer Battery Cover Console Right Attachment Wheel Bolt Wheel Frame Screw Base Pad Washer Latch Screw Latch Upright Base Console Pivot Bolt Console Pivot Washer Console Pivot Spacer Upright Base Bracket Wire Harness Motor Nut Motor Assembly Pulley/FlywheeVFan Motor Motor Pivot Bolt Motor Tension Bolt/Incline Bolt Motor Tension Washer Motor Tension Star Washer Motor Tension Nut Rear Isolator Screw Electronics Plate Left Foot Rail Incline Motor Rear Roller Adjustment Bolt Controller Right Link Arm Left Link Arm Hood Hood Cover Motor Belt...


