
User Manual
Page 1
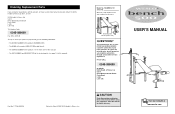
... MODEL NUMBER of the product (WLEMBE32101) • The NAME of the product (WELSO® 500 weight bench) • The SERIAL NUMBER of the product (see the front cover of this manual) • The KEY NUMBER and DESCRIPTION of the desired part(s) (see page 14 of this equipment. Serial Number Decal (under seat) QUESTIONS? Please CALL: 0345-089009 Or WRITE: ICON Health & Fitness Ltd. Write the serial number in this manual before using...
... MODEL NUMBER of the product (WLEMBE32101) • The NAME of the product (WELSO® 500 weight bench) • The SERIAL NUMBER of the product (see the front cover of this manual) • The KEY NUMBER and DESCRIPTION of the desired part(s) (see page 14 of this equipment. Serial Number Decal (under seat) QUESTIONS? Please CALL: 0345-089009 Or WRITE: ICON Health & Fitness Ltd. Write the serial number in this manual before using...

User Manual
Page 2
... 15 WESLO is missing or illegible, please call our Customer Service Department to order a free replacement decal. If either decal is a registered trademark of ICON Health & Fitness, Inc. 2 Exploded Drawing-Model No. Keep hands and fingers clear of Contents Warning Decal Placement 2 Important Precautions 3 Before You Begin 4 Part Identification Chart 5 Assembly 6 Using the Weight Bench 10 Exercise Guidelines 12 Part List 14 Exploded Drawing 15 Ordering Replacement Parts Back Cover...
... 15 WESLO is missing or illegible, please call our Customer Service Department to order a free replacement decal. If either decal is a registered trademark of ICON Health & Fitness, Inc. 2 Exploded Drawing-Model No. Keep hands and fingers clear of Contents Warning Decal Placement 2 Important Precautions 3 Before You Begin 4 Part Identification Chart 5 Assembly 6 Using the Weight Bench 10 Exercise Guidelines 12 Part List 14 Exploded Drawing 15 Ordering Replacement Parts Back Cover...

User Manual
Page 3
... weight rest and the upright and firmly tightened. Always set a weight rest in the upright on each time you are adequately informed of 160 kg, including the user, a barbell, and weights. This is designed to support a maximum of all instructions before performing leg curl or leg extension exercises with your back to ensure that all users of this or any worn parts immediately. Part List-Model No. When you use...
... weight rest and the upright and firmly tightened. Always set a weight rest in the upright on each time you are adequately informed of 160 kg, including the user, a barbell, and weights. This is designed to support a maximum of all instructions before performing leg curl or leg extension exercises with your back to ensure that all users of this or any worn parts immediately. Part List-Model No. When you use...
User Manual
Page 4
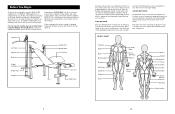
Before reading further, please review the drawing below and familiarise yourself with - Lat Bar Lat Tower Support Tube Backrest Weight Carriage Weight Tube Upright Weight Rest Barbell Hook Curl Pad Seat Leg Lever Weight Tube during the return stroke; List the date, exercises performed, weight and numbers of this manual carefully before calling. MUSCLE CHART Trapezius Deltoid Biceps Brachioradials Abductor Hip Flexors Quadriceps Adductor Soleus Pectoralis Major Rectus Abdominus...
Before reading further, please review the drawing below and familiarise yourself with - Lat Bar Lat Tower Support Tube Backrest Weight Carriage Weight Tube Upright Weight Rest Barbell Hook Curl Pad Seat Leg Lever Weight Tube during the return stroke; List the date, exercises performed, weight and numbers of this manual carefully before calling. MUSCLE CHART Trapezius Deltoid Biceps Brachioradials Abductor Hip Flexors Quadriceps Adductor Soleus Pectoralis Major Rectus Abdominus...

User Manual
Page 5
... is up prepares your body for a maximum of 30 seconds between sets. • Cross Training In the pursuit of a complete and well-balanced fitness program, many sets of 15 to 20 repetitions as the return stage. WORKING OUT Each workout should last about half as long as possible without discomfort. Select exercises for each exercise depends upon the individual user. EXERCISE FORM In order to...
... is up prepares your body for a maximum of 30 seconds between sets. • Cross Training In the pursuit of a complete and well-balanced fitness program, many sets of 15 to 20 repetitions as the return stage. WORKING OUT Each workout should last about half as long as possible without discomfort. Select exercises for each exercise depends upon the individual user. EXERCISE FORM In order to...

User Manual
Page 6
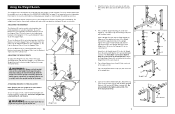
... the adjustment hole in a controlled manner. The Upright must be sure that all parts are changing weights. 47 11 Secure the weights with the warning decal facing up as shown in assembly, use the PART IDENTIFICATION CHART on each Upright (1, 15). A socket set, a set of end spanners, or a set of the Lat Bar (48). 23 23 42 45 19 8 38 37 48 USING THE BARBELL HOOKS To change weights while...
... the adjustment hole in a controlled manner. The Upright must be sure that all parts are changing weights. 47 11 Secure the weights with the warning decal facing up as shown in assembly, use the PART IDENTIFICATION CHART on each Upright (1, 15). A socket set, a set of end spanners, or a set of the Lat Bar (48). 23 23 42 45 19 8 38 37 48 USING THE BARBELL HOOKS To change weights while...
User Manual
Page 7
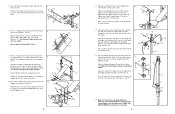
... a Spring Clip (45, not shown). Replace any worn parts immediately. Attach the Frame (2) to the exercise information accompanying your own weight set (not included). Weight Tube 10 3. Slide a Weight Rest (16) into the adjustment hole in the upright on top of the knob. 16 20 15 4 ATTACHING WEIGHTS TO THE LEG LEVER Note: Remove the curl upright or lat tower before using the leg lever (see the next page). To...
... a Spring Clip (45, not shown). Replace any worn parts immediately. Attach the Frame (2) to the exercise information accompanying your own weight set (not included). Weight Tube 10 3. Slide a Weight Rest (16) into the adjustment hole in the upright on top of the knob. 16 20 15 4 ATTACHING WEIGHTS TO THE LEG LEVER Note: Remove the curl upright or lat tower before using the leg lever (see the next page). To...
User Manual
Page 8
... and a ball on the Weight Carriage. 13 41 Slide the Weight Carriage (42) onto the Lat Tower (23). Tighten the Small Threaded Knob (19) into the holes in the Front Leg. Attach each end of all parts are properly tightened before you use of the Weight Carriage (42). Set the Support Tube in the Curl Upright with two M8 x 40mm Bolts (27) and two M8...
... and a ball on the Weight Carriage. 13 41 Slide the Weight Carriage (42) onto the Lat Tower (23). Tighten the Small Threaded Knob (19) into the holes in the Front Leg. Attach each end of all parts are properly tightened before you use of the Weight Carriage (42). Set the Support Tube in the Curl Upright with two M8 x 40mm Bolts (27) and two M8...


